
The Process
Wanting a cheaper manufacturing option, I looked around YouTube for how people made their models before the days of 3D printing. I came across a video, which you can search for under ‘Iron Man Helmet Build’, that basically walks you through how to make a high quality prop model. The basics steps are:
- Cut template out of cardstock paper and assemble together
- Apply fiberglass resin on the inside and outside surface to add rigidity
- Apply fiberglass cloth in addition to fiberglass resin to enhance strength
- Apply Bondo fiberglass filler to smooth surface (Wear respirators and gloves!)
- Apply primer and sand surface smooth
- Apply spot putty to small craters/scratches and sand smooth
- Clean up small details and apply finishing paint, clear coat… etc.
How to Start
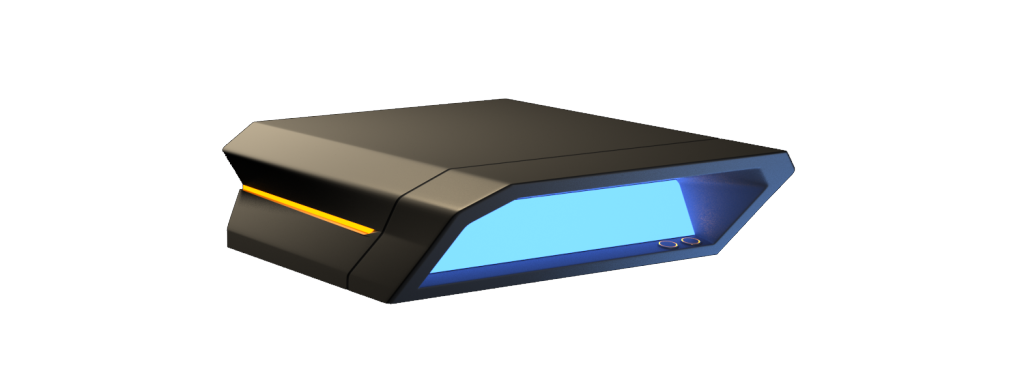
After developing a model in Autodesk 3DS Max, I went ahead and unfolded the model into pieces that I would then be able to print onto paper and start making templates. The scale of the pieces are set in Photoshop by using the handy ruler tool. I re-scaled the map such that the display opening was 194 mm or 7.63 inches wide, which is the width of the two displays put together.

I cut the pieces out of standard paper first since my printer can’t accept thick, hard-to-bend paper. I laid these pieces onto the card stock paper instead and cut them out from there. The results are shown below. You’ll notice that there are lines on the map above that indicate where to fold the paper and create the bends.

After 3-4 hours of cutting and taping, a rough model is assembled. Obviously, it is not perfect, and it is not meant to be perfect. In the next update, I will be applying the fiberglass and resin in addition to the Bondo filler to fill in the holes and gaps. Furthermore, the next update will give the body a uniform color after a coat of primer. I really like the look of flat, grey look of primer, so I think I will no longer paint this but instead create the Borderlands aesthetic through the sanding.

The fiberglass process will be subdivided into the main body and the front shield. It will be difficult to get fiberglass into every spot if it were assembled just like the image above. After the two components are finished and dried, I will join them together and apply another layer of resin and fiberglass to essentially glue them together.

That’s all for now! In the mean time, I will be programming the LCD displays and figuring out if I still want to implement the buttons.

2 Comments. Leave new
The model seems really cool! It looks pretty fancy right now. I like the concept of Borderlands aesthetic. The only thing I am worried about is that if you glue one layer over the other, will it look a little bit rough? Since there might be some vestige from the glue.
It’s looking really cool! I can’t wait to see what it looks like when you start adding the resin and fiberglass. I like the pictures you added. They almost look like they’re rendered, rather than actual pictures with the backgrounds removed. When you start layering on the resin and stuff, are you going to support the paper at all? It’s hard to tell from the pictures how thick the paper is, but hopefully it’ll be strong enough not to collapse before the first layer of resin dries.