
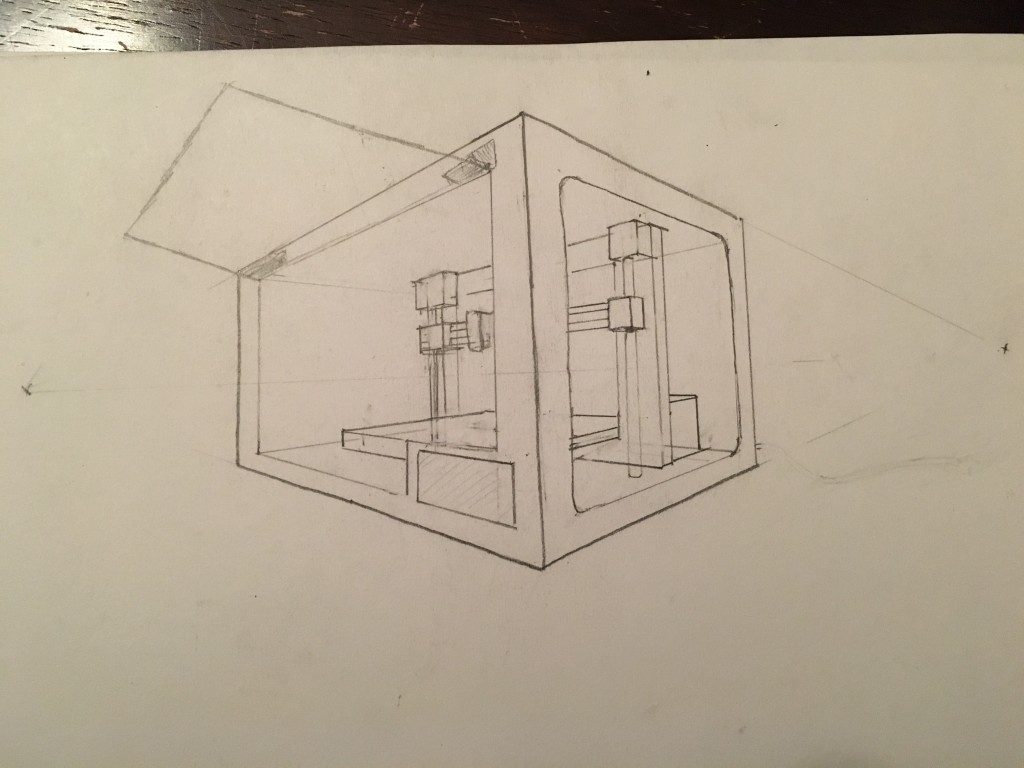
This post will discuss progress on my 3D printer since Spring Break, as well as discuss how my aesthetic has been shaped by 20th Century design movements. The timing of this post’s discussion is appropriate because I’ve started constructing the stand which the printer will sit on/in, and am really working on honing in on my aesthetic and it has been helpful to seek inspiration from previous movements. At the beginning of the semester, I started my project with a few sketches of my printer and its stand, which are seed below. My vision has changed a bit since then, but these give an idea of where I was coming from:


If you recall, I wanted to create something that gives a sufficient appearance/facade to the traditional DIY printer projects. The sketches above all included ways to enclose and otherwise hide the printer, with doors/windows allowing access to the build volume and hardware if necessary. I decided to make the printer a standing unit (as in the second two images) rather than a standalone item (first image) because I don’t have a good desk or table area to place the printer. After weighing feasibility and cost factors, I decided on constructing my printer and stand based on the third image, with the four legs and rounded corners. I planned on making the stand white.
I think that my idea seeks influence from the generally-broad “modernist” design movements, which arose in the 1920s with “Bauhaus” and “International Style” aesthetics. Specifically, I think that my design lends aspects from the “Streamlining” movement of the 1930s-1950s and the “art deco” movement of the 1920’s and 1930’s. The filleted inside corners draw from both movements, while the flat faces of the stand are reminiscent of art deco furniture. By making the entire thing white, it seems like an entirely “modern” design, fulfilling what many viewers would deem a “modernist” aesthetic.
In the past few weeks, I purchased all of the materials I need for my stand (or the base part of it, at least). I’m using 3/4″ thick melamine panels from Home Depot for all of the faces, and 2×2 beams as inner supports for each leg. The surface that the printer sits on will also be melamine. For construction, I’m using a circular saw for long cuts, a jigsaw for the corners and shorter cuts, and a drill. I’m saving the pictures of the almost-completed stand for the next week’s update, but here is a teaser of what the panels looked like as I sketched out my cutting profiles:

2 Comments. Leave new
I like the curved corners of the final design iteration. It makes the printer more friendly and approachable compared to a machine with sharp corners. Have you played around at all with the ratio between leg height and printer height? it might be interesting to see if the golden ratio could be applied there. I also like the functionality of the stand alone design. It makes it possible to store printer equipment and material underneath, although that might be a reason to add a shelf. Nicely done so far!
This is an awesome project.
As an owner/tinkerer, I’ve had several thoughts about modifying my own printer. This is what it looks like now: http://www.seemecnc.com/products/rostock-max-complete-kit.
Here’s what I love about my printer physically:
– Circular, stationary build plate
– Easy to access to critical components
– Modularity (DIY kit)
– Futuristic appearance (black + silver)
Here’s what I would change about my printer:
– Sturdy and stable legs. Currently, I let it sit on the floor since it is rather large, which means I can’t sit on a chair while using the printer. However, it also doesn’t sit particularly well on carpet (I had to lay down a flat piece of wood that I harvested from an old desk). This means that moving it becomes a two-person job.
– Filament loader in a more stable location. As it is, my filament has to be at the very top of the machine. This makes the whole printer top heavy.
– Enclosure. The smells and sounds of the printer can be annoying at times, and it would be nice to have it all enclosed. I prefer to use PLA, but the studies involving potential carcinogens in printed ABS would also make an enclosure important. That said, it is important to note that I would only prefer an enclosure if there is adequate heat dissipation. As it is, my extruder stepper tends to overheat on long prints, so I use a pedestal fan to cool it right now. An enclosure would prevent this technique from being effective.
Honestly, I think you’ve already addressed all of my areas of change with your design, but I just thought I’d throw this out there. Excited to see how it all turns out. Perhaps it’ll provide me with some incentive to tweak mine as well!