
This week, the full assembly of the drum pad came together. I knew that I wanted to use acrylic for the body of the assembly, but I wasn’t quite sure what the shape was going to resemble. So, I went to the local Salvation Army to start looking for some sort of body that I could maybe fill the inside of.
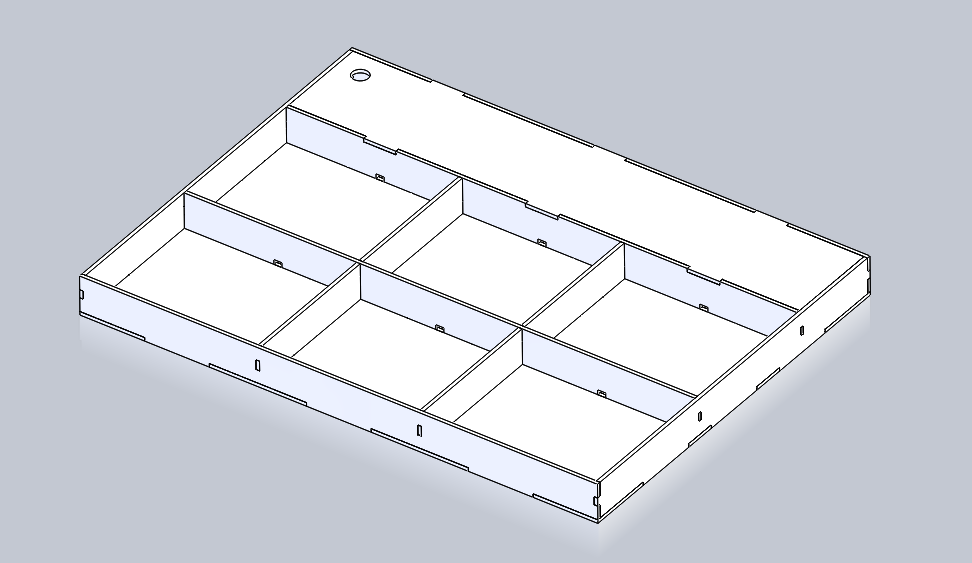
Luckily, I found this wooden shadow-box frame for $2.00. Its made of particleboard, but it actually looks pretty nice, and its just about the size I imagined the final product being. So, I opened up SolidWorks, and got to work. I ended up with this design:

I managed to get a pretty big piece of scrap acrylic from McGuckins before they stopped selling it (r.i.p.) which should work for printing out all of these parts. One thing I’ve learned from my Mechatronics class this semester is that slotted parts work wonderfully for acrylic assemblies. They allow for seamless assembly (different sized slots can prevent incorrect assembly) and provide more surface area for bonding.
I laser cut the parts using the ITLL’s laser cutter (Speed 12, Power 100), and taped them together (I didn’t want to bond anything in case I ran into something unforeseen). It fits inside of the shadow-box like a glove.
Next, scaled up my circuit, and added some LEDs. The circuit’s a little messy, so I think I’ll get some black acrylic to cover up the top – this’ll look a lot more slick anyway.

A PCB would really help to clean things up. I don’t think I’ll have time to do this before expo, but I’ll probably draft one up for order this summer.
I also cut out the pad assemblies. I got some semi-soft foam sheeting and rubber sheets from McGuckins. In each pad, there are two squares of foam, a sensor, a square of acrylic, and a square of rubber. I didn’t have an amazing way of cutting the foam (i just used a razor), but the rubber cut well in the laser cutter (with a 90W laser, 1/8″ did not, but 1/16″ did).

Check next weeks post (potentially the final report?) for a final update and full assembly picture/potentially a video).
2 Comments. Leave new
Good use of resources. That wood looked very professional in your end result. How do you intend to hide everything and keep with your aesthetic intent of simplicity. Did you use any particular tools to make sure you made straight cuts?
I’m seeing the aesthetics come together, but I wonder how are you doing the electronics? You mentioned you are in mechatronics so you have some experience. I would have no idea where to start with this. Best of luck. I hope you get it working!