
Hello Everyone!
The purpose of this post is to explain everything about how I made this standing desk:


I am going to skip the part where I introduce my inspiration and initial design sketches, because those are already discussed in previous posts (see the prototype presentation). So let’s just get right into it.
First, during the design phase, I really wanted my desk not to have any legs. But I did some engineering with Alex Thompson’s help and came up with this diagram/calculation:

Bam! Engineering at work! Unfortunately, this told me that without legs, if I put an ~15 lb weight on the table end, it would fall over. Legs it is.
Building the base form of the table
I started with these legs that I made from wood:

Wow. Those are super ugly. That’s what I thought. Look how broad they are, how square-ish. That’s not going to fit very well with the rest of my table, even though this would definitely provide the most stability for the table. That cement tube in the middle has cuts in the sides to accommodate the height of the wood legs.
So I changed the legs a little to be just a wooden cross:

This wood is taller than for the previous set of legs, so we had to cut the cement tube a little more to fit with the new legs. The white PVC tube goes on the base, and will prevent the cement from filling up the entire base (you’ll see in a second). I used a plane saw and a wood chisel to get the PVC in there.
We pounded the lower bearing, which consists of a round piece of wood with a plastic bushing pushed into it, into the PVC (more on this bearing creation later)

Here is a an image of all the base pieces put together:

Note the black brackets as the legs. These are shelf brackets from McGuckins. They are not meant to bear a lot of weight, just keep the table from tipping over. The cement will go in the gap between the white PVC tube and the yellow cement form tube. But before I poured the cement, we had to make the top bearing structure.
Creating the lower and upper bearing systems
Here’s a solidworks exploded view, labeled with all the parts I’m going to talk about:

Alright, we’re going to go bottom up here. The lower housing is a round piece of wood. I needed it to be 4″ in diameter to fit in the PVC tube, but they only had 5″. We drew straight lines and used a radial arm saw to make the wood smaller, then used a belt sander to make it into a circle instead of a decagon.

you can see that pencil-drawn circle in the middle. We used a hole saw to cut that out, then a wood rasper to sand the inside of the hole to make it just the perfect size to put the plastic bushing:

I used the vice to push this bushing inside the wood. It fits the 1″ tube that I bought for the stem, but not really tightly like I thought it would. That’s why the upper bearing structure is so important. That’s next.
Here is an image of the upper bearing without being stained yet:

I call it a bearing, but really that shaft collar with the gold latch on the top is the bearing. It fits the stem very tightly, so if it is clamped shut, the stem won’t go anywhere. I got the tree cut circle from Michaels. It was kind of expensive, about $15 dollars, but it looked so cool I couldn’t pass it up. The four big holes in this piece are so big so that I could put nuts on bolts. The 4″ bolts come up through the bottom with a nut on both the bottom and the top. This way, when this piece is squished into the cement, the long bolts will be bonded to the cement, but I could still theoretically take the nuts off the top and take this whole piece of the cement base if I needed to.
The part in the middle is a piece of remnant delrin from Colorado Plastics. The delrin has a 1″ hole in it for the pipe to fit through. The delrin piece is 2″ wide. The 2″ hole in the wood only goes half way through the wood. The delrin is held in by screws coming through the bottom of the wood and into the delrin.
For the shaft collar, we drilled two holes through the aluminum, and used screws to attach it to the delrin piece. The delrin is there so that the shaft collar does lie right next to the wood. You need to be able to get your fingers around that latch to move the desk around.
putting the base together: pour the cement
The next step was to put everything together. The cement I got is called Cement All, and it starts to set in 15 minutes. This ended up being a blessing and a curse, which I’ll discuss in a moment. The steps for this process were as follows:
- cover the upper bearing with plastic, to prevent cement from getting inside the tube.
- pour the cement in the gap, tamping all the time (to prevent air bubbles)
- Squish the top bearing part onto the cement while the stem is inserted, and try to line it up perpendicular to the ground
- let cure!
Here’s what it looked like after we poured the cement:

As you can see, this was a sloppy process. It was actually almost disastrous. Cement is very heavy. I taped the bottom of the tube to that white plastic sheet, but tape was not enough. As we started pouring the cement in, it busted out the bottom and oozed everywhere. I ran to get some screws and drill them next to the sides to keep the cement form from bending up and releasing the cement everywhere.

We only had 15 minutes to get this in and clean up. We ended up frantically scooping it in with our hands. You probably shouldn’t touch cement if you can help it. Because we couldn’t take our time, there were a few air bubbles in the cement, which are visible in the final project. The quick-setting was a blessing too though, because as it began to set, it stopped oozing out the bottom.
fun fact for those of you who don’t know: when cement cures, it get’s really warm. It’s the chemical reaction that is releasing heat. Surprising!
Now that the base was poured, I moved on to the table top.
building the table top
The top was very easy compared to the bottom. I used some extra wood to make supports to go under the table:

Then I used an air-powered nail gun to put tiny nails through the table top onto the side supports, the middle support remained unattached for now:

The nail gun is very fun to use.
Next, I cut the steel stem to size with a hack saw and filed the end with a metal file.
Then, I used a hole saw to cut a 1″ hole through the middle supports, in the middle. I drilled two holes in the sides of the stem and in the wood. I pushed the stem into the 1″holes with some epoxy on it, then put two bolts through the sides. More epoxy followed that to make sure the stem wouldn’t move. This is a solidworks image of how the stem is attached:

Then I attached this piece to the table top.
Finishing touches
The next step was to stain and varnish all the pieces. The top of the table wood was already stained. This was actually a problem, because it was also really rough, but I couldn’t sand it without taking the stain off. The solution was about 5 coats of varnish. Between coats 2 and 3 and 4 and 5, I sanded the table.
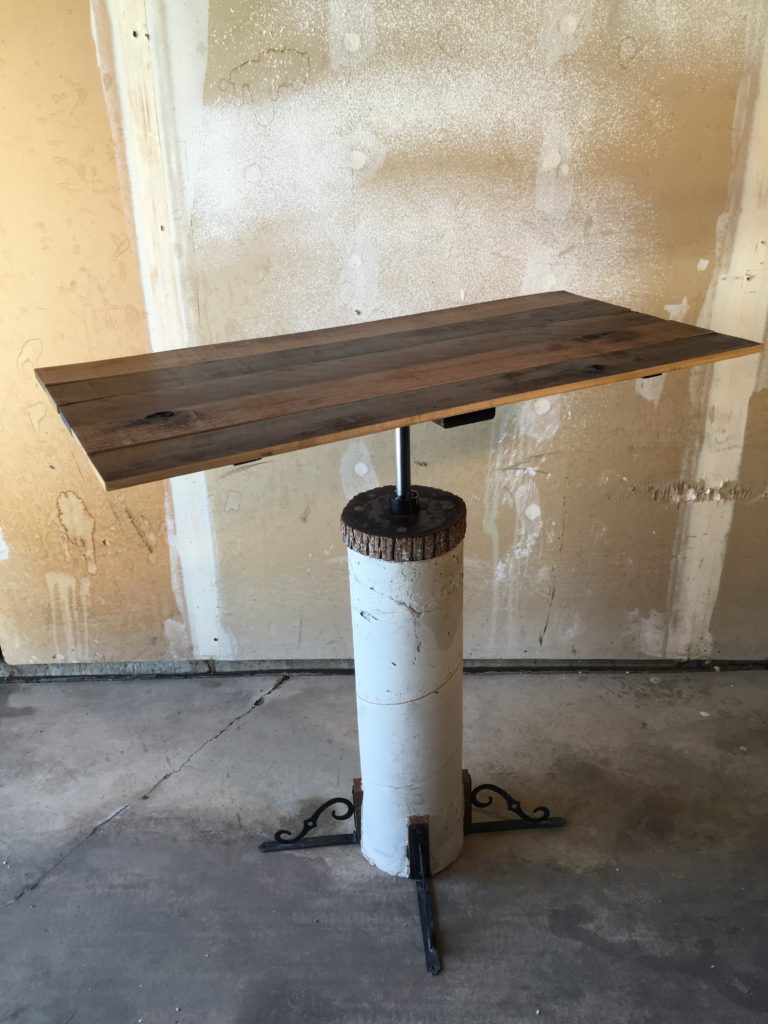
Here’s what it looked like before finishing:

And here is what it looked like after. I used spar urethane as the varnish, because it’s thick

Looks nice!
I also finished the tree circle piece:

The putty is not exactly the same color, because it’s a different hardness than the basswood. I think it looks good anyway though. The basswood is really absorbant, so the stain is a little darker than I wanted, but it still fits the rest of the table.
and that’s it!
Budget and time
This desk, after I return all the parts I didn’t use, will have cost me about $175 dollars. Which is cheap for this kind of movable desk, but expensive for a class at school. This project was a bit ambitious. I’ve probably spend about 40 hours on it total, thinking about the design, picking up materials, and building it.
Aknowledgements
My dad deserves a huge thank you for all his help. I always overthink things, he just gets right in there with a drill or a saw. It would have taken me so much longer without him. Thanks Pop.
3 Comments. Leave new
Kira, thank your for the very detailed explanation of this very interesting design project. Not only did it turn out very well but someone reading this post could easily recreate the process and make their own standing desk. I especially like how you balanced the industrial chic aesthetic of the concrete and metal with the organic textures of the reclaimed wood visual. The explanation of your iterations also help the audience to understand the challenges of the project and why it eventually was a success. The final product is very unique and visually appealing. Have you decided where you want it to live long-term?
This project turned out great! I love the use of tree sections and old L bracket to keep it all standing as well. Almost feels like there are some elements of the epicycle project incorporated into this one. Also looks like you put a good amount of time and effort into this one. All the extra finishes really polished off the product. Good job.
Wow this was a very long process. I like that you documented every single different step that you made. It also looks like you made lots of different iterations throughout your project when you were trying to figure out if the table would need legs or not. I wonder what an air powered nail gun would be like, sounds like fun to use! I am slightly confused with all of the cement you used is the table going to be to heavy? Or was the cement just to help with a different part of the project? You spent a solid amount of time on this (40 hours is a full work week!) and the expenses were quite high. How much would you sell your project for if someone were looking to buy it?
Great job! Can’t wait to see it at expo.