

For my project, I decided to try and make a windmill with a classic countryside aesthetic. It was modeled after old windmills that have stood for hundreds of years, and almost become part of the landscapes in some rural areas. The project was inspired by an old stone windmill that was near my house when I lived in England as a kid.
The first decision I had to make about the project was the scale. Because windmills are generally very large, I decided that mine would be a scale model of one, about the size of a piece of backyard furniture. The idea was that it would be a decorative ornament that someone could put up near their house like a birdbath or a sculpture. I decided that the windmill would end up being about 3 feet tall, with 2 foot long blades, and the base would be 2 feet by 1 foot.

Sketch with the dimensions for the base
The next major decision in the design process was what to construct the base and blades out of. I wanted the final product to be true to the times when classic windmills were made, so I decided not to use any materials that would not have been available centuries ago. I decided that the blades would be made from wood, which would allow them to spin easily.

Sketch with the blade dimensions

The blades being painted
I also wanted the base to be made from stone, to look more true to the aesthetic, but a base made completely of stone would be expensive and impractical with the tools that I had access to. It would also have been too heavy to transport, so I decided to make the base out of wood as well and then apply stone veneer to it. I also chose a denser wood for the base to lower the center of gravity of the finished windmill. The stone veneer was actually stone tiles that people generally use to cover walls of their houses. Because the size of the tiles did not match the dimensions of my windmill, I had to break apart the tiles and then rearrange the individual stone pieces before attaching them to the base with tile grout.

Sketch with base dimensions

Construction of the front panel of the base

The original layout of the section of stone tile
To attach the blades to the actual base of the windmill, I decided to use a bolt that would go into the roof part of the base and would be attached to the blades. The bolt was threaded at one end so that it could be secured to the roof and smooth at the end where the blades rotate. The blades themselves are at a slight angle to one another so that the wind can be translated into angular momentum. I decided to paint the blades white, which I thought would contrast well with the stone tiles and would also give it a more vintage look.
Originally, my total budget for the parts and materials of the project was originally $100. The most expensive individual part was the set of stone tiles, at $40. The lumber for the project cost about $30 total, with the birchwood used for the base taking up most of the cost. The blades were made of simple 2X4s and the plate in front of the blades was made of plywood that I already had around my house. I had to spend $18 total on construction screws to form each of the individual parts, and then another $10 on the main bolt and clamps that connect the base to the blades. The only other necessary expenses were the grout to attach the stone tiles ($15) and white paint for the windmill blades ($8). This brought the total expenses to $121, which was slightly above my budget. Overall, I was happy with the amount of materials I could get for the money, and the decision to use stone tiles instead of building the base out of stone kept the costs within reason.

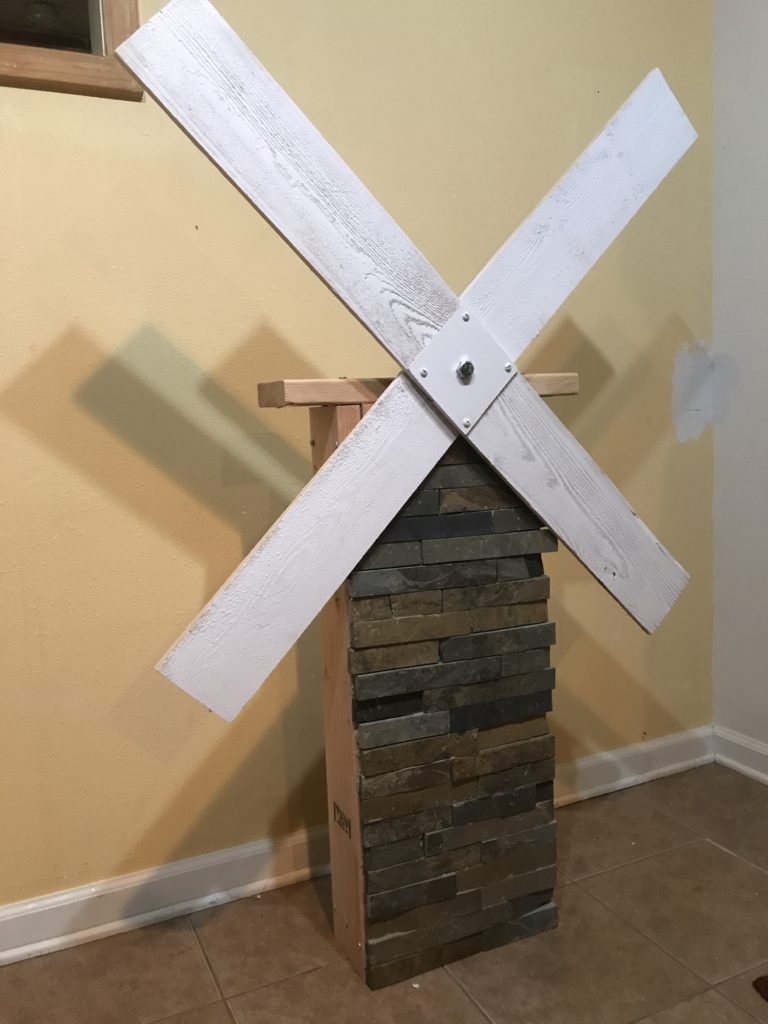
Finished product
Overall, I was very pleased with the end product. Once I saw it in my backyard, it seemed to mirror the aesthetic that I was originally going for, and it was a very reasonable size for a decorative piece. I could see it becoming a part of the landscape in the same way that old country windmills did, and I will be keeping it around my house in the future.
1 Comment. Leave new
Hi Jack,
The final product turned out really nice, I like how you incorporated the stone tile into the stand. The scale you decided to go with is convenient in my opinion since you could have it in you’re front/back yard. I am just wondering if it would spin if the wind blows by? Are you thinking by any means to reduce the weight or are you going to keep it like that?
Overall I think it turned out great and looks really good, well done.