

Abstract
This main project was done for the Aesthetics of Design course taught in the Mechanical Engineering Department at the University of Colorado Boulder. Initially the requirements for the project were that it could be anything we wanted, as long as it had some sort of dynamic component (or something that changes with time) and expressed some sort of aesthetic that we get to choose ancd define. We were also expected to pay for the materials (about $150). At the end of the semester, the project is ours to keep! All the more incentive to produce an amazing artifact. As the COVID-19 pandemic emerged, so did the scope changes and pivoting of projects. I was originally going to make a river table out of epoxy resin and olive wood. This tabletop would have had 4 adjustable legs that I machined in the machine shop at school. Due to the closures of the school, my project pivoted to just creating the tabletop and saving the legs for a later time when the school reopens. I still stayed true to the original aesthetic that I was going for. A rustic ocean river table. I wanted it to look similar and represent the clear oceans in the world.
COVID-19 (CoronaVirus) Disclaimer
Initially the requirements for this project were stated by Prof. Hertzberg as,
“You can make anything you want, as long as it has some sort of dynamic component; a moving part or something that changes with time. You are expected to pay for the materials (cost at least equivalent to a hardcopy textbook, say $150) and the project is yours to keep at the end of the semester. And of course, it must express some aesthetic that you choose and define. That’s what this class is about, right?”
I was going to create a tabletop made out of live edge wood/epoxy resin and adjustable legs out of aluminum.
Following the COVID-19 pandemic, school closures, and loss of access to machine shops, I spoke with Prof. Hertzberg, and we agreed on me completing just the tabletop for now. Then finishing the legs when the school is reopened. Completing the table top was still within scope because I had already done most of the wood working prior to pouring the resin and the school closing down. I had enough resources and supplies that I was able to continue the project at my house during my social distancing.
Background/Inspiration
This artifact that we needed to create could be anything we wanted. As long as it had a dynamic part and conformed to some sort of aesthetic that we chose and defined. So I began thinking and searching for ideas for the project.
When I first started thinking about this, I knew that I wanted it to be functional. I wanted to find something that I could use on a day to day, or week by week basis. Due to my recent machine shop experiences in my other classes, I was very comfortable fabricating simple things using a mill and lathe. I thought I could make something out of aluminum. This would be easy and faster to manufacture than most metals, looks nice, is lightweight, and would be strong enough for almost any purpose I would need it for. After a while, I couldn’t think of anything cool that I could make. I thought I could make a box, but that wasn’t useful enough for me. So I started to consider other methods for fabrication of this artifact (I still haven’t decided on the artifact idea yet). I began thinking about what I was going to do for the main project artifact in late January or early February. So I had a couple weeks to decide, and still could not come up with anything.
As I was scrolling through my social media one day (maybe on facebook or instagram) I saw a DIY how to video on making river tables. This included the whole process from prepping the wood to pouring and finishing the epoxy resin. I have seen many videos like this before in the last couple years and have been wanting to make one for a long time. The only issue was that I didn’t have access to a machine shop and tools. I would have access for this class though, so this was a perfect time to take on this project. The next step was to research the scope, time, and cost of the project in order to see if it was feasible.
After many hours of research, I found that the scope was reasonable since I have had previous woodworking experience and had many resources on the internet for resin information. I also calculated out that it would be 20-50 hours of total work, which I deemed reasonable. The last thing that I looked at was the cost. This was the thing that would make this project unfeasible. The cost was higher than I expected, a lot higher. I thought about it for many days and decided that financially I could handle it, so this was the artifact I was going to create for the final project in my Aesthetics of Design course at the University of Colorado Boulder.
Aesthetics and Vision
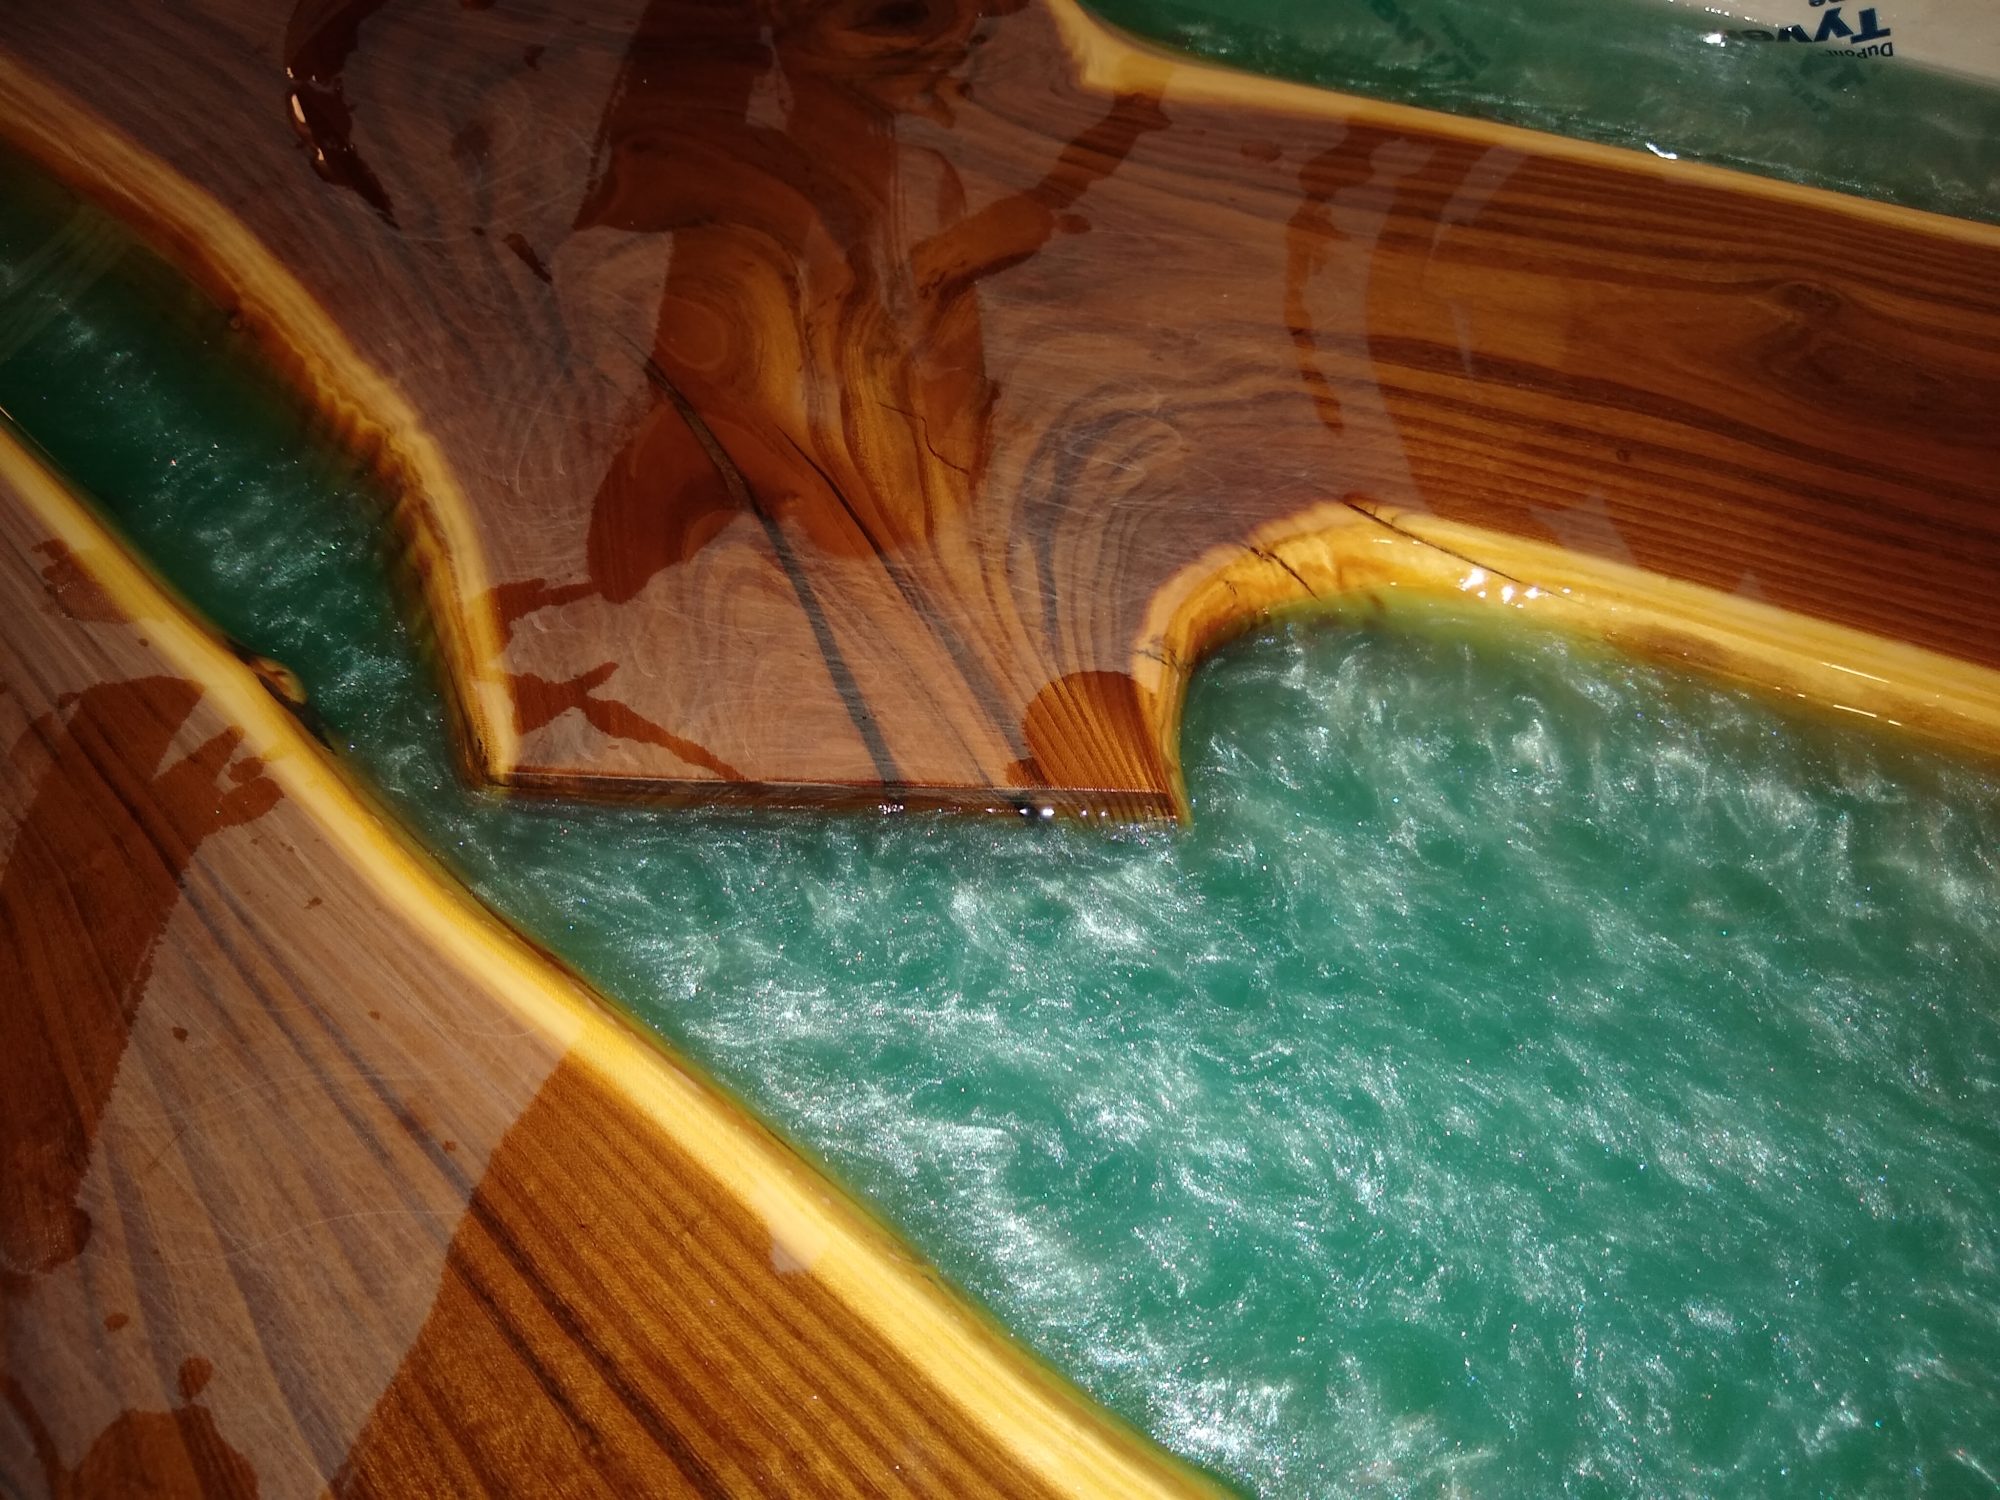
A river table by nature has a rustic aesthetic. So there is no way I can really stray away from that one, but I want to include the aesthetic of looking similar to clear oceans in places like Cancun, Mexico. So my table will have a Rustic Ocean Aesthetic, which is a very unique one.


https://www.tripsavvy.com/cancun-travel-guide-1588615 (Cancun, Mexico)
The first portion of completing my aesthetic was to find a piece of wood that looked similar to land. I wanted a dark hardwood that was dark in the middle with lighter edges where the bark is. This lighter section would represent the sandy beaches. I also wanted to get a curvy enough piece of wood so that it looked like a coast along an ocean (with many variations).
The second portion is the color and placement of the resin. I wanted the resin to be clear enough to be translucent, but I wanted it to have some sort of metallic pigment to represent the foam in the ocean. As you will see later in the project, I did lots of testing to see figure out the exact color combination to create this aesthetic. Overall I was very happy with the resulting color in the table I created.
Initial Sketches/Plans/BOM
My initial sketches are shown below. I pictured it with two pieces of wood with resin on both sides of them. A lot of resin tables only put the resin in the middle, I thought it would look more like an ocean if there was more resin everywhere.


The schedule shown below is for this entire project.

The initial high level steps for creating the table are shown in the list below,
- Buy materials
- Test mixing and coloring resin
- Prepare Wood
- Remove bark
- Cut to size
- Sand smooth
- Seal with epoxy
- Prepare the mold
- Cut the wood to length
- Assemble mold
- Place tape and silicone to seal them mold
- Main pour
- Vacuum and remove all debris from mold
- Heat up resin
- Place wood in mold and clamp down
- Level the table
- Mix the two colors
- Pour the two colors
- Torch the bubbles for the first hour
- Cover with a tarp
- Keep room heated in between 70-80F for 48 hrs
- Machine tabletop
- Cut the sides with a table saw
- Round the edges with a router
- Sand entire tabletop
- Final Flood Coat
- Set up and level tabletop
- Mix and pour a clear coat of epoxy resin over the entire table to finish it.
- Machining Aluminum Legs
- Machine all holes in 4 aluminum pipes
- Assemble Aluminum legs and tabletop

After the extensive research that I did, I created a Bill of Materials (BOM) shown below. This includes everything I needed to buy/get other than tools that would be used at the machine shop at school.

3 Comments. Leave new
This is absolutely amazing and I’m really impressed with how it turned out. I really feel that you captured the initial beach aesthetics super well! Good job
Hey George, can’t wait to see the final product, your teaser shot of the table looks fantastic. I remember you mentioning your pour being miscalculated and having to hurry to remedy that, but I really think the level of resin to wood turned out perfect! I appreciate how well thought out the entirety of this project has been, and how long in the making it is. I second Justin’s question concerning the table legs – do you think you’ll still go for adjustable legs as you had originally planned? Or do you think you’ll switch it up now that it will likely be concluded outside the context of this course? Good luck with wrapping up!
Hello George! I’ve chosen to do a more in-depth critique of your Final Report 1 as I really liked your featured image! That is an image of your final product table, correct?
As a statement of meaning, I think you’ve done an excellent job with the resin pour! It really looks like waves crashing and matches the turquoise waters of your Cancun inspiration image quite well.
Please let me know if you have any questions for me regarding your main project to fulfill the “Artist Asks Questions” step of Liz Lerman’s critiquing methods.
As a neutral question, have you began to brainstorm what kind of legs you’ll look to add to the table?
And finally, I have an opinion about a potential table leg choice that would be cohesive with the aesthetic of your tabletop.
Excellent final product! Smart move getting a start early in the semester prior to the pandemic so that you were able to complete a large, tangible creation.
-Justin Engbrecht