
Project Description
The project I chose to work on was a flashlight that attaches to a Bear Spray bottle. This item was 3D printed and contains a combination of Art Deco and Organic Aesthetics. The following posts will describe my inspirations, timeline, constraints and final iterations.
Project Inspirations
My dad and I have always been thinking of new products to develop, whether it is for our outdoor recreation business or just for convenience. When thinking about a main project, I decided that I wanted to try and kill two birds with one stone and develop a product that we could use in the mountains that would also be convenient, even if it never gets mass produced.
One of the hardest thing about owning a family business where you take people into the mountains is the assurance that each client will be safe. One factor that adds to this safety is to have bear spray (pepper spray) on you at all times when in the wilderness. Fun fact: my father and I were horn hunting once and actually came 20 yards away from a grizzly! Thankfully it was during the daylight so if we needed the bear spray, which thankfully we didn’t that time, we could see where to get it.
But what happens when it is dark outside and you don’t have time to look for a flash light and bear spray? Well that is where my idea comes in. I want to 3D print a lighting device that can be attached around the bear spray with velcro. Not only will you save time by only needing to find one item, but you can even use the light to aim and shoot the bear spray if it ever gets that close!
Eventually, my dad and I also want to develop a beeping mechanism that will go off if the bear spray is unsealed because getting sprayed but that stuff, even as an accident, is one of the worst pains I’ve ever had!
Top 5 Constraints
My bear spray light is a project can be designed many different ways, which is why I want to define 5 constraints to help hone in this project. One of my five constraints for my final project will be the aesthetics. I want to incorporate Art Deco and Organic aesthetics of design for the lights.
My second constraint will be that it needs to be small enough that the bear spray contraption can still fit in your backpack side pocket or even hook onto your jeans.
My third constraint is that the light fixture needs to use batteries that can be found at normal convenience stores, such as Wal-Mart or Safeway.
My fourth is that my light fixture needs to have three different light settings. In my mind, these will include a bright light straight ahead, a light that encompasses 180 degrees and even a red light. My idea for this comes from your typical head lamp. A picture of this can be seen in Figure 1 below.
My last and final constraint, for now, is that my project is durable. I don’t need fragments of glass breaking easily when you are already flustered if you see a bear!

Figure 1: Head lamp with three light variations which is an inspiration for my light idea (Picture Courtesy of XSCOURCE) [1]
Project Aesthetics with 20th Century
Starting out the project, I wanted my design to have a bubbly aesthetic. After doing more research, I realized that Art Deco was basically the aesthetic I was hoping to achieve. Below are aesthetics I want to further incorporate into my design, one of which is Art Deco. I wanted to see what the outcome would be if I included this!
One of the three aesthetics I would like to incorporate into my design is Art Deco. The sharpness of the lines and the contrast are two elements that draw me to this aesthetic. A sketch of how I could incorporate this into my design is seen in Figure 2.
 Figure 2: Bear Spray Light with Art Deco Aesthetic
The second aesthetic I want to choose is an international style aesthetic. This is a boxy, industrial type design that would add uniqueness to this project. A sketch of this integrated into my project is seen in Figure 3 below.
 Figure 3: Bear Spray Light with International Style Aesthetic
The last aesthetic I want to choose is the Organic Aesthetic. This is my last choice for aesthetics but it is definitely a radical idea!
 Figure 4: Bear Spray Light with Organic Style
After researching and drawing out these aesthetics, I decided to add both Art Deco and an Organic Aesthetic to my Bear Spray light. The light fixture itself will have the curved look of organic while the housing will feature mostly Art Deco.
Construction Timeline
Fortunately, I have already flushed out a good amount of the Solidworks for this project. I must say that did take much longer than I expected so I can see how the rule of 7 applies!
After making my first prototype, I realized I would want me bear spray light smaller. The next step I have is to adjust this size in solidworks. After that, I hope to 3D print the object. If time permits, I will design the lighting circuitry and start to assemble that. Figure 5 below shows the tasks I still need to complete and how much allotted time I expect to spend on these.

Figure 5: Table of tasks and time allotments
Given this timeline, I know I have 71 hours worth of work left do to. The goal is to finish resizing this week and start 3D printing the beginning of next week. Knowing spots fill up, it may take longer to 3D print than expected so I am going to get on the Solidworks as soon as possible.
Final Report Part 1
After the planning stages, I dove into my first prototype. Someone once told me to make prototypes to answer a certain question, so for me, I wanted to see the size of the device I was looking into. I went to JoAnns and got some foam balls and block and cut them into my general shape. I tried to add some sparkles to add more aesthetics but noticed that once they dried, you could barely even see they were there! Figure 6 below shows my initial Solidworks model and Figure 7 shows my first built prototype.
 Figure 6: Solidworks Model of Initial Bear Spray Light Design
 Figure 7: Prototype 1 of Bear Spray Light
After making this first prototype, I decided I wanted to make the design a little bit smaller. I also needed to make sure that the device incorporated the curvature of the outter diameter of the bear spray light and had holes for wiring and controls. I ended up remaking my solidworks model completely, which can be seen in Figure 8 below. In addition, I added slots where velcro could attach to so that you could then attach to the bottle and I cut out holes in the back so that I could later go back and 3D print a back cover piece if I decided to leave this as my final model.
 Figure 8: Solidworks model of Prototype 2
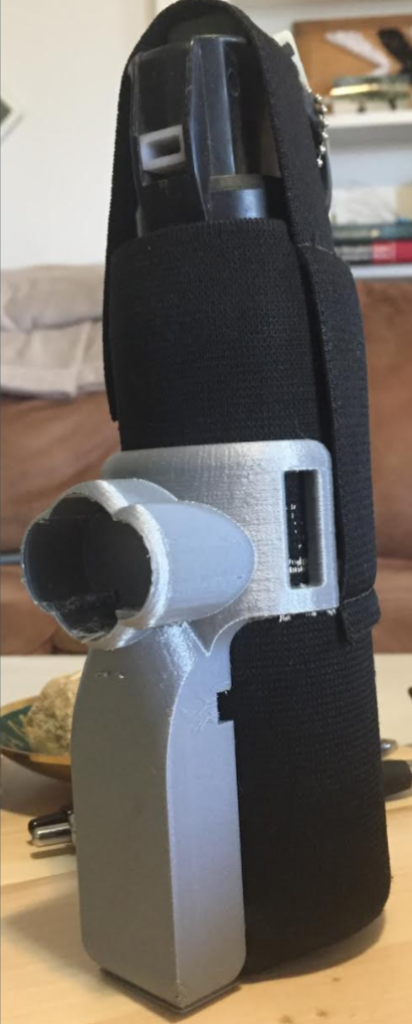
After this, I went to 3D printing. It only took about 8 hours but had a substantial amount of support material based on the design. In future designs, I will probably want to redesign again so that less support material is used. My final 3D printed project can be seen in Figure 9 below. Figure 10 also shows the attachment to the Bear Spray bottle. It fits snugly which is exactly what I had toleranced for so I am content.
 Figure 9: 3D printed Prototype 2
 Figure 10: 3D printed Prototype 2 on the Bear Spray bottle
I always told myself if I had time, I would start trying to figure out the lighting and controls. Circuitry is the subject I am worse at and it took me longer than most to figure out how to set this all up. The biggest help was taking apart a couple of head lamps to see the inside circuitry. A picture of a BlackDiamond head lamp I took apart is shown in Figure 11 below.
 Figure 11: BlackDiamond Head Lamp guts
Final Report Part 2
After completing my second prototype, which was my first 3D printed part, I realized that I needed to change the design to fit the 9V battery I am using for this project. I also wanted to go back and add a hole for a button that was already pre-measured instead of guessing after the fact. With these in mind, I went ahead and redid my 3D printed model to include these changes in design. I also redesigned the circuitry such that I have the amount of LEDs and switch that I was hoping to achieve.
Once the 3D printed part was complete, I actually ended up giving it to my dad for his 50th birthday.. and he loved it!! His eyes lit up and now we are talking about starting a business based on his great ideas and my knowledge on 3D printed and how to turn an idea into a real physical item.
At Expo, I got a lot of people really interested in my product. I think my idea is something that most people don’t realize they need but once I told them, everyone seemed shocked that it wasn’t already a product on the market.
The biggest thing I took from this class was how to take an idea and make it one: stand out based on its aesthetics and two: how to actually take an idea and make it into a product. This relates particularly to the circuitry part. Before this project, I always assumed I was incompetent when it came to circuits, partly because I almost failed my Circuits class. After this project, and much struggling I must add, I was able to figure out the LEDs, how to put them in parallel and how to connect that to a momentary switch. It’s exciting to know that now matter what problem is given to me, I have the skills and a way of thinking now to know that I will figure it out. Even if it takes a while! Overall, I am very proud of my work and was glad to have taken this class and gotten to do such a cool project!
Resources
[1] url: https://www.amazon.com/XCSOURCE%C2%AE-5000-Lumen-HeadLamp-LD272/dp/B00HD5D5C0


