
In this blog post, I’ll be presenting my final revision of my Lichtenberg album frame. I constructed this out of 2-by-4’s laying around my house as the upcycled part in my project. To introduce my project, I’ll first touch on my inspirations.
The two main inspirations for this upcycle project are having seen YouTube videos of Lichtenberg wood-burning and a Pink Floyd light show I went to at Fiske Auditorium freshman year. I was inspired by this video that I saw while down a rabbit hole on YouTube.
My vision for this project was simple: my overall goal was to create a very simple frame for my Dark Side of the Moon record. My functional goals were also simple: no inner length could be longer than 12.25 inches, and the frame must fit a vinyl record (12.5″ squared) on the inside. The artistic goal for this upcycle project was to achieve a unique fractal pattern that juxtaposes the unburnt wood surrounding the fractals. Below, I will detail the fabrication process as well as the materials needed.
As mentioned previously in a blog post, I purchased the transformer used to get the high voltages necessary for this art. I then used small artwork-hanging nails as the conductors, attached to the leads of the transformer. Below is a video of the nails applying a current to the wood.
Since wood is not a good conductor of electricity, I was advised by the video above to use a baking-soda-water mixture on the wood. I applied the mixture using a sponge and let the mixture soak into the wood for about five minutes before applying a current to the material. Below is an example of when I applied the current while there was still a significant amount of water on the surface of the wood.
When the wood was too dry, the current would travel in a more linear fashion, reaching the other electrode without creating significant fractal patterns in the wood. For this reason, I used a typical amount of water as seen in the previous videos. When the wood was too wet, the wood would not burn but would burn even if the transformer was left on for the time it takes for the surface of the wood to dry. This made the process somewhat easy as I could place the leads in the next desired location and switch on the transformer and let the process go on unhindered. I found the most success by taking an iterative approach with the wood-burning – I would keep one electrode in place from the previous burn, find a new location for the second electrode, start a burning process, and then move the original electrode to a new location. This iterative process made the wood-burning go by faster than placing the two electrodes at random locations on the piece of wood. The resulting process, however, kept the fractal going for almost the entire length of the wood – as seen below.
The above video shows the final piece of wood prior to cutting. To construct the frame, I started with cutting a 45-degree angle on the wood to make the corners of the frame. After cutting one 45-degree angle, I measured the short (inner) length of the frame to be about 12 inches, then cut another 45-degree angle from the other end. A cut-list of the wood is seen in the image below.

Following those cuts, I found that some of the angles were slightly off. To make each piece uniform, I used the smallest length piece as a guide piece for making edits to the remaining pieces. See the image below for a visualization of using a guide piece:

I placed the guide piece on each of the other three pieces and cut the angles to match those of the first one. This is where my lack of experience with woodworking hurt me the most – three of the corners lined up somewhat well, but the final corner had a significant gap when it was assembled. Luckily, I had plenty of scrap wood with Lichtenberg burns on it to use as shims. I placed the shims in the faulty corner as seen below.

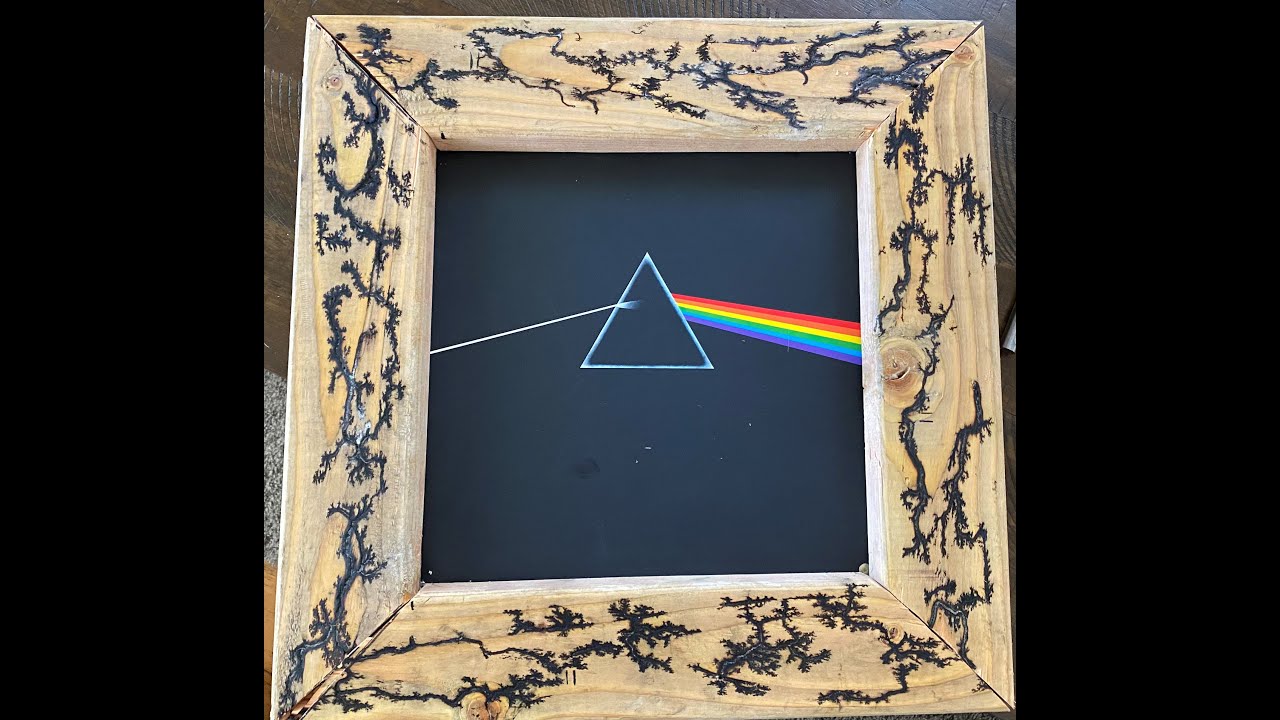
Since the shim also had burn marks on it, it ended up looking somewhat seamless if you ignore the outside corner. One other thing to note about the process is that the wood seen above became somewhat greyed-out by using the baking soda mixture – this was an unexpected anomaly, but a welcome one. The grey appearance of the wood makes the deep black fractals more pronounced. Since one of my artistic goals for this was to have the fractal burns juxtapose the unburned wood, this effect actually helped my goal. Overall, my functional and artistic goals were achieved. Below is an image of the final product.

The vinyl frame is covered by the entirety of the frame, so my design goals were successful. As for the quality of the corners, I feel that I did a great job without having solid woodworking skills to utilize. I really enjoyed the process of burning the wood and got more and more creative with the wood-burning as it went on. I like how the fractals in each of the corners ended up looking like they merge into each other – this was also not by design, so I’m excited with how that turned out.
In this process, I learned a lot about how I could have improved this. As seen in the first and second videos, the nails used as conductors were rather small, leading to less contact area between the wood and the electrode. In the next revision, I would use larger nails to get larger fractals. As for the baking-soda-water mixture, I had fun experimenting with the amount of baking soda and would likely continue experimenting with the ratio of baking soda to water in the next version. If I had more time, I’d like to finish the wood with a dark oil or one that achieves the same “greyed-out” finish as accomplished by the baking soda. With the neutral color background instead of the 2-by-4 natural finish, I’d fill in the fractals with an epoxy resin with colors. I like the idea of using orange as the prominent color since it would give the appearance of the wood being actively burned. In fact, when the current was being applied to the wood, the deepest rut (I liked to think of it as a river) would light up in bright orange color, as seen below.

Replicating the bright orange color seen as the wood is being actively burned would carry an aesthetic that gives insight into the process behind making the fractals. Alternatively, I would use a rainbow of colors to match the aesthetic of the Dark Side of the Moon album. If I filled the fractals with resin, I would then apply a clear coat of resin, sand down a layer, and then shine the resulting epoxy finish by using toothpaste and wet sandpaper (I have used this process before on resin-casted parts and it turns out amazing).
Overall, I am very pleased with the final product for this project. I achieved both my functional and artistic goals, as well as my overall goal. I’m open to any suggestions for a second iteration – I loved the process of burning the wood and would love to hear some suggestions for fractal patterns, colors, etc.
Thanks!
Sources: All images were created by me. See the link above for the YouTube video that inspired me.
3 Comments. Leave new
Hey Chris,
This project came out looking amazing! I’ve always found fractals to be beautiful, both mathematically and aesthetically. I think your design just proves that more designs in the world should have some form of fractal art. Your use of a transformer with nails is very innovative and overall I think you did a great job. If you were to do this project again, what is the one thing you would definitely change?
Hey Chris,
Excellent work on this artifact. I’ve seen this lighting technique before and have always wanted to try it. Would you say that it was more difficult than you expected it to be? I also love that you used the frame for vinyl. It is a fresh interpretation on a dying media.
Hey Chris,
Great work on your project. Making is frames are great because they only have to emphasize what is in them. I wonder what the specific voltage and amperage was that mad these pattern in the wood. Did anything dangerous happen during the building process? I know that when I have worked with high voltages in the past I have accidently made a spot welder on multiple occasions. My last question is how particualar were you in places the screw were for voltage application.