
Final Project Report:
Initial idea:
I wanted to design and build a custom longboard for my friend out of scratch, including the trucks. 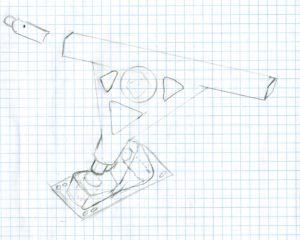
 After playing with solid works and talking to skate shop owners, I began to understand that it was not realistic and a productive use of my time to build trucks, because of cast costs and CNC machine not being able to make the proper cuts I would need, not to mention the materials would be out of my price range. I instead turned my focus to the deck, the heart of the board. This is really where the aesthetic would come into play. After looking at hundreds of longboard designs and shapes and colorings, I decided I would go for a modern style of the classic longboard. Longboarding culture really progressed in California when surfers took to the streets when the waves were lame. The sandy simple beach theme became the pinnacle of the longboard. This inspired me and allowed a vision to form of what I would design.
The Functionality:
The functionality of the board is vital. I specifically designed it with space around the wheels so it is possible to loosen the trucks, which allows sharp turns. The wheels are designed for cruising, with 78A hardness. 78A is considered a middle ground hardness. It is soft enough that you can grip the road well to make quick turns, but hard enough that you can cruise without slowing down too fast due to unnecessary friction. The trucks are reverse kingpin, which allows for speed and a tighter turning radius. As a custom board, I wanted specific attributes to create a useful product for my friend. She lives in the middle of New York City and she rides a longboard to get around. This means she needs something that can cruise well, and be “turny” to get around people on crowded streets. The shape of the deck and style of wheels and trucks are meant to accommodate her needs. The wood I used is hard rock maple, a classic material for boards, but it turned out a little stiffer than I would have preferred. The lack of flexibility inhibits the turning radius somewhat. In the future, I would combine birch and maple, to add some flex. At the end of the day, the board rides decently well and I am happy with the functionality.
The Aesthetic:
The aesthetic is a classic modern looking old school board. It has a sandy wood color and is simple. The 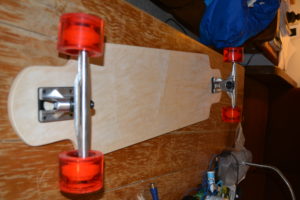 cuts of the deck are circular and consistent. They match the simple curves of the art I drew and laser etched into the deck. Curvy and relaxed as they were in California back in the day. The red wheels are also a classic and compliment the board. Simple silver steel and aluminum trucks connect the board to the wheels without taking much attention away from the laser art.
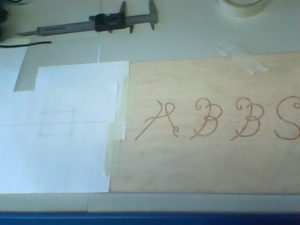


 On the top of the board you can see Abbster carved. Abby is the friend to whom I am gifting the board (I call her Abbster). I created the font style myself, incorporating simple curved lines to form letters to match the curvature of the rest of the board.
The Building Process:
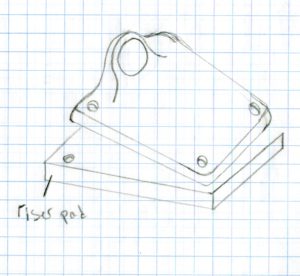
First I had to order the materials and get necessary supplies. This included wood, trucks, wheels, riser pads, grip tape, bearings, screws and nuts, wood glue, polyurethane, sand paper, steel wool, tools, access to saws and a router, and lots of measuring tools. The wood was the most essential, hard rock maple veneer, 7 plies of 1/16th inch in thickness, 35” by 10”. The veneer was had 3 differing cuts, 4 normal grain following the length, 2 crosscuts, and one core cut. These combine to create flex and strength.
Specs:
 The board after the cutting is 34.25 inches long and 8.9375 inches wide.
Speed Cruiser 70x 52mm Wheels, 78A Hardness
Ritalin Abec 7 Chrome Bearings come pre-lubed with synthetic oil.
Heavy Duty 1.25″ Hardware. Bolts and Nuts come with black coating.
Trucks: (2x) Polished 175mm Hanger, 9.675″ axle to axle
Cost:
Wood $26
Trucks/wheels/risers/bearings/hardware/grip tape $52
Glue/polyurethane/brushes/steel wool/tack cloth $35
Total = $113
I predicted I would spend $150-$200, So I am very pleased with the end price.
Building:
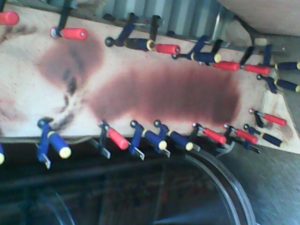
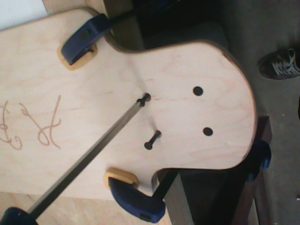
 Gluing the wood was vastly more frantic than I expected. The glue starts to set fast, I only had minutes to evenly spread glue across 7 warped plies of wood on front and back (except for the top and bottom faces). I used over 20 clamps to secure the creation, using large sturdy wood to keep a flat shape.
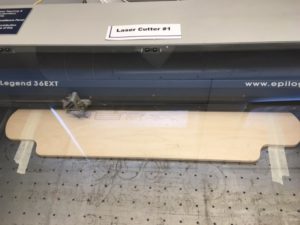
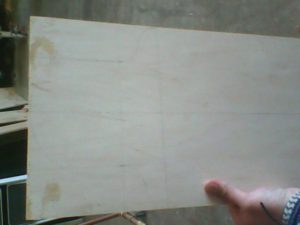 Once dry, I drew out my design of board shape and used a precision saw and a band saw to cut. I spent a couple hours chiseling way stuck on glue from the faces of the board. One wrong flick and my whole board could be ruined, so I took my time. Craftsmanship is key to my design. I must admit I spent hours sanding everything just right. I relied heavily on my hands rather than machine precision, (that’s my style).
 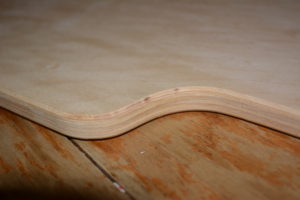 Once perfectly shaped and sanded, I used a router to curve the edges of the board to keep with my curvy round aesthetic. The next step was to use the laser cutter to etch my art into the wood. I spent hours upon hours drawing and redrawing both on papers and then tracing over on adobe illustrator my figures. Never underestimate how long drawing takes. I think at the end it was worth it. I am pleased with how my depictions came out on the deck.
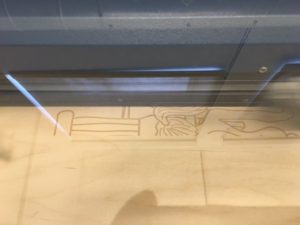
 With the help of Sami, my drawings were ingrained into the board. After playing with some scrap wood I had, we decided on using 50% power and doing one pass on the top (the font) and two passes on the bottom art, (since the bottom of boards get scratched up, I wanted to engrave a little deeper).
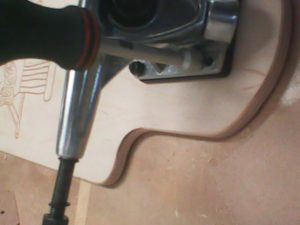
 Next I needed to set my trucks perfectly square to each other and parallel to the board. This step is critical for the functionality. If the trucks are not square, then they will pull in slightly different directions. This occurring at high speeds would generate intense friction and could blow off the truck from the board. I CADed the truck dimensions and used a large square tool to insure parallelism and equal spacing. As far as I can tell the trucks are seemingly perfectly square. (I would guess my error is no more than a couple thousandths). I used the dimension drawing to poke precise holes into the wood and drilled using a drill press. The first drill bid was small just to make the path clear and direct for the next ones. The next drill bid was to the exact size of the hardware to screw in. I then drilled a slightly wider bid to be able to place the screws in straight. The last drill bid was wide, but only went in a few millimeters so the screws would not stick out on top of the wood.
The final steps were to put the bearings in the wheels and the wheels on the trucks.
I still need to polyurethane and attach the grip tape. This will be done by the expo. The polyurethane is a simple spray and I have steel wool to keep it smooth and not scratch up the protective coat. Polyurethane is essential, because it waterproofs the wood and keeps it more durable from wear and tear.
9 Comments. Leave new
[…] Final Project Report: Longboard […]
Great Presentation!
Great job on your longboard. If you’re interested in making another one, experiment with the thickness of the wood plies an board material layers and see if you can optimize them so it flexes more than this board does. I think it’s finished very well and I probably couldn’t tell the difference between yours and one in the store. Your friend is gonna love it!
Great project Sophia. I came across this project in the MakerSpace when I was making my sand frame, its really impressive that you managed to get everything together on time. The skateboard really looks nice and polished. Can you tighten down the trucks somehow so it can ride better? I hope your friend enjoys it. Great job!
Great work, your friend is going to love it!
Your longboard turned out amazing! I am happy to have been your minion for a tiny part of the project. Doing this project for your friend was extremely nice, and I hope she enjoys the boards because you put a ton of effort into the personal aesthetics and functionality. Also, as a Californian thank you for complimenting the state a ton.
Great drawing too.
Awesome! Are you going to stain the wood first, or just slap the polyurethane on it? I can’t wait to see this at expo.
The project it looking great! I can’t wait to see the final project. Did you consider maybe trying the polyurethane coating on the scrap pieces? That way you would be able to test the best way to create the coating before trying it on the board.