
General Description
The swing bike is a bicycle meant for fun. Therefore, when a viewer looks at it, that should be the first thing that he/she thinks of. To achieve this, I’ve gone for a way different aesthetic than most bicycles today, which are sleek and polished machines that scream business. Instead, I’ve mashed up a couple of old steel mountain bikes (the type you rode as a kid) with a wacky paint job and older mountain bike components. This is meant to hark back to the bikes you rode as a kid and all the fun you had riding it around your block, your first feeling of freedom, with a splash of color to liven it up.
What is a swing bike, you ask? Well, a swing bike is a bike that adds an extra pivot at the seat tube, which allows the rear wheel to pivot independently from the front of the bike and the front wheel. The purpose of doing this, as stated before, is purely for fun. With that pivot, you you can do things you normally can’t do on a bike, such as riding in a super tight circle, swooping and swerving across the road like a skier weaves down a mountain, and riding with your wheels misaligned in different planes. Above that, you have the novelty of riding something very few people have, the thrill of the challenge of controlling two steerable wheels, and a whole new discipline of riding a bike.
Fabrication
Step 1: Designing the Frame
The first consideration in designing the frame is the type of riding I want to do with it. I wanted my bike to be able to do everything a swing bike can, but also remain usable as a mode of transportation around town. However, after riding the bike, I discovered that while it’s fun, it’s completely impractical as a mode of transportation because it’s harder to ride. You can’t stand up and pedal since the rear end is loose, and that rear end also makes it flop around when straddling the bike and standing (like you would when you’re stopped at a stop light) which could swing the frame and pedals around and gouge your shins. Therefore, I decided to scrap the idea of making this a geared bike since it’ll purely be for fun. Doing so cleans up the aesthetics of the frame as well by having one less cable to route.
Next was the material of the frame. I went with steel, which was really a no brainer since it’s cheaper and easier to weld. I also had two old unused steel mountain bikes at home which were perfect. Steel is also likely the material the bike you rode as a kid was made of, so helps pay more homage to the fun times you had on two wheels.
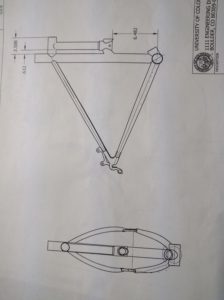
Finally, the last step was designing the layout. I measured the dimensions of my mountain bike that mattered (top tube length, bottom bracket height, and head angle) and applied them to my design. I also considered a locking mechanism for the seat pivot at one point for making it a normal bike when you don’t feel like swinging. I eventually decided against it for a self-stabilizing system. If the pivot was perpendicular to the ground, there are no moments acting on it besides your body english and steering, so it’s the floppiest setup. Instead, I angled it back at around 30 degrees, lending the pivot an arc where the bottom is the dead straight position, which means the pivot will default to being straight when you’re not trying to swing.
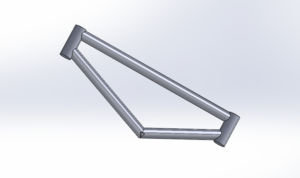
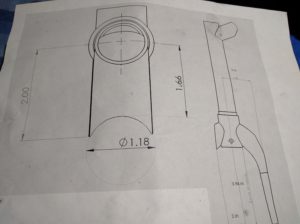
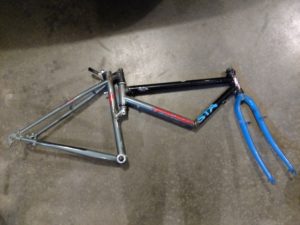
I also had to balance the robustness and strength of the design with ease of manufacturing. After a lot of brainstorming, I settled on a design where the pivot attaches to the seat tube using one side of a cut-off fork leg and a cut-off portion of the stem. The front triangle was made by cutting the head tube and down tube off of one frame, and welding it to the entire front triangle of the other one. The top tube of the other frame is welded to the head tube, and the two down tubes are cut so they join, and can be welded together. The result is a triangle, which is strong and will take any loads from the front wheel well. Best of all, this design only requires four welds and a handful of cuts.
All parts of the model were drawn in Solidworks so I had a blueprint to take to me into the machine shop.
Part 2: Construction of the frame.
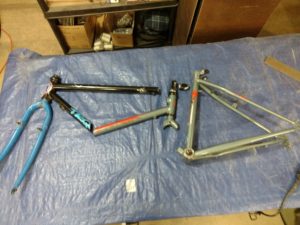
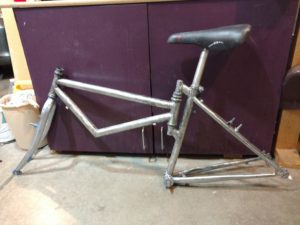
This part was fairly straightforward. I took my bikes and the blueprint into the Idea Forge machine shop, and made all the cuts I needed via saw and angle grinder, and also ground any extra stubs down in the name of aesthetics. After learning how to weld from the Idea Forge welding class, I then welded it all together.
Even though some research online revealed that TIG welding is far superior to MIG for bike frames since the tubing is thin, I still used MIG since that’s all I had access to and had time to learn. It’s still possible to weld bike frame tubes with MIG, you just have to be careful to not completely blow through the tubes due to lack of fine control. I practiced welding the frame scraps I had together (and got pointers from a friend) to make sure this didn’t happen when welding the real thing. Thankfully, the frame was welded properly on the first try.
Part 3: Finishing
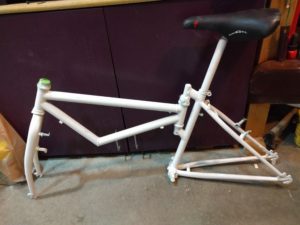
This is the part that took much longer than I anticipated, and am glad that I had buffer time in my schedule for. It’s not that it was complicated or hard to do, it just took a long time. First, I stripped all the old paint from the tubes using a wire wheel and drill. Then I sanded everything down before applying paint primer.
The frame was painted in the spirit of Rayonism, which is an aesthetic movement described in one of my earlier posts. I made the base color of the frame maroon, with triangle slashes of color (gold and yellow) to represent rays shooting across the frame tubes for added drama. While my painting skills are subpar and I couldn’t get it to look like actual Rayonism pieces, I at least captured the brightly colored triangles that are a heavy part of the aesthetic. I think it looks nice, and it’s still a carefree, fun-inspiring, abstract paintjob. The bike will also be christened the “Inswingerator.”
Part 4: Assembly
The bike was finished with the original parts from the two bikes I butchered. They are all matched, which will simplify the aesthetics. And since they look dated but not like junk, they keep in the theme of throwing back to the old bike you had as a kid.
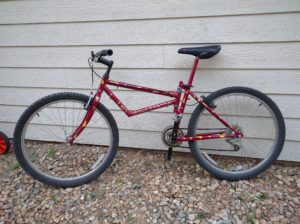
This is how it turned out. My paintjob could be better quality wise, but there’s no time at this point for me to strip down the frame again and repaint it. As for how it rides, it’s… new. Certainly different from any other bicycle. You have to use your hips not only to steer but to keep the bike stable. It’s fun though. I’ll be riding this thing to strengthen my core and to improve my bike handling skills, which will help me greatly when I race.
Costs:
$20 for paint and primer
$20 for six packs as thank yous to those that helped me.
I didn’t spend much on this project except on paint. I already had the bikes I used, and some friends lent me everything else I needed (tools, advice, etc.) I needed to get this done.
6 Comments. Leave new
[…] Final Report Part 1: Swing Bike […]
Great work! I’m glad you finished it and brought it to your presentation so we could all see it. If you had more time would you think about putting a lock on the pivot so you could ride it like a normal bike? There might be a way to make one that’s not too bulky and doesn’t take away from your aesthetic.
I can’t believe you made a bike. Blows my mind. Nice job!
It looks like a lot of time and effort went into this. Good work!
This was such a cool project! You definitely put a tremendous amount of machine time, welding, designing, and CADing the frame really payed off in the end. The bike looks like the aesthetically pleasing, and reminds me of the mountain bikes I used to ride as a kid. Your presentation was great too!
Make sure you post lots of pictures after the paint job! I can’t wait to see how that turns out. It is very impressive that you spent so little to have such a neatly designed and implemented new(ish) bike! What are your future plans for your swing bike? How did the welding go? Do you think those skills will come in handy for additional swing bike remodels? Great work, you should also eventually upload a video of you riding it!