

When I started this project I had a pretty good idea what I wanted my final product to look like and what kind of experience I wanted the viewers to have. It’s supposed to be cool, fun, entrancing, and interactive. At this point in the process I’m sad to say that the product is still not complete as the design process took much longer than expected.
I was pretty much redesigning a pre-existing project except I wanted my product to have a cleaner design, hide the motors and other components, and be easy to assemble and disassemble. I immediately thought that 3D printing the components would satisfy all these goals and it would allow me to share it with others so that they can make their own LED Orbs. 3D printed parts are also very lightweight and sturdy which is exactly what I need for my final product. I went with black filament to go with the electronics aesthetic. If you look around you the majority of electronics’ casings are black so I wanted my product to fit into that. Also for the light show to be more effective it should be viewed in a dark environment, so I thought the black frame would distract the viewers less from the light show.
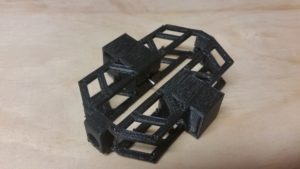
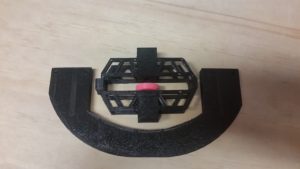
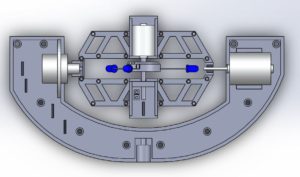
Above is the CAD model and some printed parts of the project. This was all I had to bring to expo and some people were understandable unimpressed and some were impressed. Those who have designed parts to be 3D printed understood the challenge of doing so and they thankfully appreciate my efforts. (You can find more pictures of the parts and screenshots of the CAD in my first post).
I originally thought the CAD for this project was going to be straight forward but quickly learned otherwise. From this experience I learned a lot about how to design something to be 3D printed and how easy it is to get sucked into the CAD and make something that would be impossible to make. I also learned more about how to use the Arduino and basic circuitry related to LEDs, switches, and DC motors.
I will be in Boulder over the summer and I will have the time and energy to finish this project. Also the 3D printers will be more available which was the biggest constraint I ran into in the past few weeks. Once the project is finished it will have a place on my desk or in the living room where people can play around with it. Also once it is complete I will be uploading my CAD files to thingiverse and create posts on reddit and Instructables on how I made it so that others can make their own LED Orb.
References
http://laserpointerforums.com/f57/led-orb-2-0-a-50012.html
2 Comments. Leave new
I totally get the struggle with the 3D printers at CU. You have to be guarding them in order to get a part printed next. It is unfortunate that you were not able to complete the project, but life happens. Hopefully since you have come this far you will not abandon your efforts!
That would be an awesome idea to share your designs with others so they could print and assemble their own LED orbs! It’s very clear that you spent an enormous amount of time carefully designing the pieces, and I am certain that having that experience is just as important as having a finished product. I appreciated hearing about your design process and the challenges you faced in your presentation. You’ve put so much work into it, I hope you are able to print something that you are happy with and can eventually be put together for the final model. Good luck for the future, it has been great to work with you this semester!