
Casting Colors

Inspiration
At my house, when I open what we call “the junk drawer” I see some keys that have unknown homes, papers that have accumulated a thick layer of dust, dried glue sticks, half used containers of silicon, and a multitude of broken pencil ends and batteries. Colored pencils can be used for art in more ways than one could imagine. After scanning google for colored pencil sculptures, I have been inspired to try and make one myself. Some of my inspiration is displayed below.
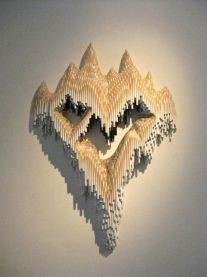

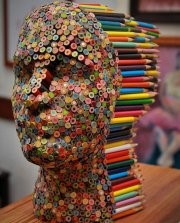
Figure 1: Inspiration Images
These images have simply been copied directly from google images, the original artists are unknown.
Vision
To brush some dust from the colored pencils in the junk drawer and finally put them to use. I have decided to attempt casting the pencil pieces in a clear resin material to create a nice desk ordainment. In theory, I will be able to place the pieces where I would like and let the substance harden, leaving me a beautiful piece of art. The individual colors of each pencil will show through every side of the casting, giving it a bright colorful feel when viewed. The clear matrix of hardened resin will give the sculpture an elegant aesthetic as well. With all of the pencils being scavenged from junk in my house, I still need to purchase the casting material. The casting resin is only $20 for a box and I only used half of it throughout the project.
Design Process
Upcycling can be defined by using leftover pieces that would usually be considered trash. Personally, I am the type of person that throws my trash out as soon as it takes up too much space. Due to my lack of material options, the Design loop for this project was rather unique and can be seen below in figure 2. It was mostly a linear process due to my lack of material options, but iterative processes begun when I started to play with materials I have never used before.
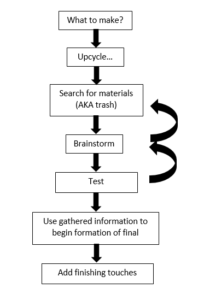
Figure 2: Design Loop Graphic
To begin the testing iterations, I did a small trial run to make sure my mold technique would work. It turned out to me more of a learning experience than intended. With my small mold created from leftover silicon, I filled it with the resin, and attempted to place the pencil pieces’ side by side where I desired them to stay. It turns out that the pencils are less dense than the resin and they floated to the top. Although this should have been an obvious outcome, this was a very unexpected, and lead me to thinking about different methods of holding my materials in place.
Before I had done any post processing work with the resin material, I had assumed that I could simply cut my imperfect casting to the shape I desired, and sand it back to a nice clear finish. Each half of the test specimen is displayed below in figure 3. After cutting and a rigorous sanding of my small test piece I learned a few things. First, that I liked the aesthetic of the pencils inside of the clear material, and second, that even a fine sanding of the clear surface leaves the surface with a foggy white hue. Lastly, I learned that silicon is a great material to avoid the resin from sticking to the mold, but I still needed a better method of building structure than just layering silicon.
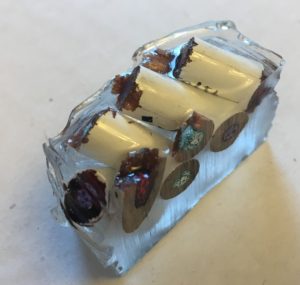

Figure 3: Left; Cut, but not sanded. Right; All sides fully sanded.
Although the aesthetic achieved with the wooden colored pencils protruding from the surface is nice. The problem was that I had no control over where the pencils set. To avoid this problem, I begun to devise a new plan. I decided that pre-building the shape I wanted out of the pencils would give me better chances at getting them to set up where I desired. First, I built a pyramid with pencil ends that were sharpened at both sides. Keeping the shavings to use later for the base. The pyramid is shown below in figure 4.
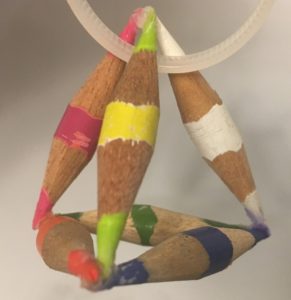
Figure 4: Pencil Pyramid
Now that I had something to cast, I needed a mold big enough to hold it. After scanning various sources for mold building techniques, I decided Legos were my best option. Using some Legos I had picking up dust in my closet, I built a cube shaped mold and coated the inside with the silicon so the resin could easily be removed. The mold can be seen below in figure 5.
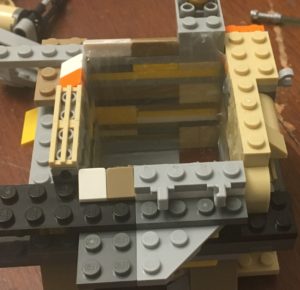
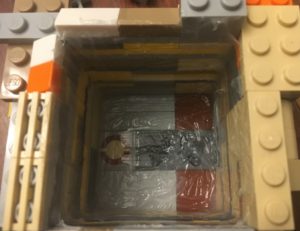
Figure 5: Lego Mold
Next step was to cast the pyramid. To avoid the floating problem, I didn’t fully submerge the pyramid, without the volume fully submerged, it will not float. I devised a device with the Legos and a zip tie to hang the pyramid and avoid it from sinking while holding it in place until the resin could dry enough to hold it itself. This first casting is displayed in figure 6 below, both before and after drying. The pyramid is hung in about ¾ of an inch of the liquid resin material, with most of the base pyramid pencils submerged into the fluid.
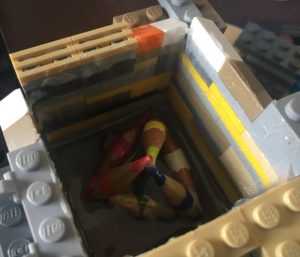
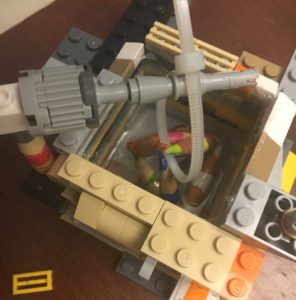
Figure 6: First Layer Pyramid Casting
The remainder of the casting resin was added and I allowed it time to dry. Meanwhile I wanted to make a stand for it to sit upon. Building another prototype style mold with the silicon layer by layer, I could create a semi organic looking shape. Casting two different layers with different materials I gave it a nice aesthetic. One side of the base has the colored shavings from the pencil leads, and the other has the wooden shavings from the pencil shaft. Both sides can be seen below in figure 7.
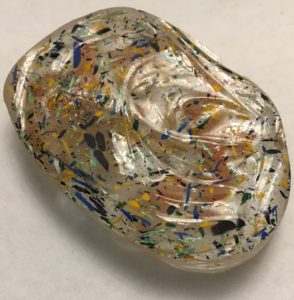

Figure 7: Upcycle Stand
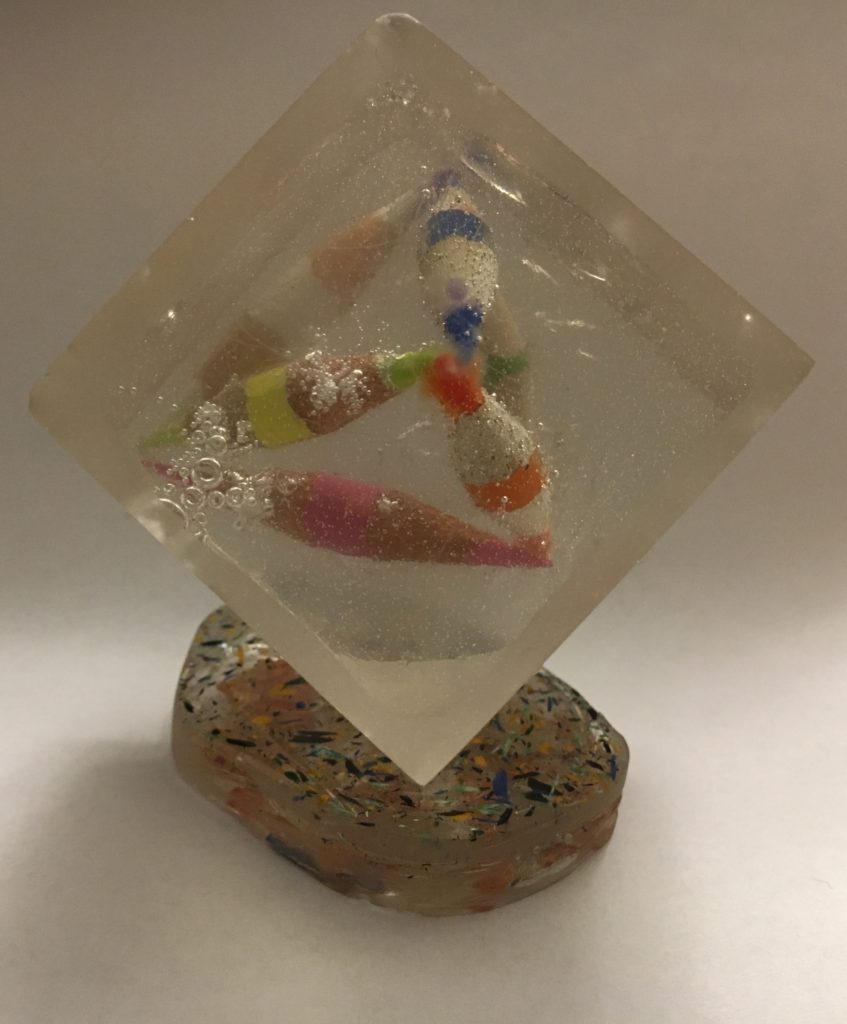
After some serious sanding the cube ended up looking fantastic. The white hue left by the finishing processes makes it look like ice, and a clear viewing window allows for easy viewing of the pyramid inside. The last touch I added was to allow it to stand up on a corner. I sanded down a corner to give it a flat face to sit on to stand up in a seemingly gravity defying way. It is shown below in Figure 8, with the stand and without.
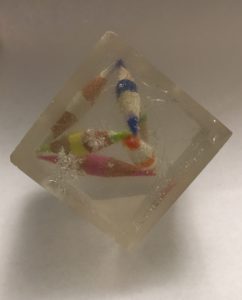
Figure 8: Finished Cube
The Future
More than half of the casting material remains unused from this project, and my mind has not stopped turning on things I could cast. I am almost positive that I will end up making a light up stand with a leftover Arduino board from previous projects, as well as multiple other ideas that my roommates and I have come up with over the hours that went into this project. I am very proud of how this cube turned out. This piece of art will simply sit upon a shelf, or on a desk living up to its full potential as a beautiful aesthetic piece. It would certainly make a great birthday gift to a parent.
My Presentation
My presentation video can be found at: https://youtu.be/jSoo8Hm1Wws
10 Comments. Leave new
This is a really cool idea. I like the way you experimented with different pieces before coming to the final cubic design. It sounds like you learned a lot quickly as you went through the iterative process of design. You showed great creativity in using Legos to make the mold, using zip ties to hang the color pencils in place, then filling one-half at a time to allow you to take the zip tie out. The project is very well presented and written. It sounds like you have clearly documented your inspiration and captured the vision. If you decide to make more, please post it so we can all check it out. Overall, great job!
I liked how you used the left over shavings of the pencils and used them to make a base for your sculpture. It is an upcycle within an upcycle. It was really smart to make a mold out of legos. Could you have used the mold to make the base as well? If you decide to do it again, you might want to look into different resins that allow the pencils to float in the material. Also since you have some remaining silicon, it would be cool to see a structure like this one that uses the window view to its advantage, or with that view in mind.
I really liked the outcome of this project. I am really curious as to how the artists you used as inspiration managed to keep there projects aligned and stable. I also liked that you adapted your project to still make it work when it wasn’t going the way you originally envisioned it.
Very clever idea! The use of legos to make a mold was a good idea. Regarding the problem with the silicon mold liner not being smooth, could you have used a putty scraper or somethin g to smooth it down so that you wouldn’t need to sand it (hence not fogging up the sides)? It is a really cool project, very pretty.
Very unique project. Loved the overall idea of taking one aesthetic and including into another. I loved the different finishes that you were able to get on each of the different pieces. If you could find a way to deal with the density issues, you could come up with some really interesting design.
I love the way you really refined your design throughout this process. When you were met with obstacles, you powered through and found new ways to create. I am glad you brought your trial runs to class. Also, seeing the way in which you used legos to hold the colored pencils was super cool.
This is a really cool, simple project. It think it will be perfect for what you intended it to be, this will be an interesting desk ornament. The colored pencils add interesting color and the window on the top is really interesting. I wonder if you could get different designs and shapes using a different resin.
Great idea! I really like the colors of the colored pencils and the white outside color. The sanding and positioning in the acrylic is really nice! Great job!
Cool idea. I like the lego jig that you made, that’s really creative.
It was cool to see the iterations of your design. I like your drafts and first iterations just as much as the final block.
Sanding it is interesting too. You should try using a belt sander or power tool, you could get a straighter edge and could cut through the material with ease.
What is the function of this aesthetic?
It’s a cool piece of art. The window effect it has is really cool and the base is a great way to reuse the wasted shavings.