

This blog post outlines the What and How of my final project: a Shipping Pallet Garden turned Standing Garden. Originally, I had hoped to make my project out of used shipping pallets to converse money and achieve a weathered rustic aesthetic. Unfortunately, I could not find any shipping pallets that weren’t broken or rotting, or the correct color of wood; therefore, I opted to buy the necessary materials and construct my garden from scratch! Below is a description of the final product and how it was made.
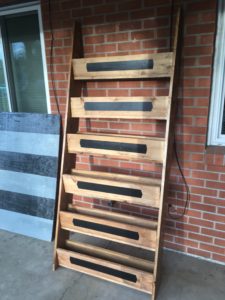
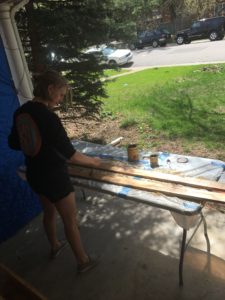
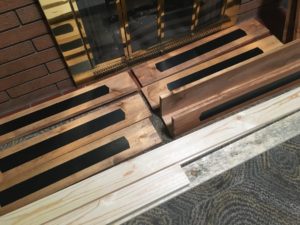
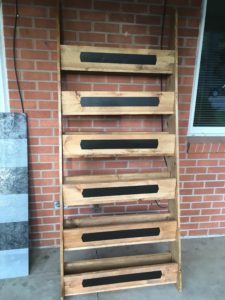
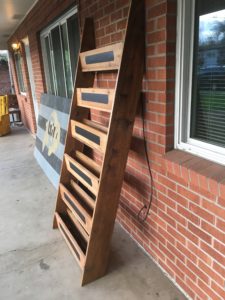
This first photo is my Standing Garden leaning against the exterior of my apartment. It is just under 6 feet table, approximately 2.5 feet wide, and leans at a 75 degree angle from the horizontal. It is made of pine lumber purchase from Home Depot and held together with trim head screws. The purpose of this product is to house plants for growing on a deck or small porch. It does not take up much space, but requires a wall to lean against. The chalkboard paint allows you to identify what plants are growing where and gives it a dynamic aspect. Additionally, I believe that a garden itself is a very dynamic thing as it results in the interaction of nature and humans, as well as humans amongst themselves.
Design Phase:
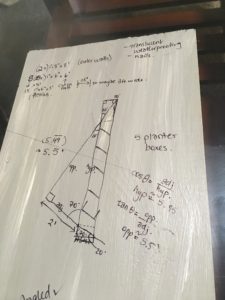
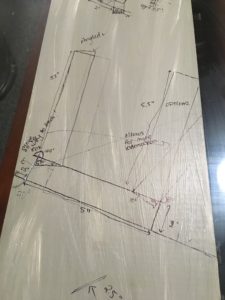
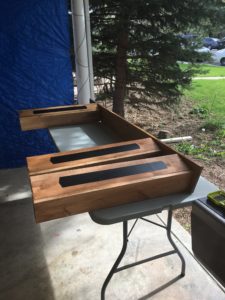
The design phase for this project required a lot of drawings and calculations, especially trigonometry. To get the ideal angle and size, I used trigonometry, as shown in the image on the left. In the end, I settled on a 75 degree angle with the horizontal. This made the distance between the vertical wall and the feet 1.5 feet and the distance between the ground and the lowest leaning point about 5 feet. The right hand image shows the basket design. Originally I had hoped to have the walls of the baskets on an angle, but that proved too difficult. The baskets are equally spaced out, giving them each about 1 foot and growing is not obstructed by the higher basket. Once I had completed all my calculations, I headed to Home Depot to find all my supplies.
Materials & Tools:
Most of my materials and tools were purchased from Home Depot, but somewhere already in my disposition. In total, I spent $98.43 to get all the necessary wood, screws, stains, paints, and a saw. Those articles are as follows:
- 1”x8” Pine Wood (sides)
- 1”x6” Pine Wood (baskets)
- #6 x 1-5/8” Trim Head Screws
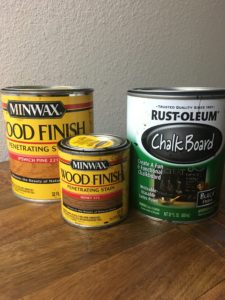
- Ipswich Pine 221 Wood Stain
- Honey 272 Wood Stain
- Chalk Board Paint
- Tool Box Saw
The remaining tools and materials, listed below, I had at home from previous projects.
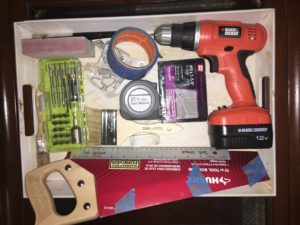
- Block of Sand Paper
- Coloured Chalk
- 12V Power Drill/Driver
- Paint Brushes
- Measuring Tape
- Painters Tape
- Ruler
- Pencil
Construction Steps:
Making the standing garden was a really fun process and there were not too many hiccups. I did a fair bit of calculations and designing early on so that no such problem were occur. The main issue during this phase was my use of a hand saw instead of an power-saw: the hand saw made the cuts wonky and time consuming to cut. Otherwise, it was a fun process and I would love to make another one at home for my mom.
1) Staining
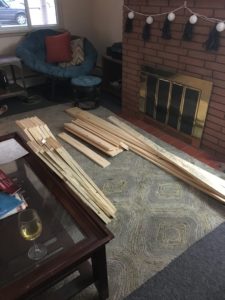
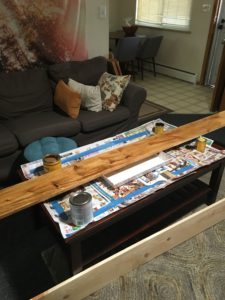
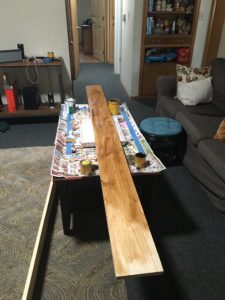
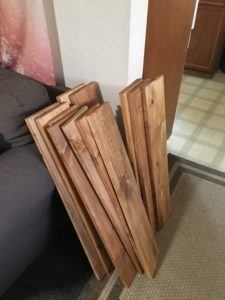
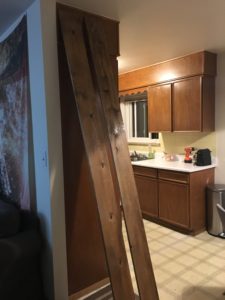
Staining all the wood took approximately 5 hours, twice as much as expected. To achieve the color I liked from my prototype, I mixed the MINWAX Ipswich Pine 221 Wood Stain and Honey 272 Wood Stain. There was no exact formula for this stain, so I added more Honey to the mix when I though the Ipswich Pine was too light. Even though the planks are not a uniform color, it makes it look more natural and I like it that way. I started staining the small boards on my coffee table, as shown in left and middle photos below. As I graduated to the longer boards, I realized my living room was not sufficient and moved outdoors. The set-up shown in the right-most photo below was way better: didn’t have to worry about staining my carpet and my house didn’t smell of wood stain. I used this outdoor set up for the remainder of the construction phase.
2) Cutting & Drilling
Once the stain had dried, I did all the cutting and drilling for the project. When I asked for help at Home Depot, the employee recommended that I drill holes first, then drive the trim-screws into the planks. This would prevent the planks from cracking and splitting. Therefore, I took that advice and drilled all the necessary 1/4 inch holes in the boards for the trim-screws. This process took about 3 hours to complete, and I had to charge my drill several times throughout the process. Initially I had hoped to use nails, but in the long run, I do believe trim-screws were a better option.
Additionally, as my garden leans at a 75 degree angle, I had to cut the bottom and top of the large planks on the respective angles. This proved much more difficult than expected, especially with a hand saw. This process took me at least 2 hours, when I was hoping it would take less than 30 mins.
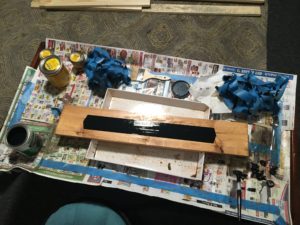
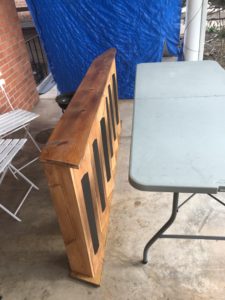
3) Chalkboard Paint
The chalkboard paint was applied to six boards. To apply it, I used painters tape to create a frame. I had had practice doing this at the prototype stage, but I decreased the width of the board for this stage, so the chalkboard strip was much thinner than expected. This process probably took an hour and created a lot more waste than expected.
4) Basket Assembly
The basket assembly was fairly easy. With all the drilled holes, all I needed to do was drive the trim head screws into the boards forming a rectangular shape. This process took less than an hour to do, and I was very satisfied with the outcome. Once the baskets were assembled, I drilled additional holes in the ends for assembly with the outer structural planks.
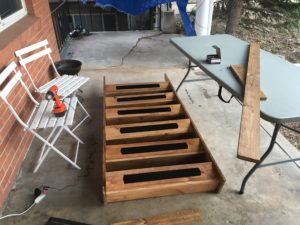
5) Full Assembly
This stage was definitely the most time consuming! Constructing the entire thing took at least 6 hours and at least 2 sets of hands. I started by screwing in the (looker’s) right hand side of the baskets in to the right structural plank. This process was fine, and it aligned fairly well with the drilled out holes in the large structural plank. Aligning the left hand side of the baskets with the left structural plank was really difficult! This was primarily due to the fact that I did not take into account that the planks were warped when I purchased them, hence some of the baskets don’t sit flat. All in all, I had to redrill all the holes in the left structural plank and realign everything. Luckily, it turned out when regardless.
Final Product:
I am very pleased with my final project!! I like the color, the chalkboard sections, the height, the angle, etc. I am very proud of all the work I put into this project.
4 Comments. Leave new
Really nice work on your project Sofi. I think that it turned out great and the stain really helped the final product of your garden. The blackboard paint on the front is awesome and so cool how you can customize the label with what it is in the garden. Really nice work using a hand saw to get everything to come together and line up well. It will be cool to see it with some plants in it! now that it is spring time it is a perfect time to put some plants in the garden. overall great job on the project!
Did you end up getting any help with these large boards, or was it all you? Either way, great work. I know the angles and cutting were difficult, but the final product is spot on. I will definitely be referring to your work if I build planters in the next year or two (when I know I’m going to live somewhere more than a single year). The chalk board paint is an especially nice touch, an aesthetic I used for the meals/shopping-list board in my kitchen! I wonder about rain messing it up though…
This was a really neat project! I loved that you challenged yourself and made something this big! I like growing plants and this would be a really cool project down the road. I am also glad you were able to sell it. I wonder if the height was too tall? The math you did to figure out the angle is really impressive and the assembly looks like it took a while.
I love that you used chalkboard paint and it added really well to the aesthetic.
Sofi, I saw your project at expo and I thought that it turned out great! The wood stain you chose really gives the wood that distressed look and it really brings out all the small notches and grains. I think it adds to the very natural garden aspect of your overall project. The chalkboard paint was also a very clever idea and a great way to keep all of your plants in order. Do you think you will actually try planting plants in it, or will you try to sell it? Great work!