
For my final project, I will be making a long distance mousetrap car. This is inspired by a high school physics project that I did 5 years ago. Since the mousetrap car that I made previously didn’t do too well in a long distance race, I wanted to take on this project again and see how well I can improve my record now that I have more engineering experience and resources.
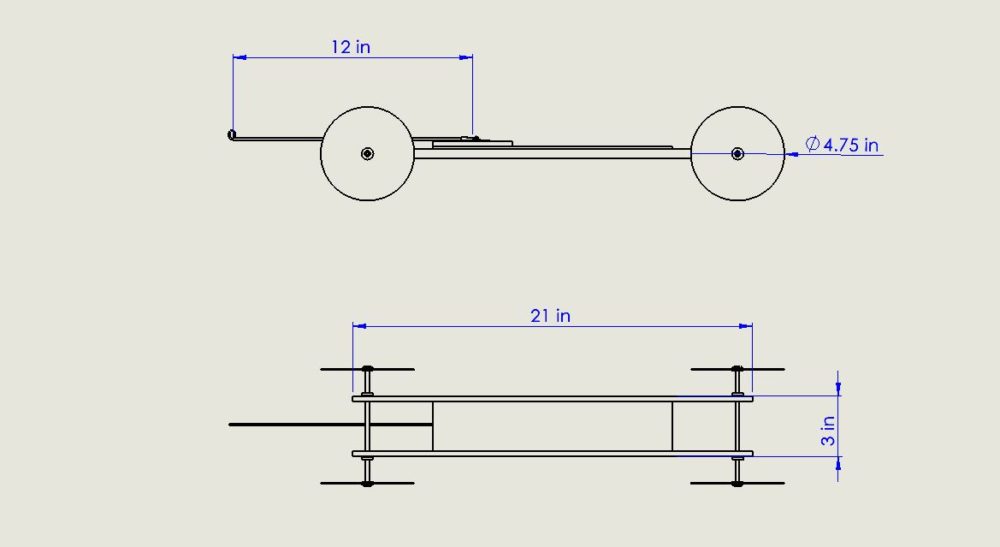
After some research, I decided that the best design for a long distance mousetrap car would look something like the one shown below. I made this model in Solidworks to use it as a reference for when I build the car.

In my previous posts, I specified some dimensions for different parts of the car in order to make it a long distance car. One of the most important dimension being the lever arm length, and 12 inches is what I found to be the optimal length for it. the drawing below shows some of the critical dimensions for the vehicle.
I have obtained all of the materials I would need to build the mousetrap car:
- Balsa wood
- Brass Axles and lever arm
- CDs
- Mousetrap
- Kevlar string
- Spacers and washers
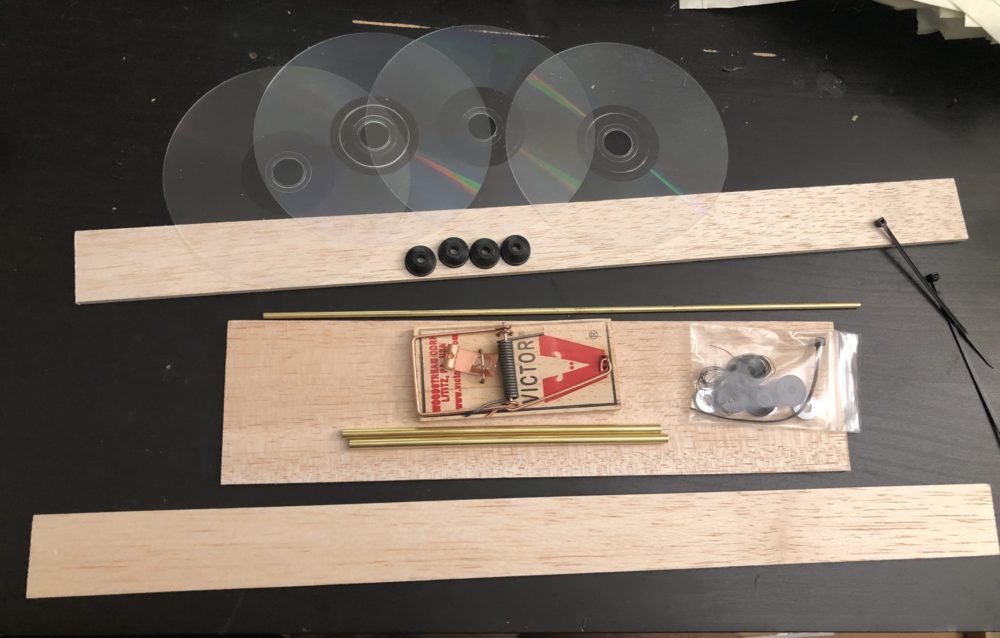
The total cost was only about 16 dollars so I’m pretty happy with that. In addition, I could get some powered graphite lubricant to apply it to the wheel axle to reduce friction between the wheels and the axle, and this would theoretically increase my distance even more.
The next step would be to start the building process for the mousetrap car. I will also conduct a test run right after I finish building it to see how far the car can go. Ideally, I’d like to have the car run on a straight and smooth surface for the test run so that I can test the actual performance of the car as accurately as possible. Below is a detailed timeline for my project.
- 04/02 – 04/06 Measure and drill holes for axles
- 04/07 – 04/11 Assemble the car’s body, assemble wheels onto car’s body
- 04/12 – 04/16 Attach lever arm to mousetrap, attach string to lever arm
- 04/17 – 04/21 Attach mousetrap to car’s body, wrap string around drive axle
- 04/22 – 04/23 Test run
3 Comments. Leave new
Thuc,
This looks similar to something I did in high school too. I remember struggling to get the wheels to not fall off. My one question to you is what kind of aesthetic are you going after? I think adding some color to the wood is a bold decision since the wood itself already looks fantastic. Either way, I think this will end up looking really good.
Hi Thuc,
I think this is an awesome project and am excited to see how it will turn out! Is there a type of aesthetic that you are going to design into the car or just leave it as the bare materials?
Hey Thuc,
I gotta say when I read the title I first thought this was a seriously messed up way to take care of a rodent infestation. I am thankful I kept reading. It looks like you’re making some good progress and the project likes really interesting. I’ve never seen anything like this before so I’m not really sure how they work. I would also highly recommend some graphite lubricant like you pointed out. I’ve used it before on similar projects involving axels and it really helps a lot. Great job and I’m excited to see how well it comes out.