
As a little kid I constantly found myself wanting to take apart objects or find a way to lock mechanisms that could be used for storage. For example, I had a special piggy bank for my allowance that had a key locking mechanism which must be inserted a certain way to unlock the piggy bank. These simplistic objects and toys were my childhood and have always served a purpose in my life. Lately, I have been wanting to build my own locking mechanism and utilize the resources I have available at school before I graduate. Therefore, this project provided the perfect opportunity for me to incorporate an aesthetic while designing something that can be 3D printed.
Over the course of the semester, I remembered how difficult it is to think of an idea that meets the project requirements but also one that interests me moving forward. Creativity is not one of my strong suits and therefore, I struggle to find meaningful projects to create. However, with a cryptex lock there are a magnitude of ways to fabricate and design the overall locking mechanism. Some common design opportunities include how the key will be designed, how many teeth the key will have, what will the lock combination be for the lock, and will the locking mechanism include numbers or letters.
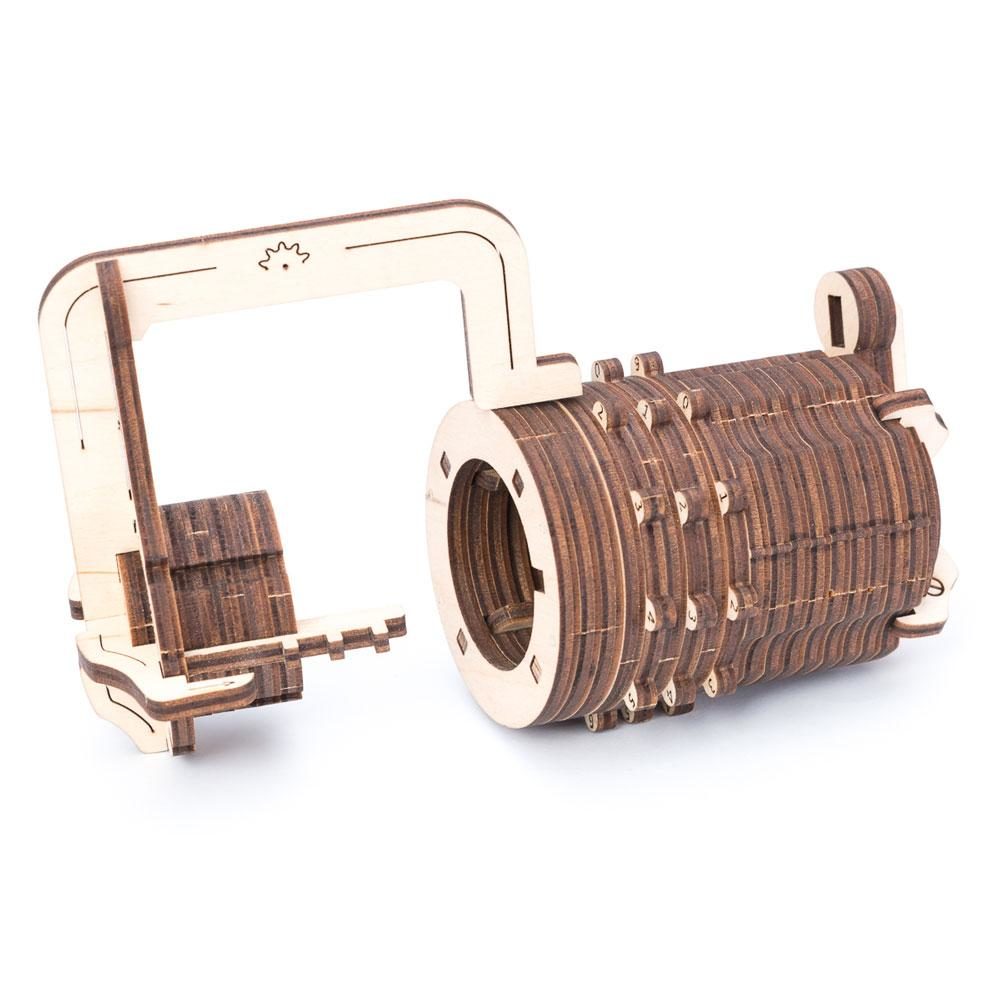
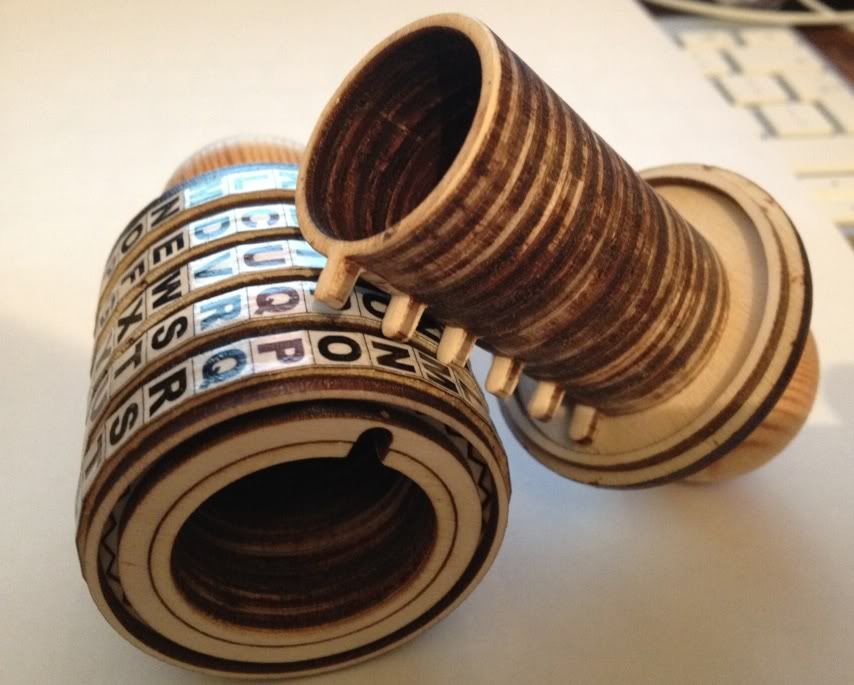
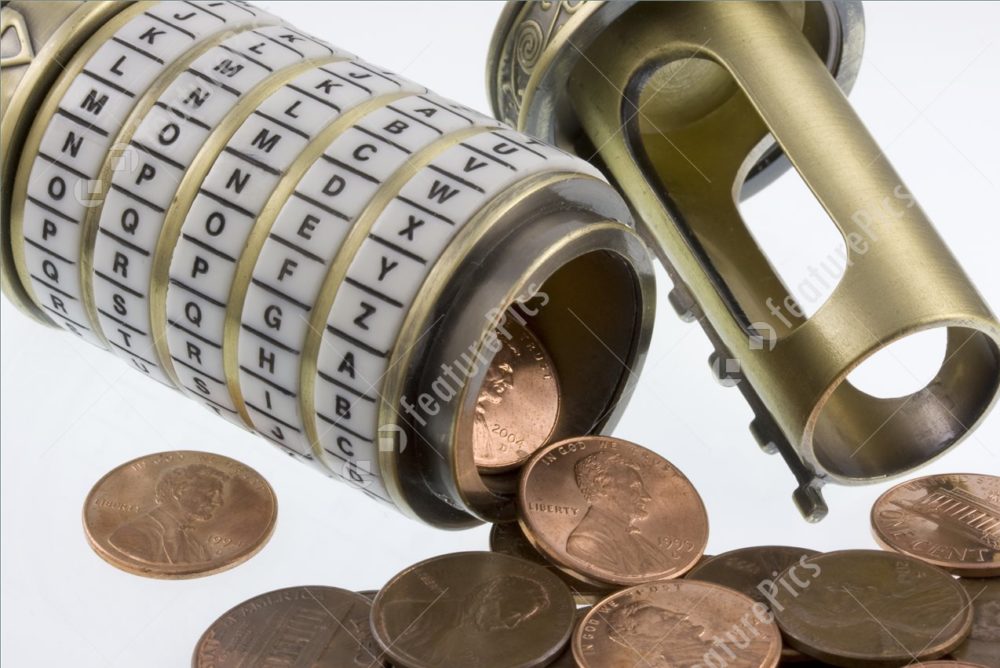
Upon completion of my research looking online for inspiration it seemed pretty apparent that all these locks follow a standard design pattern. They usually have a standard shape with a desired number of dials and a long horizontal key that protrudes into the dials. This key is how the cryptex lock knows when the correct code has been entered and allows for the storage inside the lock to become exposed.

In order to properly fabricate and and construct this final cryptex lock, I utilized SolidWorks to design each individual component. SolidWorks is a great tool as I am able to dimension my parts and construct the lock to a desirable size. However, working in any CAD software takes time and constructing a cryptex lock requires multiple parts.
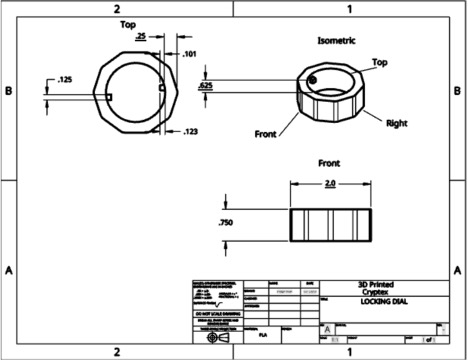
Overview
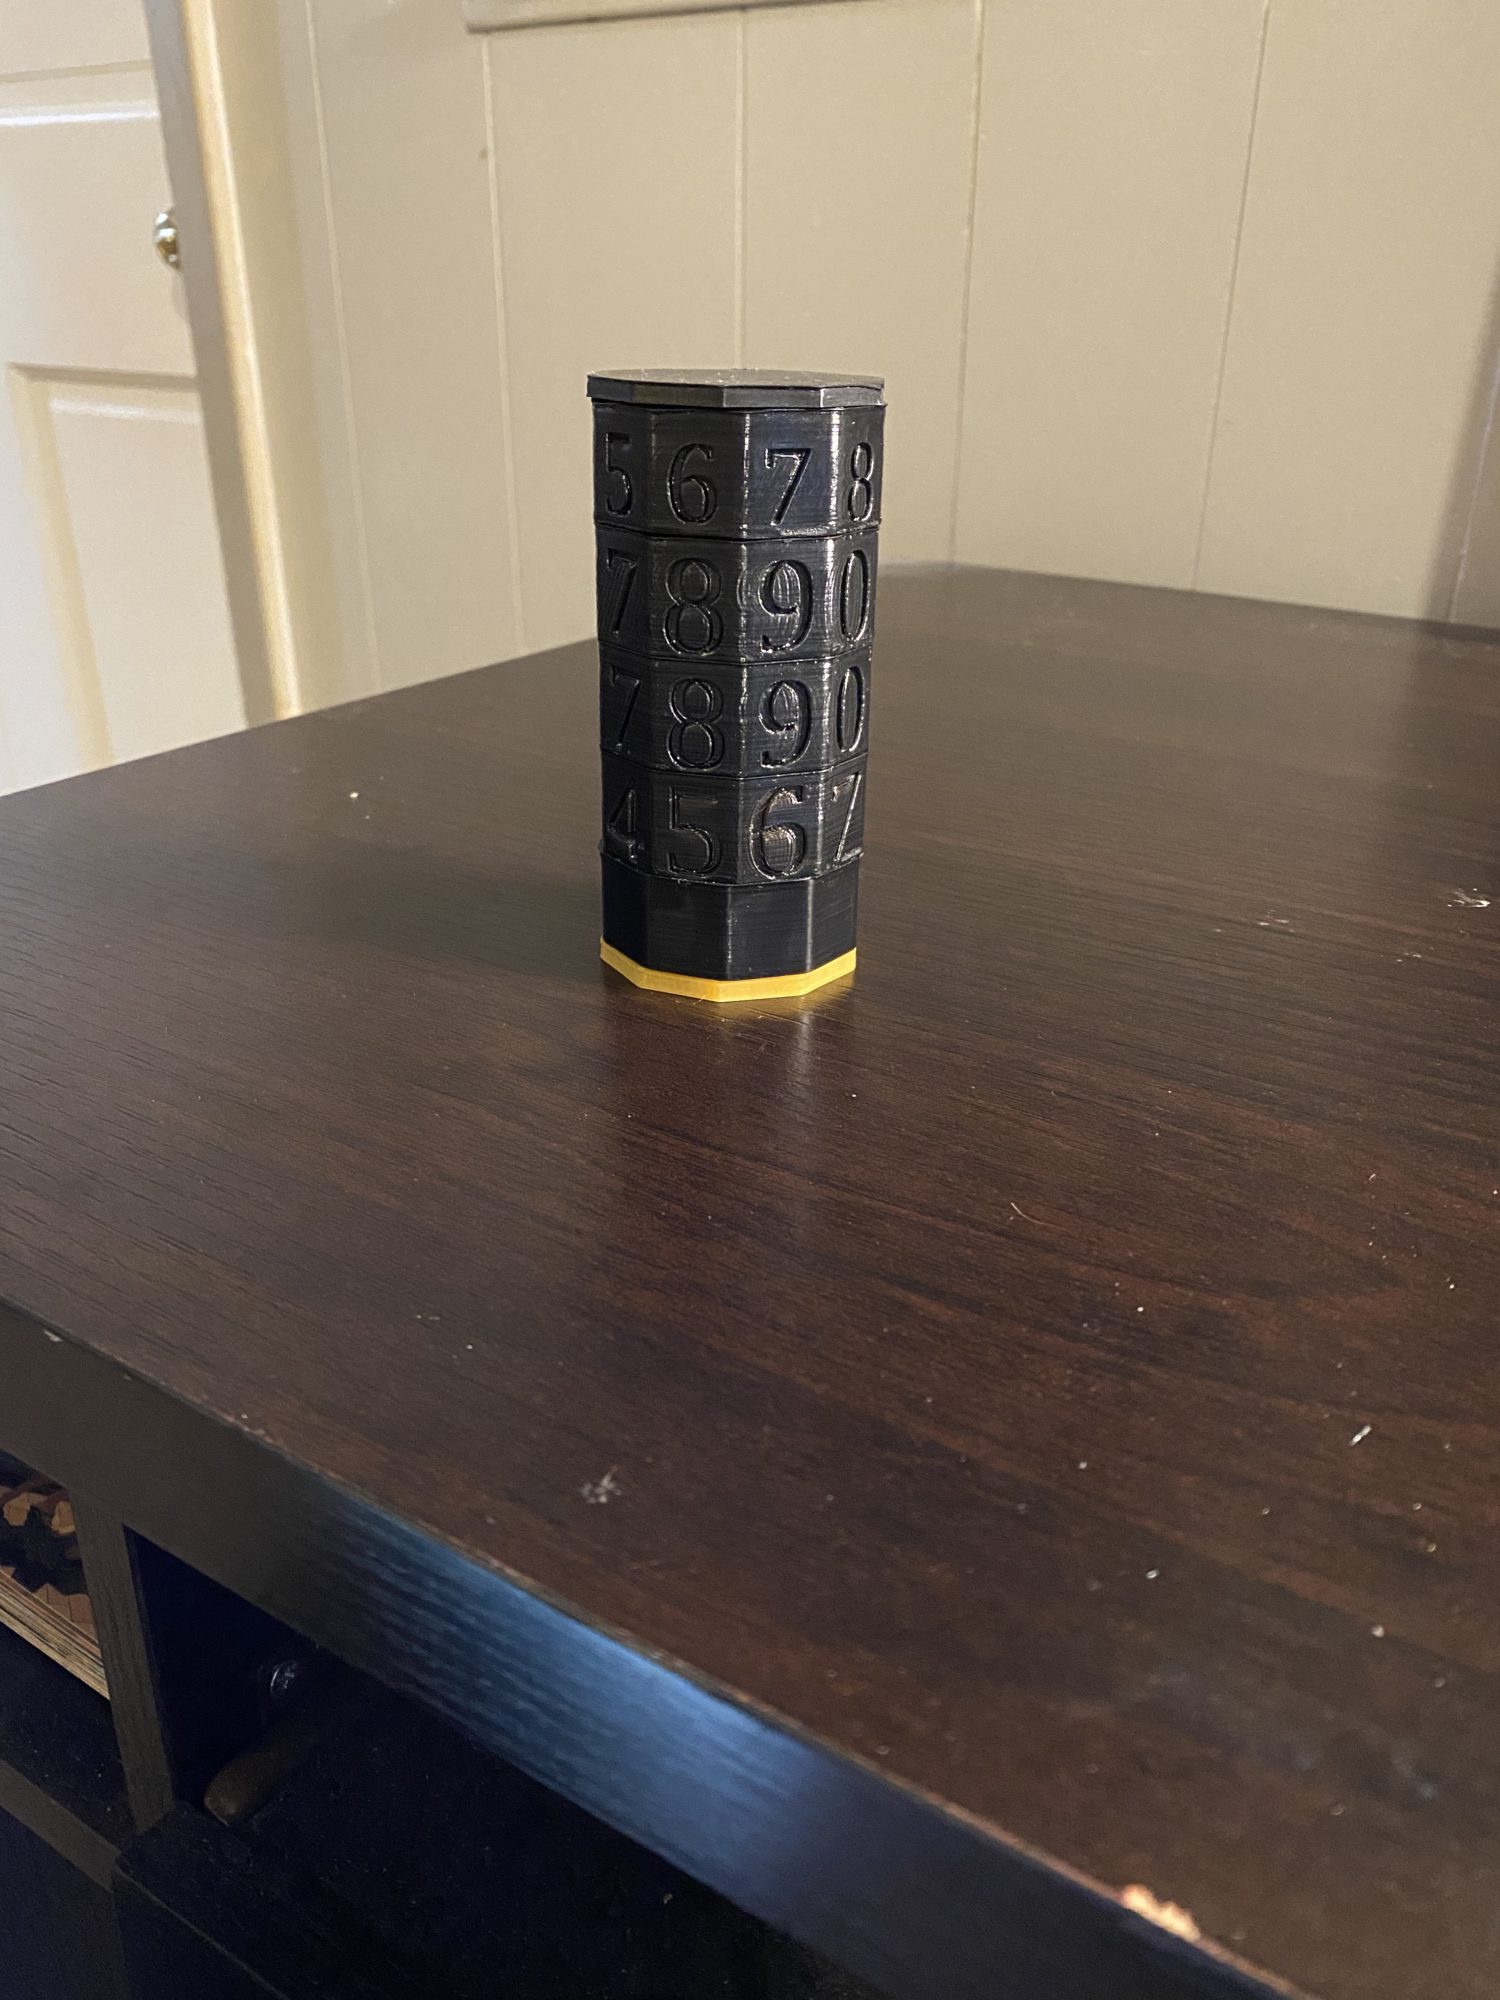
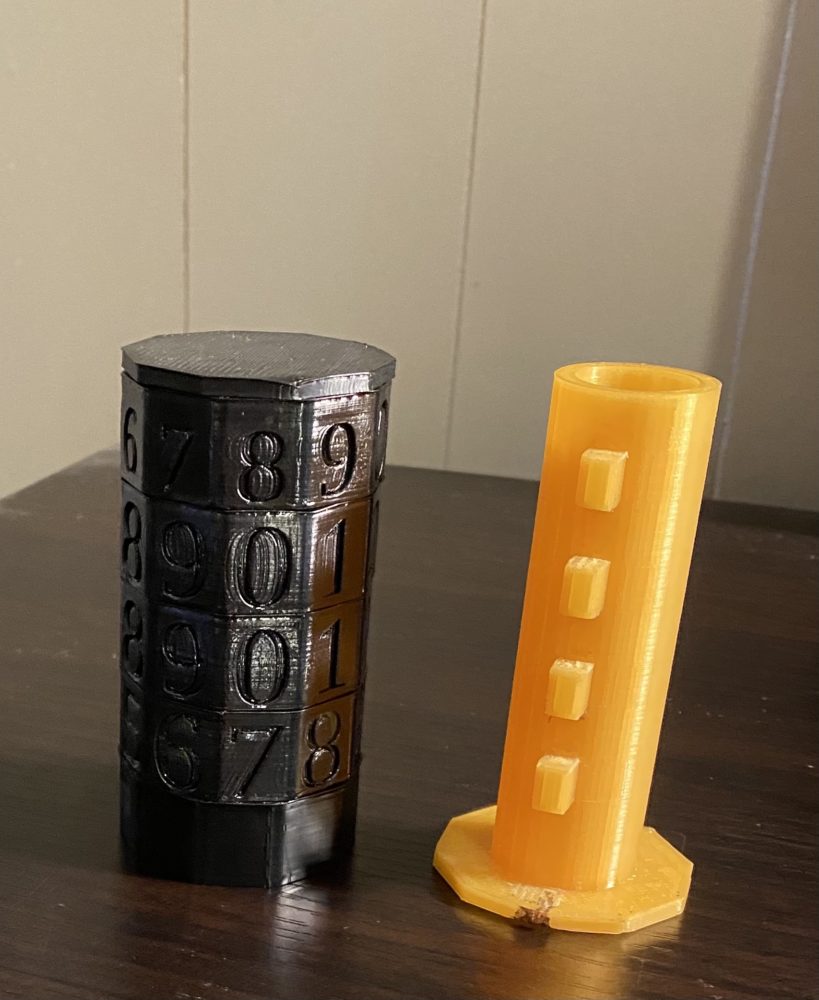
The 3D printed Cryptex will be cylindrical in shape, 4” in length and 2” in diameter. It will consist of 7 major parts to include one inner cylinder, one outer cylinder, four rotating decagonal dials, and one locking ring.
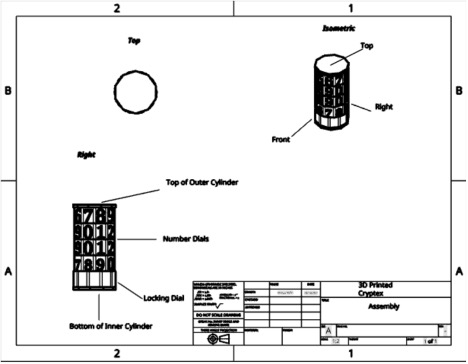
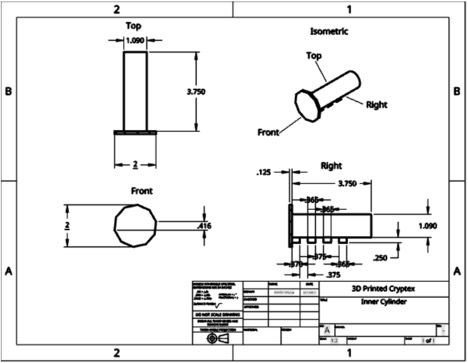
Inner cylinder
The inner cylinder will be the smaller of the two cylinders. Along the major axis will be a tooth shaped spine, which will prevent the cylinders from being separated from one another unless the proper combination is input into the Cryptex. The base of the inner cylinder will be flared out, and will align with the outer edge of the locking ring when the cylinders are fully seated. The center of the inner cylinder will contain a piece of paper with the previously specified dimensions.
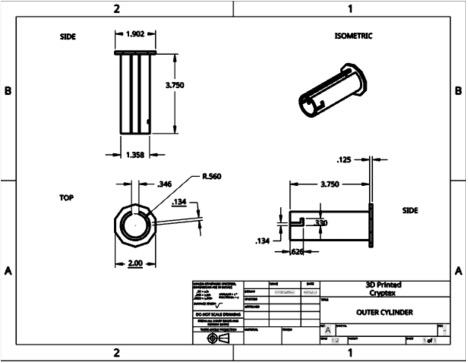
Outer Cylinder
The outer cylinder will be larger than the inner cylinder, allowing the inner cylinder to be inserted. A groove will run along the major axis, into which the spine of the inner cylinder will be inserted. The bottom of the cylinder will have four locking points. The locking ring will be placed onto the locking points, and subsequently rotated locking it in place. This will prevent the rotating number dials from falling off the outer cylinder. Along the superior edge will be an indicator, in order to ensure the end user knows what plane the dials must be aligned upon in order to open the cryptex. When the rotating dials are placed around the outer cylinder, the locking ring is installed, and the inner cylinder is inserted, the edges of the Cryptex will be flush.
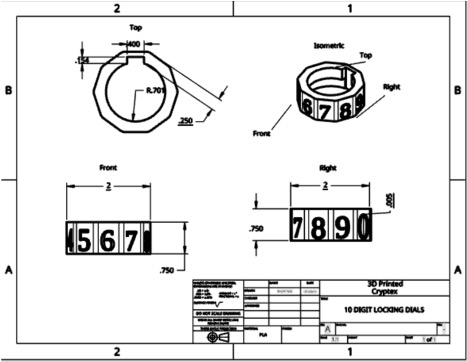
10 Digit Dials
The four rotating dials will be a decagonal in shape along the outside circumference. At a fixed interval, in this case .628 in there will be a printed number indentation, increasing by 1, from 0 to 9. Along the interior circumference, there will be a circular shape, with a rectangular piece missing, but not breaking the continuity of the dial. This rectangle will allow the inner cylinder be withdrawn once the correct code is input. Half of the inner circle will be removed, allowing the 10 digit dials to rotate freely along the exterior of the outer cylinder when the inner cylinder is fully seated. The code to open the cryptex will be 1330.
Locking Dial
The locking ring will be circular in shape. Along the interior circumference will run 2 protrusions, allowing the ring to be placed on the outer cylinder and rotated to be locked into place. Once installed, the locking ring will prevent the 10 digit dials from falling off of the outer cylinder. When the Cryptex is fully assembled, the locking ring and the flare of the inner cylinder will be flush.
Design Modifications
During the design of this Cryptex, several improvements have been made. The first was the thickening of all structural walls to .125 in. This prevents major warping during printing and allows for structural integrity. The protrusions of the locking ring had to be modified in order to ensure proper function. The protrusions had to be both thick enough, and be offset from the face by .125 in to allow for proper locking onto the cylinder. The biggest change was the removal of half of the inner cylinder of the 10 digit locking dials. Without this modification, the cryptex would have been unable to rotate freely. Lastly, in the final stages of the planning process I realized that during the next iteration a piece identical to the one on the 10 Digit dials would need to be removed for the inner cylinder to be inserted. In addition, the teeth would need to be adjusted to the other end of the inner cylinder.
For my aesthetic, I initially debated between a sports themed Pittsburgh Penguins aesthetic or a gothic aesthetic for my final design. My personal aesthetic is casual sports wear and a cryptex lock doesn’t fit the typical casual sports wear look. However, after my design preview and much deliberation, I decided to pursue the gothic aesthetic and fabricate my final design in all black PLA. This gave my lock a more 20th century look and embodied the gothic era very closely in my eyes. I also threw in a fun touch for the aesthetic after talking with my Pod and left the inner cylinder where the paper can be stored yellow to give it a unique feel. Thus, when you look at the actual lock all you see is black but inside the lock there is a yellow inner cylinder which can only be exposed when the correct combination is entered. This twist gave the audience a new feel for how design and aesthetics can differ but still provide the same feel for the artifact as a whole.
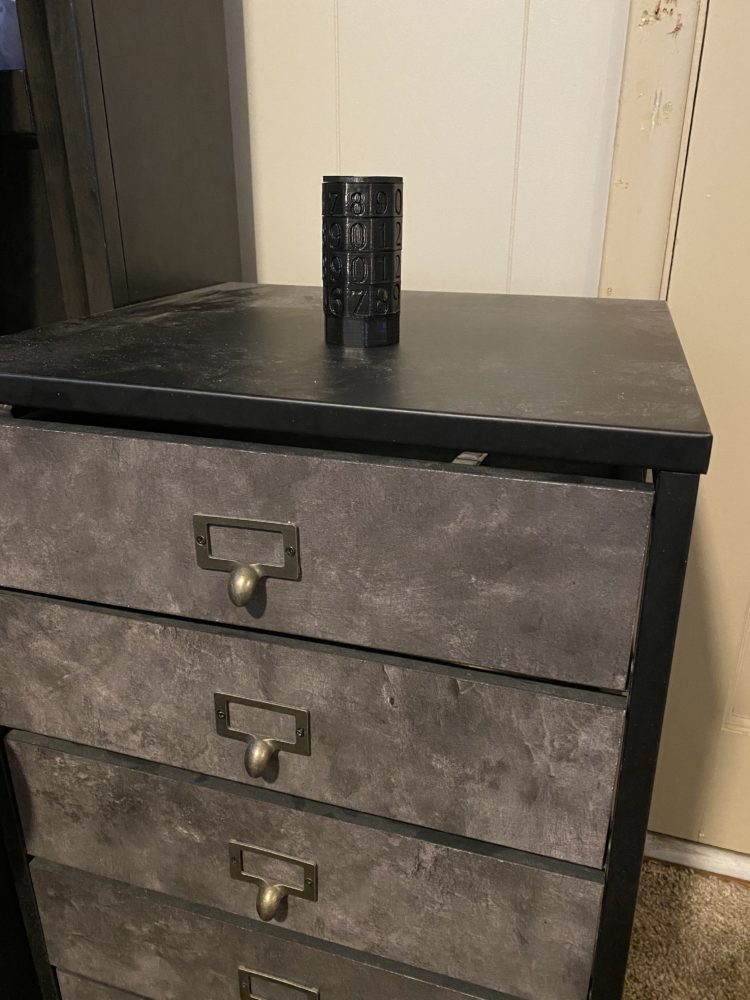
Overall, I think my cryptex lock turned our better than anticipated in both the functionality aspect as well as the aesthetic. At the beginning of the design process, I had an idea for what I wanted to build, but nothing to support the vision. I wasn’t sure how I was going to design the lock or what aesthetic I wanted to pursue. Therefore, seeing my final artifact with a gothic 20th century aesthetic gives me a big sense of accomplishment and a goal I didn’t know I could achieve. Although I am pleased with how my artifact turned out I do wish I was able to shrink the size of my locking number dials to condense the overall height of my lock. I feel as if my lock is a bit taller than I had anticipated. Now, that I have my artifact complete, I plan on using my cryptex lock to store something small and private to myself within the lock. After all, I did build a lock! Looking back at this design and how it turned out I also am very happy with the choice I made going with a gothic aesthetic for my final artifact. I currently have my lock sitting on my bed side table which has a rustic feel to it and I think my cryptex lock fits nicely positioned on the table. Both the rustic look of the table and the gothic aesthetic of my lock have a 20th century feel and complement each other nicely. This was fun project and an awesome class!
Link to Video:
Below is a link to the video of the zoom presentation I gave on my Final Project:
[1] “Finance and Currency: Money Concept – Coins (Pennies) Spilling out from Open Combination Puzzle Box with Rings of Letters (Cryptex), See a Set Password.” FeaturePics, www.featurepics.com/online/Coins-Spilling-Open-Conbination-Puzzle-Box-Cryptex-720696.aspx. [2] “BuildMe! 3D Wooden Cryptex Combination Lock Pick Puzzle / Working Lock Kit.” LockPickWorld.com, www.lockpickworld.com/products/build-it-yourself-combination-lock-model-wooden-3d-puzzle-kit-no-glue-required. [3] “Buildlog.net • View Topic – Cryptex Puzzle: Wooden Puzzle Box, Unique Items Products, Wooden Box Diy.” Pinterest, www.pinterest.es/pin/339740365625333126/. [4] “335.73US $: Fashion New Style Educational Toys Cryptex Locks Gift Ideas Da Vinci Code Lock to Marry Lover Escape Chamber Props Black: Locks: – AliExpress.” Aliexpress.com, www.aliexpress.com/item/4000390838745.html.
4 Comments. Leave new
Hey Brandon, you have done some amazing work with this lock and your engineering is very impressive. Obviously, you were effective because you were able to make a fully functional lock, I did have a couple questions though. Firstly, did the tolerances come out ok the first time or did you have to go through multiple iterations to make it work smoothly? Second, have you considered adding paint to the numbers and then sanding the dials to highlight the digits, maybe in a darker color as to not affect your aesthetic. Overall great job this is amazing work!
Hi Zack! This project did take multiple iterations as it was very difficult to figure out my tolerances and ensure they worked properly. Therefore, in total I had 4 iterations of prints before the tolerances were fully functioning for all the major components. As for the second question, I have considered adding paint of some sort however, I am worried paint adds thickness to my lock. Thus, I might to readjust my tolerances to account for the paint that would be added.
Hi Branden, great job achieving a fully functional cryptex. I am impressed that you got everything to fit together like you wanted, given that most materials were 3-D printed and you had to modify some of them. What was the main thing you learned from this project? What was the cost of the product and what can you do to make it less expensive? Do you think this would be a commercially viable product?
Hi Gary! The main takeaway from this project is that CAD doesn’t always match what you think your final product will be. For example in CAD my tolerances were perfect from the beginning but when I printed my components it actually took a few iterations to get the tolerances correct. As for the cost I spent about $20 which accounts for 1 kg of PLA. I have my own 3D printer so this project was very low budget for me to complete! Lastly, I don’t think this product is commercially viable as there are similar products made of metals and other materials that people would gravitate towards before a PLA printed lock.