
Inspiration
For my final project, I will design and build an alarm clock based on the aesthetic of late 70’s futuristic and science fiction design. This style is often called “Cassette Futurism”. The modern product design of the 70’s was very sleek and minimalistic, as pictured in the cover photo [1], while the science fiction of the time portrayed technology as over-engineered and rugged whilst still being dated and very analog. The set designs of the films Star Wars and Alien are representative of this.
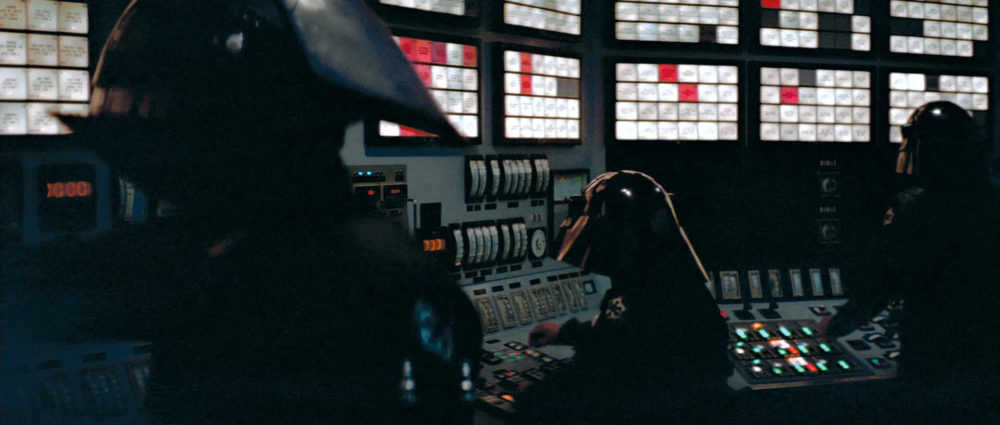
“Death Star Control Panel”, Star Wars (1977) [1]
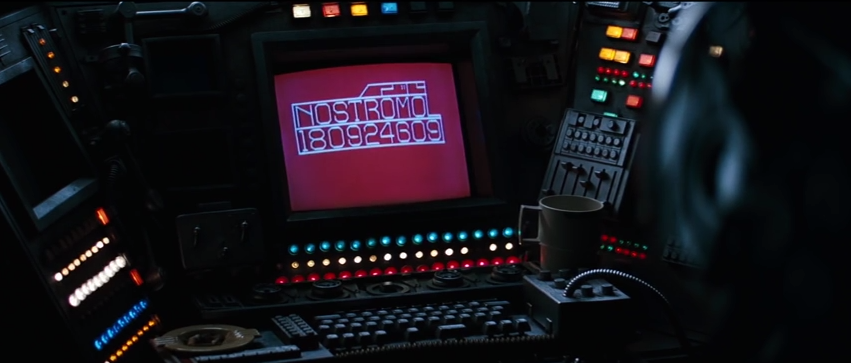
“Nostromo Flight Computer”, Alien (1979) [2]
I wanted to make a unique, stylish, and functional product for my project. If the alarm clock is functional, it could alleviate some gripes I have with current alarm clocks. I could remove the ambient, harsh lighting found on modern alarm clocks. I could also make it programmable and change the sound of the alarm to anything I want. Finally it would remove the need to have my phone by my bedside which interrupts my sleep. These factors alone would make an alarm clock worth building from scratch.
Conceptualizing Design with Machine Learning Image Generation
To provide context to the design I am envisioning, and as another way of “sketching” designs, I decided to utilize the Midjourney ML image generation service. With this service, you provide a prompt of what you would like the program to “imagine” and it will produce 4 variations of how it interprets your prompt.
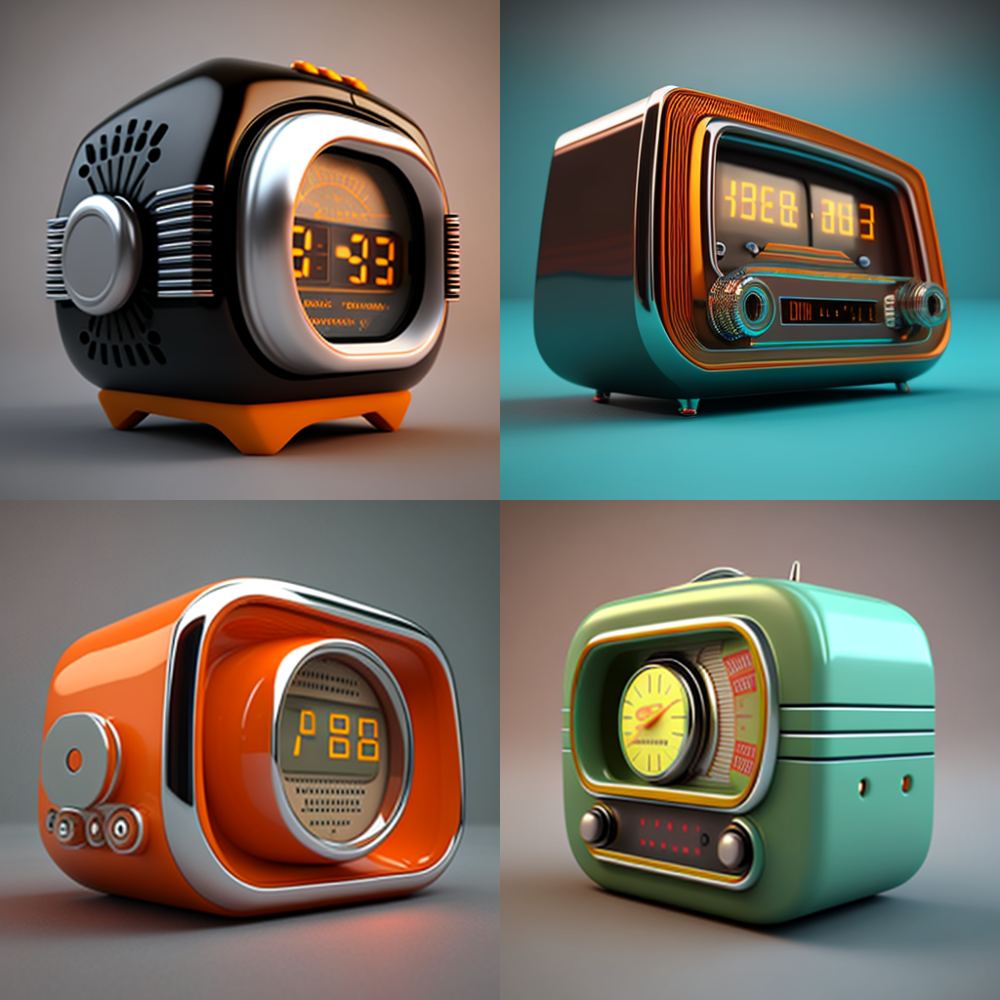
Prompt: “Retro Futuristic Alarm Clock”, Midjourney V4 [3]

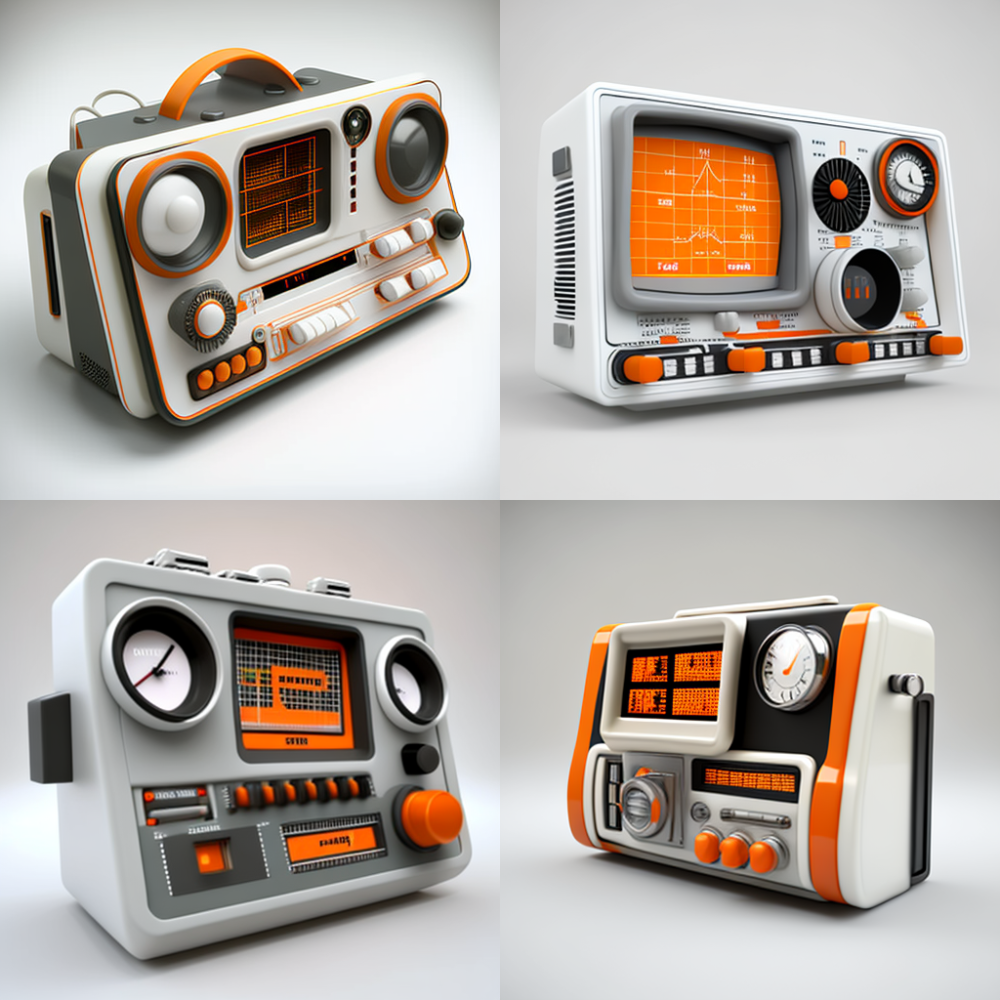
Prompt (truncated): “Spaceship Console from the 70s”, Midjourney V4 [3]
Prompt (truncated): “Alarm Clock 70s Sci Fi”, Midjourney V4 [3]
This series of images shows my progression with formulating a design. I wanted to see what would be generated just from the title of my project. Although the generated designs were elegant, they were not exactly what I had in mind. I moved on to envisioning the control panels from science fiction that originally promoted my idea for this project. It did an excellent job at conceptualizing what I had in my mind. I wanted to apply this aesthetic to an alarm clock. It came up with a very stylistic alarm clock that I think looks good, but not really the aesthetic I had in mind. It looks more like scientific equipment than a consumer electronic. product. I kept this in mind during later portions of the design process.
Specifications
The alarm clock shall conform to the futuristic aesthetic of the 70s. This aesthetic should invoke themes of analog design (switches, buttons), scientific equipment (oscilloscopes), dated technology (CRT screens), and a deliberate avoidance of sleek, minimalistic design with instead a favor for an over-engineered and busy design.
The alarm clock shall function like any commercial alarm clock. This involves keeping and displaying time, being able to set alarms, and playing a sound at the set alarm time. These functions should adhere to the clock’s aesthetic and should not detract from it.
The alarm clock shall avoid any extraneous light as not pollute the room it is in with bright “status lights” during the night. It shall also not make any sound or be distracting in any way outside of sounding its alarm. My desire to build my own alarm clock stems form the annoyance of having my phone near me at night as well as how annoying commercial alarm clocks are in terms of extraneous light and sound.
The alarm clock shall be a décor piece as much as it is a functional piece. If possible, it should not look cheap or poorly made. This would includes things such as seams that don’t fit well, gaps, rough finishes, and lack of consistency or symmetry. I would like my project to be less of a hobby project that I never use and instead have it be a piece I am proud to keep and will continued o use. This will only happen if I am satisfied with the quality of the finished piece.
The alarm clock shall be sized reasonably so that it is small enough to potentially fit on a shelf while being large/heavy enough to give the clock a feeling quality. If the clock is too light it will be bumped around and potentially broken too easily. As much as the clock looks the aesthetic it should “feel” the aesthetic and the immersion should not be broken by the device being surprisingly light.
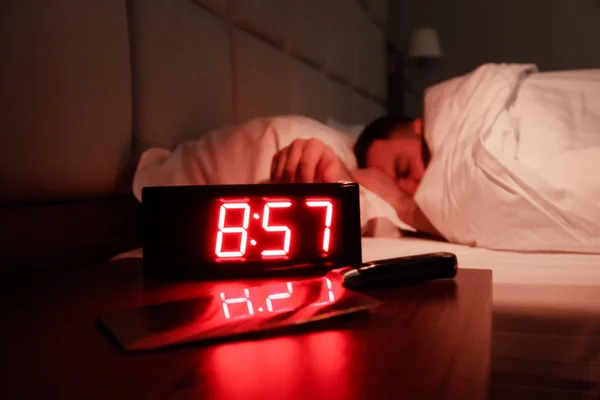
Example of ambient light I am trying to avoid [4]
Constraints
Trim and metal finishes. I will not be able to include the 50-60s aesthetic of metal trims on my artifact. This would require manufacturing processes I do not have the time/money/equipment to perform and would add unnecessary complexity to my project. I believe I can still meet the desired aesthetic with little to no metal and save on time and complexity.
Not using a kit. I do not want to us an alarm clock electronics kit for this project. The entire reason I am doing the project is for future customizability. I will do all the electronics design from scratch and incorporate my own computer and microcontroller. This will increase the risk of the device not working by the end of the required timeline but it should not affect the physical aesthetic and will allow me to continue work on the device later on.
Reducing sound and light. I do not want the screen to always be on or any kind of light shining through while I am sleeping. I want as switch that I can turn the screen on and off when I want to check the time at night. I do not want any electronics or fan hum so if that occurs I will need to incorporate sound damping in the device. In a story telling sense, I want the deice to remain dormant until it “wakes up” on its own in the morning.
Quality of 3D prints. 3D printing, especially on my at home printer, does not produce very refined products. It can be sanded down and post processed, but I still consider this a restriction. I would like to 3D print as much of this project as I can. This will require testing the prints and the post processing methods to achieve the finish and quality I desire. This restricts the speed at which this project can be produced and means I would like the design done in advance so I can being to prototype and refine the finishing of it.
Clash with existing décor. As much as I want this design to be stylized and stand out, there is a limit I would like to set. If the piece stands out in a cartoonish or out-of-context way, it would detract from both itself and everything else around it. I would like the device to feel grounded, like it is meant to be where it is. This will require identifying what colors I want and the brightness that is acceptable for them. It will also require visually seeing the piece in the lighting and backdrop it is expected to be in. This will be achieved in two ways: rending the CAD design of the device and 3D printing “swatches” to see how the colors look in context with their background. This can also be fixed by intentionally giving the device wear and darkening the outside with paint or other methods to make it look used.
Design Plan
Having defined the aesthetic, specifications, and constraints, the project is ready to progress. I started with a timeline of when I wanted to achieve certain goals. Although the design is not finalized yet, the goals are generalized enough to apply to any alarm clock project.
The steps for completion of this project will be as follows:
- (4/9) Have supplies and components bought and/or ordered
- (4/12) Have CAD done so project is stylistically complete
- (4/15) 3D print first iteration of design
- (4/19) Have electronics fully integrated and working
- (4/22) Finish first iteration of design
- Time left for design to be wrong and for iterations to occur
I have marked this timeline on my calendar and working towards sourcing all the electronic components currently.
Component Selection
I have begun selection of the components that will be used in the project. The electronics components will be bought first and the 3D printed components will be designed around them.
Computation: Raspberry Pi Zero
Interface Controller: Teensy 4.0
Screen: TBD
Analog Control: Toggle Switches, Number Pad, Dials
Speaker: TBD
Exterior Material: Black, White, and Gray PLA
The components that are giving me the most trouble are the screen and speaker, but most notably the screen. I would like a screen that is large, high resolution, and interfaceable with the Raspberry Pi, without being too expensive. My goal is to have this component finalized by the end of the week so all the electronics can be purchased and I can start producing the final CAD design for manufacturing.
Manufacturing Plan
All manufacturing will be 3D printing which I can perform on my home 3D printer. This will allow me more time and flexibility to make multiple design iterations and not rush the 3D printing process. The material used will be PLA and with a high resolution print I can achieve the exterior finish I am going for. This will also allow me to quickly make changes to the CAD and reprint parts if needed, quickening the iterative process.
Design Sketches
To begin the design process, I started with paper sketches of ideas for what the project could look like. These ideas all conformed to the aesthetic and vision I had for the project. I ended up going with the third sketch idea because I felt it was the most unique, achievable to make and flexible for positioning in a room.
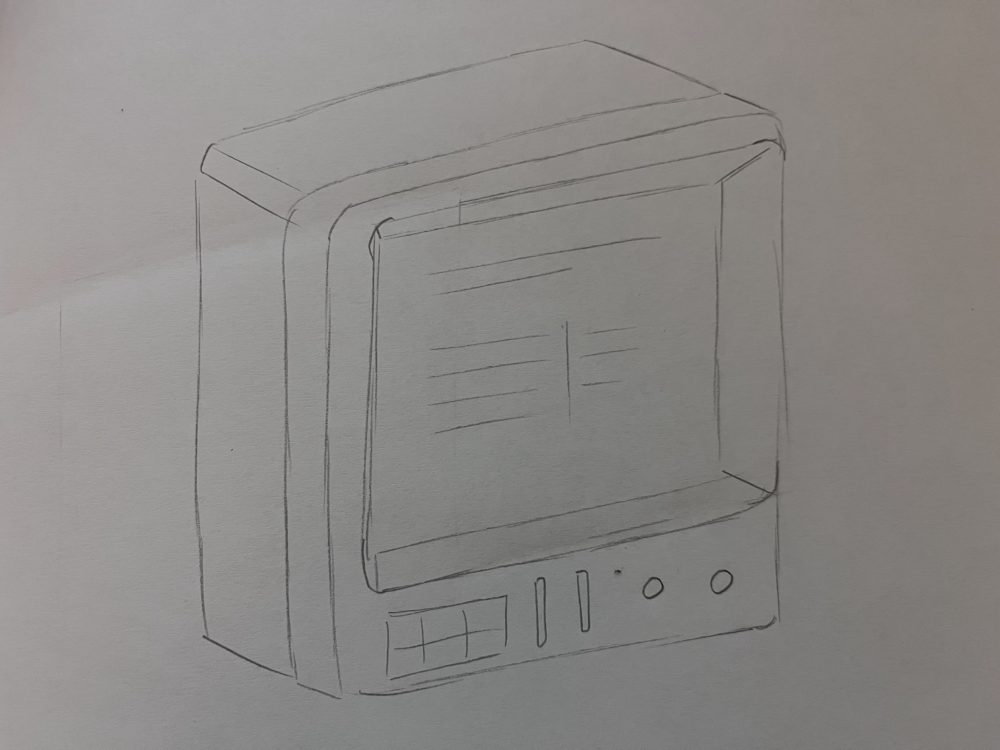
Sketch 1
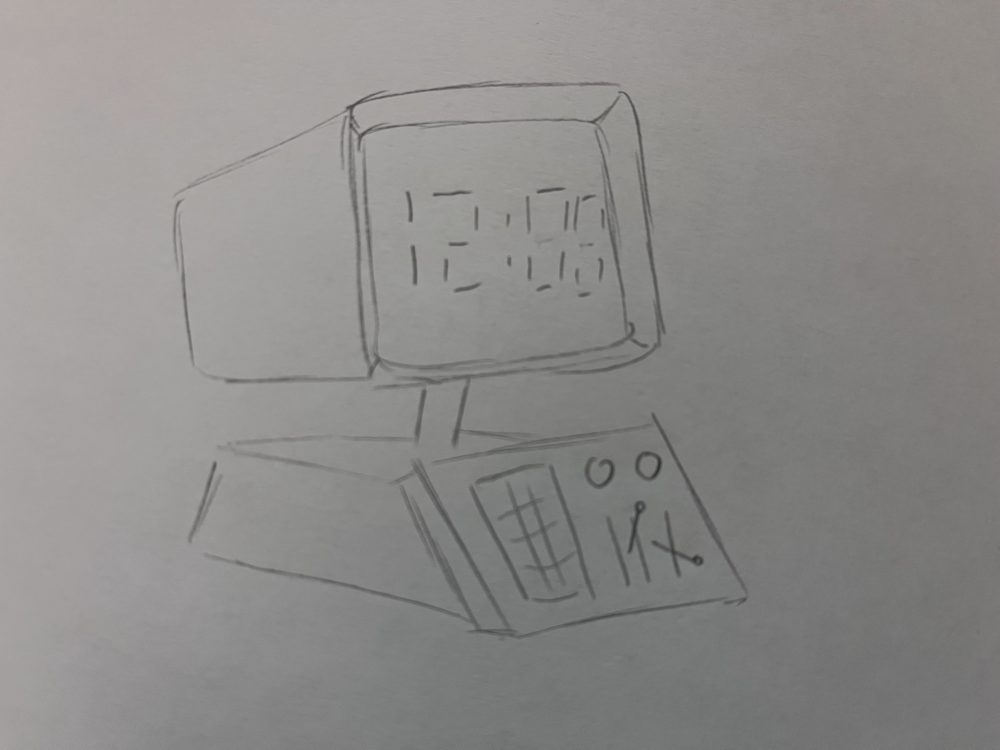
Sketch 2
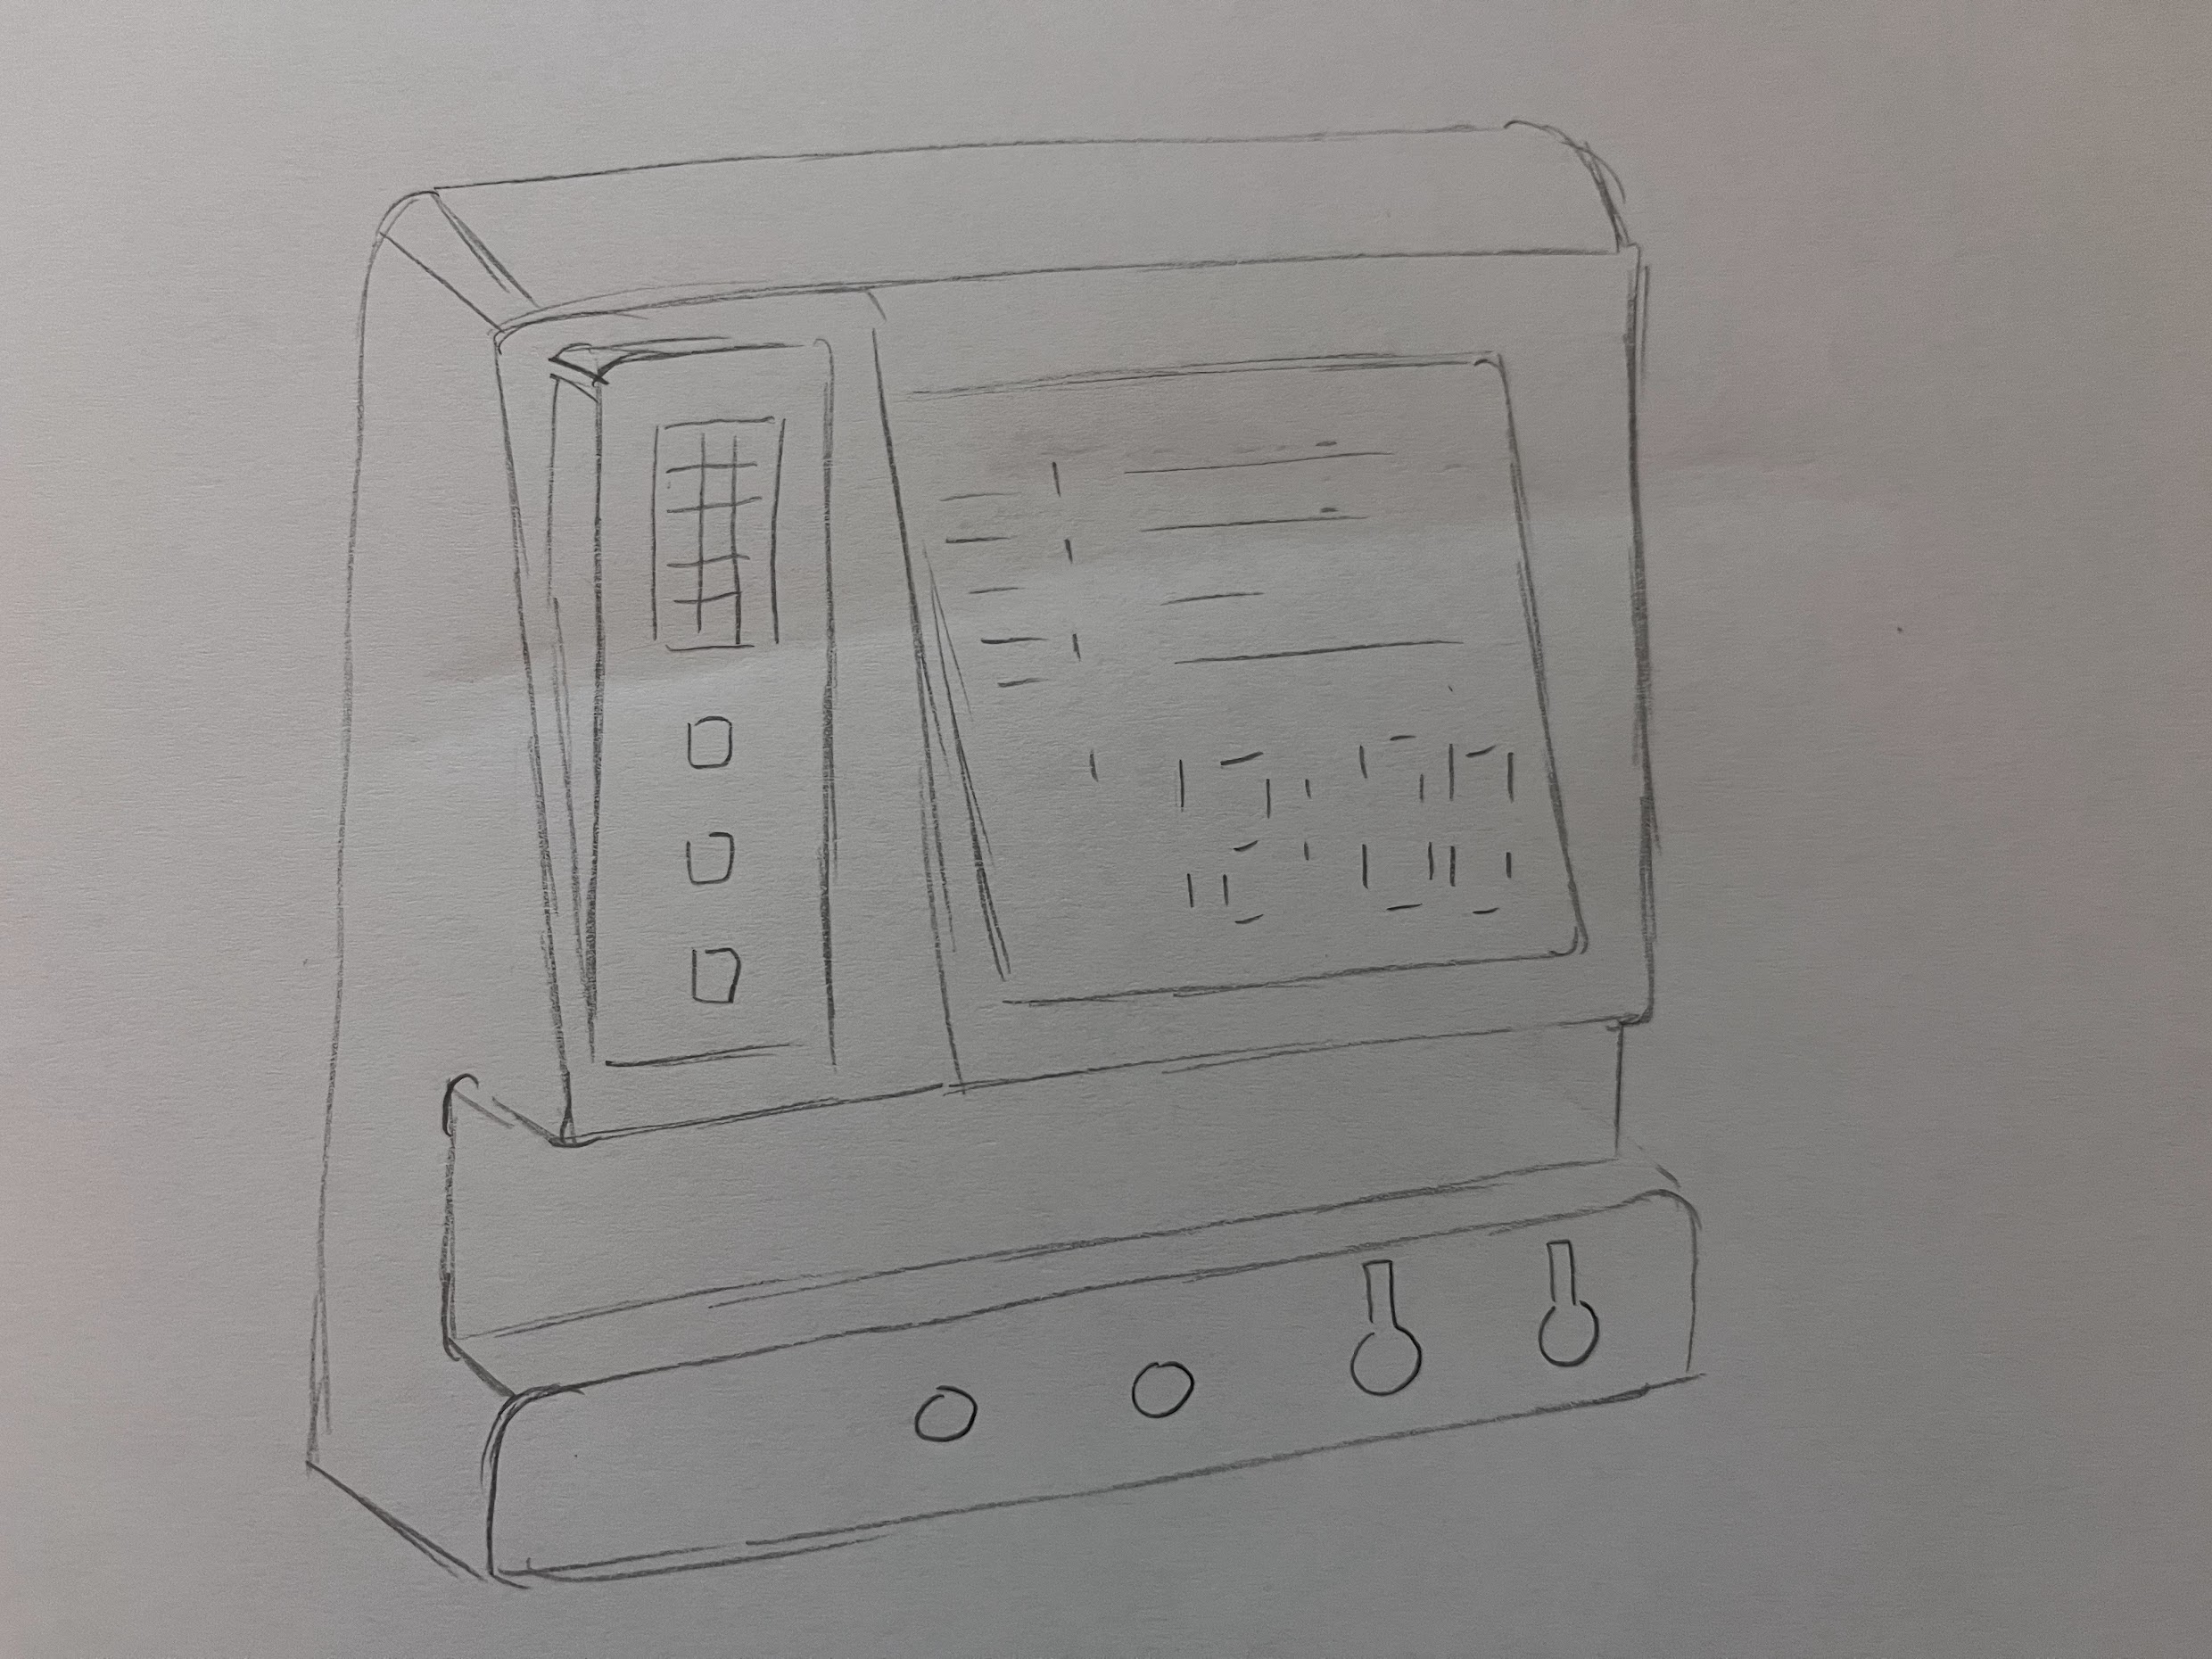
Sketch 3
In the third sketch, I have included a screen, key pad, dials, and switches. The screen will be interfaced with through the keypad and dials, in true analog fashion. The switches will turn power on/off and the screen on/off. The last is very important to me since I would like zero light when I am not looking at the device’s screen. This switch will not directly interface with the power to the screen, since in the morning when the alarm wakes up I would like the screen to light up regardless of the state of the switch. I envision the alarm clock sequence being both and audio and visual event, with the clock alarm shut off by the push of a button. Once I have the electronics layed out, I wwill begin human usew testing to see wwhere the layout of the buttons and other interfaces should be for the best usability and effectiveness.
Conceptual Renders
I created some conceptual renders using SOLIDWORKS Photoview 360 to determine the color pallet and proportions of my design. This design,. with these colors, ended up looking like something out of the movie Alien, so I believe I have achieved the vision I set out for.
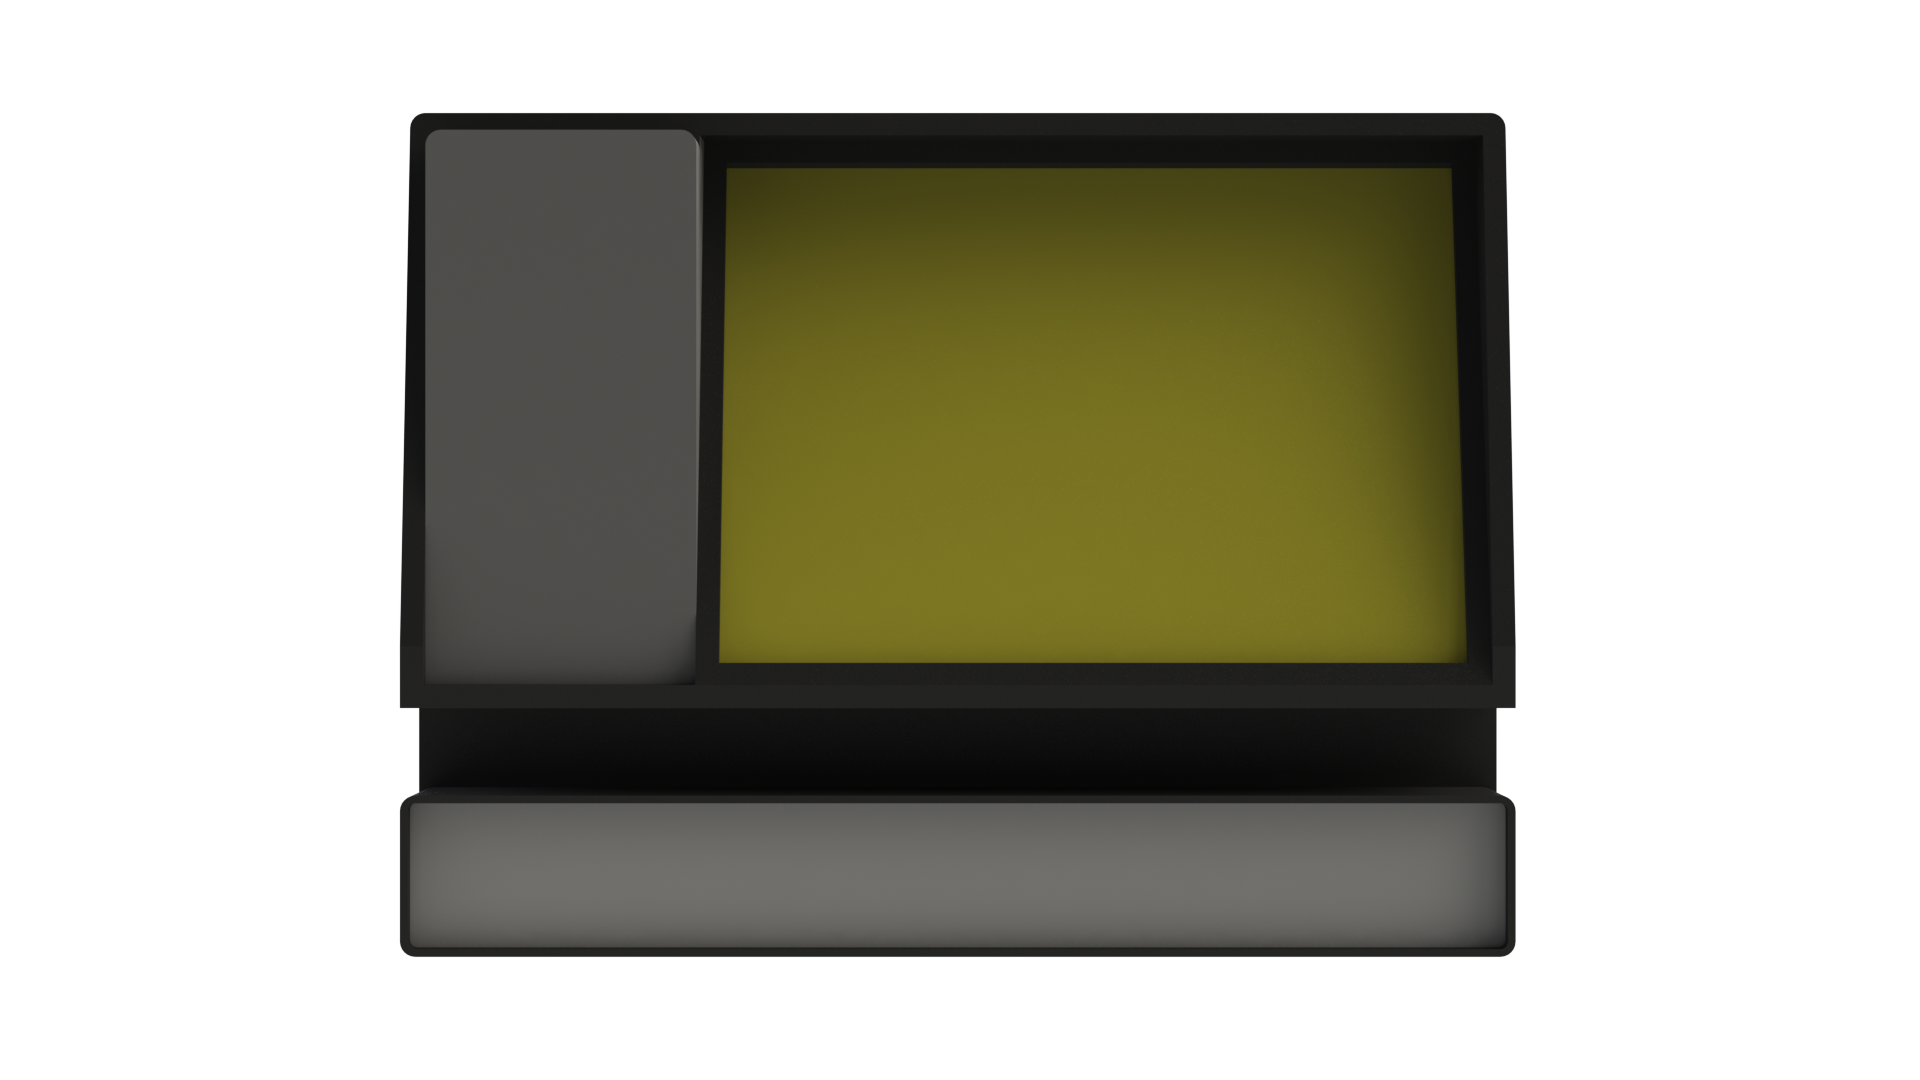
Render (Front View)
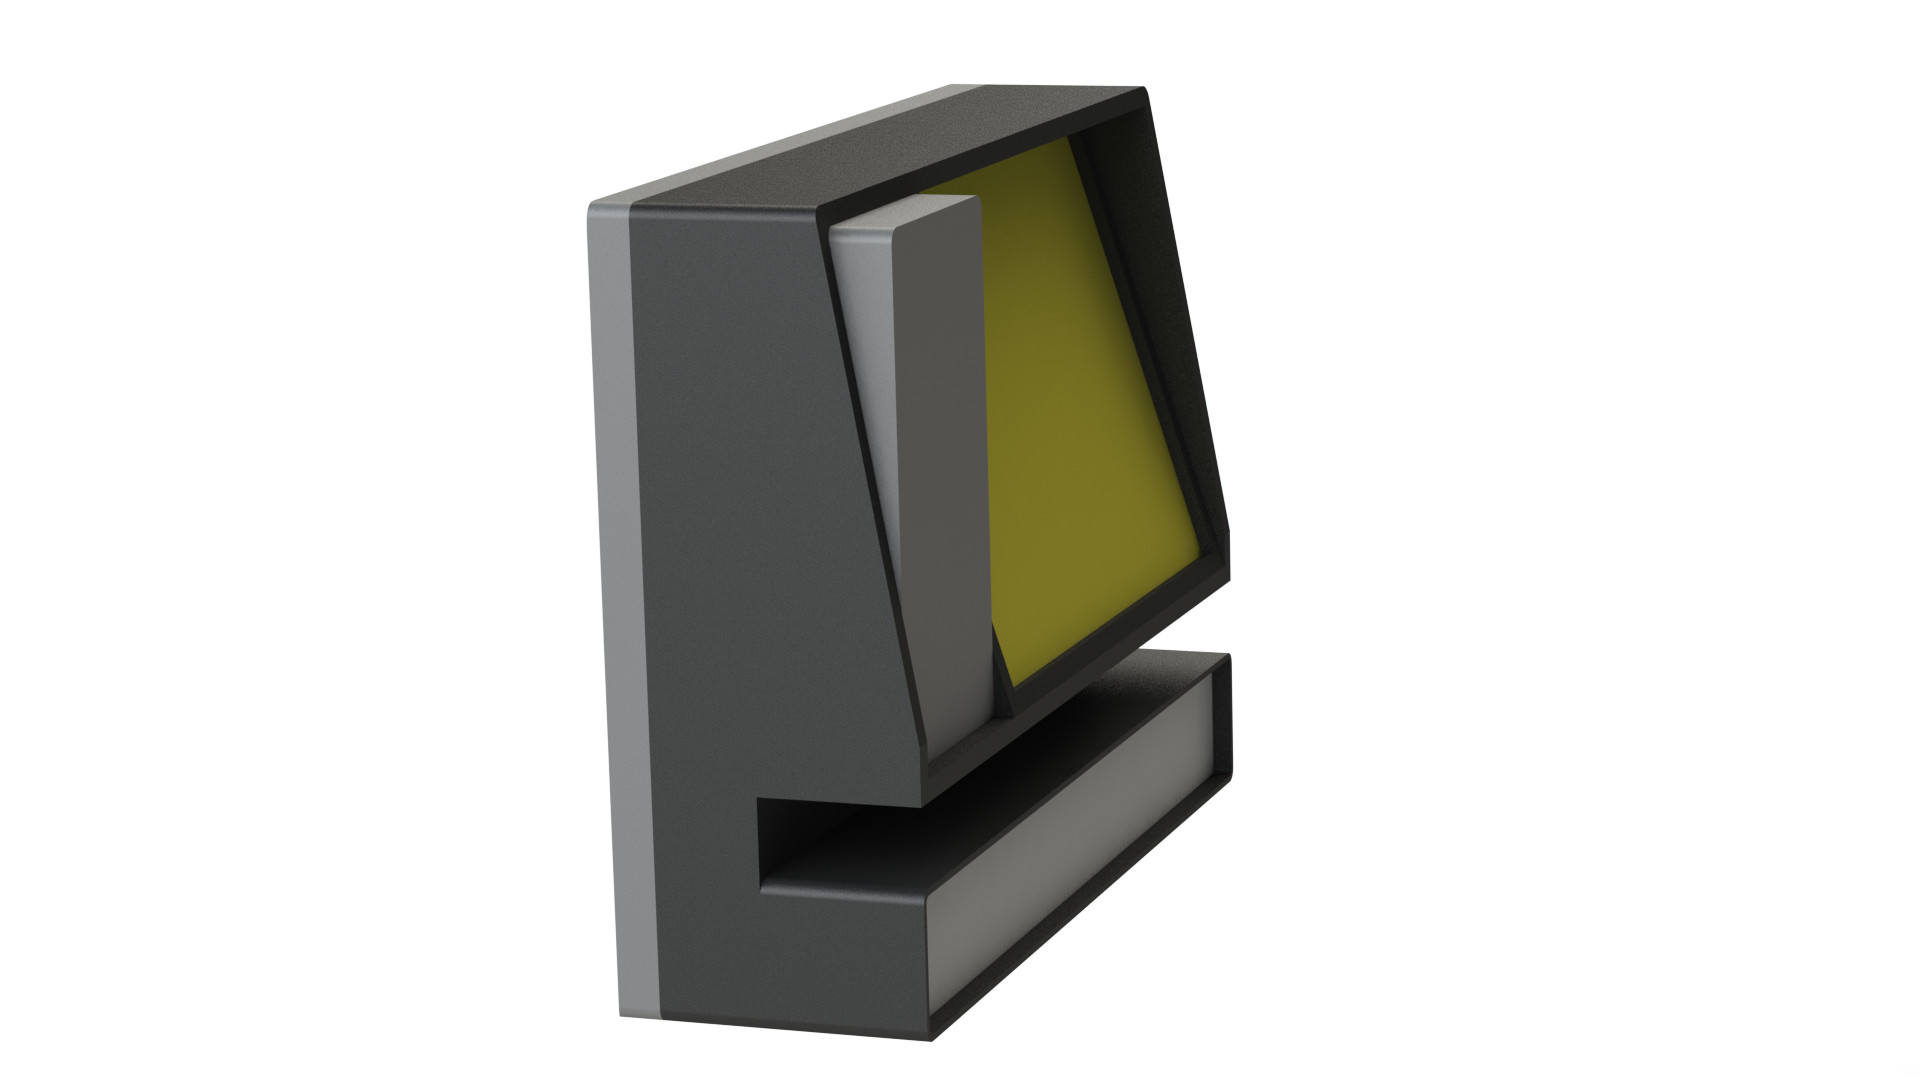
Render (Isometric View)
Presentation
References:
[1] https://dorksideoftheforce.com/2021/06/18/star-wars-insider-203-preview-california-filming-locations/[2] https://brennan.io/2017/06/14/alien-computer-card/
[3] https://www.midjourney.com/
[4] https://www.everypixel.com/image-10587349248006597776
2 Comments. Leave new
This aesthetic is a super unique one and I would argue a hard one to define, but you did an excellent job capturing the “vibe” of it. You’re doing a lot of cool stuff with the electronics too. I think it’s going to be super cool when its done and I can’t wait to see it.
Nic this is a very interesting project. I am very excited to see the final Alarm Clock. I love that you have a full design plan ready to ensure your project is successful. Have you thought of using any other printer besides the PLA?