
For my upcycle project I had decided to take the feeling of one of my favorite activities of climbing to that of a piece of art that can be hung on my wall to bring the feeling of this outdoor activity to my living room. To accomplish the upcycle theme of this project, I decided to utilize extra electrical wire that I had laying around my garage from my previous work as an electrician. The goal was to capture the aesthetic of climbing in a minimalist way that would only utilize the copper wire that I had on hand. At first I had done some preliminary prototyping which involved bending the wire with just my hands to try and produce an anatomically correct copper stick figure that resembled that of a rock climber scaling up the face of a mountain. If I said this was easy I would be lying; it turns out that the anatomy of humans is actually quite tricky to replicate through the use of copper wire. One arm shorter than the other, a torso that is much too short or tall, and a head that resembles that of a cartoon character were just a few of the many intricacies that I had to overcome to create the human like copper climbers that I incorporated into this project.
Once I had learned from my initial transgressions, I charged on, modifying my techniques to utilize the tools I had on hand to create an end product I would be proud to hang on my wall. To do so, I went to the tool belt and grabbed my wire strippers, linesmans pliers, needle nose pliers, power drill, wire cutter, and a empty medicine bottle that I used as the template for my copper climber heads. I knew if I wanted to have any resemblance of uniformity, I needed to twist and form each copper climber in the same manner. Accordingly, I decided to start with the formation of the head, to do so, I wrapped the midpoint of my wire around the empty medicine bottle and then proceeded to twist the wire approximately three times to form the head and neck portion of the climber. Once the head was compete I then took a piece of white scratch paper and marked the location for the length of the arms that would be inherently uniform in distance from the neck of the climber. Next I needed to give my figurines a torso, after some rough measurements of my own body I found a ratio of arm to torso length that I then marked down on my piece of scratch paper as a template for the twist location that I chose to create the torso and waist of the climbers. Moving down, I created additional markings which dictated the length of the legs of the climbers which was the last difficult part of the anatomical matching process of this project. To give the climbers one last detail that creates the illusion of the human form, I took my needle nose pliers and bent the tips of the arms and legs to create hands and feet for my copper climbers.
With the climbers complete, it was now time to create the rope that they will be climbing on. In the spirit of recycled wire, I only found it appropriate to use the same copper material as a way to continue my illusion of the rock climbing experience. If you have ever had experience of working with romex, (standard residential electrical wire) you may know that the insulation that protects the wire from arching can be quite the hassle to remove. After a few curse words and cuts to my fingers, I developed a method in which I clamped one end of my wire to my kitchen table and then proceeded to use a razor blade and wire stripper to remove all the insulation exposing the bare copper that I needed for my rope making process. Through my successful removal of electrical insulation, I was ready to make some rope, at first I approached this in the same manner as I had previously done when creating my initial prototypes. With two even pieces of wire clamped side-by-side on my kitchen table, I proceeded to take my linesmans pliers to grab onto the two opposite ends of said wire; I then began twisting by hand in a clock wise manner to create the twisted rope look that I was intending to achieve. It did not take long for me to realize that this method was going to take far too long as I was working with 20+ feet of wire to be twisted. In a stroke of genius, I had the idea to put the ends of the wire directly into the chuck of my electric drill. What would have taken hours by hand was done in a matter of seconds producing a copper rope aesthetic that I was very please with.
For the final stage of my project I needed to tie together my climber to the rope I had just completed. To do so I took inspiration from various images of rock climbers that I had posted in my upcycle progress post. With patience and pliers I was able to manipulate both the appendages of my climbers and the copper rope to connect the two in a way that looks natural and realistic of true rock climbers. I proceeded to make the decision to create two sets of climbers one of which resembles that of people ascending a mountain and one of which resembling people descending a mountain. In the conclusion of my project I am very pleased with how everything worked out and I am happy to have a new piece of wall decor to look at for many years to come. Below are images of the build process and completed project. I hope this project can provide anyone with inspiration to complete a project like this for themselves.
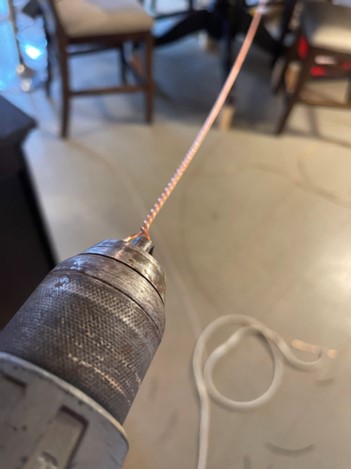
This image represents the setup I used to twist the copper wire to create the illusion of my rock climbers rope. As previously stated, by utilizing my electric drill I was able to significantly reduce the time required for this stage of my project.


The above images show the copper climber bending process. Although you may not see them in the image, the white piece of paper has lines which marked the location of the specific bends for the the arms, torso, and legs that was necessary to retain the anatomically correct shape for the climbers.
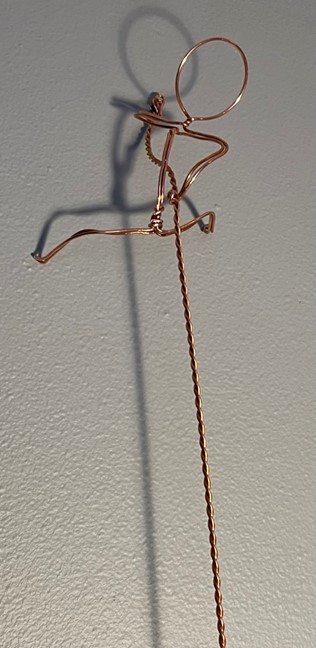
The image above is of the top climber of the set of climbers. For this climber, I was able to utilize the loop in the end of the rope and the loop in the climbers hand in order to drive a small nail into my dry wall which is the key to hanging my project on my wall.
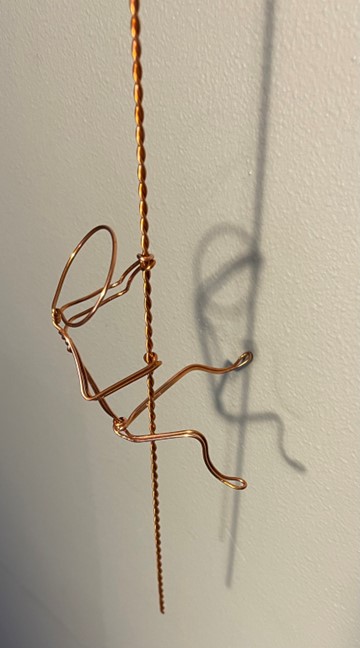
This image is of my copper climber that I tried to create as a climber that is on the descent part of a climb. To do so I bent their legs in a manner that only one foot is making contact with my wall. Accordingly, I also bent their head down as to make it look like they are looking down.
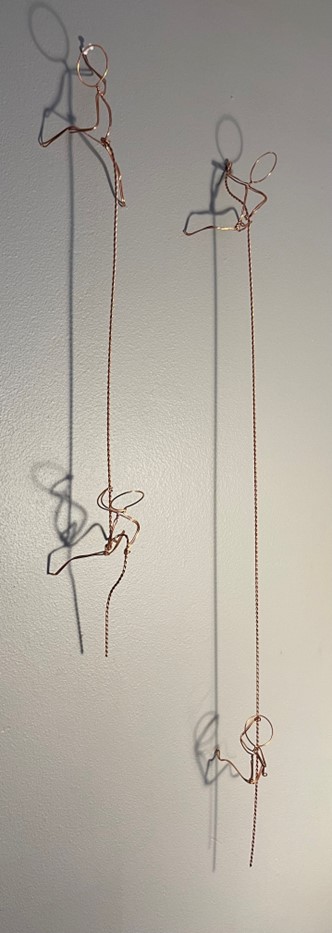
This last image is the combination of all the climbers and rope sections fully assembled on my wall. My goal for this was to create the illusion that the climbers on the left most rope looked as if they were climbing up the mountain. Likewise, I wanted the climbers of the right rope to look as they are descending the mountain.
In the end, I am quite pleased with the results and believe as if the end product of this project achieved all the major goals that I had set out for myself. With an end price tag of zero dollars, I really think that this project has opened my eyes to what can be possible when you have a upcycled train-of-mind. Likewise, in completion of this project I have already begun to think of other upcycle projects that could add character to the walls of my home. If given more time and wire I would like to add more climbers and possibly even backpacks and more to my copper climbers to create the most realistic illusion of rock climbing possible. I hope you enjoyed learning about my upcycle project and I invite you to comment with any questions you may have about my process or project as a whole.
4 Comments. Leave new
My dearest Charles Johnathan Bileschi,
I hope this comment finds you well. I wanted to leave this here to apprise you of my vast appreciation for the beauty and quality of your project. Looking through the delightful photos of your project I can say that my fancy has been quite tickled! The tasteful choice of photos and riveting detail in your publication make me feel like I was actually present during your construction process. Making one rope where the little copper climbers are going up and one where they’re going down has me tangibly excited. I think this is an extremely fun project to have in your home and love how it turned out. Have you considered adding something that would be what they are climbing like Ethan said above? I think it would add quite a bit to the beauty of this upcycle. Alas I digress, beautiful project and I can’t wait to see what you do in the future.
Best,
Garrett Miller
Gary you have warmed my heart with your thoughtful and considerate comment. As Ethan has suggested I do believe a custom poster would add an eloquent addition to this project.
John you sly fox you. What an elegant masterpiece you have created. The joy that fills my body when looking at those little climbers trying their hardest is unmatched. Using a template to make the heads of each climber uniform was brilliant and made me proud to call you my friend. I like your detailed description of the wire twist process. I felt like I was there twisting the wire with you. Kudos to you for creating such unique poses for each climber. I especially like the one in the bottom left. Have you considered adding a custom poster to the wall so it looks like the lil wire boys are climbing it? This might take away from the aesthetic, but I would be curious to hear your thoughts. Jonathan, you are truly a savant.
Sincerely,
Ethan Sean Sanchez
Dear Sean, the sensation that your words provide me with can only be compared to watching the end of the titanic. Yes, my lil wire boys have a hard road ahead of them, and I to believe that adding a custom poster would be of great reward. Accordingly, I too like being on the bottom left as he looks as if he is struggling the hardest. In my departure from this text, I want to once again tell you how much the air from your mouth turned into eloquent words has made my day!