
Introduction
My upcycling project was to design and build a shoe rack made from used skateboards and reclaimed wood. I drew aesthetic inspiration from the graffiti I have seen at skateparks, which shows up in the final product as graffiti spray painted onto the wooden frame. I am calling it the “Skatepark Graffiti Aesthetic.” This artifact will function as a both a decoration and an organization tool for my house, as it can store up to 9 pairs of shoes that would otherwise be somewhere on the floor. I want the form to incorporate my used skateboard decks, and look like something that you might find as a decoration at an indoor skatepark. The construction should be practical and sturdy, with 90 degree corners and clean lines. For my artistic vision, I want the material to look rugged and industrial, fully covered in different colors of spray paint with none of the original surfaces visible.
Aesthetic Inspiration
This aesthetic is characterized by bright, contrasting colors and the use of spray paint. I have noticed that skateparks are often painted with standard graffiti tags in addition to other assorted creative images and designs. Skateparks are often subject to graffiti due to the counterculture nature of both subcultures. Graffiti is also tolerated if not encouraged at skateparks. Graffiti artists collaborate to decorate the walls and ramps of certain skateparks, where the best art lasts the longest as it is less likely to be painted over. Scott Carpenter skate park (also referred to as B-park, short for Boulder Skatepark) used to look similar to this, but when it was remodeled a few years ago it was repainted to light gray.
Graffiti itself has existed for thousands of years. There are examples of graffiti in archeological remains. Modern spray paint graffiti originated in New York in the early 1960s. The artform became more popular in the 1970s, when people began “tagging” the urban environment in New York City. Graffiti was initially associated with gang activity, where different tags marked the territory of their corresponding gangs. Some consider graffiti an art form, while others consider it an eyesore. It is a unique and well developed aesthetic that should make a functional artifact visually interesting.
[2]Fabrication
There are two main materials used in this artifact: Upcycled skateboard decks and reclaimed wood. I already had all of the skateboard decks lying around in my house, and I got the wood from the Boulder Recycling Center. Decks tend to wear out over time and need to be replaced, so I have accumulated a lot of them over the years.
![]()
![]()
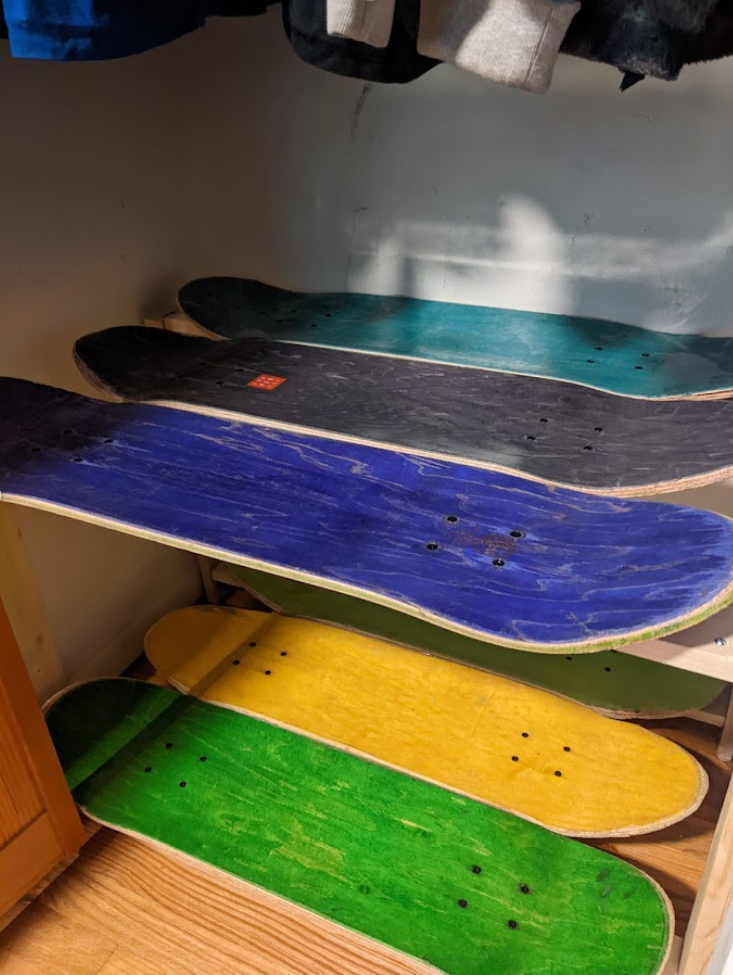
I drew some inspiration from a similar project that I did about a year ago. Rather than a shoe rack, I made a pants shelf out of 6 used skateboard decks. I made this project entirely using a hand drill with no other power tools, and I learned a lot about the correct way to construct something like this. My pants shelf was originally constructed using metal brackets instead of wood screws, which made it wobbly and unstable. It was also a pain to get the holes in the wood to line up with the holes in the brackets I got at the hardware store. I also attached the skateboards to the wood using actual skate hardware (which has a nut and a bolt). This was unnecessary and it was also annoying to get the holes to line up. For the shoe rack project, I will only be using woodscrews to connect everything, as this simplifies the design and is actually stronger than using metal brackets.
![]()
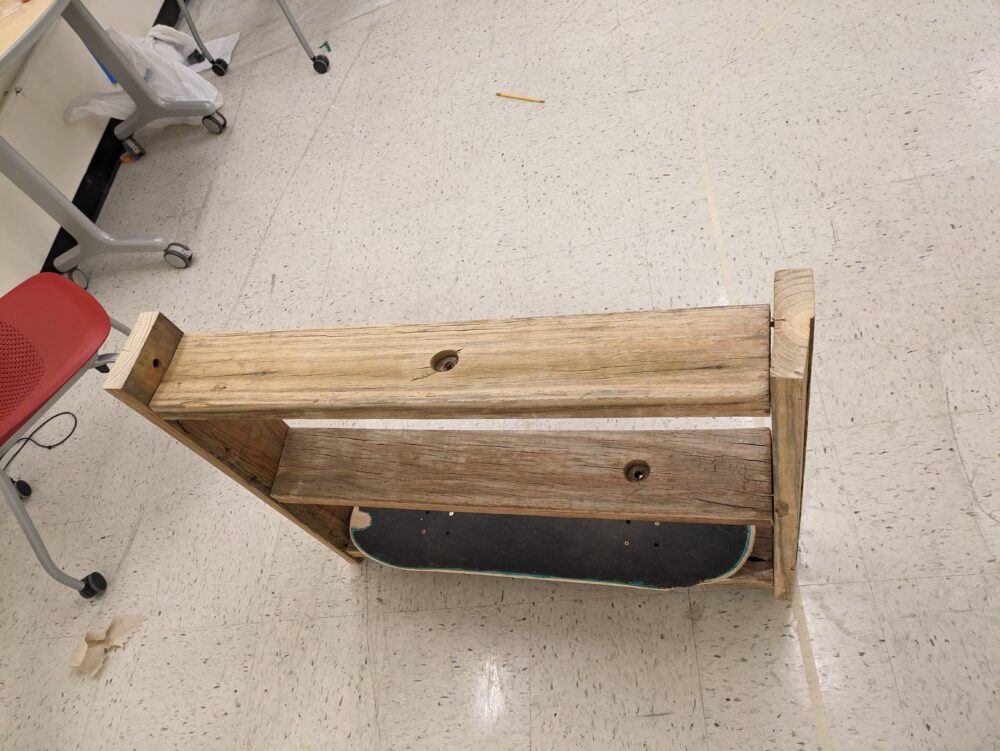
I began by cutting my wooden planks to the correct length using the miter saw at the Maker Space woodshop. Originally, I wanted to make 4 shelves but I realized that I wouldn’t have enough wood and that the shoe rack would end up being too tall. Instead, I decided to only make 3 levels and leave out one of my skateboard decks (which was cracked anyways). After I cut the wood to length, I used a hand drill, two C-Clamps, and some woodscrews to attach all of the pieces together. I drilled pilot holes before adding the screws, which helped a lot. To position the horizontal pieces correctly, I used a pencil and a measuring tape to mark the correct locations for the boards. After I screwed the boards together, I made sure that the skateboards would fit onto the frame and attached one of them to the bottom plank. (This deck is present in the pictures below, but it was removed before painting).
![]()
![]()
After assembly was complete, I took the frame home and began painting. I borrowed some spray paint from Riley Menke (a member of this class), who also helped paint since they have had experience spray painting. My friend Gabriel Nesvorny also helped with the painting. It took a bit of trial and error to get used to using the spray paint, and our biggest problem was that spraying too much in one place would cause the paint to drip. This looked pretty cool, but we did not want every single line of spray paint to have drip marks. After we got most of the surfaces covered, we decided to go to Michaels and get some more colors. This actually ended up being the most expensive part of the project, and two out of the four cans we bought did not work. The nozzles on the pink and red cans were clogged and would not spray. This meant that the final product was mostly green, orange, yellow, black, white, blue, and purple, but I think the pink and red would have added a lot of additional contrast. It is too bad these paint cans didn’t work, but I think the painting came out really good despite the setback. We also added some smaller details using paint markers
![]()
![]()
![]()
![]()
![]()
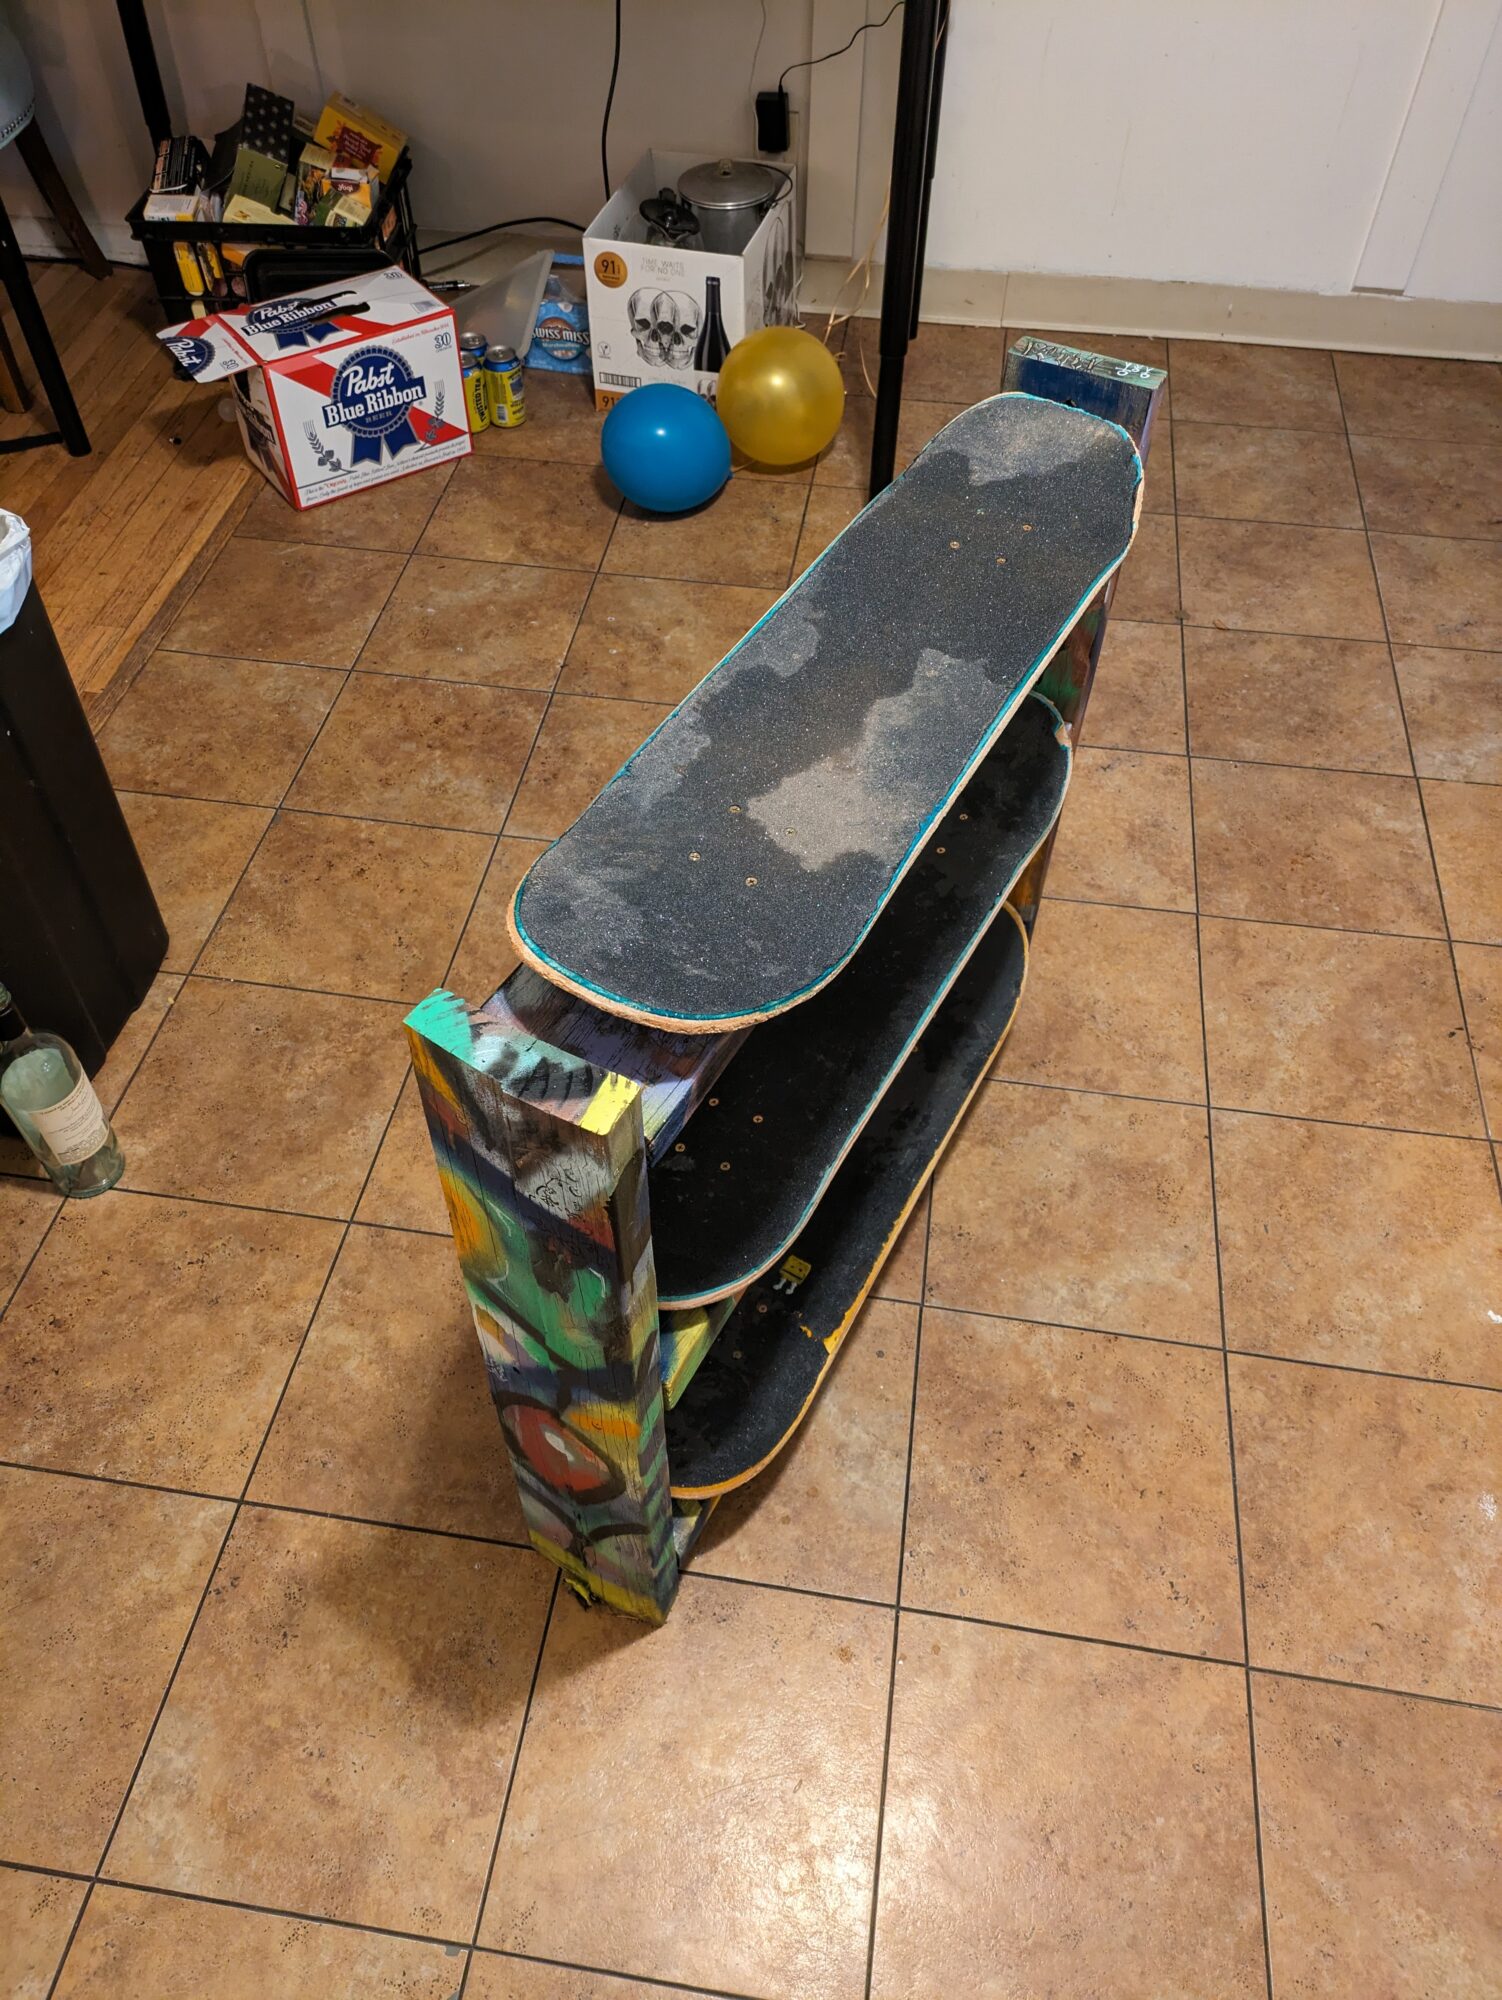
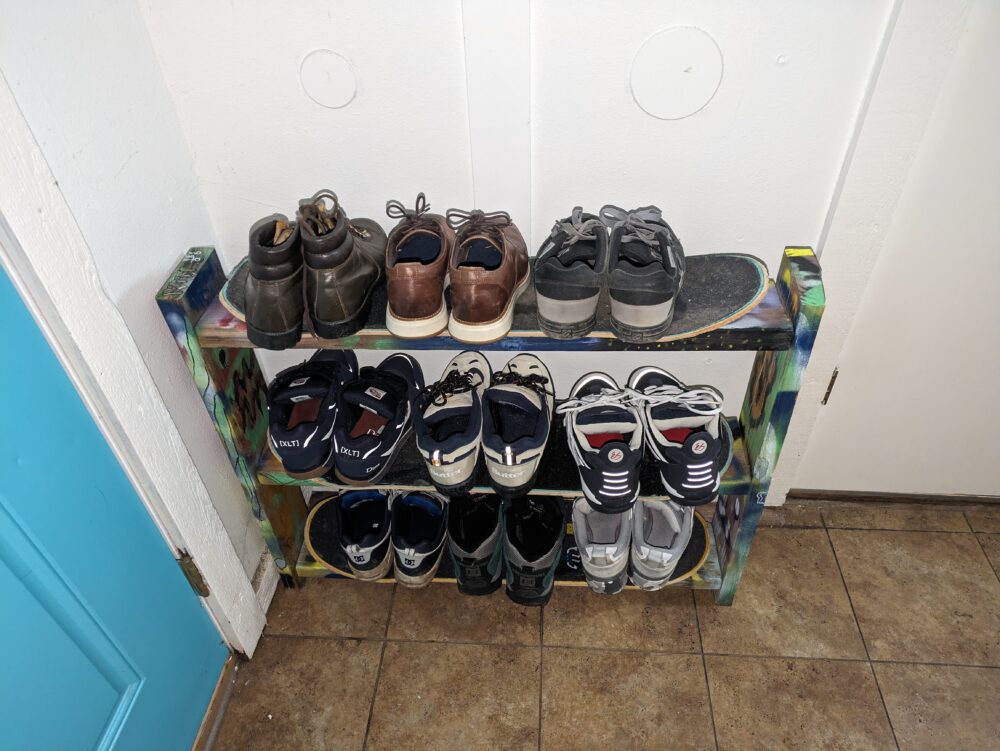
Finally, I attached the three skateboards to each of the horizontal planks so that the shoes have a surface to sit on. unfortunately, this covered up a lot of the paint that was on the boards in the pictures above. The decks are attached using some shorter woodscrews that go through the existing mounting holes. Thankfully, there was enough room between each of the shelves so that the drill could be used to screw the decks into the planks.
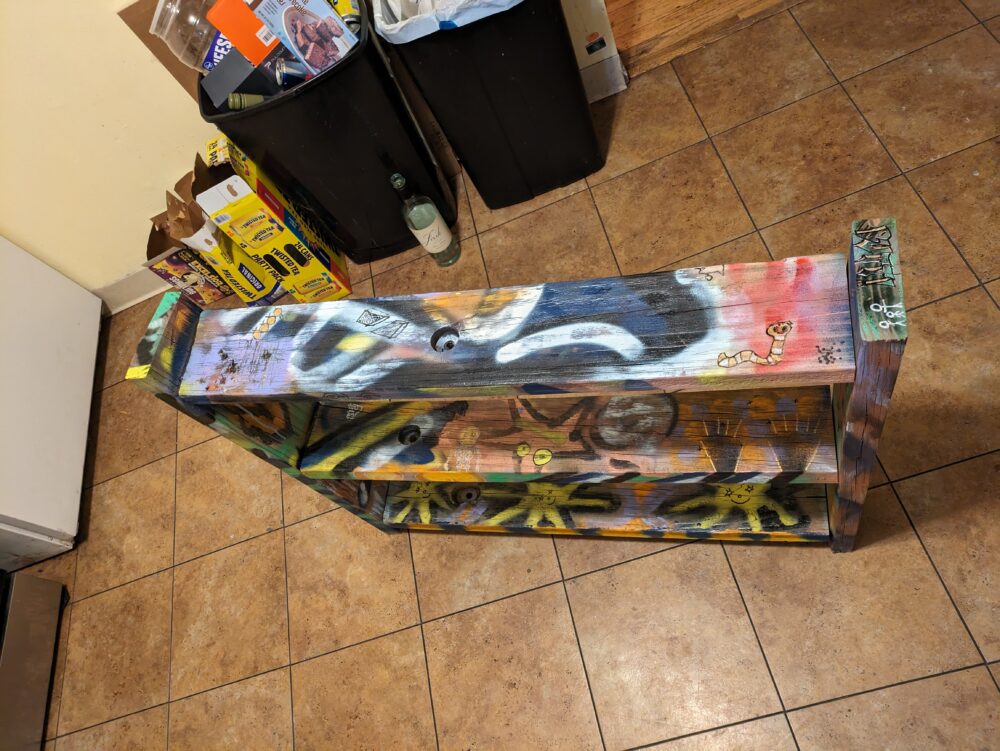
Illustrated Description of Final Artifact
This is the final product! It is constructed from three horizontal planks with two vertical planks on either side. Each horizontal plank has a skateboard deck screwed to the top. The planks are all spray painted with curved, geometric patterns and images like the famous graffiti “S”, a stick figure, and eye, and a face.
![]()
![]()
Functional and Artistic Goals
This project meets all of my functional goals. It can hold all of my shoes and it does not fall over. It can also support the weight of at least one person, meaning that you could sit on it if you wanted to. It is constructed in a much better way than my pants shelf, which used metal brackets instead of woodscrews to hold the pieces of wood together. This design was wobbly and woodscrews were added later to make it more stable. The shoe rack was designed with this construction technique in mind, so it was both easier to make than the pants rack and more stable. Using the Maker Space woodshop in the IdeaForge was extremely helpful and made the final product a lot better than if I had tried to make this at home like the previous iteration.
All of my Artistic goals were met as well. I wanted to fully cover the wood with spray paint so that every visible surface was coated. I also think I captured the most important aspects of the graffiti aesthetic by using bright contrasting colors right next to each other. It took a little bit of practice to get the technique, but I learned a lot in the process. I wish that the pink and red spray paints worked, I think that would have made the graffiti look better but it still came out better than I thought it would.
Next Steps
Currently, the shoe rack is sitting in my backyard because it still has a strong spray paint smell. Once it airs out, I am going to use this rack to store all of my shoes as shown in the previous image. This object will remain in my house for as long as I continue to live there, and I will try to bring it with me whenever I move. I might add more paint in the future, and I might even consider painting the decks themselves, as they have a much larger area to apply paint than any of the planks. This means I could add some bigger and more intricate designs since there is more space to work. I might also try to find some pink and red spray paint to add more contrast in the future. This project was a great success, and I am glad that it came out so well.
References
[1] Speakeasy Skate, Instagram Post,https://www.instagram.com/p/CtUj2VbpsG0/?utm_source=ig_embed&ig_rid=81b4c0d0-d13b-4e33-ad21-f22d886dc1c0&img_index=2 [2] Graffiti: History, Purpose, Types, Journey For Ever Magazine, https://journeyforevermag.com/typesofgraffiti
4 Comments. Leave new
Great job on this project Alex! All of the effort you put into this project really shows and I like the novel use of the skateboard decks. I would have loved to see the painted underside of one or more of these skateboard decks visible in the design. Did you ever consider flipping all or some of the skateboard decks over for the shelf? I could definitely see this type of design at a skate shop. The craftsmanship of the shelf is also impressive, with it being able to hold a person. Overall this was a great use of upcycled materials and fit with the aesthetic very well.
I also agree that it would be cool if I could show off the art on the bottom of the decks in some way, it is too bad that it gets covered up by the frame. Thanks, I am glad it is sturdy as well and I learned a lot from the previous project.
Amazed at how well the initial sketch translated to the final product, albeit with one less shelf due to stated restrictions. Especially considering you’ve given the skateboard deck a new lease on life after extensive use. In the future, will you consider creating new iterations of the shelf with different materials? Perhaps incorporating thin bars as support for the decks so that they could appear to be levitating.
Now that I have two shelfs made from skateboards, I will definitely need to make more of them. I will probably end up making a wall mounted shelf at some point in the future, and I will completely redesign everything for that purpose.