
Main Project: I am planning to make a pinhole camera with a shutter mechanism that allows for different exposure times. The camera will either be in the Industrial aesthetic or 90s clear plastic electronics aesthetic.
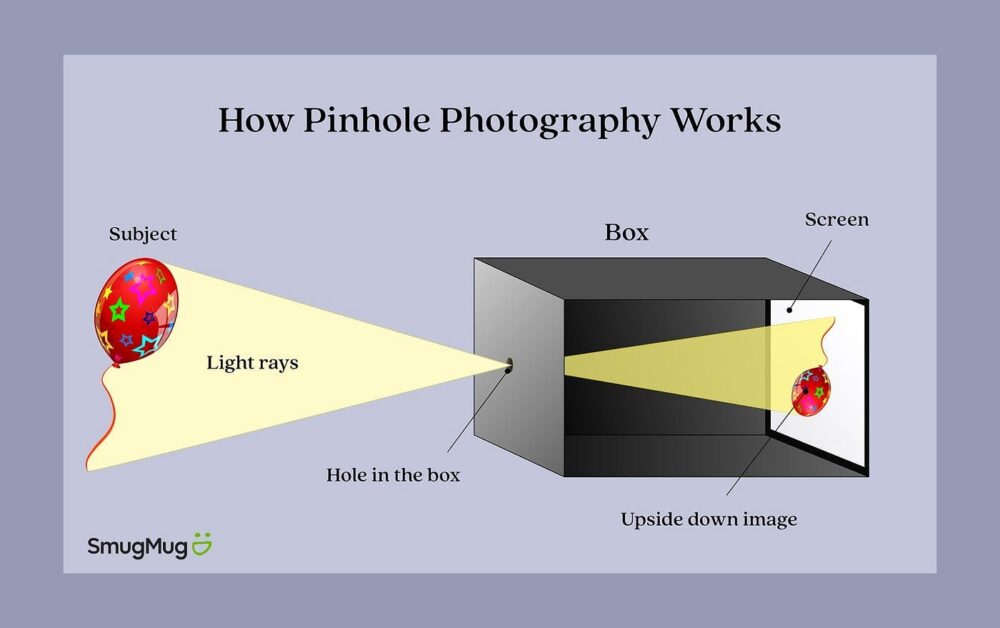
How It Works: A pinhole camera is a very simple image making device that relies on the “camera obscura” effect. It is essentially a light-proof box with a very tiny hole in one side. This small hole, or aperture, lets a few light rays in that project an inverted image on the opposite wall of the box [7]. Often people put translucent paper on this wall so they can view the image, or put photo paper or film inside to permanently capture the image. Usually, the aperture is covered with another component that serves as a shutter, and the user manually removes it for a certain exposure time. Exposure times for pinhole cameras are much longer than for regular cameras.
Design & Planning: This project has two main components: the camera body and the shutter mechanism.
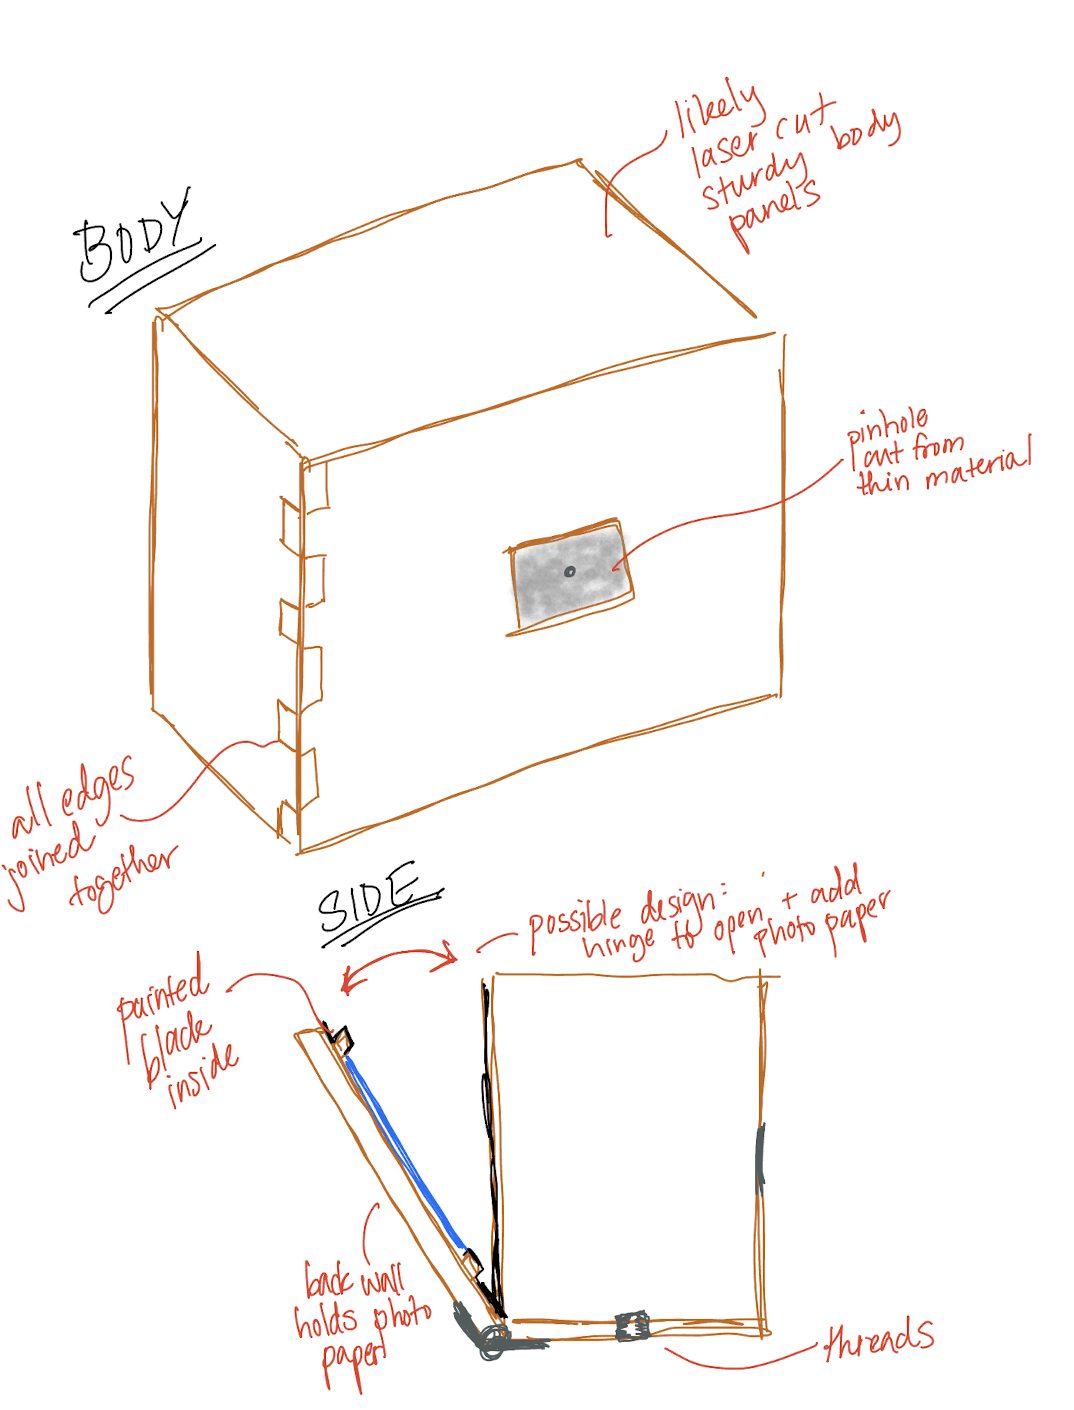
Camera Body: The camera body will be a box that can fit a 5×7 piece of photo paper on the wall opposite to the pinhole. I explored manufacturing methods and materials like folding paper or cardboard, bending a large piece of sheet metal, woodworking, and laser cutting wood or plastic panels that form into a box. I believe laser cutting plastic or wood will be the most efficient way to manufacture the camera body while still resulting in sturdy box.
The box needs to have some way of inserting the photo paper. I’ve explored having the back panel on a hinge, or having a sliding tray that holds the photo paper. This will have to be done in a dark room to prevent the photo paper from reacting. I also want to have threads in the bottom panel of the body so it can be attached to a tripod, which will be necessary with exposure times of at least 30 seconds. The front panel of the box will have a cutout to put the thin material with the pinhole poked into it.

Shutter Mechanism: I am really excited by the idea of making an automatic shutter that exposes the pinhole to light and then covers it for variable amounts of time. I am also excited by gaining more mechanism design experience, and want this shutter to be completely mechanical. The shutter mechanism needs to have a default state of covering the pinhole, then expose the pinhole, then return to the default state after the exposure time. This mechanism will attach to the outside front face of the camera body.
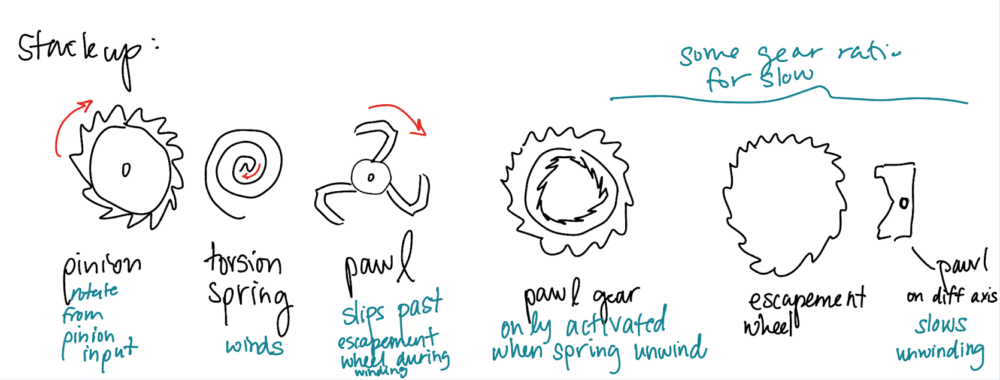
I’ve been researching products like mechanical timers, clocks, and wind up toys to learn more about timing systems that don’t use electronics. I’ve found that the systems in wind up toys are most similar to my desired function. They generally work by having a user input rotation which winds up a spring, and that energy is slowly released through a gear train with some additional features [3,4].
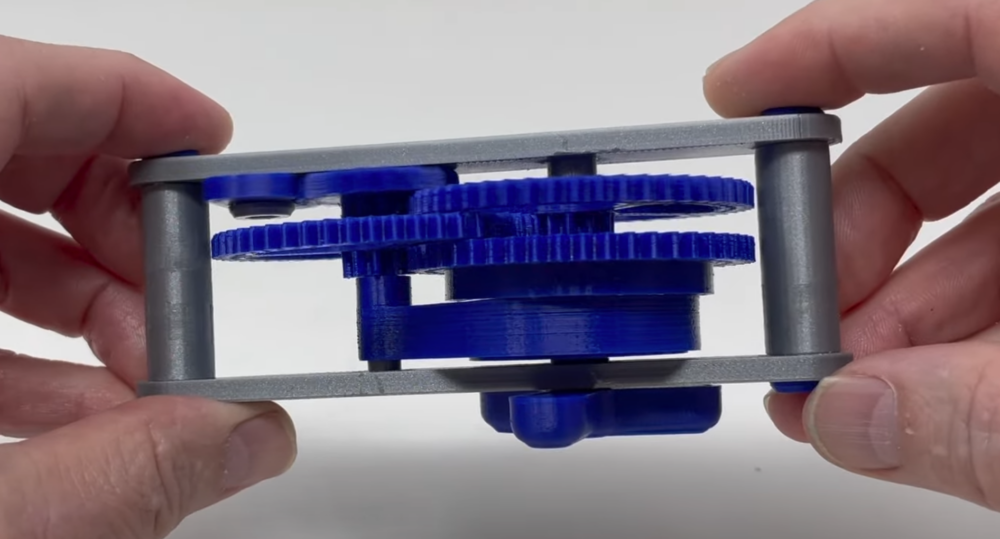
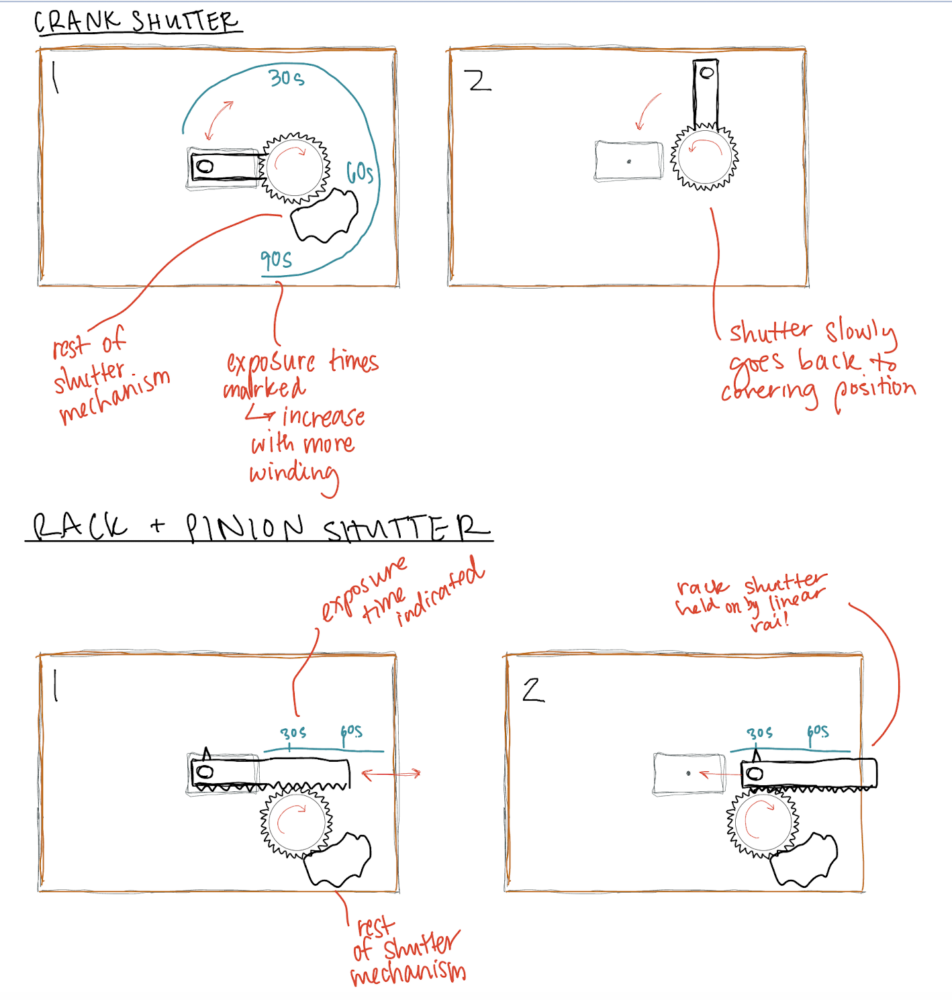
To start experimenting with some designs, I found an Instructable by Greg Zumwalt [2] that I want to base my first trials on. It consists of a knob, spring, gear train, pawl system, and escapement wheel with a pallet. The pawl system allows the spring to be wound without running the gear train backwards. When the user finishes winding, the pawl reconnects to the gear train so that the spring energy can be turned into motion. The gear ratios and escapement system really slow the release of spring energy, so the knob slowly turns back into position.
The way I would translate this design is by having my shutter as part of the knob, so the user moves it out of the way as they crank for a certain exposure time, and then it slowly moves back into place. Or, I could incorporate a rack and pinion system, where the shutter is a rack that moves linearly out of the way of the pinhole and winds the spring through the pinion gear, then is slowly moved back into place through the rest of the mechanism.
Schedule: I have a lot of the design researched and turned into theory, but there are a lot of moving parts (literally) to this project that will require some testing. I have an understanding of how this system works in my head which was a big step from the initial idea, but I am sure I will learn a lot once I get into CAD and testing prototypes.
I am going to start building the box so I can get information on the exposure times that I need for this camera body. In parallel, I will be 3D printing different mechanism arrangements to experiment with. After I get exposure time data, I can adjust the gear ratios of shutter system to accommodate this information and then put the whole module on the front of the camera box.


Aesthetics: I am still deciding between two aesthetics. My material selections depend on this aesthetic choice, so I need to decide soon. Will all of the potential exposed gears and mechanisms, I explored the steampunk aesthetic, but my custom gears will most likely be plastic which does not fit that aesthetic.
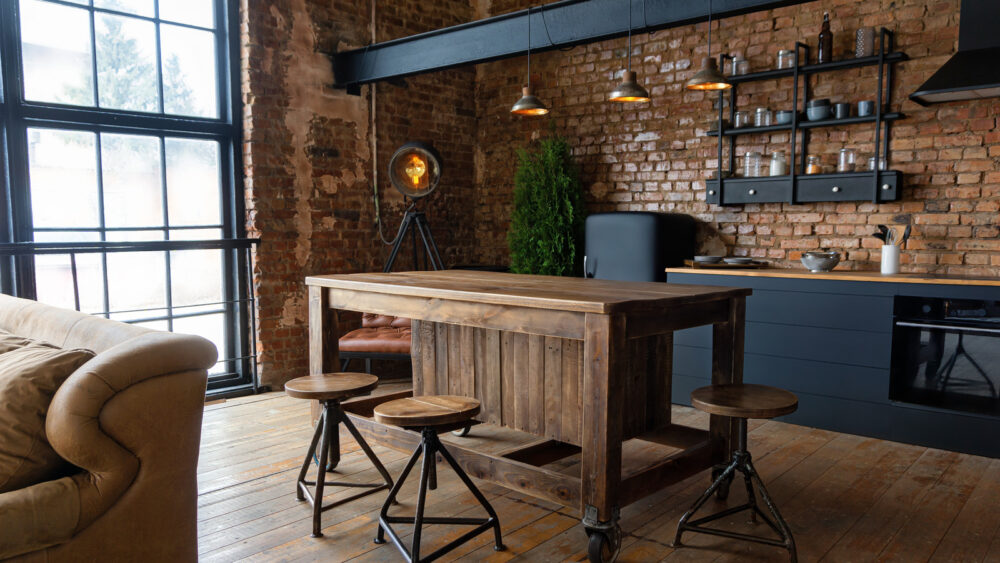
Industrial Aesthetic: “Components of industrial style include weathered wood, building systems, exposed brick, industrial lighting fixtures and concrete. [6]” There are also many black accents.
To achieve this aesthetic, I would laser cut panels for the camera body out of wood and join them together in a way that exposes the laser-burnt edges. I would print the final shutter mechanism components out of black PLA or laster cut them out of black plastic and potentially include a metal spring rather than a plastic one. I am drawn to the idea of the camera body being wood, but don’t necessarily like the idea of all of the gears being the same dark color. This aesthetic also better fits the type of pictures that the pinhole camera will take: black and white, more vintage looking images.
90s Clear Plastic Electronics Aesthetic: The 1990s saw a fad of clear, colorful plastic electronics casing. Gameboys, video game controllers, and more were enclosed in brightly colored and transparent plastics [5].
![]()
I like this aesthetic for my pinhole camera because the wind-up shutter mechanism reminds me of a colorful plastic trinket, and colorful plastics would lend themselves well to 3D printing and laser cutting, as well as differentiating each of the components in the mechanism, which is something I want to highlight. I would cut the camera body panels out of a solid-colored acrylic because the body needs to be lightproof, and will be lined with black paint or paper. Then, the mechanism (aside from the shutter that covers the pinhole) could be made out of clear colorful plastic.
Plan B: If I cannot get the shutter mechanism to work correctly, then I will have a manual shutter for expo while I continue to work on the mechanism. This would be a piece a material that blocks out the light, but is attached at a pivot so the user moves it up and down to get the desired exposure time.
References:
2 Comments. Leave new
This is such an interesting device to try to recreate with a shutter! I was also concerned about the see through plastic being light proof for the obscura part of the camera, so maybe a layer of thin black art foam could help keep the light out if you go with that aesthetic? I was also concerned about how you would keep the photo paper for being exposed while inserting and changing it out of the camera. Would you just have to change it out under a dark sheet or in a dark room?
Hello Katie,
I love your idea to build a unique pinhole camera. I never heard of this specific style of camera before and I was very interested in reading your post. Do you know where you’re going to display it when you’re finished? I think the industrial aesthetic would be more convenient but I am interested in 90s plastic for this build! I can’t wait to see how it turns out!