
The goal of this upcycle project is to create vibrant art pieces that you would want to hang on your wall, all for the low price of some milk jugs or buckets. What I will be melting down is HDPE plastic, or High Density Polyethylene. You can find this plastic in every day milk jugs. You recycle them anyways so why not make some art?

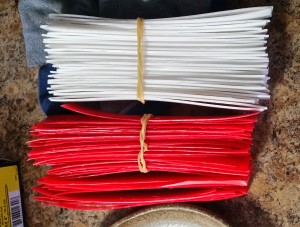
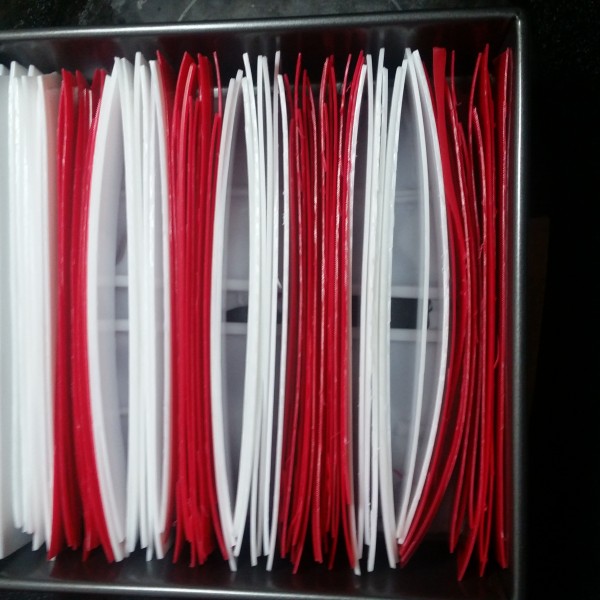
Unfortunately it can be difficult to get the the really bright and clean colors from milk jugs, so what I used are colored five gallon buckets. During this project my design process varied greatly from that which my team and I came up with in class.
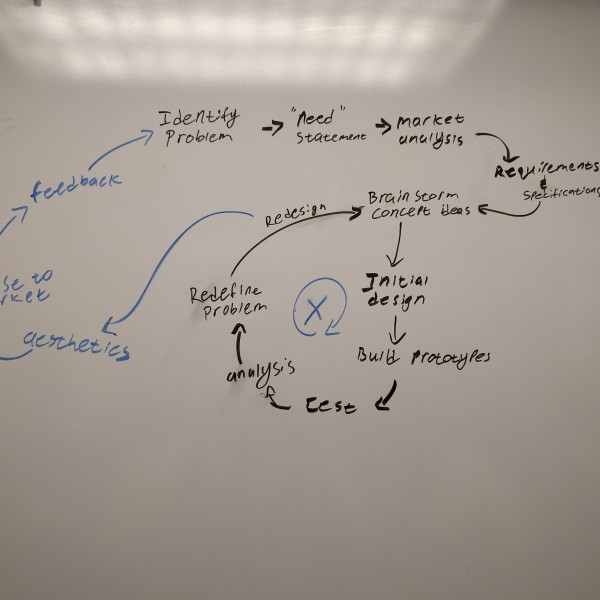
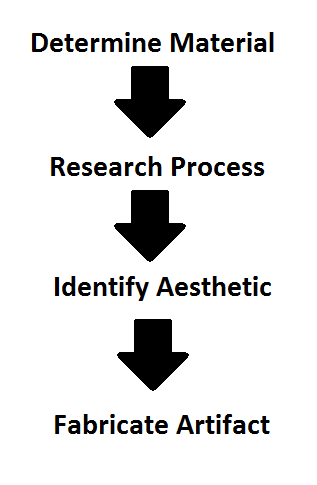
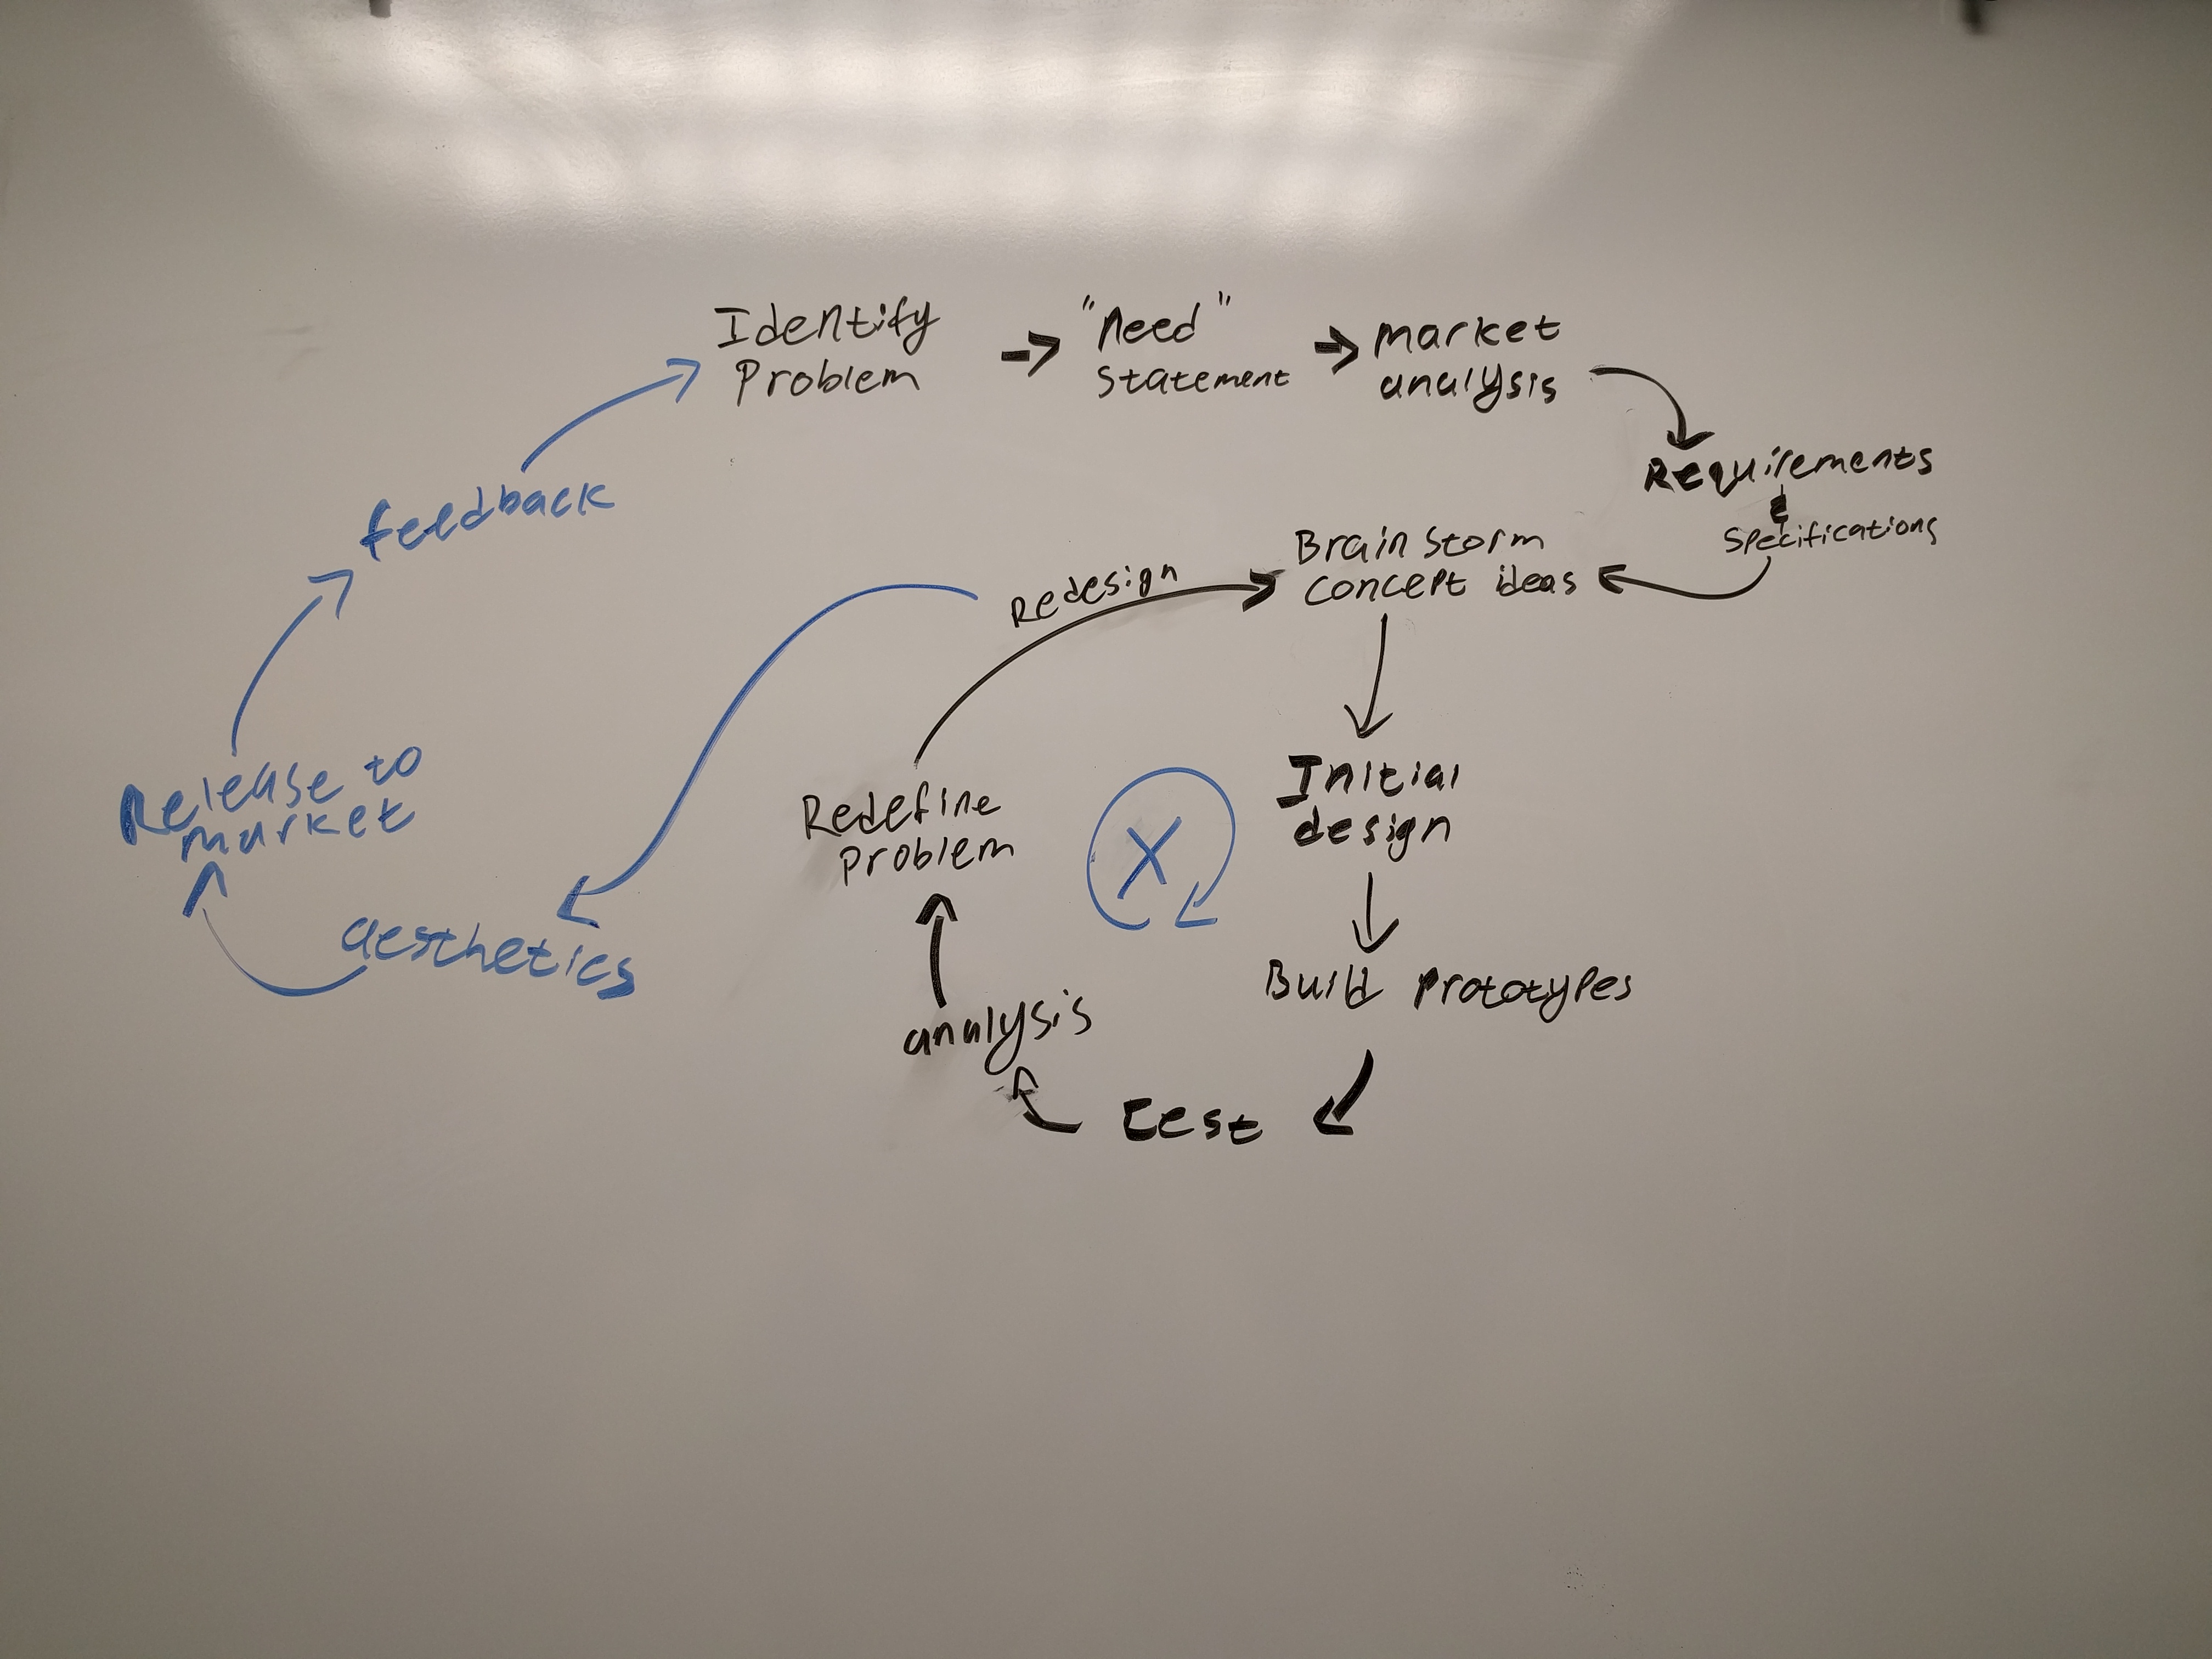
As you can see my team and I came up with the looped design process as shown on the left. However, in this project I followed the more linear design process on the right. The process I used was a much more hands on as I did little actual preliminary design work and instead I decided to just try it. Luckily I did not run into any issues or my process would look a lot more like the one on the left.
I was originally inspired to do this project by a YouTube video by Peter Brown on an HDPE mallet. In this video Peter shows the process he used to melt down milk jugs and forming them into the shape he wanted. I thought this was a cool idea and I wondered if I would be able to create blocks of HDPE for machining.
After more research I found that there is a whole community of people who use HDPE melted from milk jugs and buckets for home projects. I found a lot of videos on HDPE sling shots. I felt that these sling shots were very aesthetically pleasing as the producers used really bright colors and took advantage of the viscous property of melted HDPE.
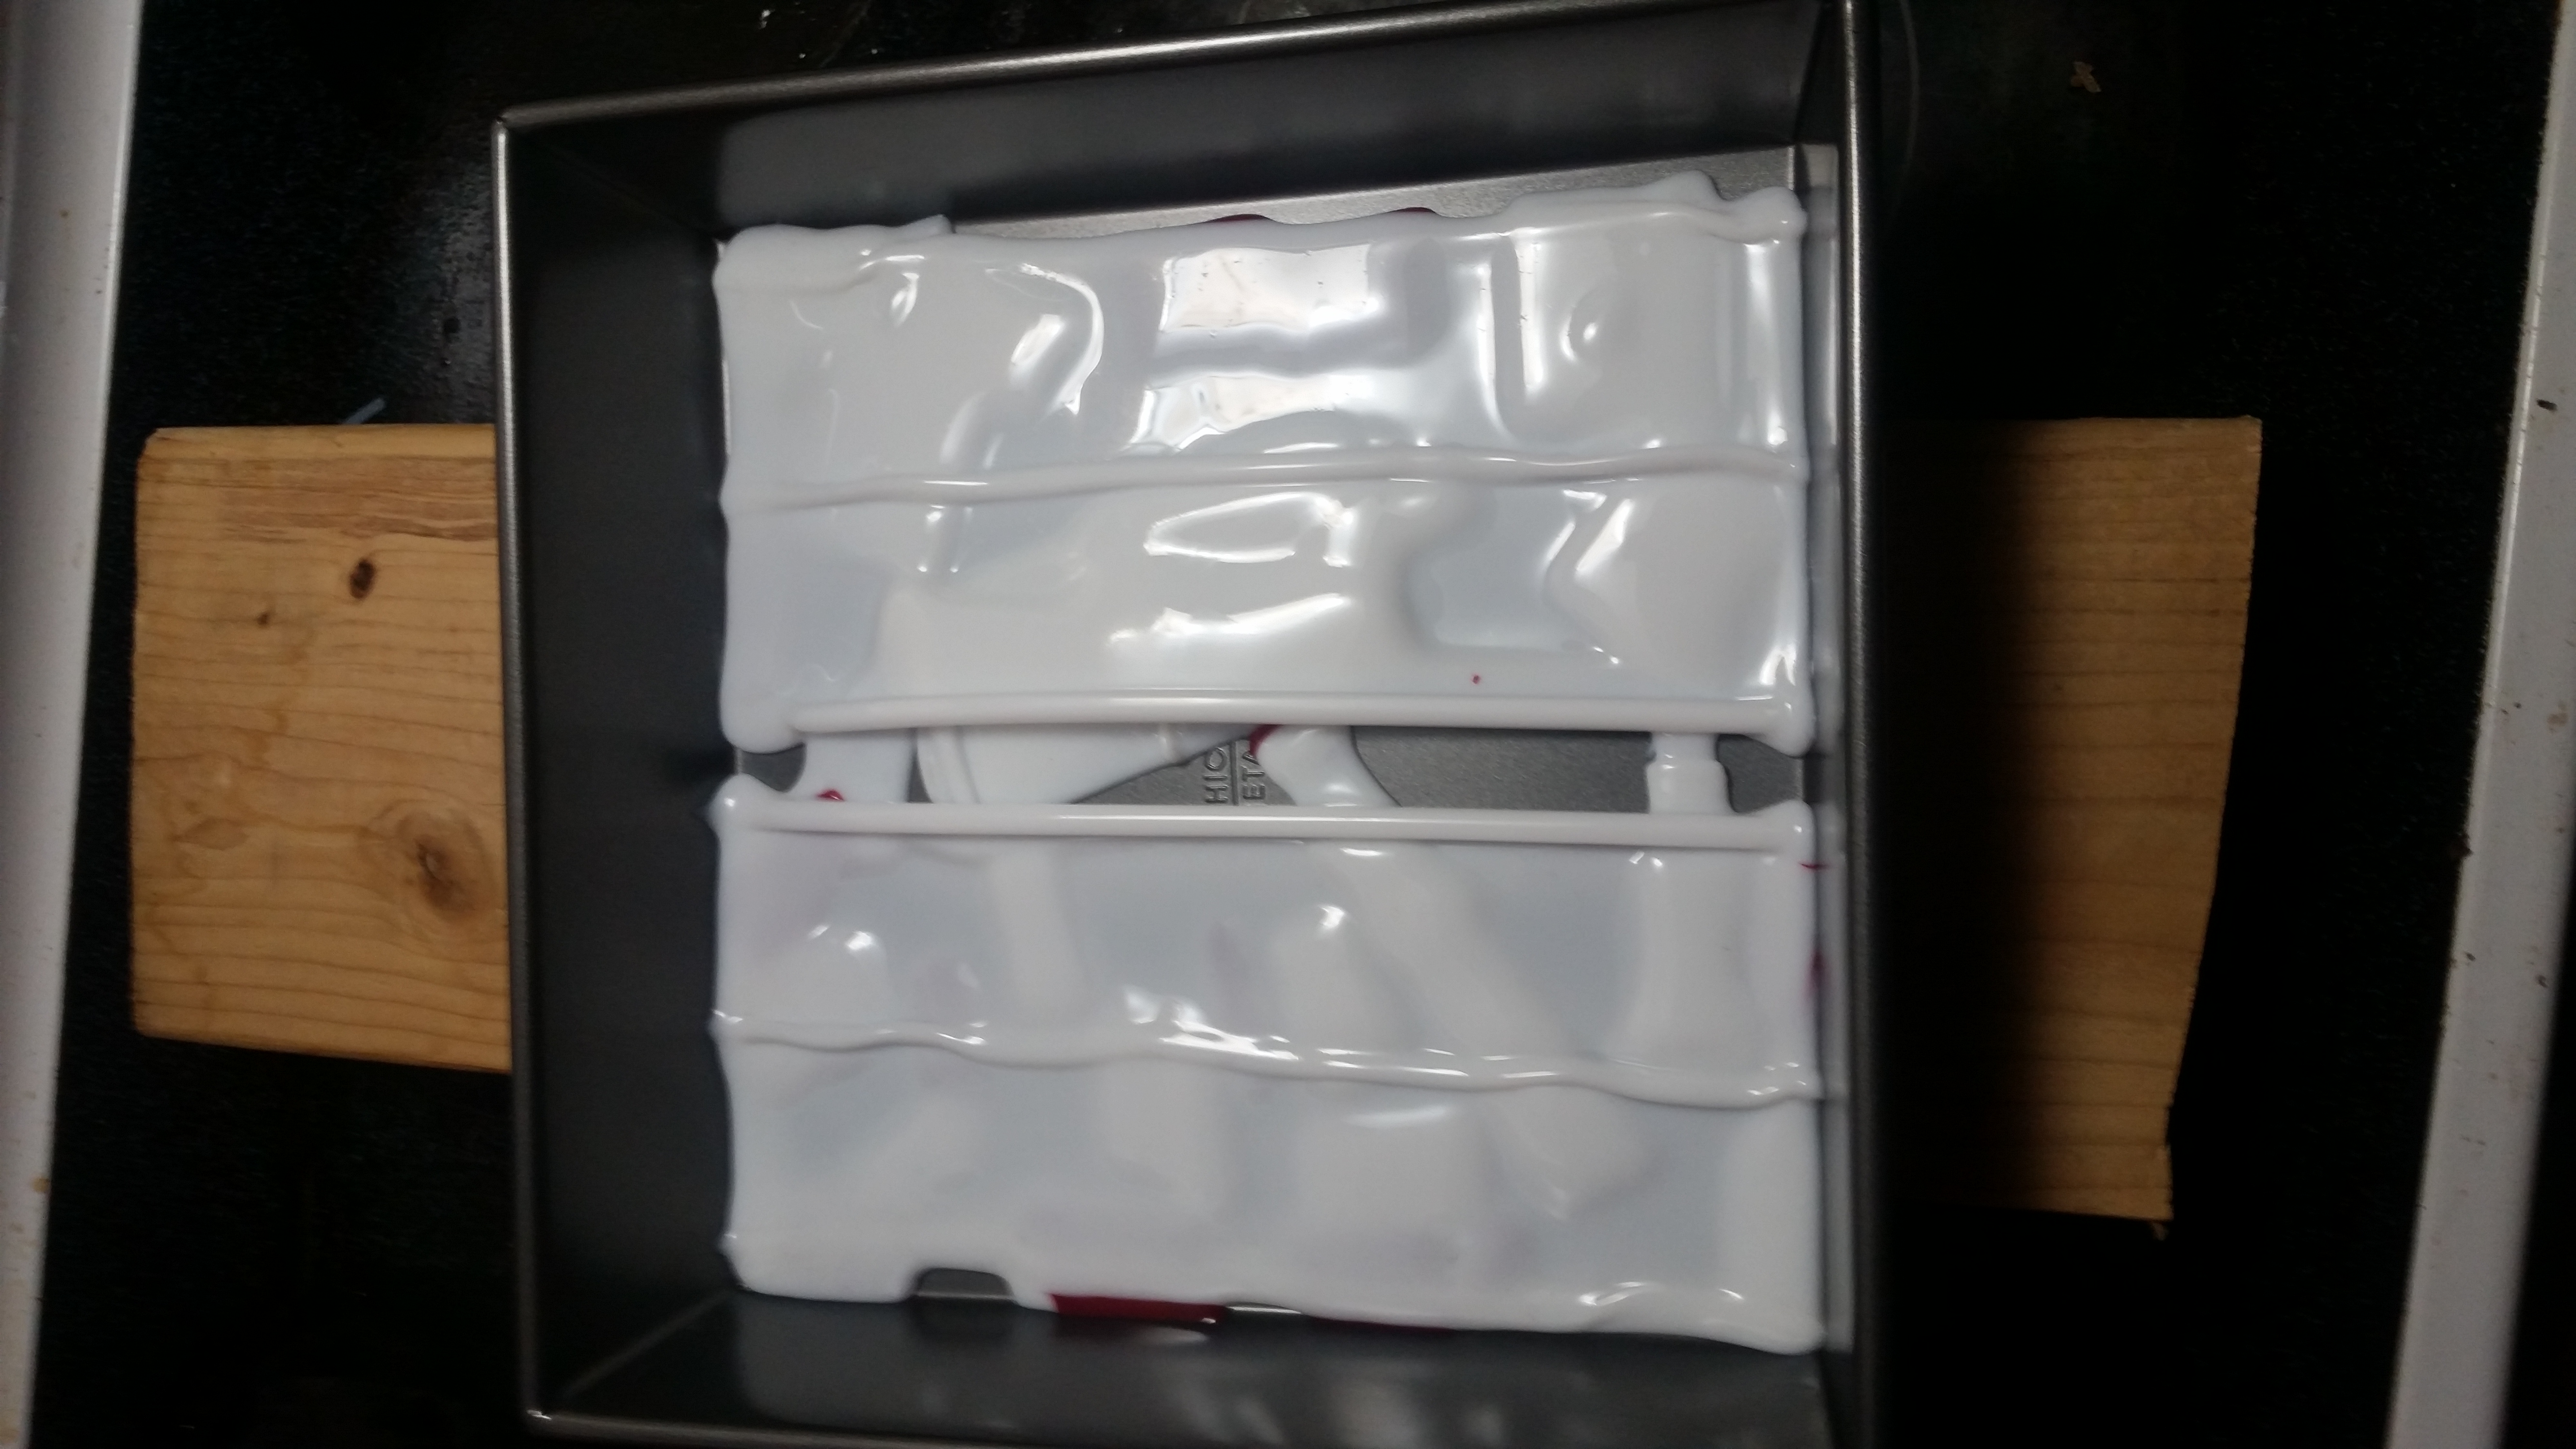
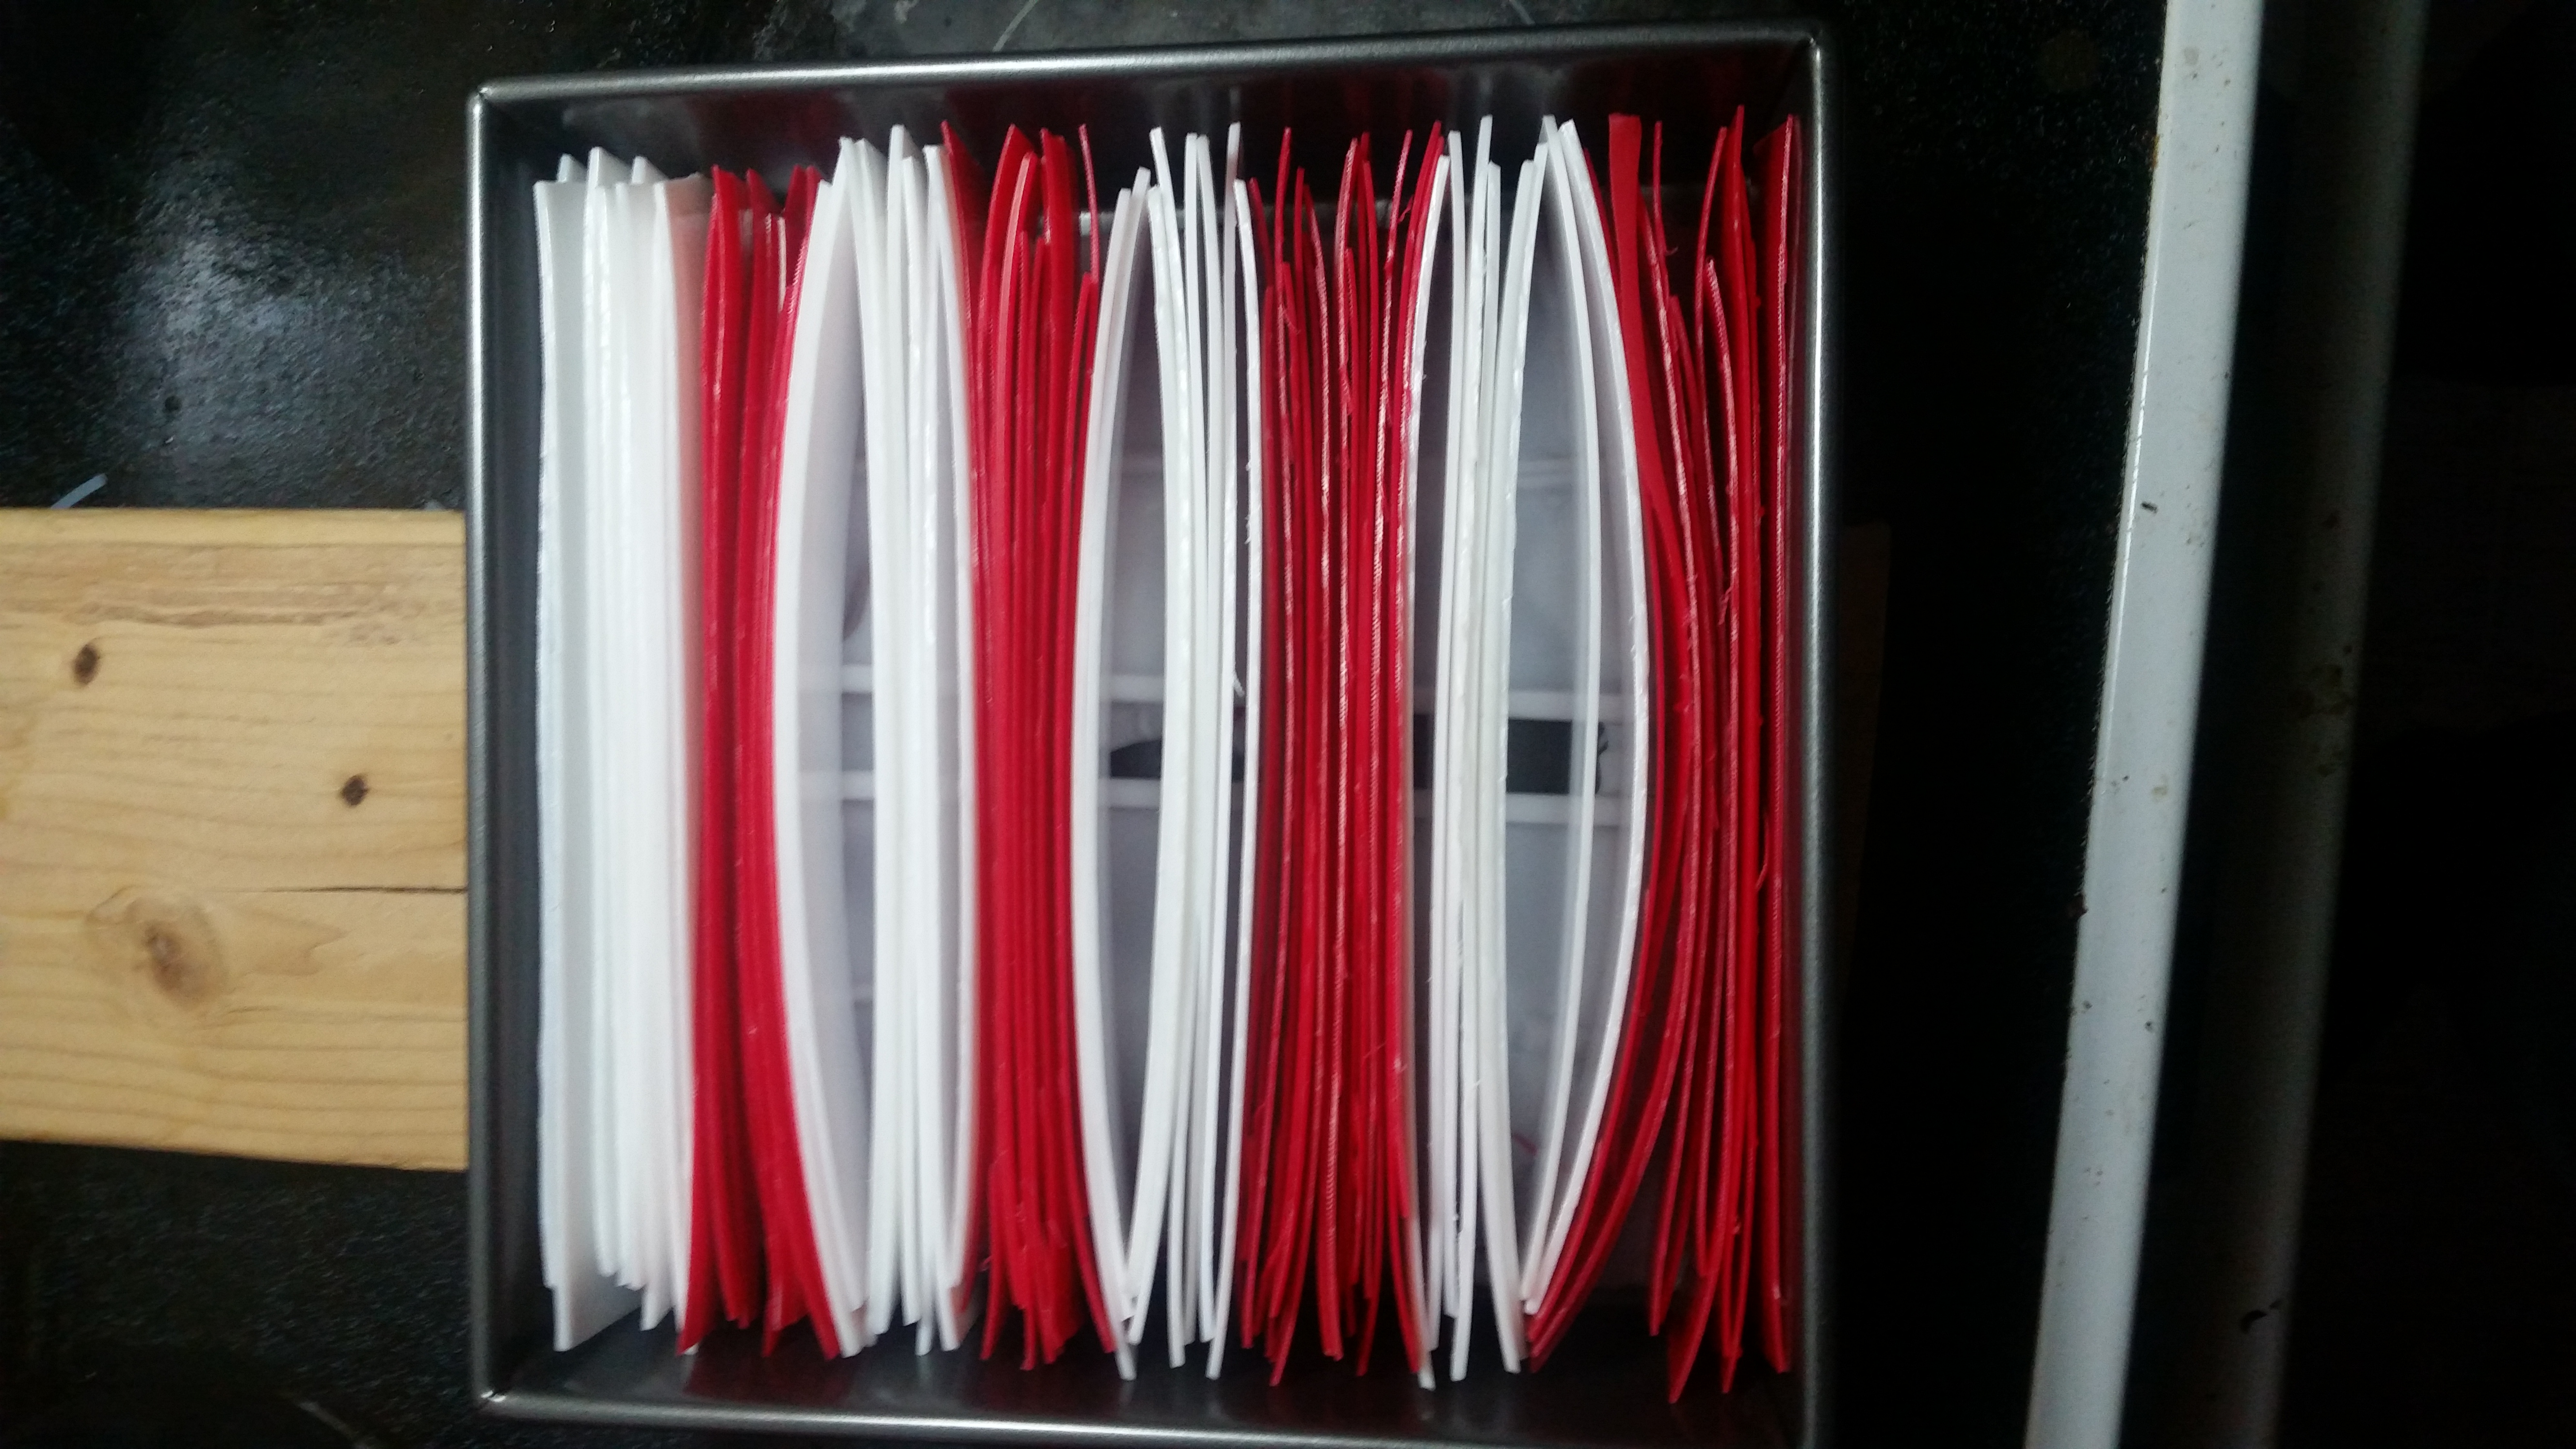
The video above describes the overall process I used to melt my plastic. It also shows how easy it is to get really cool designs with such a simple process. I started by acquiring my material and prepping it to melt. To prep the material all I did was cut the buckets into strips.
After I had my material prepped I could start melting plastic. To start I added a primer layer to the bottom of the pan. This prevents the strips from heating up two fast, without melting, which could cause burning. This layer also serves as excess material that can be removed after the plastic cools.
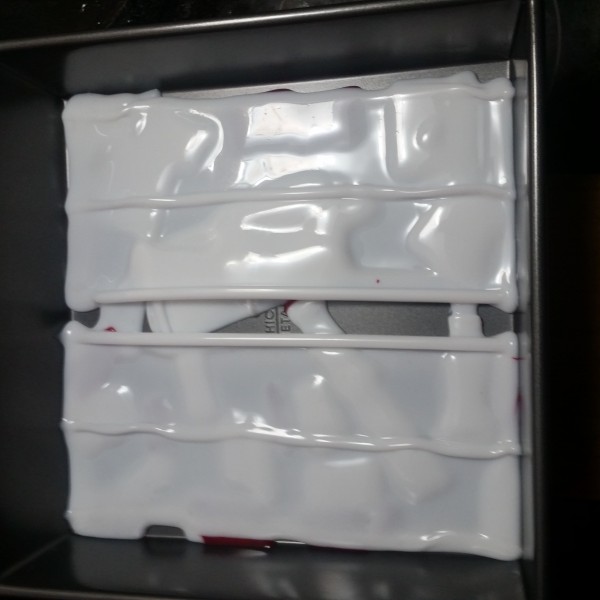
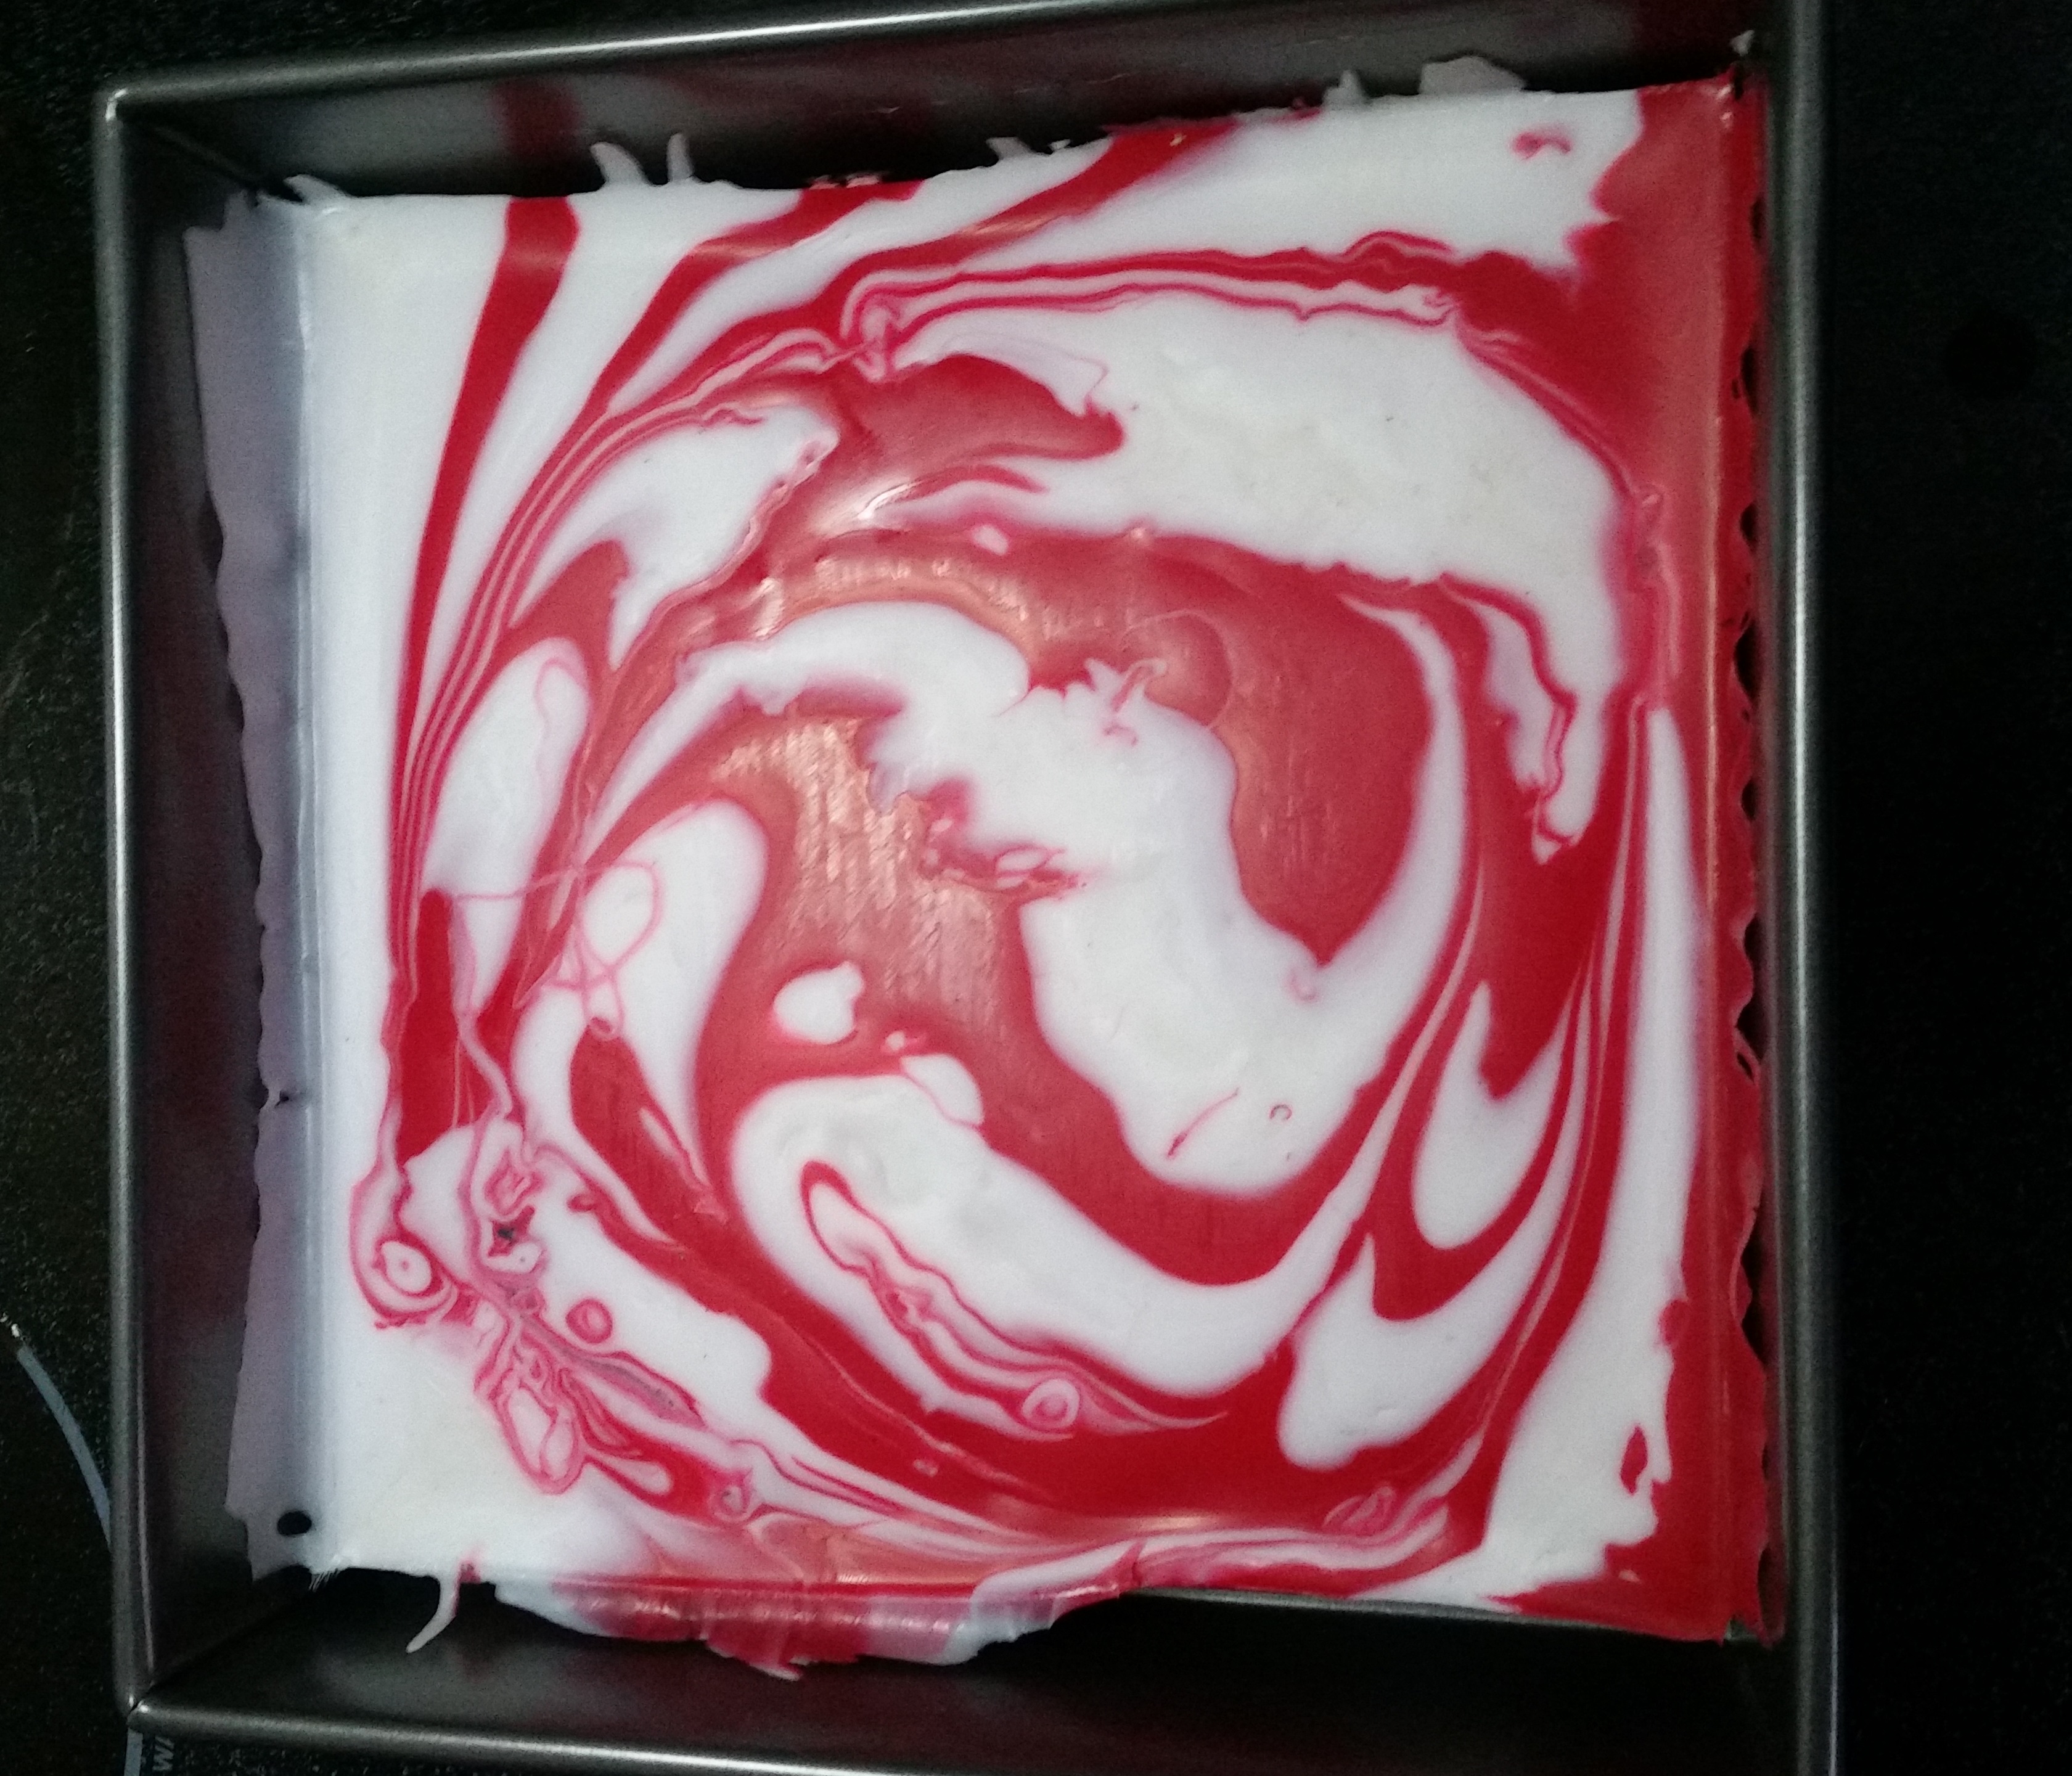
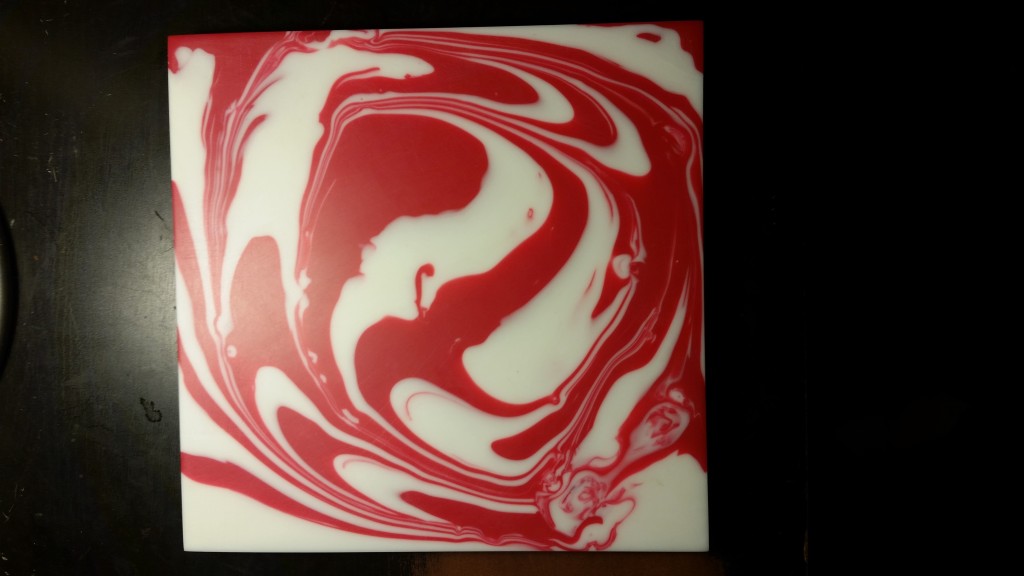
With the primer set, and the material placed the way I liked it was time to put it into the oven. I set the oven to preheat to 360 degrees before I placed the tray into the oven. From here it took around and hour to full melt. Once the material melted completely and was fluid enough that I could drag a metal rod through I could create my pattern. I decided to use a swirl pattern as I wanted to achieve a peppermint candy, or candy stripe aesthetic. Looking back I feel I could have achieved the peppermint swirls more easily if I had arranged the strips differently.
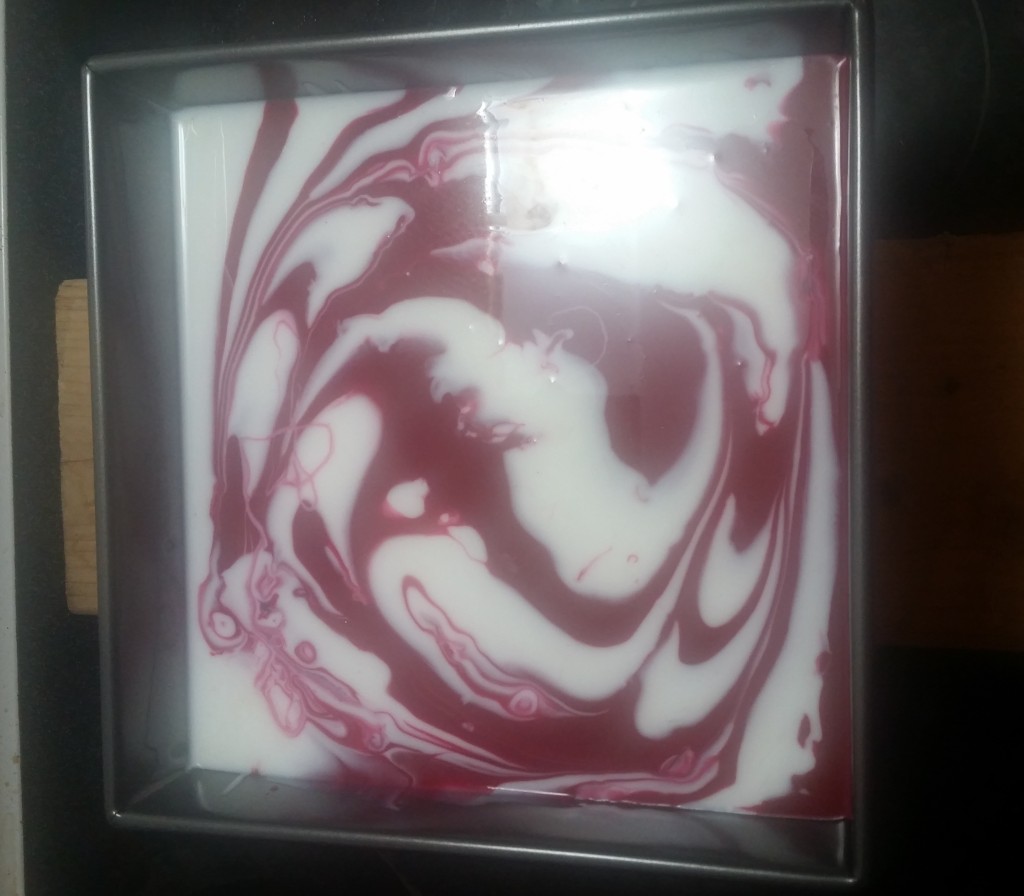
Often times the plastic will melt two fast and will trap air underneath. These bubbles will remain after the material cools and could potentially ruin the project. For this reason after I combed the plastic to create the design I left it in the oven for fifteen minute intervals, taking it out to pop the bubbles that make it to the surface. I did this until no bubbles were left in the plastic and allowed it to cool.

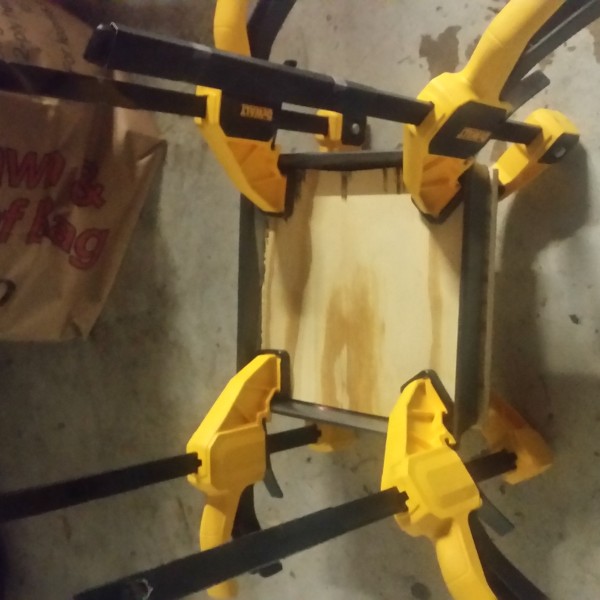
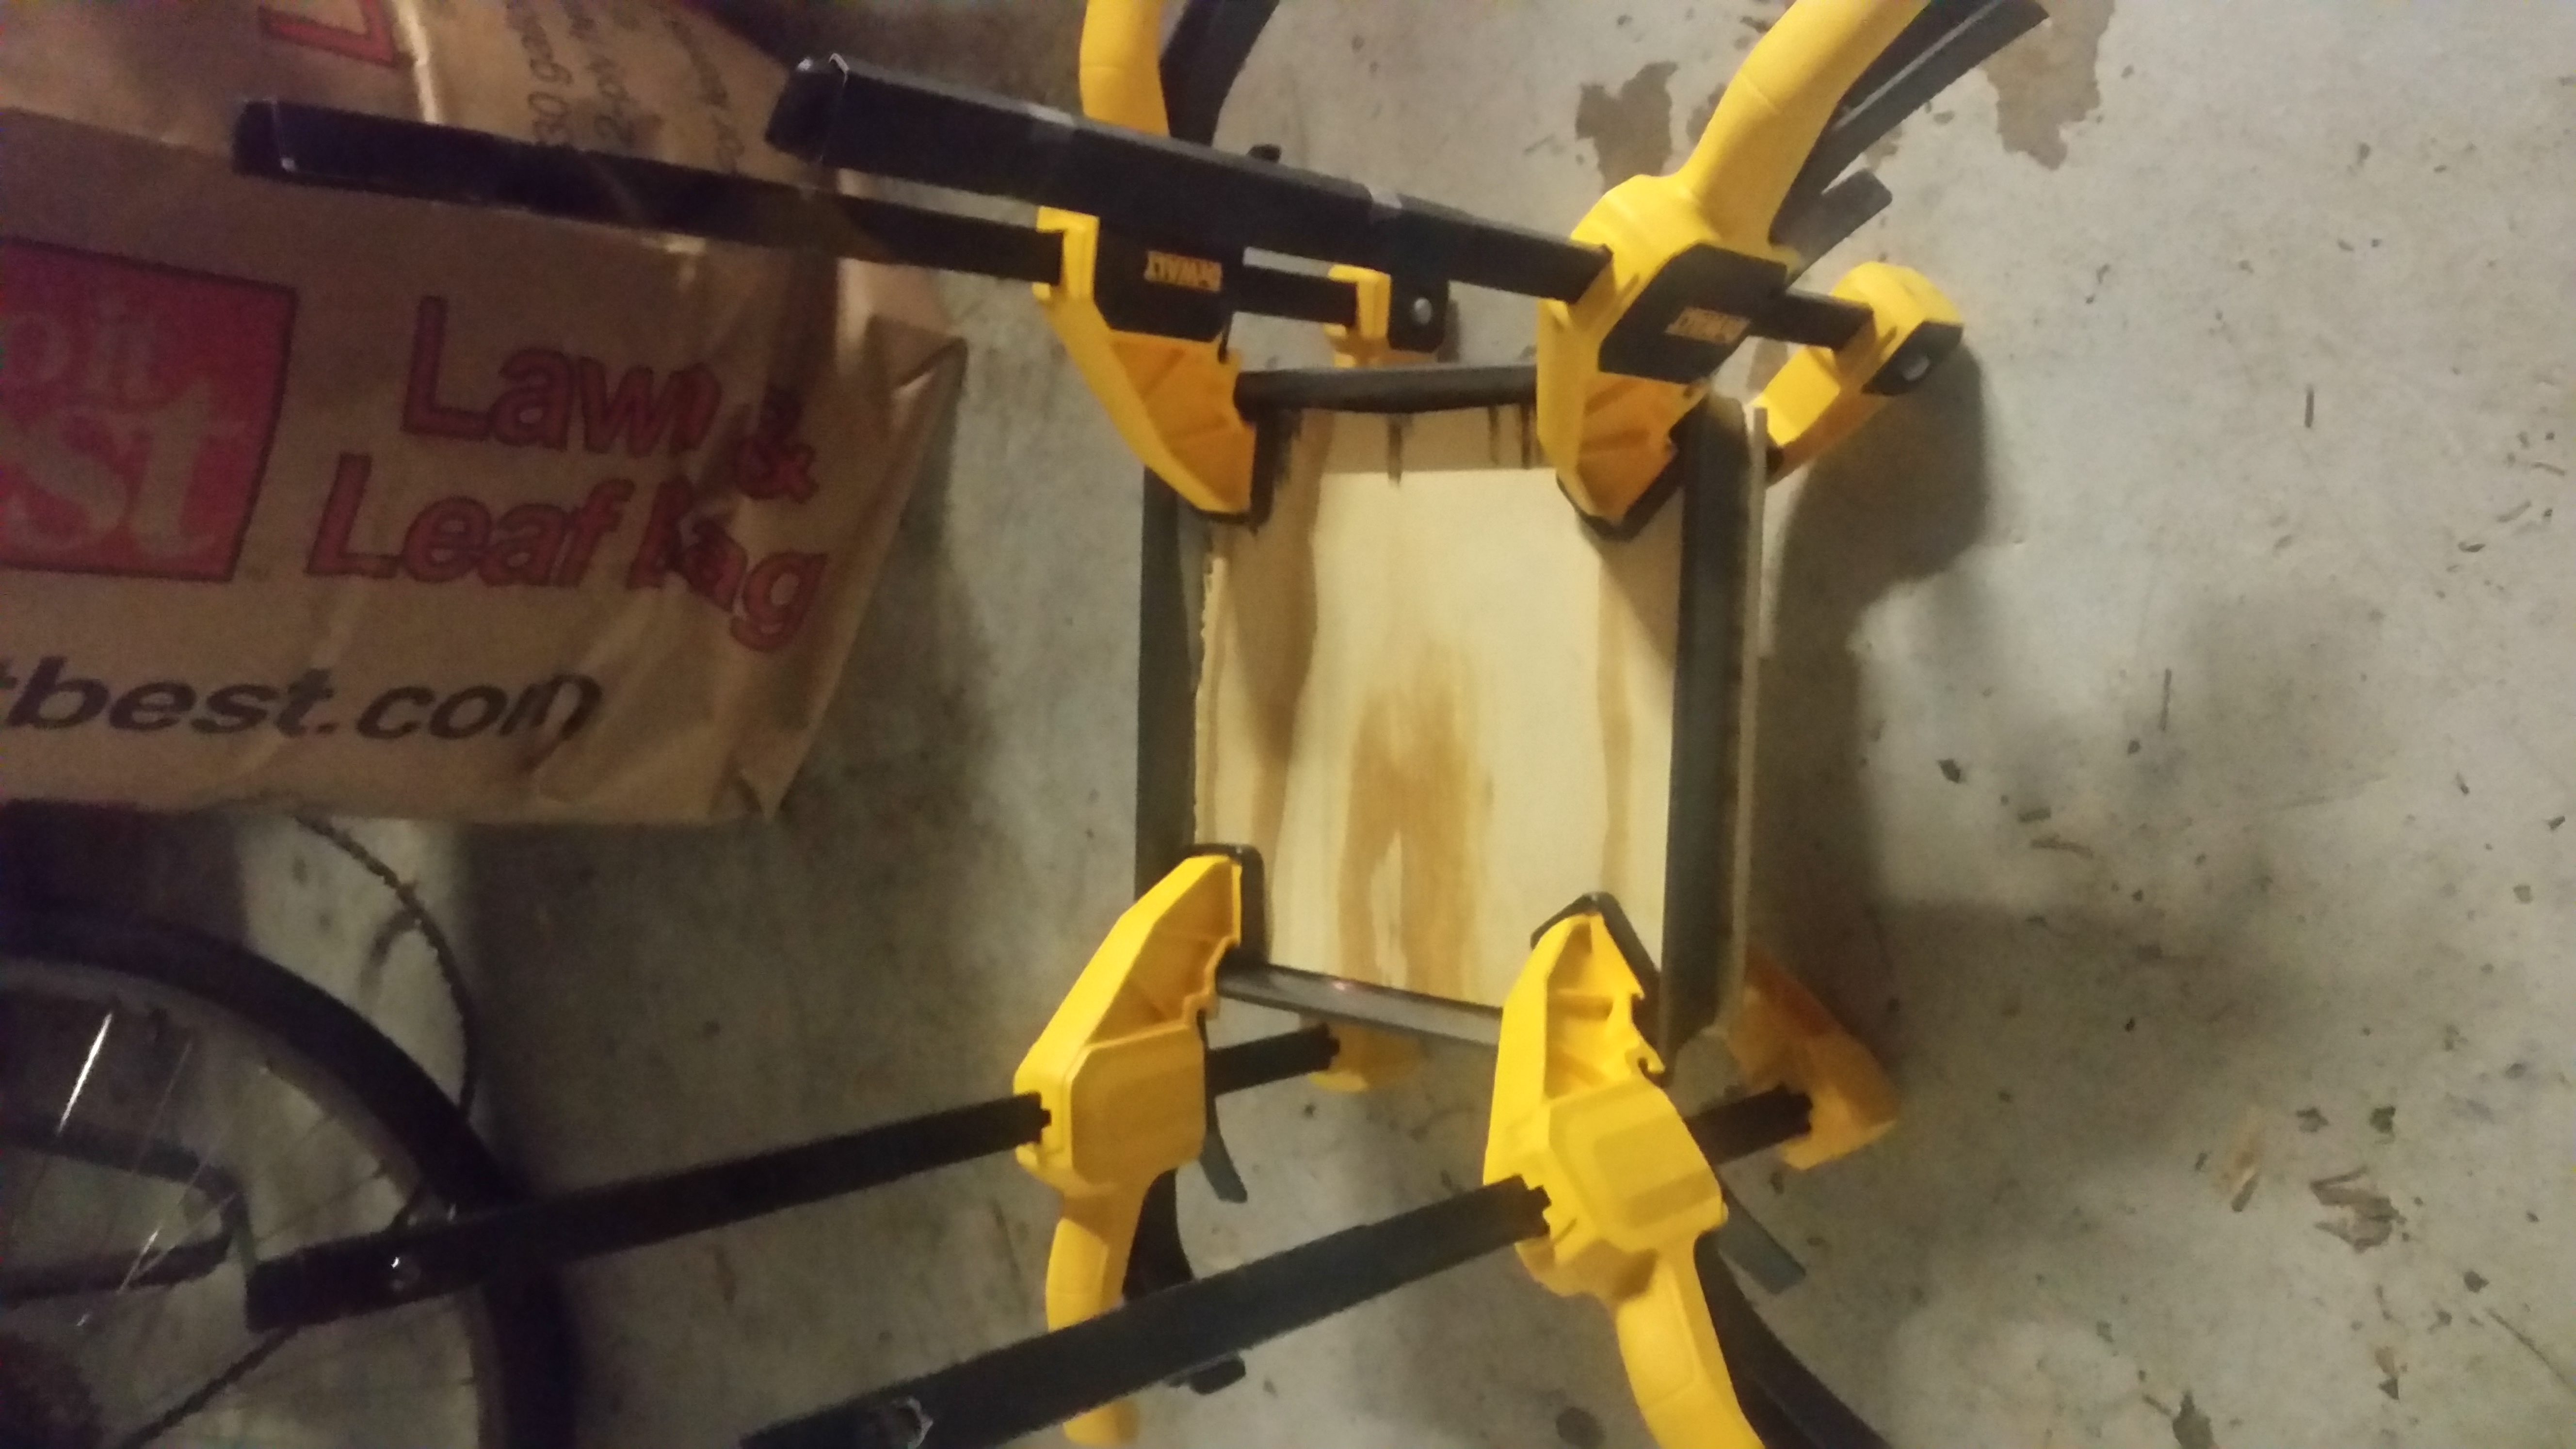
As the plastic cooled I had to clamp it between two pieces of plywood to prevent it from warping. In the end the block was relatively flat, however there was a bit of warping. With the cooled piece of plastic I had to face the the sides to get it square and flat. Afterwards I sanded and cleaned the display side to remove machine marks and make it more presentable. In the end I am very happy with the outcome.
In terms of my functional goals I am very happy with the results. I originally wanted to find a cheap material that is machinable out of recycled goods. I feel as though I succeeded in this aspect and as a bonus I was able to find a material that could create cool and unique patterns.
As for my aesthetic goals I think I captured the candy stripe aesthetic well enough, but I think if I organized the strips and stirred the plastic differently I could have gotten a much smoother pattern.
For the future I think I will be able to try this again. I want to try different colors and different patterns to really explore what I can do with this material. As for my artifact I can finally have something hanging on my wall that I can say I made.
46 Comments. Leave new
I like that you machined the piece to give it such a great finish and form.
It feels almost waxy, it’s a really interesting material. This would look great if you made a few more with different colors, and hung them up on a wall. Choosing the right colors could give it an Andy Warhol pop art look.
Very cool! I never knew you could melt down old milk cartons or buckets like that. You could make some cool coasters out of this!
Great looking material swatch you’ve created. I imagine this sheet scaled up and molded into furniture.
That’s an awesome use of plastic! It prevents the waste and minimizes the energy needed to actually recycle it. It looks really nice too! Good job!
So awesome! I love the whole process you go through to produce this, definitely something I can do at home.
You nailed the candy cane/peppermint aesthetic. Do you have plans to make anything with the plastic or are you going to simply hang it as it is? That would be a super cool way of making cheap HDPE blanks to machine for other projects.
I was really impressed after getting to hand the final product in class today. You did a really great job of prepping the final product – it has a great texture and heft to it! While you may not have been fully satisfied with the final pattern, I think it looks pretty sweet! It would be really cool to see if you could carve something out of it!
Did you try pouring any stock into a mold? It would be interesting to see how moldable it appears to be, and how this effects the outside texture, as well as the air content. I’m curious as to how many buckets you ended up having to use to create this piece – did you lose much material in the process? I’m also curious as to whether or not you could add color to stock after you’ve melted it down.
Thanks for providing the videos, I think I may try doing something with this plastic sometime soon. If you could add the links to the slingshots that would be awesome. You showed a picture of one today in class, and it looked amazing. Really awesome project!
This would be sweet to tile your house/bathroom with. I really like how smooth the piece looks and feels. nI cant help but try this out myself asap
Super cool, I love what you did with the colors. I might try it, you made it seem fairly easy but you also made it very impressive.
Very cool final project as well as approach. Interesting way to think of finding a machinable material, and the final product definitely has an artistic feel!
It looks really good for a first attempt. You could make really cool coasters with it. Nice work!
I really like your aesthetic, I think you captured the look you were going for. It was also interesting to see where you inspiration came from. What obstacles did you face? Do you have any plans for the plastic after this project?
it's really interesting to read your view on my hometown :D. i will check out Nee's when i go back in June. I think everyone has their own favorite stall for Laksa, kuehchap and kolomee in Kuh.cng.i.Are you going to be around KK in mid June?
"diversity outreach coordinator": are you being serious, or satirical, Mr Sailer? Or are you being serious about a post that was named by someone tongue-in-cheek? As they say on Slashdot: You must be new here.[Although your handle looks familiar.]
I like the aesthetic you chose, very creative. I’m glad to hear that there aren’t any fumes produced when you melt the buckets, you could really do a lot with this material. What are your plans for the piece? I bet you could 3D print, or otherwise make a mold to press into the semi solid plastic to get a sort of carved/sculpted look to it.
Is this something that you could translate to making cups or bowls with? I’m not sure how dangerous it would be to reuse HDPE over and over again when interacting with food or drink, but I think the color-swirl aesthetic would make for really interesting dish-ware (is that even a word?).
Your project looks really slick, reminds me of 70’s aesthetics for some reason. I love it as art and it would definitely be neat to see different colors but I really like the simplicity of your original design. It definitely evokes thought and emotion.
It is a very attractive use of milk bottles and seems very sturdy. It may be interesting to do in unique shapes that reflect its function more clearly.
I love how simple this is at first glass, but yet intricate in the process and final design. When I imagined you melting the plastic down, I imagined you in some sort of forge with fire everywhere, but it’s pretty cool that you were able to just use your oven!
Really neat process, and I find the swirly red plastic aesthetic very pleasing. It reminds me of this artist named Jimi Gleason, who makes art work by spreading hundred layers of paint and acrylic over a canvas until it has a plastic metallic feeling. The process for making it seems fairly safe since no fumes were produced. I do agree with our Professor that the Candy Stripe artwork could make a really cool cutting board.
I like the finished CNC look! these are awesome place settings or cutting boards too.
This was a really interesting idea. I’m curious If it is possible to melt these into forms like climbing holds or something. If it is fairly easy to create things from old jugs in your own oven that would be great!
This looks great, and it seems like a fantastic way to make stock pieces of HDPE too.
Very creative process… I’m definitely interested in trying this out with different color schemes.
Nice work! The milled surface really adds a touch of professionalism to it.
What did you mean by choosing this project/material because of machinability? Is there a specific object that you plan to form with it now?
Interesting use of recycled materials. I never considered melting down and reusing plastic. This seems like an interesting first step towards fabricating all sorts of projects. You could easily machine the slab in to new parts or make a casting!
Great use of non-diffusive mixing! Lovely tactile aesthetic too, very nice on the fingers.
I love the swirl design you were able to create! I never would have imagined creating something like this from milk jugs! Do you have any interest in expanding your design to something bigger or multiple pieces for wall art?
This is a really unique idea. I would never have thought that you would be able to melt milk jugs and buckets, and make a usable material. The multi color ones above have a tye dye like aesthetic. It would be fun to make a bunch of pucks and turn them into drink coasters.
Awesome Aesthetic. I know it’s not edible but it looks tasty. It is a great idea for an inexpensive and accessible molds. Its good to see that your design is linear. Thanks for giving credit for the Youtubers. Well done!
I like how square you managed to make this! Ah you machined it, that’s how. Very cool. I bet you could have a blast machining this stuff.
That’s a very cool project never heard of such aesthetic/art. I wish if I seen more pieces with different shapes but still this is a cool piece, I would hang it on my wall.
Thanks
I like the candy stripe aesthetic you went for. This was a really unique idea and the project turned out looking sleek and smooth.
That’s a subtle way of thniking about it.
Cool idea. I really like the natural design look from the swirls. I think it would be awesome to make a slingshot out of it like your original inspiration.
That makes me hungry. Could you try to make other patterns, or is the pattern completely random? Could you make dinner plates/other kitchen stuff?
This is a really creative idea. It looks like an ingenious way to recycle old milk jugs, and it turned out very aesthetically pleasing. Next time you should go psychedelic and add a whole bunch of colors!
The final product definitely has a really nice marbled pattern. Is there a potential for something functional to be made out of this recycled material (after it’s been melted and marbled)?
One thing that I didn’t get from the post was how thick it is. I am curious about how heavy it is. I wonder, instead of hanging it on the wall, if you could use it like a hot plate or a center plate on a table.
This is really cool. I like how creative it is and that it is purely a wall decoration in art’s name. I think it turned out really well and like what materials you used.
I really like the final look, very artistic
Brandon, this is really a cool project. I had no idea that you could use this type of plastic in so many ways! One thing that could be cool for the next time is to look up designs in the tops of coffee. Often times, baristas will add a bit of flare by creating images in the foam. I think that you could definitely do this with the plastic by doing a combination of clever laying out structures and by using precise marks with the metal rod. One thing that could be really interesting as well is to try to add a third dimension to the art. Could you do something like pouring the plastic so that it forms mountains and valleys of plastic? Maybe this would look too much like a 3-D printer with different layers but something to consider. One other thing that would be good to know is what aesthetic inspired this, or what aesthetic were you going for? I really like the “peppermint” look and I can almost taste the peppermint as I look at this work of art.
Overall, really good job. It looks fantastic.
I think you had a cool idea for your project. You came pretty close to achieving a nice candy cane aesthetic. You’re design process might have been linear, but I think that your loop should have looked more like the loop you drew up. With a design that is as artistic as this, it’s usually not likely that one will get the desired look in the first try. I think there are a lot of opportunities to experiment with this, and it would have been really cool to have seen that. For example, maybe there are some other things you could add to the plastic to get different looks (glitter comes to mind, but there are probably better options out there). Also, I think maybe making the ornament circular instead of square seems appropriate. Overall, I say you did a really good job. I’m surprised how well it turned out on your first attempt.
Brandon,
I am really digging the looks of your project. I like the color choice of red and white. I find it funny that it looks tempting to eat 🙂 . Great job on the procedure (you described it very clearly also). Thanks for giving credit to your inspiration, its important to be clear about that. There is a great deal of aesthetics in your project. Its nice to see a linear design pattern like yours, maybe that happens when you end up feeling good about the firs attempt of the design you had. I think it was going to be hard to get the peppermint swirls since you are steering it after melting. Maybe you can make the swirls with the plastic first and then melt it the way it is without steering. However it is hard to predict how it will look like. How will you hang this on the wall? I was thinking you might want to avoid drilling a hole in the back, because you can actually use the two faces for good aesthetics. You can use a wide enough paper binder clip to grip on the pallet and you can hang it from the clip. This way you can flip sides or orient it differently. Great warm up project, Good Job!