
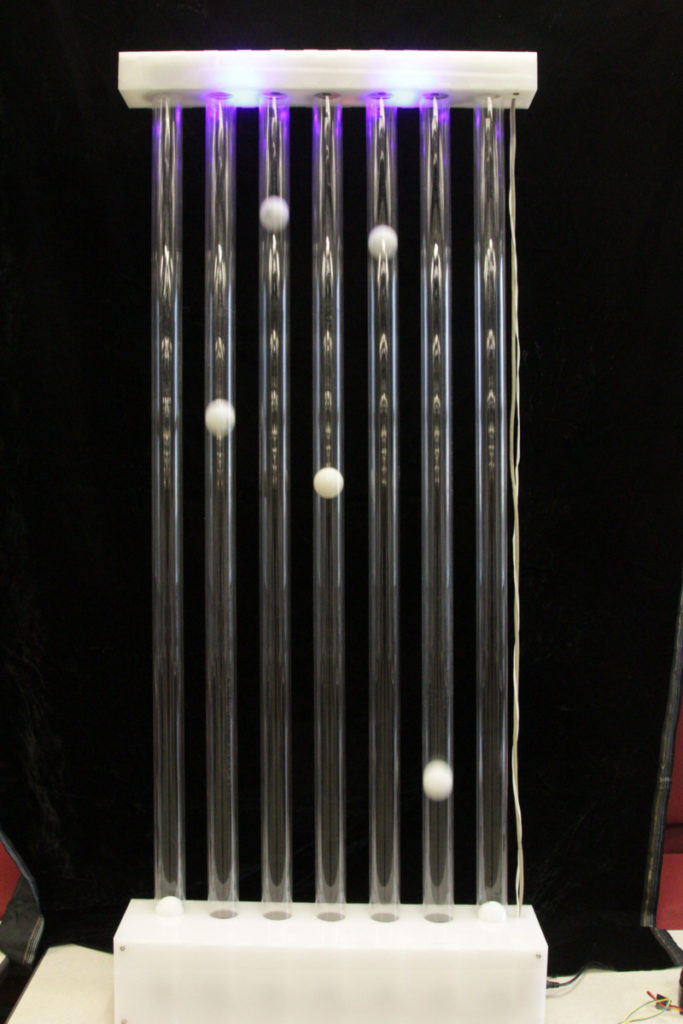
Results
Despite demoing the project at the design expo, I was unable to get the levitation audio visualizer to work as originally intended. The original idea for the levitation audio visualizer was to read in audio and change the height of levitating ping pong balls/color of lights to visually display the music. Although I was able to get the audio filtering, multiplexed range finding, individual fan control, and LEDs all working, I was unable to figure out adequate tuning constants required to get the PID control working. For the design Expo, I ended up programming a routine that randomly lifts the ping pong balls up and down (see the below video of it running at the design Expo). Even though I did not accomplish what I set out to, I believe that it is still a visually appealing contraption, and provides the user with an interesting and unique experience. I am currently undecided on whether or not I will continue trying to get it to work as I originally intended.
Aesthetic
In it’s current state, the project embodies a minimalistic and tech aesthetic. All of the electronics, wiring, and fans are discretely hidden away inside the enclosure, which makes it’s function feel somewhat mystifying. The smooth action of the ping pong balls traveling in the tube also does a wonderful job of imitating the sensation of physics-defying levitation. For the Expo I set the LEDs to blue, and had them slowly pulsating. I was unable to demonstrate the color changing lights without reading in audio, however, while I had them running without the fans, they did a marvelous job of illuminating the opaque white acrylic. This closely mimics the old school audio visualizers that provided the initial project inspiration. Additionally, this project has elements of generative art and information visualization, which I hope would be conveyed if the balls correctly followed music. I imagine that this thing would look remarkably different, and provide a completely different visual experience, while dancing to classical music rather than heavy metal. If I had been willing to accept that I was going to be unable to figure out the PID tuning in time, I could have programmed in some cool wave patterns with the balls and an interesting color pattern with the LEDs. On this project in general, I feel that I focused too much on trying to convey the aesthetics through the function. I could have definitely put further consideration into the design of the enclosure itself.
Lessons Learned
The number one lesson that I learned while working on this project is that it is okay to change your idea when you discover that it is too difficult. I had first envisioned that I would be able to control the height of each ball by just changing the voltage applied to each fan. After some prototyping, I found out that the ball would either not lift, or would lift all the way to the top. At this point I figured out that I would need to use feedback to get the balls to be suspended in the tube. I was so excited about turning my idea into reality, that I wasn’t ready to accept that the additional required work/difficulty was not feasible to do in the given time. Along with this, I also learned the importance of prototyping. I was able to figure out that IR sensors were not going to work early on, and was able to switch to ultra sonic range finders.
The next important lesson that I learned is that system integration takes a substantial amount of time, even if the subsystems are already functional. It turned out to be ridiculously time consuming to make proto-boards for each of my circuits. I overlooked the difficulty in figuring out a good layout, preparing all the wires, and soldering them together. In hindsight, I think that it would have been quicker and easier to have designed the circuit boards in Altium so I could make it in Tim’s lab. It is essential to prototype the circuit on a breadboard beforehand because it is almost impossible to rework more than a couple of connections.
I learned some other less important lesson which still proved to be frustrating along the way. I was unaware that long wires have such a significant resistance, and that the voltage drops as a result. I spend a while trying to figure out why my range finders were so finicky, and I came to realize it was due to have 6ft of wire running from the top of the tube to the bottom. I also found that you need to give adequate space for electronics and wire routing in enclosures. When designing in CAD it is tempting to optimize the size exactly, and you don’t usually think about where the wires will run. At the end, I had difficulties getting everything out of the way so that I could screw the top lid on. In the future, I will avoid using glue whenever possible. It looks messy, it is hard to align things while it’s drying, and then the parts are not removable. Also, switching voltage regulators are way better that linear voltage regulators. They consume less power, are more reliable, and do not get hot.
Finally, I have a newly acquired respect for controls. It is much more difficult than I anticipated!
Take Aways
While working on this project, I gained a significant amount of experience working with electronics. I had previously never done a project with audio, used range finders, or tried to implement control algorithms. Going into this project, I was a little nervous about trying to figure out so many new things at once. Going through the process of researching online, buying components, and successfully getting it to work myself has definitely reduced a perceived barrier of difficulty that I had. I was surprised how easy it was to use the Teeny micro controller, and I will definitely use it again in a future project. I know my new ability to build custom cables will also come in handy. In addition to learning some new technical skills, I also really enjoyed the experience of trying to understand and intentionally emulate a specific aesthetic. It can sometimes be tricky to execute exactly what you have in your head, but it is amazing how a design can be shaped by following just a few general rules of that aesthetic. I know that I will have an increased attention to form, and emphasis on the value that it creates, in future design efforts.
2 Comments. Leave new
You chose a really difficult project. Getting any kind of mechanical device to visualize sound is gonna be hard. Trying to move balls using air flow is probably one of the hardest you could choose. Layers of control systems. Serious actuator precision. In the future, you might want to use solenoids and compressed air.
Still, it looks cool. If you didn’t tell me what it was, I would have appreciated it just as a display.
I’m really impressed with the electronics work that went into this project. However, your enclosure was nicely designed to minimize these components and give a pleasing aesthetic. The white acrylic and clear tubes was a great choice for material. It seems you have thought through many future design considerations, and I would like to encourage you to experiment with these possibilities. It would be way cool if you figured out how to control the ball’s height more accurately and sync these movements and color to the dynamics of an audio input. This project among others definitely made me think of the potential that aesthetic mechanical designs have among venue designs as well as other events sponsoring art of this variety. Great job