
Seeing as this is my first kind of physical and functional project, I want to keep it pretty simple while still challenging myself to learn things like wiring the lightbulbs and make them have dimming capabilities. I wanted to create something I knew I would use. I am a big fan of Pinterest and DIY projects, so I did get the idea from Pinterest. A vanity mirror would be hands on and fictional while also being a good way to showcase an aesthetic and be a decoration piece in my bedroom.
Below were my top 5 constraints at the very beginning of this project.
- Frame: If my mirror comes without a frame, I need to find one/build one. The frame needs to be easily manipulated (to drill holes/decorate) but it needs to be strong and stable.
- Lightbulbs: I would like it if the lightbulb brightness could be adjusted but I’m not sure what kind of work goes in to that. I also need to get lightbulbs that will not make be burn up if I sit in front of them for a while. Putting on makeup or fixing my hair is no fun if I’m sweaty doing it.
- Cost: I hope to keep this relatively cheap. Vanity mirrors can run for up to a couple hundred dollars. I have seen some DIY versions on Pinterest that I will try to follow. This all depends on what kind of recycled mirrors I can find: the mirror will definitely be the most expensive part. If I don’t find any quality mirrors I will be forced to buy one which will increase the cost greatly.
- Mounting: I don’t want the mirror to have to lean up against a wall. I either want it to sit up straight on its own or be easily mountable to the wall without too much trouble or wall damage.
- Aesthetic- I think I want a Marble stone aesthetic.
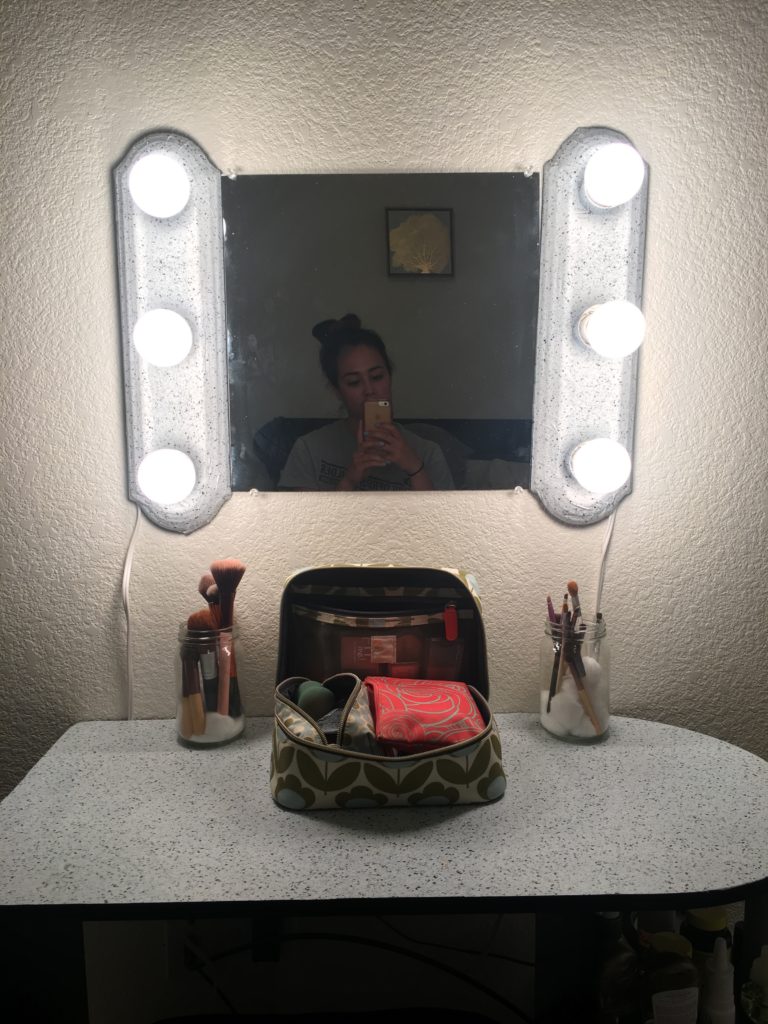
Mainly, I was very determined to keep this under 75 dollars. (they sell for a couple hundred!) After getting the materials for the prototype phase, I believe I will reach this goal. I used a mirror I already had and removed the frame it was in, purchased vanity bars that house the lightbulbs ($24) and purchased one roll of contact paper ($8.00) to use on the vanity bars to achieve my aesthetic goals. The light bulbs came in packs of four so I needed two ($18 total) plus two dimmers so that each set of bulbs could be dimmed and adjusted independently ($24) and an extension cord ($4). This brings my total up to $78 dollars. So I am right there within my budget! yay!
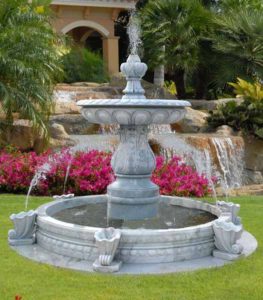
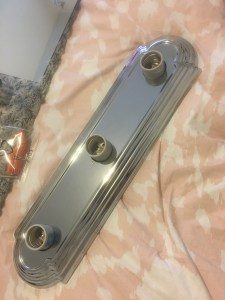
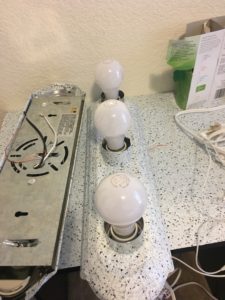
I started out by laying the contact paper on top of the vanity bars. I wasn’t able to find marble paper like I wanted, but I stuck with a masonry aesthetic and found some paper that looked like stone, which I think looks nice and expensive. I thought about big decorati
ve water fountains like the on pictured here and wanted to copy that aesthetic. I thought about how the vanity bars covered in the contact paper looked like the stone foundation of the fountain and that the reflective characteristics of the mirror resembled the actual water in the fountain.

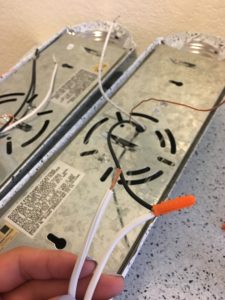
Next I wired the bulbs and connected them to dimmers. Because I am in an apartment where my landlord is very picky about holes in the walls, I decided not to mount the mirror yet. I have been hanging it up with thumbtacks which has worked well for now but is definitely not a permanent solution. Once I move out of this apartment in August I will find a better mounting solution in my new home. The three separate pieces (two vanity bars and the mirror) allow for me to find a new bigger mirror whenever I can afford it and I can also change the look by moving around where the vanity bars sit in relation to the mirror.
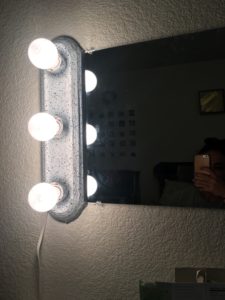
I am happy with the end result and made it for cheaper than all of the DIY videos I saw and MUCH cheaper than what is being sold in stores.
5 Comments. Leave new
I think the coolest part of this project is that you basically beat everyone trying to sell this to you. You found a way to produce something completely functional that you need, and saved money doing it. I really like the stone aesthetic. The light bulbs shine really bright, so this seems like it could work not only as a mirror but also as a light source. Good job!
First off, I’m really glad you went with the lightbulbs instead of the flowers: even though the flowers would be more artsy and colourful, I think the lightbulbs challenged you and added a dynamic aspect to your project. Additionally, the dimming made the product more functional and actually usable (the lightbulbs seems really bright at full capacity).
I think your water feature aesthetic is really cool and a good way of explaining the speckled print. The speckles do make the side bars look like an expensive stone and the mirrors do resemble the water reflection from the fountain, Its too bad you couldn’t find a marble print, but that is super trendy right now so its understandable that it was unavailable.
This came out really well! I appreciate the marble contact paper and the beveled edges, it gives the mirror a sophisticated/ classy feel. Great job with the wiring and the dimming functionality as well.
This came out really great. When I saw it, I assumed you purchased the vanity bars with the masonry aesthetic already there; I didn’t realize you created that look using contact paper so good job! The fact that it’s light weight enough that it can be mounted using thumb tacks is impressive. The dimming switch adds great versatility to the lights, enabling you to crank them up in the morning to help you wake up, or keep it dim for the afternoon. Overall, this looked like a great project that you can get a lot of use out of. Nice work!
Fantastic project! I love that you sought to make a functional project, and you were able to challenge yourself to learn new concepts like wiring the light bulbs and making them have dimming capabilities. Great work with the aesthetic, they look like they belong with the table top in the featured image. I saw your project in person at the expo as well and was very impressed. It looks professionally done but I could tell you put more thought into them than any industrial manufacturers would. Honestly, I can’t think of any way to improve upon your project. As long as you are happy with the end result, I am thoroughly impressed! Great job!