
Abstract
The upcycling projects goal is to take some material, that may have been leftover or is no longer used, and create something that follows an aesthetic and in turn increase its perceived value to the creator. Some examples include creating furniture out of used cardboard, making a lamp out of plastic spoons, or maybe even creating a sculpture out of straws. For my upcycle project I created a steam engine sculpture with unused fasteners, lights, wires, and batteries from the Idea Forge and ITLL at the University of Colorado Boulder. This sculpture follows the steampunk aesthetic as it is a sculpture made from raw machine parts, similar to other steampunk art.
Background/Inspiration
For my upcycling project I initially thought about using leftover fasteners from engineering design projects in order to build what looks like a steam engine. This would follow the Steampunk Aesthetic.
I got this idea when I was looking around for fasteners for my design project. As I went through all of the fasteners that have been left unused over the years, I thought this would be a perfect material for the upcycling project. The bolts and fasteners barely get used, especially because they are so disorganized. So I just started grabbing handfuls from both the Idea Forge and the ITLL. I got all sizes, big and small with wide ranges in shapes. This way I would have the freedom to explore whatever it is I was going to find or think of.
After a couple days I had thought about how I could use these fasteners in a way that would increase the value in some way. As I was going across the aesthetics posts, I came across some Steam punk aesthetics. I couldn’t help but notice all of the fasteners and mechanical things used. I knew that this could be the aesthetic that I should go for with this material. I could make anything out of this and could claim the Steampunk aesthetic.
Now I did some research on Steampunk, what it meant, and how to create the aesthetic. In the definition was the answer to my question of what I would make. I decided to make a steam engine sculpture made out of these fasteners.
Next, I had to figure out some way of putting these fasteners together. My first thoughts were using a hot glue gun we have at the school. The second was to use some sort of epoxy. I have gotten both of those and tested both to see which works better. I wanted it to look clean and with not too much glue. Those were my inspirations and how I came to decide what I was going to do for this upcycling project.
Supplies
The supplies for this sculpture were very simple and were very convenient and easy to get around the University of Colorado Boulder. Nothing was purchased for this project. Everything was found on campus, used or unused. The following list below is all of the materials used for this upcycling project,
- Fasteners and Bearings
- Wood for base
- Light, wires, switch, and a 9V battery
- Hot glue and epoxy
- Peat pot (biodegradable flower pot)
- Painters and electrical tape
Vision
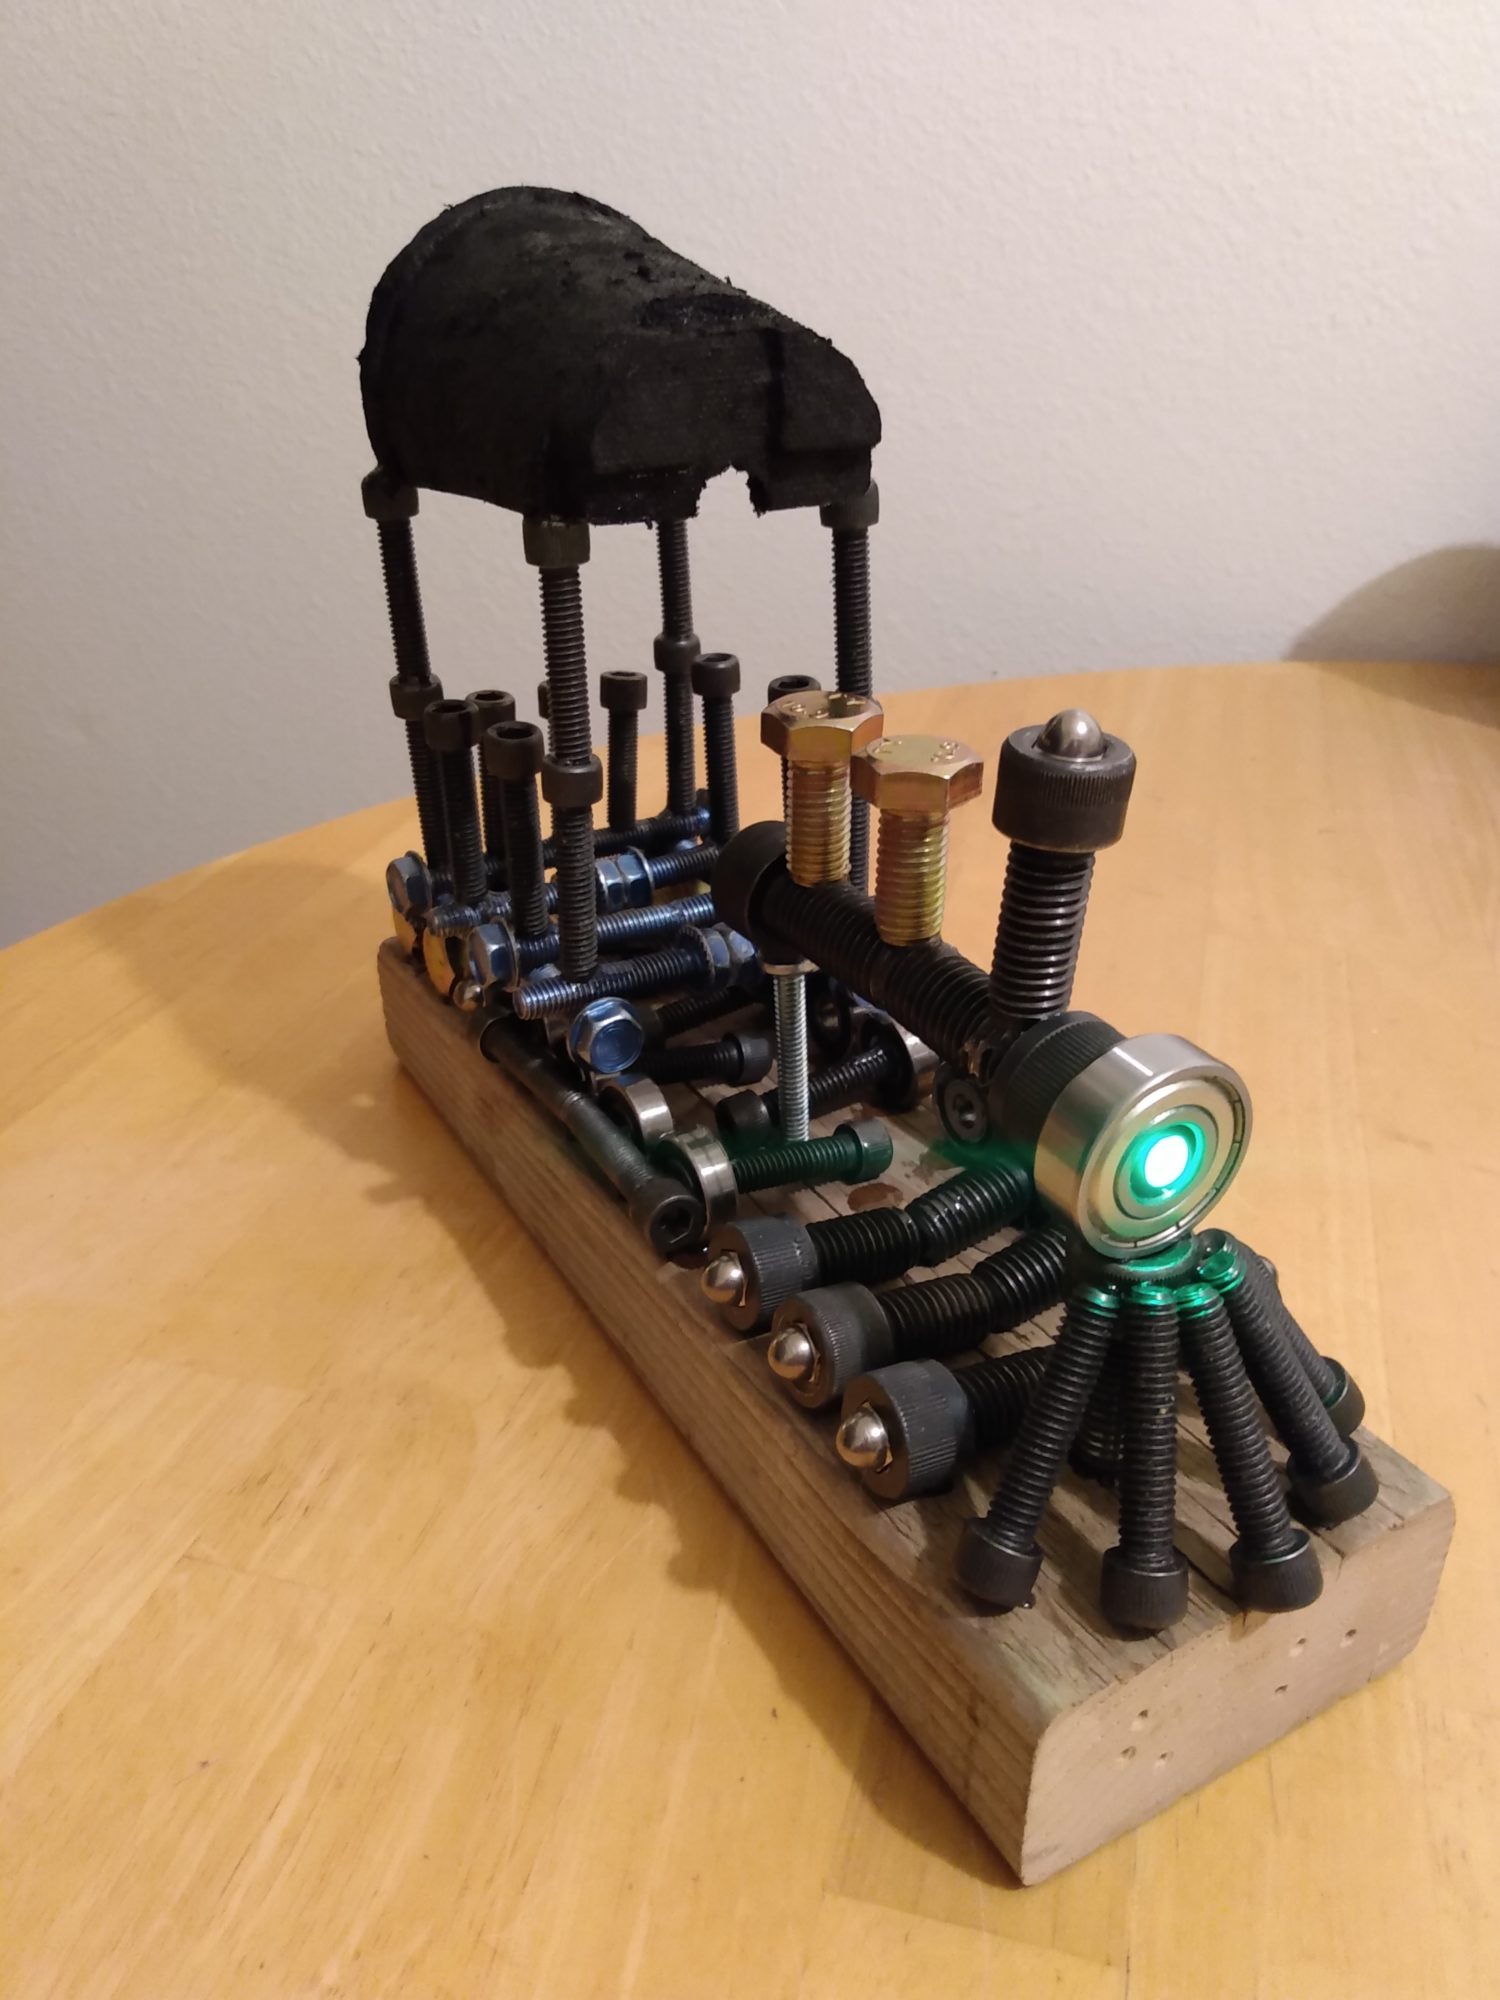
My initial vision for this project was any object sculpted out of used and unused fasteners. When I originally thought of doing the steam engine itself, I thought to myself what a perfect idea for the Steampunk aesthetic. It fit the aesthetic perfectly. Following the conception of the idea I initially imagined a ton of fasteners glued together to fill out the shape of a 1900’s steam engine. I pictured a mess of random fasteners that magically shaped the steam engine replica. Note that later in the project I realized there had to be some organization of the fasteners so that It was easily recognizable. There was no other function for this steam engine than to just look like a steam engine. I did not imagine it moving, or with any dynamic components. Later you will see as the project progressed I added an electrical/lighting system in order to further complete the aesthetic and form a recognizable steam engine. My vision definitely changed throughout the project, which was interesting to see. The picture in my head of the initial idea would still be great, but with the boundary conditions of my environment, skills, and accessibility, my vision changed.
Design and Fabrication Processes
The design and fabrication processes of this steam engine sculpture really took on the “go with the flow” mode. I have never done something like this so I just kinda went for it and hurdled the challenges as they came.
Design
The actual design process consisted of me concepting the material first, then the fabrication process, then working from the ground up designing and fabricating at the same time. I did not take on the traditional path of designing before building. I designed the wheels first, then fabricated them without knowing what anything on top would look like. Then once I finished the wheels, I played around with the fasteners in all sorts of combinations until something felt right. At that moment I fabricated the part I had come up with. This was done without knowing how the next part would be designed or fabricated. I never once sketched anything on paper. I had the material, so I just tried all sorts of combinations right in front of myself until I felt that the parts fit together in the correct manner.
I’d say the ideal design process would be a combination of designing it before and going along with the changes along the way. This is because I definitely find value in having thought out clearly what you want to do and preparing for that. Then when a hurdle presents itself or you see another opportunity, you can change the design. This allows it to be structural, yet artistic influence using the subjective decisions any human might make. I could have defintely drew something out before then. That would have been helpful, but also would have been a completely different outcome, which I am not sure I would have wanted. The sculpture turned out nearly perfect to me the way that I did it off the fly.
Fabrication
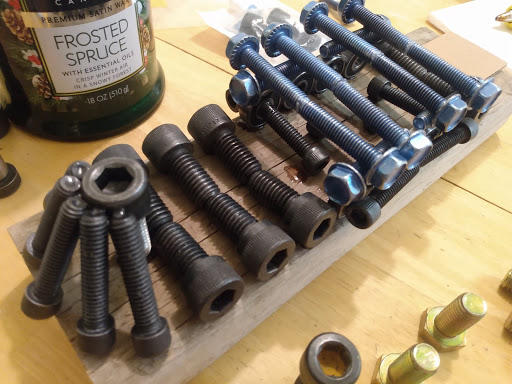
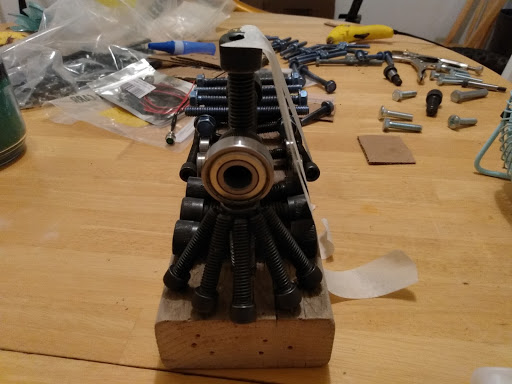
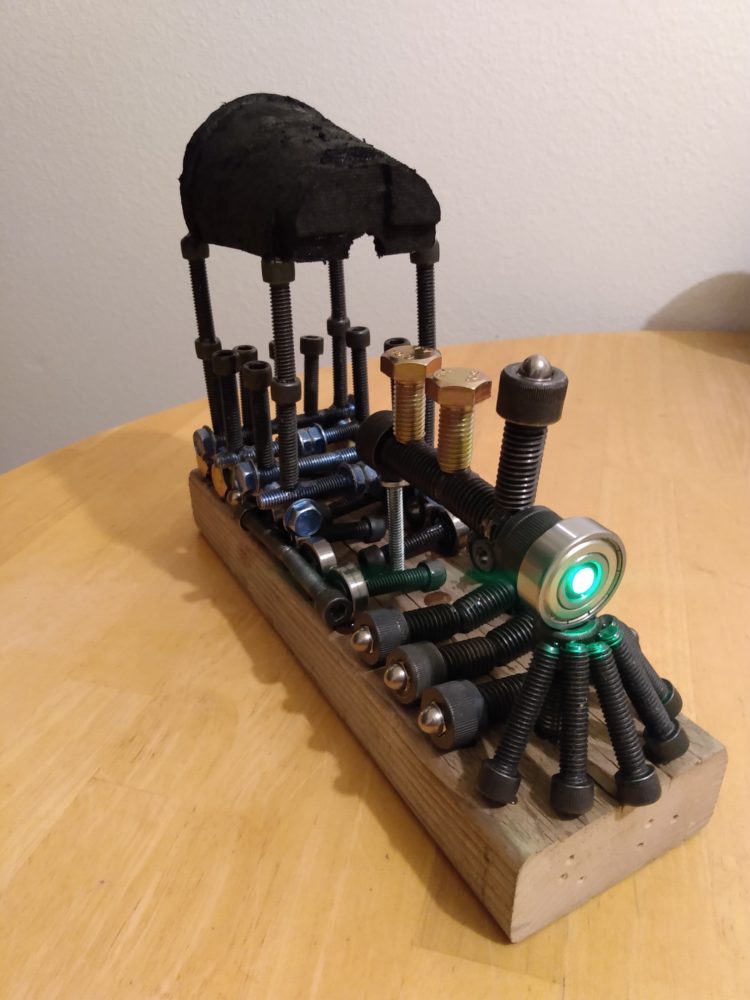
The fabrication process started with the 2×4 piece of wood. I layed out the bearings flat on the wood and glued fasteners to make the part connecting the wheels. Then I glued the rest of the fasteners as wheels. After I did that I made the front part of the train that removes debris from in front of the train. After the bearings with glued on fastener dried out, I glued them in the wheel positions I imagined them in. The blue bolts were then glued on as the floor of the train. Each glueing process/layer needed to be done fast, before the glue set, but had to sit there for 4-6 hrs to get full strength so that I could begin the next layer. Everything I did at this point was balanced without anything holding it in place. That way the glue could cure and harden without me or anything else holding it. The two pictures below display the end of this step.
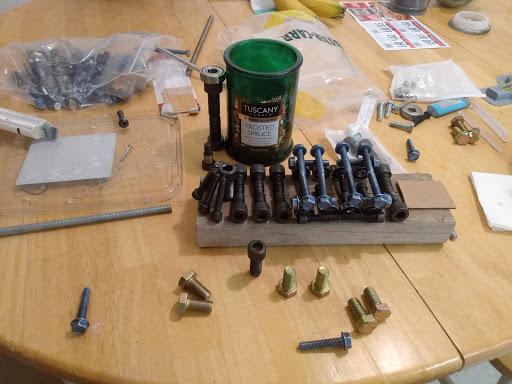
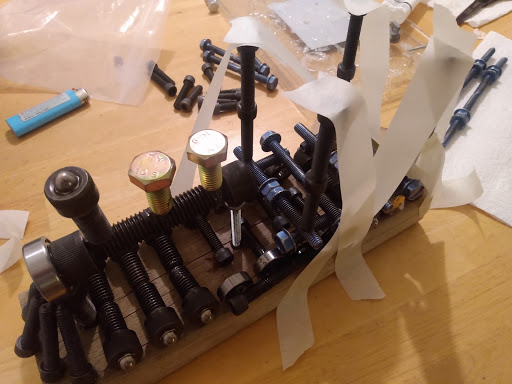
First thing I did for this step was drill holes in my two biggest fasteners, that way I could potentially put a cable for a light through them. This was difficult as they are made out of a hard alloy steel, but it worked. Now I glued two of the biggest socket head cap screws along with a big bearing in order to make the long cylinder in the front half of the train. Once that was dried, I balanced it on the front grill and put another fastener on the back to hold it up and keep it in place. Then I added the smoke stack on top. At this point I was having a very hard time keeping everything balanced, so I started using tape to hold the smoke stacks in place while the glue dried. This was the first time I used this technique in this project. You can see the results of this step in the following two pictures.
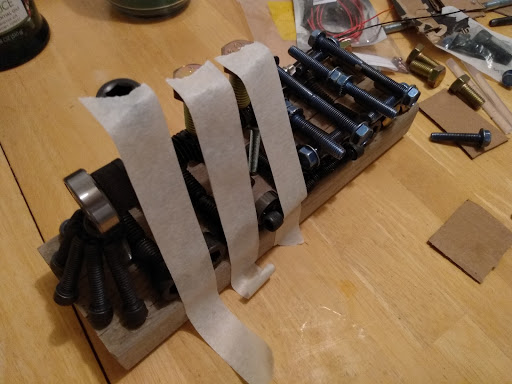
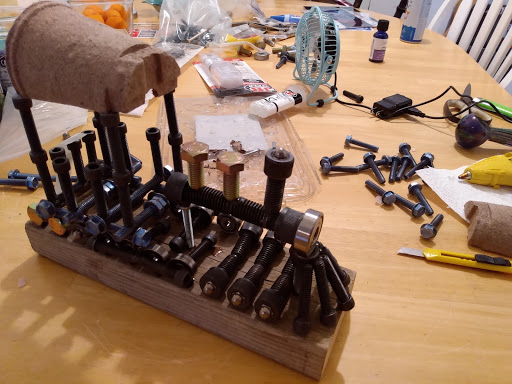
It was time to create the section where the engineer would be while operating the train. This was the hardest part yet. It was very difficult to balance these so I glued on one fastener at a time and then taped it down to be held in place to dry. I did this for each layer. Finally I had to figure out what the top would be. I initially thought I would use fasteners to do it, but it didn’t look right. So I used a biodegradable pea pot which had the curvature of a roof that I was looking for. It was perfect. I used super glue to put this on as it did not need to be so structurally strong. The following pictures show the process and end of this step.
Now that I had finished I messed around with a batter, wires, switch, and I light to see if I could somehow manage to get a light in the front of the train. Remember previously I had drilled the holes so it was possible. I found the perfect configuration with the battery hot glued to the back of the wood and the switch glued in between the back two wheels. I marked the red wires to make them black, cut them to length, and wrapped them with electrical tape before I put everything in place. Then I glued the battery and switches. You can see the battery, switch, and light positions in the following pictures.
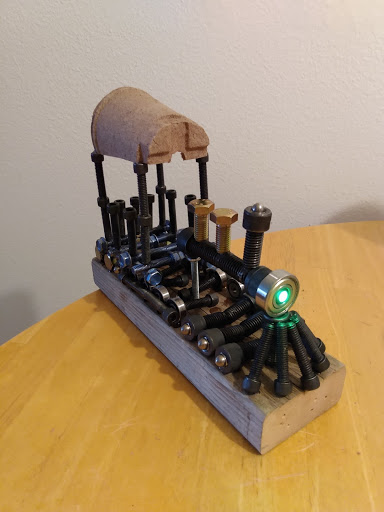

The final step was to paint the top/roof in order to match the rest of the train. I did this with a paint marker. The sculpture was now complete.
Final Sculpture
Functional Goals
I achieved exactly what I wanted to functionally. I wanted it to be a sculpture that represented what it was supposed to and with a working light.
Artistic Goals
As an artistic piece this was not what I had imagined initially. At first I pictured something a little more cluttered, but still with a definite resemblance of a steam engine. Throughout the project my vision/artistic goal changed and ended up how I wanted it. It really looks like a steam engine, follows the steampunk aesthetic, and is something I want to have in my house to look at. The light also makes it perfect. Really represents a steam engine.
What’s Next?
I do not want to change this piece at all. For what it is, it is perfect. I will be keeping this in my house as a school artifact/sculpture of art. I am excited to be able to show this off to whoever comes over to visit me.
14 Comments. Leave new
Hi George,
I love this. This is a great piece. The use of color and not having to paint anything other than the cup. The green LED is a great addition to the aesthetic. There’s so much more to talk about that was done well.
I think the only change I would make is lowering the cup and finding a more “steampunk” aesthetic cup. The base could change, but knowing that this could be a desk ornament I believe the 2 by 4 is a fine choice.
Wonderful job.
Justin Lim
Justin, thank you. Yea, I am going to keep an eye out for something that can fit it better. I only hot glued the top on so it should be no problem to switch it out when I find the right piece.
George, nice work! Really cool to see how just random bolts can come together to a very recognizable sculpture. I can totally tell that it is a steam engine! I would suggest in the future you paint the 2×4 base block black and possibly draw railroad ties and rails on it to finish the look and give it a setting but otherwise, I really like how it turned out!
Davis, thank you. I am very pleased with the way it turned out. Better than what I expected. I honestly never thought about painting it, but if I do I will do this. I need to think about that one though. Im not a good painter, and I dont want to ruin it.
The project looks really cool and pleasing. It really sticks to the steampunk aesthetic and it fits exactly the need of the upcycle project. It is amazing on how you have integrated all the screws together. I would really love to have one of these at my home.
Sarthak, I am glad you like it so much. I am going to enjoy having it in my house.
I think using the same size fasteners really added to the aesthetic. Steampunk tends to have a lot going on but it still appears organized and purposeful. The LED light is a really neat touch, even though it’s a different material, it really adds to the aesthetic. If there was a way to color the inside of the pot, I would suggest doing that. However, you can only see the inside of the pot from the back and when you’re eye level, so it doesn’t stand out.
Overall, I really like your piece and it came together very nicely.
Hannah, I really agree. Once I found a bunch of the same fasteners, I really thought this project could take shape in a clean looking manner. The top is going to be a work in progress. I am not totally happy with it and want to make some changes to it, but I havent figured out what yet.
Hey George! I think this was such a perfect representation of the upcycle project. The fasteners are so consistent and make a really cool aesthetic, and I actually love that you decided to glue the fasteners together because it gives the steam engine a sort of movement to it. I am SO impressed with the LED light, and how you screwed it into the front of the engine. Super cool!!!
Hailee, thank you so much. I wonder what doing something like welding would do to the look, but Idk if id ever do that. And yes, the light is awesome, one of my favorite parts.
George,
Nice work. I think you nailed the aesthetic, and the fasteners added an awesome look to the steam engine. I would be curious to see if you could make the top part out of fasteners as well, possibly angling them as a “triangle” on the top. I think the pot looks a little out of place with the fasteners. Great work!
Nathaniel, Thank you. I will look into that in the future. It would look really neat and follow the aesthetic more if I made the top fasteners. The pot totally looks out of place.
Hi George! Here is my critique following the 4 steps outlined in Liz Lerman’s Critical Response Process.
1. Statement of Meaning: I really loved the addition of the LED! I think this addition made your sculpture really look like a steam engine. I also think that you did a good job of capturing the steampunk aesthetic.
2. Artist Questions: Let me know if you have any questions, ff you do, I will be sure to reply.
3. Neutral Questions: You chose a number of different fasteners to create your sculpture, did color play a role in your choices? Why did you choose to use gold bolts for the top of the engine? Why did you choose to use a green LED rather than say a white one? Finally, what made you keep the wood natural rather than painting it black or staining it a different color?
4. Permission Opinion: I am just going to assume you give me permission (if you don’t, you can just ignore this then). As far as documentation goes, I would have loved to see some of the steam engine images you used as inspiration for your piece when you talked about inspiration. As far as the artifact goes, I personally think the compostable cup looks a little bit too organic/natural for the steampunk aesthetic, and I think a black plastic cup might have looked a bit cleaner.
Overall, I think your piece was very clever. Good work!
Hi Fiona. Thank you, I really appreciate it. Color defintely played a role. At first I didnt care, but after I layed the first layer down and most of it was black and silver I knew that I wanted to keep it that way. I originally had a bunch of blue fasteners that I wanted to use but didnt becuase I thought it would look weird. The gold bolts were chosen that way because those were the only size that fit those positions so thats why I used those. And the green LED was chosen becuase my favorite color is green. The reason I left the wood that color was because I liked the old and used look of it. I thought it went along with the old and used fasteners. Ok that makes sense. I didnt really look at too many photos, but I should include them. Ok, the top part is a good idea. I had a feeling it looked a little too organic and thats why I painted it black, but if I find a black colored cup I will change it. That would be easy and look better.