
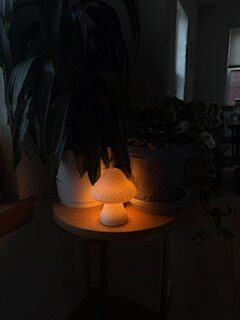
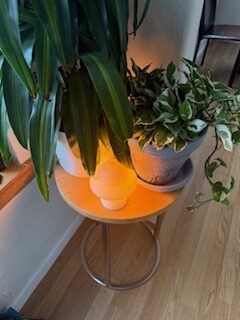
The project I decided to pursue is a mushroom lamp with a varying light output that is controlled by the turning of the top of the mushroom. When I started this class and was looking for inspiration for this project, I stumbled upon a mushroom lamp in a coffee shop off Pearl Street in downtown Boulder. The lamp is a small battery powered lamp in the shape of a mushroom. I picked it up and started messing around with it. I instinctually tried to turn the top of the lamp to dim it, but it was rigid. The description on the price tag said that it was dimming, yet I couldn’t figure out what the mechanism was for the dimming. I finally figured out that you must press and hold the power button to turn down the power. This makes some intuitive sense looking back on it because it keeps the number of parts to a minimum and you can make the lamp much smaller. However, it felt a bit disappointing that you are not able to turn the cap of the mushroom. It would be a lot more interactive, and I think would be a more interesting design to be able to turn the cap of the mushroom to achieve the dimming effect.
I decided to take on the challenge of recreating the lamp, but with the features I wanted. During the hunt for similar methods of dimming a lamp, I stumbled upon a piece made by an artist I met with in Chicago this past winter break. His name is Erik Gustafson, and he does a lot of woodworking, building custom furniture and lighting elements. His light fixtures range from massive chandeliers to small desk lamps, but one piece stood out to me as having a possible application for my lamp. The piece I am referring to is two vertical beams that can turn in respect to each other. When the two beams are lined up with each other, almost no light escapes the back, but as you turn the pivoting beam, more and more light can escape. I thought this was a fascinating way to adjust the light. He used physical elements to block the light instead of circuitry. I wanted to explore a similar route with the dimming of the mushroom lamp.
Exploring ways in which I could dim the light led me to three main paths. The first was the physical dimming of the light as discussed previously, another is using a potentiometer to vary resistance in a circuit, and the third is using a variable neutral density filter. Being a photographer, I have had some experience with variable ND filters and wanted to explore if they could be a viable solution to the dimming. A variable ND filter is two polarizers stacked on top of each other that are freely rotating. A polarizer works by only allowing light waves in a particular orientation through the filter. Light waves are emitted in waves in every orientation, but polarizers have a unique crystal structure that absorbs light in all directions except for one. This is commonly used in photography to reduce reflections by bouncing off water or windows, but that is due to reflected light only bouncing off in one orientation, so a polarizer can be turned to block that light. It allows you to look through the reflections and take pictures with fewer distracting. However, something very interesting happens when two polarizers are placed on top of each other. When the polarizing lenses are aligned properly, all light is let through, but when the polarizing elements are turned perpendicular to each other, no light is let through. One polarizer converts all the light to be vertical while the other blocks all the light coming in vertically. Turning between the elements being parallel and perpendicular allows for a range of light constriction and acts as a dimming effect. This would allow me to use just a power source and an on/off switch for the circuitry. I could then make the lamp as small as I wanted to be able to fit into a planter or small bedside desks.
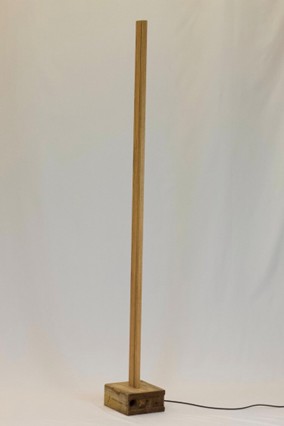
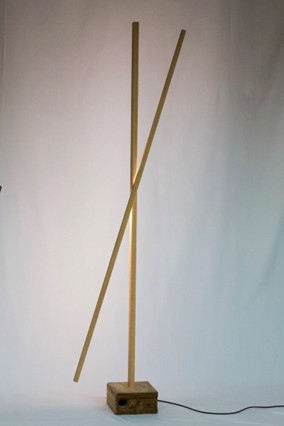
Erik Gustafson’s Vertically Turning Lamp
As I investigated variable ND filters as a method for dimming, I quickly learned that they would not be feasible for me. Polarized glass is very expensive, and cutting said glass is very difficult. I would likely need to purchase multiple lenses in case of mistakes. The physical blocking of light seemed like the best option to keep circuity simple and keeping costs down, but this method came with drawbacks as well. When making early prototypes, blocking light physically created strong shadows on the base of the lamp, and the brightness of the lamp was not reduced how I wanted it to be, the light was still very potent, just more focused on one side of the lamp. This led me to investigate potentiometers to dim the light.

Variable ND filters
I purchased an LED strip that was around 100mm in length and very flexible. The LED manufacturer recommended using a MOSFET or a transistor to adjust the voltage going to the LED and therefore the light level. This would require a micro controller and slightly more advanced circuitry with some light coding. This does not increase the scope of the project much but increases the price significantly. The LED strip is only around four dollars, and the wiring and power bank was free from the ITLL. The micro controller itself was around 15 dollars, so it tripled the price with one item without purchasing the MOSFET. It is still relatively cheap, but I was hoping to make multiple different sizes, so this was significantly restricting.
For the aesthetics of the mushroom, I was initially torn between two drastically different styles. The first is more in line with the first mushroom lamp I found in the coffee shop on Pearl. I really like the cottage core and the mid-century modern aesthetics, so the first of the two aesthetics would be a blend of the two. The cottage core is very familiar to most as it is used commonly in Disney. One of the most recognizable uses of cottage core aesthetic is the house in snow white. The aesthetic plays heavy on nature and is very nonsymmetrical. This creates a feeling that the house is handmade and one with nature. In the snow-white story, it helps with the narrative that snow white has a strong connection with animals and nature. It uses a lot of exposed wood and bright colors, natural light, and lots of foliage. The mid-century modern aesthetic is similar with light colors, bright natural light, and moderate use of plants. It uses simple shapes and high symmetry which is where it differs from the cottage core aesthetic. My first aesthetic I wanted to create was a blend of cottage core and mid-century modern. My goal was to take the foliage and exposed wood of the cottage core and use the simple shapes and symmetry of mid-century modern aesthetic.
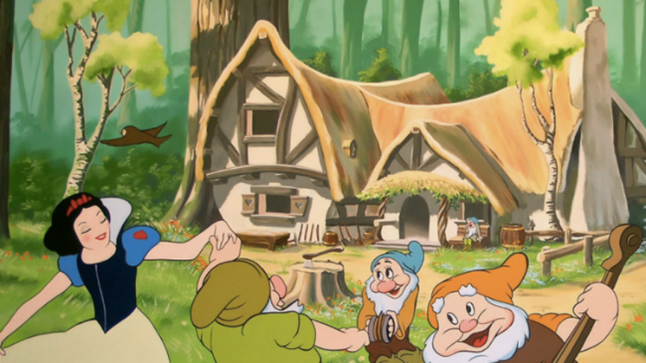

Cottage Core and Mid-Century Modern examples
The second aesthetic I was considering pursuing was the psychedelic aesthetic. This is a vastly different style as it relies heavily on supernatural imagery. Intense, vivid colors that you would often not find together in nature. It is chaotic and with a lot of detailed imagery that overwhelms the brain. It creates a surreal feeling that is almost mind-bending. Mushrooms are a staple symbol in the psychedelic world as many mushrooms give you a psychedelic trip when consumed. One of the most famous psychedelics is the amanita muscaria. It is seen a lot in Mario kart and has multiple references throughout pop culture. I thought I could either point to match the amanita muscaria or go all out and have the LED strip wrap around the outside of the mushroom cap and give it a glowing psychedelic look. The Initial psychedelic design as well as the amanita muscaria can be seen below.
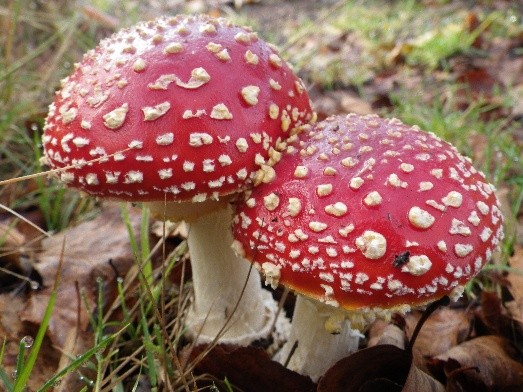
Amanita Muscaria and Potential Mushroom Cap Design
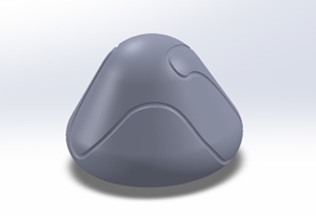
I decided to go with what I call the mid-modern cottage core and is a blend of the mid-century modern and cottage core aesthetics. The design is very sleek, all white with gentle curves. I plan on housing it in a planter and have made it with waterproofing in mind so it can fit more in line with the cottage core aesthetic. I want the piece to bring more attention to the plans in my house, and I think placing a lamp in the planter is a unique way to do so. I have left it as white 3D print to keep it waterproof, but in the future, I would like to make other versions out of wood with varying shapes and sizes. I would also like to have them growing all over my apartment like growing spores to leave my house feeling like it is more connected with nature.
Reference image links:
Variable ND Filter Image
https://c1.staticflickr.com/3/2473/4361184830_9526fe470d_z.jpg?zz=1
Mid-Century Modern
Snow White house
https://static.domain.com.au/domainblog/uploads/2017/01/10050726/2_gtoz1e.png
Amanita Muscaria
https://pantorra.pt/wp-content/uploads/2015/05/amanita_muscaria_8.jpg
1 Comment. Leave new
Your project to create a mushroom lamp with a tactile, turn-to-dim cap is a delightful example of improving upon an existing design for a more intuitive user experience. Your exploration of dimming mechanisms, from Erik Gustafson’s physical light blocking and variable ND filters to the practical choice of a potentiometer and microcontroller, shows a thorough design process.
The “mid-modern cottage core” aesthetic you’ve landed on, blending natural, asymmetrical cottage core elements with the clean lines of mid-century modern, sounds charming. Envisioning these lamps in planters to enhance a home’s connection with nature is a lovely touch.