
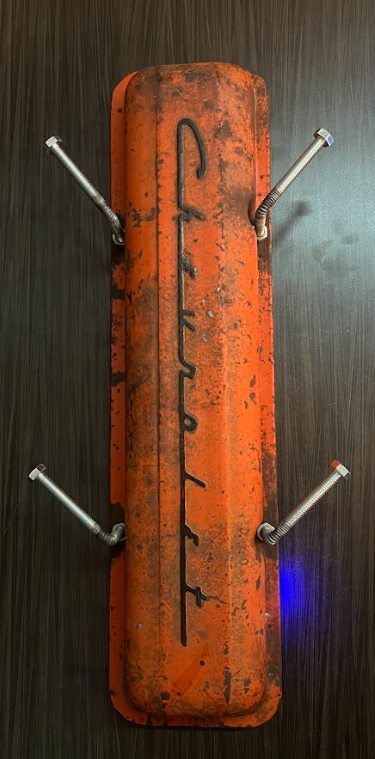
Post 1: For my project I really was liking my industrial aesthetic more than the others I choose and I found this old Chevy valve cover on eBay. My goal is to paint the Chevrolet script to make it stand out more and then mount it vertically to make a hat / coat hanger. I will make the hooks out of overly long bolts that I will bend outward. I liked the idea but it also seemed a little to easy, so I have been talking to pat about a way to back light it. Since the entire valve cover is metal and has a large internal cavity, I figured it would be cool to make the entire thing a touch lamp with all the batteries hidden internally. I have already gotten batteries, hook ups, and a power strip from Pat, but I had to order in the touch sensors as shown above. One last thing I plan to design is a 3d printed battery box that holds the 2 9V batteries that will power it. I want to make it so that I can re-orient the valve cover horizontally If I feel like that would look better in the future and keep all of the functionality.
Post 2: To continue development of the electrical portion of my project, I needed to figure out how to attach the battery’s via a battery box. Since Pat suggested I used 9V batteries instead of AA’s, and the electronics lab didn’t have any premade battery boxes, it was up to me to make my own. What I came up with is what you see above. It houses 2 9V batteries wired in series, and relies on a press fit to stay closed. Figuring out the fitment was relatively challenging and I had to do some research on 3d printing to make the lid and box work well together. I also wanted to carry over the Chevrolet theme of the valve cover over to the back, so I decided to make the handles to the lid the Chevrolet bow tie logo.
Post 3: Here is the final product. This coat hanger not only portrays the look of an industrial aesthetic but also appeals to my personal interests and passion for automobiles. I also know that it does not necessarily come through on photos and videos, but it feels very solid and robust, also aiding into the industrial aesthetic through the idea that functionality outweighs the actual look. You can see from the front that I was able to paint the raised Chevrolet script in black, but I scuffed this paint to make it look more natural and weathered like the rest valve cover. I also used and acetalyne torch to bend the bolts I am using as my hangers, but I made sure that they were all in the same orientation before bending so that you are flush with a singe face of the head of each bolt. I think this small touch plays into the idea of symmetry in this aesthetic. I wanted to keep the front very simple and didn’t want to add anymore than that. Moving to the back and the electronics,the first thing you will see is the giant Chevrolet bow tie battery box. It is perfectly press fit and doesn’t use and latches or mechanisms to shut and stay closed. From there my battery’s run to my touch sensor. My initial idea was to wire this touch sensor to the valve cover itself and have the entire thing be a touch lamp. You can actually see next to the battery box where I initially made this connection and where the metal on the valve cover is still tinned from soldering. However this never ended up working. I think the issue lies in the paint on the valve cover. Since your finger isn’t conducive enough to alter the charge on the valve cover through the paint, the sensor was never able to trigger. My work around to this was to cut off the sensor from where I initially soldered it and secure it to the outter back edge of the valve cover. Now instead of touching the face of the valve cover to activate the lamp, you have to touch the sensor directly. I also wasn’t aware when purchasing the touch sensor that it had a blue LED built in, but honestly with the new design I think it works well because it is intuitive and tells the user exactly where to touch. Also funny enough it is blue, playing off the theme of complementary colors and the orange the valve cover is painted in. After this sensor you can see the solid beam light strip I have glued to the backside. You can also see the hanging mounts I have secured to the back. I have 3 total (1 along the short top width, and 2 across the right length side) allowing me to change between a vertical and horizontal orientation in the future. However right now I am using it in the vertical orientation because that is what works for me. Hopefully everyone enjoys this final project as much as I do and I’m glad to have made something that I look forward too using.