
This upcycle project was inspired by the rustic Adirondack feel that many mountain cabins and homes have. When I lived in upstate New York (Potsdam, NY), many home had this aesthetic associated with it.


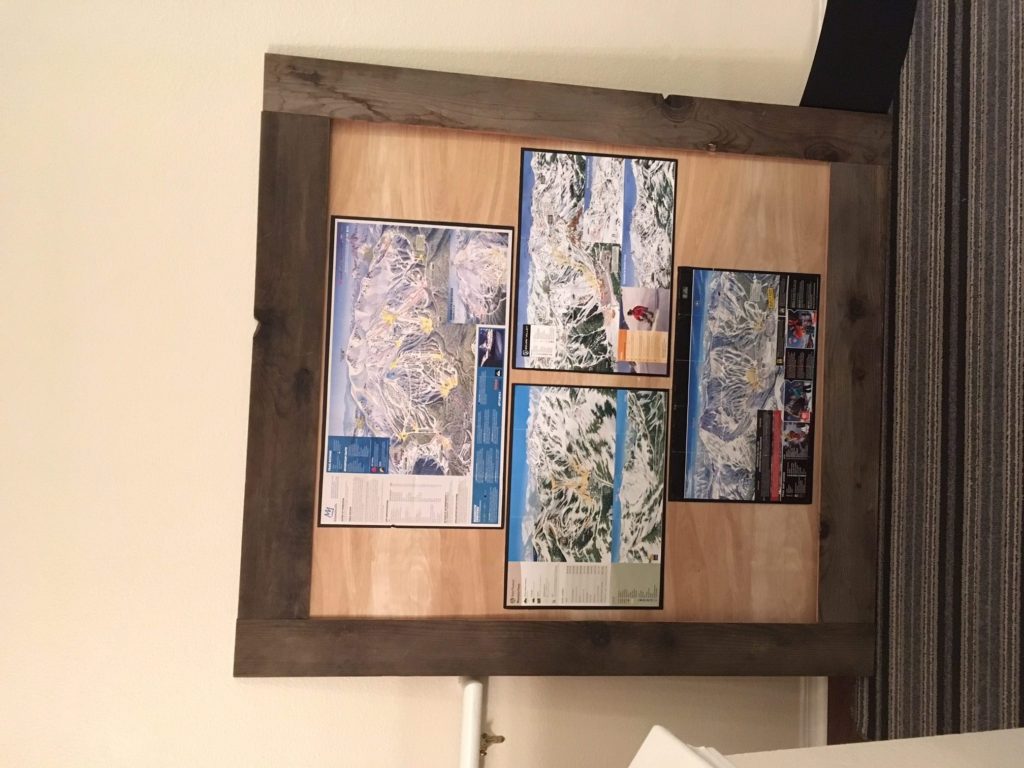
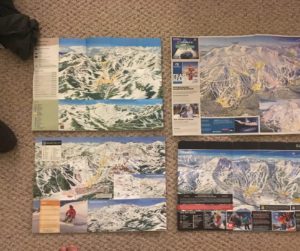
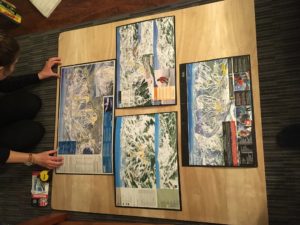
Being an avid skier and having a lot of extra trail maps, it seemed appropriate to use these maps to remind me of all the good times I had during my three years in California. In particular, Mammoth Mountain, Kirkwood, Squaw Valley, and Alpine Meadows were my favorite mountains where I spent many weekends with friends, skiing steep chutes and deep powder.


Not only will these maps serve as an aesthetically pleasing art piece, but they also will act as a conversation starter. I want my friends and family to be able to look at the maps, the trails, and talk about it.
When I started this project, I had a grandiose idea of putting all my ski trail maps into a matte’d USA map, geographically placing each map in it’s appropriate place. I discovered I did not have many maps for the south or central states, so it would look empty. I then considered matte’ing Vermont or California and doing a similar thing, but the laser cutter could only cut 3’x3’, which was not big enough.
I finally settled with just laying out the maps in a neat manner, and going with a rustic reclaimed wood look. This wood look was a large aspect of my artistic goal. I want the whole project to look weathered, beaten, and unique. To begin, I searched all over the Boulder-Denver corridor to find inexpensive, reclaimed wood. My search took me to a shop on I-36 in Broomfield—Front Range Timer—where I found nice barn wood that was out of my budget.
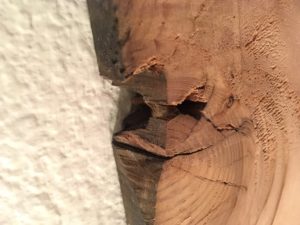
I ended up at Resource, and found a weathered 114”x11.5”x1.5” board which would suit my needs.
It was moist, covered in snow, and had clearly been outdoors for a long period of time. After letting it dry, I utilized the Idea Forge Makerspace for my work.
I was worried that the large trail maps would not fit into the frame, so I used Solidworks to lay out potential designs, seen below.
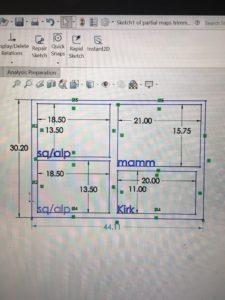
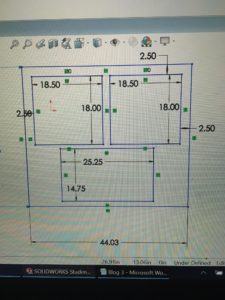
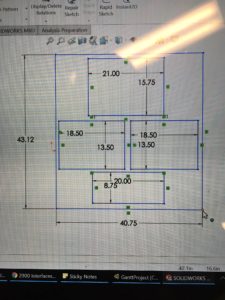
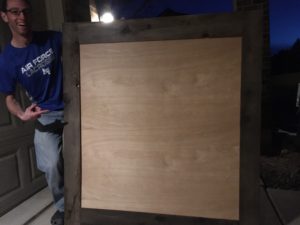
I eventually decided on an approximate 41”x44” size. Figuring out my design reality was the most difficult part of this. Having a vision is the easy part, but deciding how to build it can often be the struggle.
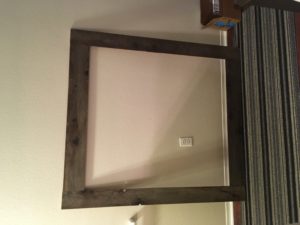
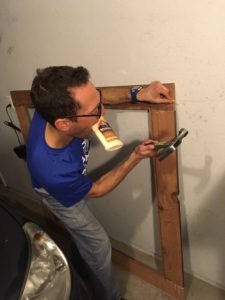
I started by cutting this wood board in half (0.75”x5.75”) pieces. This will reduce the hanging weight of the final frame and give me more lumber to work with. A bandsaw was used for this. Next, grooves were routered out so that the glass and trail maps could be recessed inside of the frame. This was my first time using a table router, so the process took a little longer than expected. Each side of the frame was connected using dowel connectors and drilled out holes. All holes and seams were reinforced using wood glue.

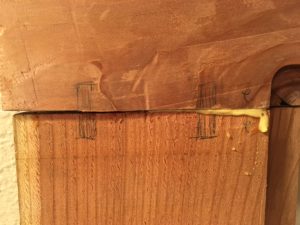
Originally I thought I would cut 45 degree angles for each corner. However, after seeing the rustic look that the 90 degree corners provided, I changed my design. The build would also be simpler if I used dowel connectors instead of joining biscuits.


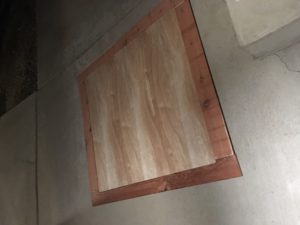
After the frame was build, I created a ¼” black matte border for all the maps. This looks very sharp when contrasted with the wood background.

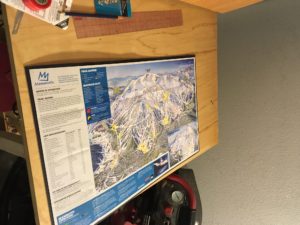
JB Weld was used to connect these maps to the matte, and the matte to the wooden backboard. It took upwards of 6 hours to dry, so I made sure to keep adequate pressure on the glue throughout the process.
Trust me, there are maps under that pile of heavy stuff.
I then put the image into the frame, where it nested nicely without any issues. I now have a large ~50”x50” wall art that is ready to be hung.

Having completed the first iteration of this, I can see many more improvements, which are listed below:
- Laser engraving mountain logos or other images onto wood
- More precise measurements and connections with the frame beams
- Better rear mounting hardware for wall
- Better woodworking techniques (better precision)
I still have enough extra wood for a smaller picture frame, so I will attempt this again and learn from my mistakes.
For more images, see the attached presentation from class: (LINK)
Here is the Youtube link to the in class presentation video: LINK
7 Comments. Leave new
I have the same thing in my room; I think trail maps are super cool and I could look at them all day. I like how you left a lot of unused space that leaves exposed wood, it adds to the rustic, piney, mountain aesthetic. The knotted wood that you found is excellent. Do you think it would look better with a stain on the wood?
First of all, I love your fascination with maps and the outdoors! Your project does a great job of embodying this unique passion. Your chosen aesthetic also plays well into this.
Secondly, the number of detailed photos and visual representations you incorporated in both your blog and presentation were extremely beneficial understanding the ways in which your project fits together.
If you are interested in a more functional next step, I can see how you might be able to make this into a pretty legit coffee table although the surface area may be a bit large…?
Great presentation. It was cool to see your whole design process and how detailed it is. Your project is definitely something that would be put up in ski lodge.
Great presentation on your maps project. I really like the look of the old and new wood together. I also thought it was very effective to use solid works as a way of checking for fit before actually going about building it.
Your Trail map design was great. Perfect for putting in a ski cabin or even your own home. I liked the idea you had of possibly filling in the empty spaces with signs that have the resort name later etched on them. As you get more maps, you could probably find cool ways to incorporate those as well. Overall, great job!
Your presentation was very effective, I liked seeing some pictures that detailed the ski cabin aesthetic you were going for. I could definitely see your piece being hung in a backwoods ski cabin. It’s a very interesting artistic piece. I think it looks just a little unfinished with the exposed wood inside the frame, but I also think that is part of the aesthetic you’re going for. Good job!
Fantastic upcycle project! It looks so good-just like something I’d buy. The idea is great, and I like how you laid out the maps. Nice drawings and good job working in the wood shop! The laser cutting idea is very interesting too. Great job!