

 The bottle tree has always been a project that I wanted to complete. Originally I had seen a similar design at a friends house and thought, “What a creative way to reuse old bottles!” Ideas started bouncing around. First, it was to display some of the better drinks in my opinion. Next, to be a lamp in a fairly dark room in my house. It was then onto a rotation structure so no drink was left in the dark. I also wanted to build something that fit into the college life aesthetic in my house. From here the idea festered more until the Upcycle project surfaced and gave me the proper motivation to complete the bottle tree, or bottle cake if you prefer.
Once the upcycle project surfaced, I started brainstorming the ideas that I had above. Lights became a necessity, along with the bottles and wood for the stand. There wasn’t much more brainstorming and from here went to sketching. The first sketches were with bottles and circular pieces of wood.
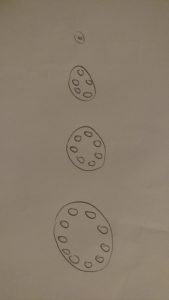
These ideas also included, cutout in the wood for placement of the bottles, on both top and bottom. The lights would then be run within a groove on the bottom of the 2nd, 3rd, 4th, etc tiers of the structure. However, those ideas were quickly shoot down due to the availability of the tools I had. They turned into just placing the bottles on the wood and placing the lights between each bottle, ideally from the inside.
From here it was on to my material selection. I had a bunch of plywood laying around my house and was quick to think how I would use that in the design. This wood would be for the tiers of the tree. I had also been collecting a bottle or can of every different drink I had tried. The top of my fridge was getting cluttered and this project was a prefect time to clear some of that clutter off. Lights were also laying around my house. The epoxy I had to run home and take a partially used bottle from my parents (shhh, don’t tell them 🙂 ).
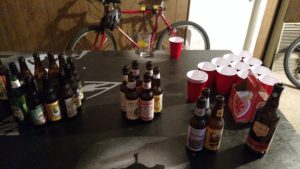
After searching my house a little more I found a nicer piece of wood, seen already cut above. I also discovered that every company has different sized bottles. This was with exception of a few. Seen above is the grouping I was planning on using for each tier of the tree (yes I thought it was appropriate to include the cups 🙂 Luckily I didn’t have to employ anyone to help me obtain more bottles and had enough on my fridge.
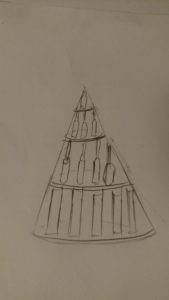
Once I was ready to start cutting the piece of wood I had found, I made sure that it would work. This lead me back to another sketching phase in my design process. This time adding dimensions and placement of all the bottles. I also switched from circles to a hexagon. This would be easier to cut out than trying to make a circle since I only had a hand saw.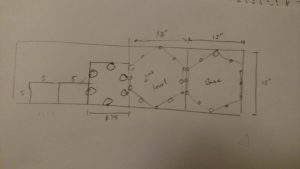
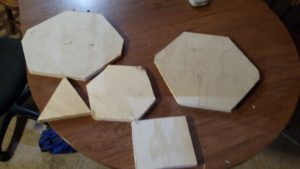
From here it was time to get sawing. I cut out the squares first, and then moved onto the triangular parts. The final cuts can been seen above. Yes they turned out more like a octagon, but hey that was with a hand saw and rough measurements. Once the pieces were completed, I moved onto laying out the bottle on each tier just to get an idea of what it would look like. 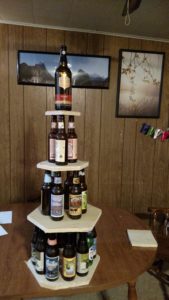
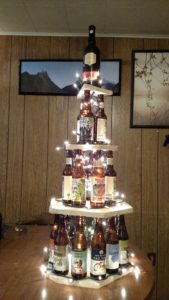
After this it was onto epoxying each bottle to the wood. I built up layer by layer until the top, where I had just enough epoxy left to complete it. Lights came next. Originally I was planning on using colored lights, but after a test of wrapping them around, I decided on white lights. I started at the top and worked my way down. A light went in the gap between bottles and a bunch went inside each tier. Staples were used to hold the light strand in place. Finally I plugged it in!
The initial lighting stunned me for a sec since it came out better than I was expecting! I stood back and took it all in. I had successfully completed my goal of creating a bottle tree that fit within my college house aesthetic. It was able to generate a surprising amount of light and even gave the bottles a glow I wasn’t expecting.
With all projects come ideas that you want to add onto the final product. One would be to try and incorporate some sort of spinning mechanism. Next would to be attaching the lights as I built the tree. This proved to be fairly challenging since I had to feed the light through the bottles along with stapling them to the wood. another thought, was that I could always keep adding on as I collect more bottles. But for now, it will be a great piece lighting up my house!
9 Comments. Leave new
Sam after we discussed the early iterations and design challenges you were grappling with, I am happy to see how it all turned out. You had discussed several lessons learned and potential design improvements, hopefully you can incorporate these into a future spin of the bottle tree. I still think you could motorize this bad boy and make it spin :). One concept that may look cool would be using different types of bottle to change the layer height, sort of like you did with the bombers on the 2nd layer from the top. Otherwise this design turned out very cool, hopefully you will showcase it at home.
Again, I really like your idea. You really did a lot with what you had to work with and you pivoted your idea when you ran into any obstacles. The report has a good description of your entire process. Main things with your report you should probably change are that you need a featured image so that you have an icon when people are scrolling through the website and the pictures should be larger in general.
Cool idea, I like how you redesigned it throughout the process due to what materials you ended up getting and the bottle height discrepancies. The product seems perfect for the typical college house. The lights going in the bottles seemed to be the only thing I would change.
You mentioned that you layered the beer on your statue by order of preference and I thought that was a good artistic addition to your project. I also thought having all different types of beer, minus the one duplicate, made this project even better! It was also interesting to hear that you might want to put the lights in as you go next time instead of the end. I think that would be smart! Great job!!
This is a classic college project. This is a project that I can see getting some pretty heavy use, which is something I like to see from these projects. It’s pretty amazing that you didn’t hit any real obstacles along your design process. This turned out great, nicely done.
This is a really unique idea! I like how this beer bottle tree can be used for picking out the type of beer to drink. This project is aesthetically pleasing with the incorporation of the chirstmas lights. One thing that you can look into is getting a lazy susan bearing at the bottom to help make it spin. Overall, great project!
What a cool idea! I enjoyed your discussion of the process and your inspiration for the project. I wonder what how your design varied from some of the other ones you based yours off of. It was interesting to hear about some of the challenges related to stacking the mismatched bottles. Your cut sketches also helped to see how you planned the design. I like how you showed the progress of the build in stages. Since you want the tree to spin, how could you enable that feature in a future design?
I like your inspiration for this project: “After a long day of skiing, go to the tree, admire it, pick a bottle, and pick your beer”. It gives a very calming and bright aesthetic too it. Instead of randomly placing each bottle, you really wanted to pick out where everything went… based on bottle size or type of beer. I like the redesigns you chose, they are interesting… The lights would have worked better before hand?
Really cool idea! I like that its something that you could add to a college apartment, you’ll definitely get some use out of it. Good job on planning out the whole project before actually building it, you probably ran into less problems while actually building than myself because of this.