
I have been conceptualizing this project since last fall. Its an attempt to satisfy my desires for a backpack that I truly love. I am not trying to make the ‘best’ backpack ever invented, but one that satisfies my needs and one that is right for me.
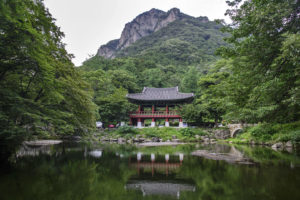
I want to use an Asian aesthetic with a minimalist/modern approach. As I stated in my previous blog posts, I was inspired by the architecture at the Baegyangsa Temple in Jangseong County, South Korea. An example of one of the buildings is presented below. Specifically, the curvature of the building roofs is what I want to mimic for the form of the backpack. The roofs taper upward and curve out downward, I find this style of architecture fascinating. From this inspiration, I want the backpack to taper downward and have some sort of a curve at the top when it is closed. I plan to produce the taper by designing the panels of the backpack to taper downward. For the curvature at the top, I am relying on the fact that the compression strap at the top will cinch it down and make the rolled-top portion bend. I also wanted to add some flash colors in there to mimic the bright red pillars that support the roof in the picture below.
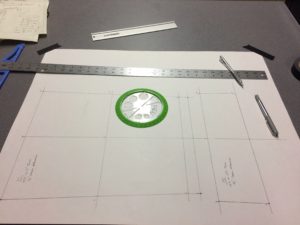
For this prototype, I wanted to focus on the main form of the backpack. I didn’t want to get bogged down on trying to incorporate all of the features I wanted to include in the final version. I started by drawing out the pattern of the backpack. A pattern refers to the collection of shapes needed to form the designed garmet. The pattern is usually made out of some material that is easy to draw on and cut out to form a template to help trace the shapes onto the fabric before being cut. To do this, I used large poster boards (very heavy and big card stock paper), a T-square, a Pentel GraphGear1000 (mechanical pencil), and painters tape. I aligned the edge of the poster board with the edge of the work bench and taped the corners of the board to the surface of the workbench. From here, I went to town drawing out the panels that I designed. This is the part of the process that you should spend the most time on because this will dictate whether your panels will actually align properly and keep your design as repeatable as possible. A picture of the setup I used is provided below.
Once I had all of the templates cut out, I used them to help me cut the panels out of the fabric. I used a Alvin cutting mat, a rotary cutting tool, the templates I made. With the cutting mat on the work bench, I spread out the fabric so it laid flat, placed the templates on top of the fabric and traced the perimeter of the template with the rotary cutter. This was the second to most nerve racking part of the process because I wanted the panels to be cut perfectly and I kept accidentally cutting into the paper templates I was using. I managed to survive the process and had nice looking panels.
I don’t have any photos of the actual process of sewing all of the panels together. But I basically aligned the panels one by one and sew the seams together. I started with the front panels which consisted of four parts. Then I did the back which has three individual parts. The sides and bottom are kind of one big part made up of multiple panels. One side and half of the bottom was made up of three parts each.
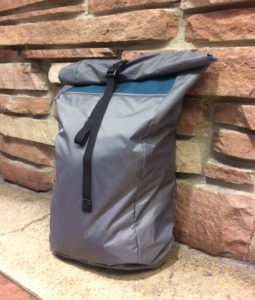
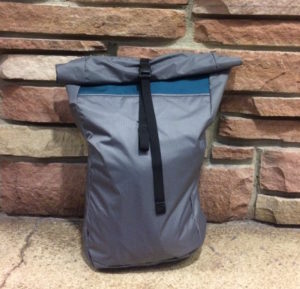
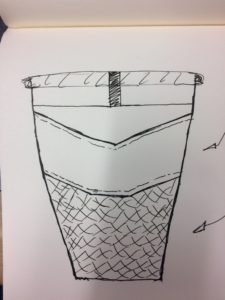
The end result is pictured below with a couple of notebooks, a sweater, and a rain jacket inside. I am somewhat happy with the way it turned out, but there are a decent amount of changes I want to make. First, the taper I originally designed does not stand out nearly as much as I hoped. Second, the curvature at the rolled-top portion I planed to have is entirely absent. The overall structure of the prototype is very floppy and doesn’t support its own weight at all, which contributes to the bag not reflecting the pattern I designed. I also think the backpack’s length is to long for what I intended to use it for. This problems were a serious let down to be honest.
Moving forward, I need to redesign the pattern to incorporate dimensional changes that I think will improve the form of the backpack. To make the taper stand out more, I plan to reduce the total length of the backpack by about three inches, but keep the top and bottom widths the same as before. Keep the widths the same but decreasing the length will increase the angle at which the bag tapers. I purchased a type of ribbon called grosgrain, which is a milspec nylon commonly used in backpack design to reinforce certain features and to line the inside seams which hides the where the panels meet. Because the grosgrain is pretty stiff, I think it will help keep the backpacks shape/structure and produce the curvature at the top of the rolled section how I want. To further increase the rigidity of the backpack, I bought fabric that is 6x heavier than the fabric I used for the prototype. This fabric is also way stronger than what I used previously yet still relatively light weight (6.7oz/yd !). I am in the process of sourcing some foam that I can use for cushioning the back panel, this will also make it easier to take notebooks and laptops in and out of bag. For the next prototype iteration, I want to include some features that are inspired by the Samurai aesthetics. This will be mainly done by adding a large pocket in the front that will take up 75% of the front surface area. The contours of the pocket will resemble a minimalist take on the masks that some Samurai wore in combat. A sketch of a this concept is presented below.
17 Comments. Leave new
I really like the idea of a backpack, it is something that most of us use every day so it is worth making one that you like! I also am drawn to the Asian aesthetic, especially the simplistic aesthetic combined with it. Are you confident with sewing? I know that I would be way over my head with this project but I think that is a great way to learn something!
Ethan,
I have been teaching myself how to so by watching tutorials online and also practicing different patterns. This is my biggest sewing project to date, but I eventually want to make a 4 piece line of bags. Thank you for your comment!
I think adding a featured image to your report would make it easier for your peers to locate the post. I really love this design, and it’s clear that you put a lot of thought and effort into your prototype. It’s a shame that you faced some design flaws, but it seems like you have a good plan for how to attack these setbacks. I’m curious about the durability of the materials you are using. Will the pocket have an impact on wear? Is the material waterproof? Your report is well structured and describes your process thoroughly. Have you thought about possibly including some more photos of your process? I think it may guide your peers through the process a bit better. It also looks like your report could use a spelling/grammar check.
Hi Emma,
You’re so right about the featured image, I will add one. I anticipated this prototype would have a fair amount of flaws, but it put the project in perspective for me. Two types of woven nylon fabric were used to make this prototype. The main grey material is a 70denier Hexagonal ripstop nylon with a DWR waterproof coating on the bottom side, 3.2 oz/yd. The teal stripe is an off brand of Cordura, which is a tight, heavy weave of nylon that has some sort of a water resistant coated on the underside, ~10 oz/yd. They are both fiarly strong, but the grey has a very high tenacity for how light the material is. One of the things I disliked the most was how flimsy the bag felt to me. Yes, the materials are super strong and dependable, but it felt like it would rip any second. So I am using a heavier material (~6.7 oz/yd) that is much stronger than the grey and lighter than the cordura. So I plan to use this 420 denier fabric for the whole bag. I bought it in black, really light green, and dark blue.
As for the process photos, I wish I took way more, but just forgot to document the sewing portion of it. For the next iteration, I am going to take a photo of every step. Like an instructable tutorial. Thank you for your comment!
I like that you’re using this project to create something useful for yourself. Backpack are very common & convenient, but I understand your frustration and want to make something that caters to your needs. Your chosen aesthetic is also intriguing: I would never have thought of incorporating Korean architecture into a bag design. I’m not sure if this is something you might be interested in adding to your bag, but I have an exterior hard shell sunglass case on my backpack and I love it!! Integrating a hard material into the top/lid of the bag may allow you to better achieve the ruff structure of the temple. Just a thought. Good luck!
Hi Sofi,
I think the architecture is just so beautiful, and interesting. It is great balance of ornamentation and simplicity , IMO. The hard shell case does sound like a cool idea! Maybe I could figure out a way to thermo mold some padding or plastic to create the shell; I have seen tutorials for this on the youtube. What if I shaped it like a terracotta shingle? Thank you for your feedback!
I might want to borrow your patterns and make my own bag with a different color palette, this fabric and style is slick. It’s too bad your chosen aesthetic doesn’t apply to soft goods more easily… it appears you’re having to make a lot of compromises on the style and shapes. How do you think your final patterns will change to more closely emulate the roof designs of Asian cultures? Is there a way to use the padding and straps (not yet implemented) to further apply your aesthetic of choice? I hope you are able to create something you are proud of and get many years of use out of!
Hi Luke,
I was planning on release the patterns and write a tutorial on how to make the bag I am designing. Kinda like an open source project or instructable. The next iteration will be made of a heavier, stronger material; that should help the bag retain its shape more. In my report, I mention the use of grosgrain as a seam allowance taping. The nylon ribbon will provide more rigidity to critical areas, that I hope will resist shear more and potential curl. I am gonna try to make a prototype of this concept as well to fiddle with.
As for changing the actual pattern. I want to decrease the total length by 2-3″ and keep the top and bottom widths the same. Hopefully this change will make the tapering form more prominent. Thank you for the feedback!
Your inspiration is very in-depth. It is interesting that the actual shape of the backpack is a rendition of the temple tops. Its a very innovation was of thinking.
I also appreciate that you’ve name it; YaYa is a catchy name. Your whole aesthetic seems to be very well thought out as well.
I’m interested in the sewing aspect. Is this the biggest sewing project you’ve done? Was there a learning curve?
Hey Alex,
I really like the name too. Some of my friends are helping me with a logo design to print on patches for the backpack. Its gonna look pretty sweet, I think.
This is the biggest sewing project I have every done. Before this, I made a couple of utility pouches (which I used every day) and some tiny cord pouches. I might post some photos of my other works. There is quite a learning curve, which I am still on. Every time I sew, I mess something up and learn from it, no joke. But I have made some serious progress on my sewing skills. I plan to post the hole process for the final version. Thank you for the feedback!
The direct application of that Korean temple’s aesthetic to this backpack turned out well. You really thought this project through and it shows! I am a bit concerned about the length of the strap in the front, there is a possibility of that getting snagged on something: have you thought about adding something that can reduce the length of that strap?
Great look into your aesthetic inspirations for your project. You really went into detail on the aesthetics and I like all the sketching you did to fit your goals. I know nothing about fabric fabrication so seeing how well your prototype turned out really impressed me. I look forward to seeing what the final product turns out to look like!
I think it’s interesting that you drew inspiration for your backpack from oriental architecture. Do you think you’ll add internal compartments for pencils or a laptop? Comfort wise, do you think it will distribute weight well? It seems like it’s more for light weight items, so maybe it’s not a huge deal.
I’d be interested to find out how you selected the fabric. It reminds me of tent material. The design reminds me of water proof bags. Perhaps you could implement some water proof material.
Inspirations can come from anywhere. Your project is a perfect example for that. You prototype captures the simplistic aesthetic your going for. The taper down is a nice addition to the backpack although it might lose a bit of functionality. Looking forward to see your final product
Your prototype is really well made and you got what is the purpose of a prototype, to learn from it. Taking an old aesthetic, you put a great spin on it. I really liked your presentation, and you conveyed your ideas very well. I see myself using the product for my daily commute.
I love this project — it’s so useful! Your prototype looks really lovely for as you said “throwing it together in the idea forge”. The tapering effect is definitely very representative of the Asian style architecture. The samurai inspiration takes it even a step further and I think will really add to the aesthetic of your project. Have you thought about coloring in the same scheme of Asian design/the samurai costumes? I think that the grey is great but the bluish green makes it a little harder to see what aesthetic you were going for. What was the inspiration for those colors?
Great presentation! I think you have a really neat concept and design. I wonder if you will lose out on some space if you have a taper towards the bottom. You have combined concepts of art and engineering really well and it shows from your prototype. Samurai armor is really cool and a good source for additional details. It will blend well with your original aesthetic of the buddhist temples.