
Inspiration
The original inspiration for my Upcycle project came from a Netflix show called The Repair Shop. The Repair Shop highlights the repair and improvement of vintage antiques and cherished family items.

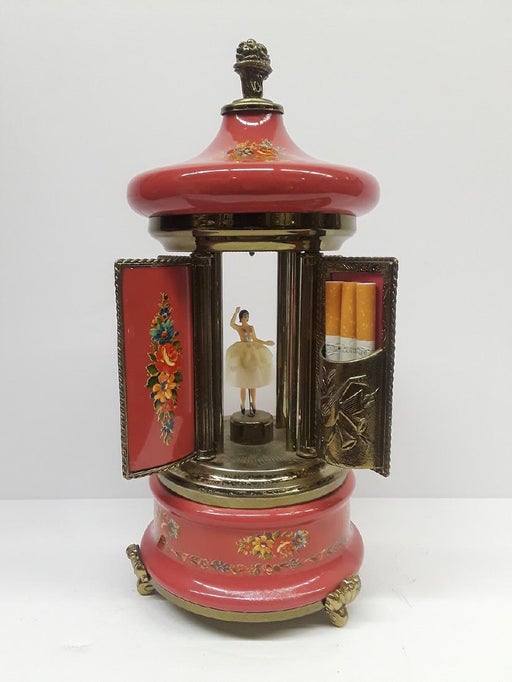
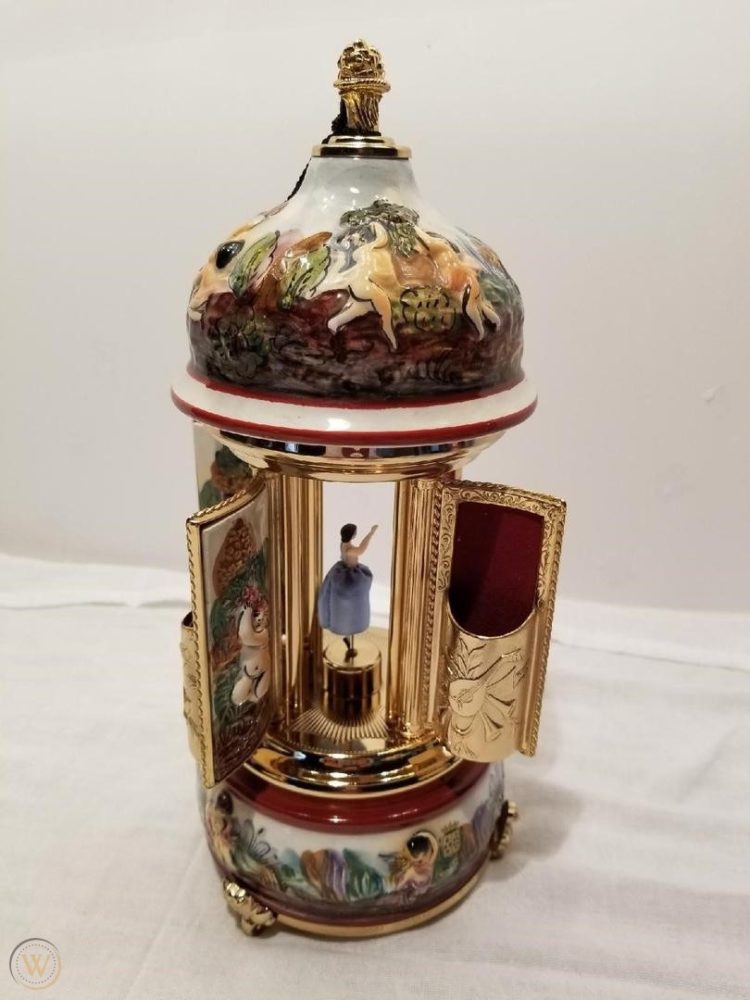
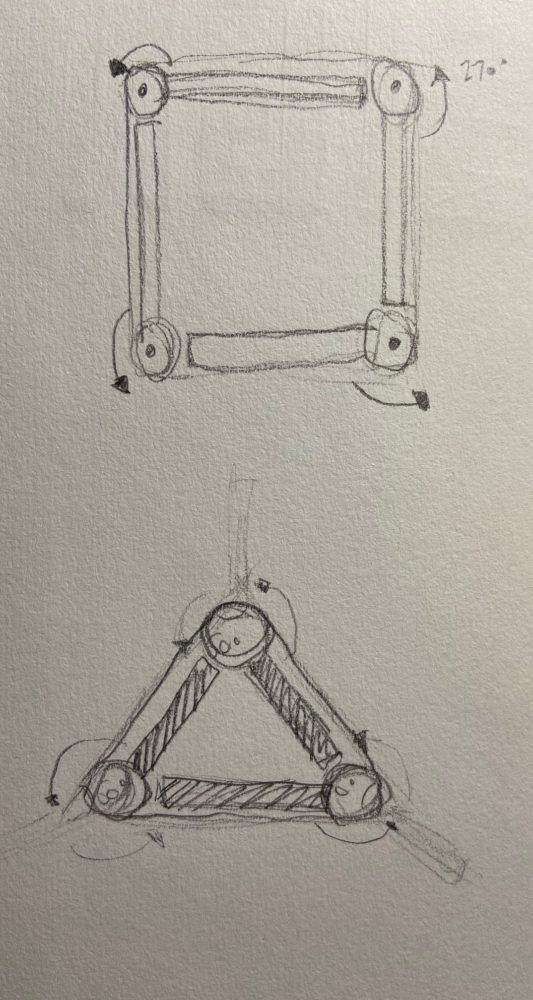
In one of the first episodes, a vintage music player/cigar holder was brought in for refurbishment. While the musical aspect may not be feasible for this project, the base mechanics of the device were quite interesting. There is a dial at the top of the holder, with 4 panel doors on the sides (forming a square). Rotating the dial opens each panel wall to expose inner compartments. Two examples are given below:
My specific iteration will not be designed to hold cigars. Instead, I intend for the device to hold pencils, keys, and other everyday items. Because the inspiration is based on designs from history, I think it will be interesting to create a similar product with more modern materials. From years of engineering projects, I have lots of scrap materials to upcycle.
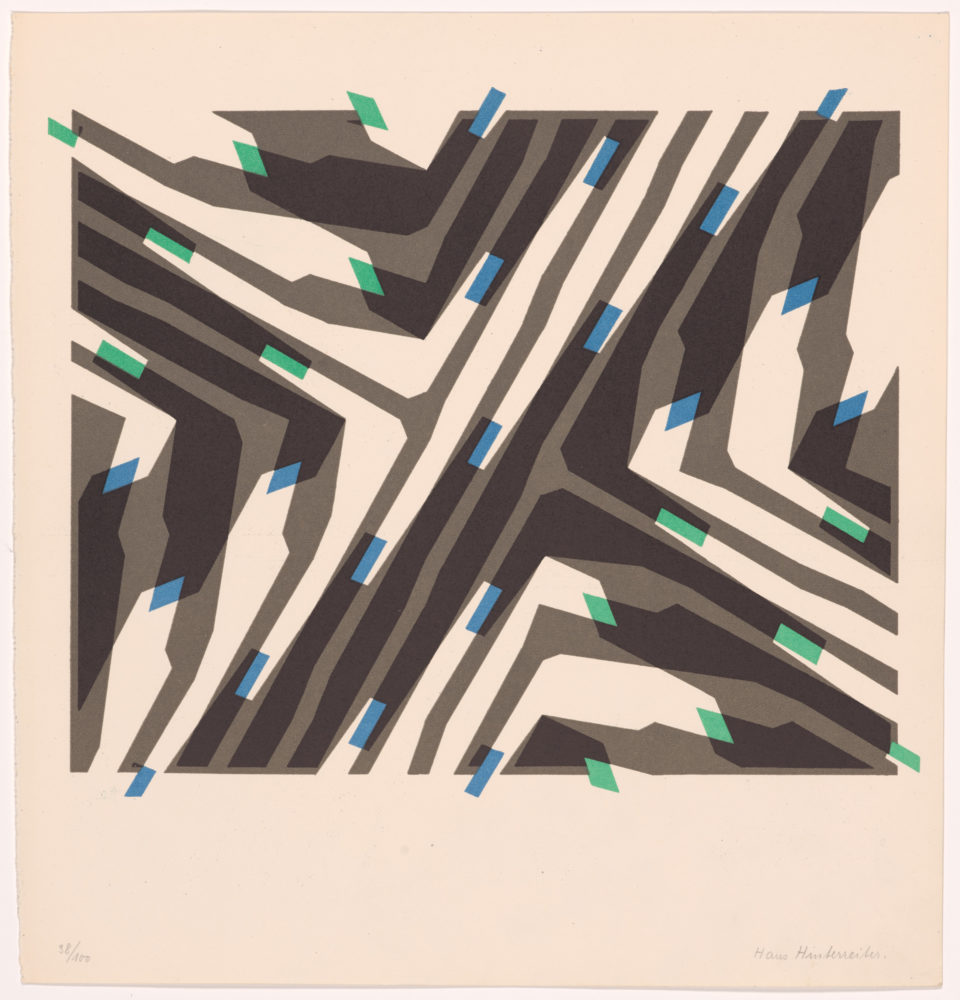
In terms of applying an aesthetic, I have been inspired by further research into my aesthetic explorations post. I explored tessellations, focusing on the work of M.C. Escher. After looking into more modern applications of tessellations, I found the Swiss artist Hans Hinterreiter. His work has a colorful, futuristic, geometric aesthetic that closely relates to the artists I researched. Again, I believe this futuristic, geometric look will provide an interesting contrast when applied to this vintage cigar holder.
Vision
With this project I hope to combine the ideals of restoration and upcycling. Restoration is taking something old and repairing it to original condition. Upcycling is utilizing used items to create an artifact of increased value. This rotary storage device can meld these two ideals by utilizing scrap materials with an antique inspiration to make a modern finished product.
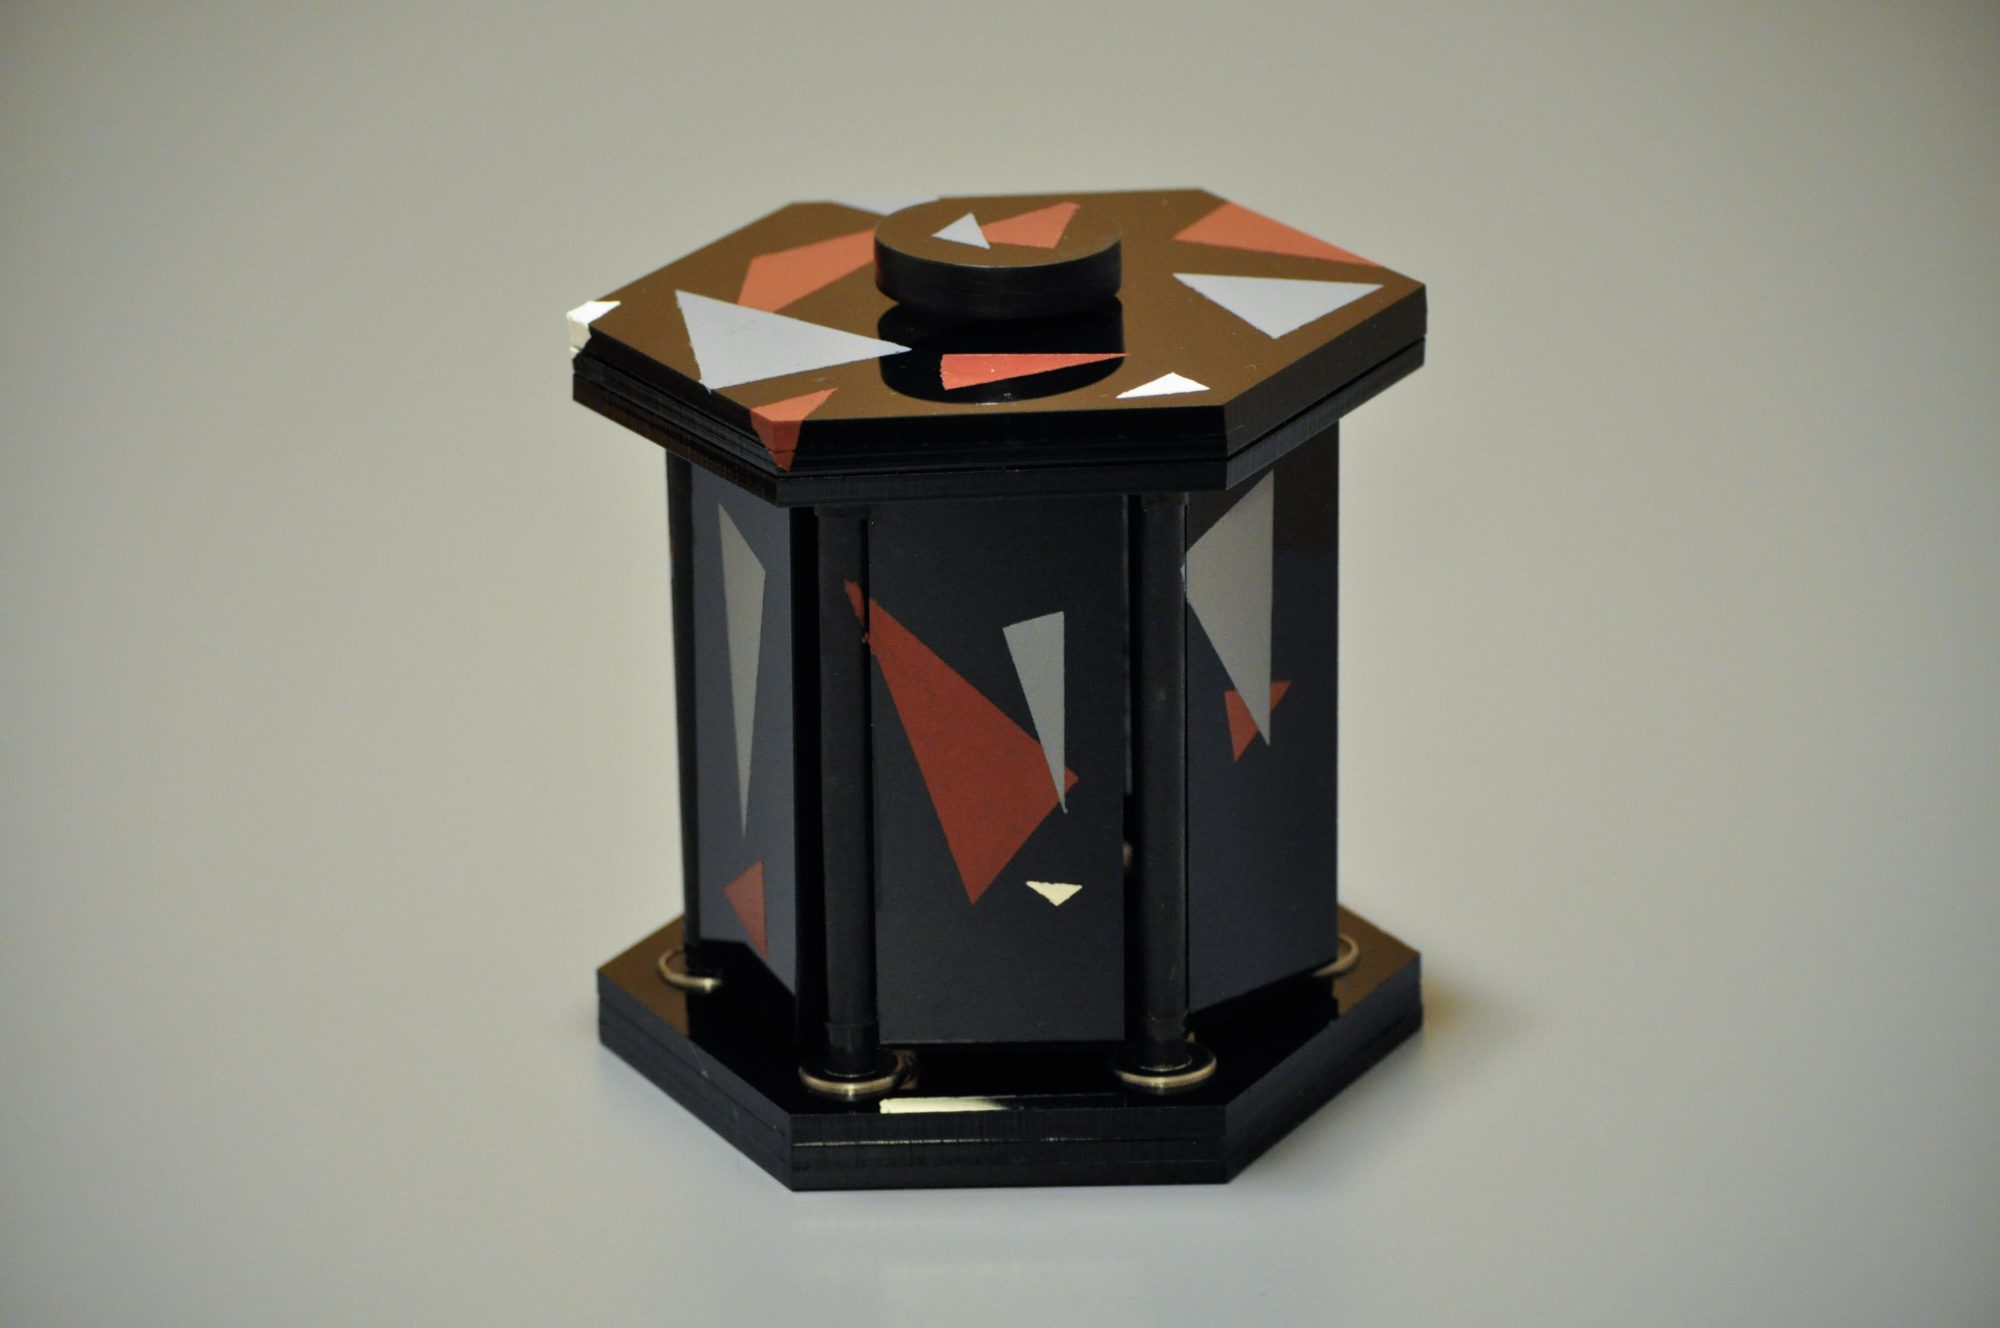
The next step was some initial sketching to brainstorm the base functionality. Although my research revealed that four doors was the most popular design, I opted to utilize six doors. This is because with more faces, the base becomes more circular. With a more circular base, there is more room for a central gear.
This means that each door must now be able to rotate 240 degrees (if the doors rotate on the exterior of the artifact). To accommodate reasonable storage, I also specified that each door should be 2″ x 5″. This allows for ample room to fit keys, flash drives, and more. My last functional specification was a central dial to drive door rotation. On the aesthetic side, I aim to accomplish a geometric, futuristic look as described above.
Design Process
The following schematic outlines my typical design process.

The design process begins with defining a problem to solve. Next, research and expert interviews are utilized to clarify and specify the problem. Then brainstorming and ideation takes place, followed by pretotyping and prototyping. The prototype must then be evaluated before creation can take place (redesigning as needed). The final product is then tested and evaluated relative to the problem specifications. Note that this process is iterative. The following diagram illustrates the process utilized for my upcycling project.
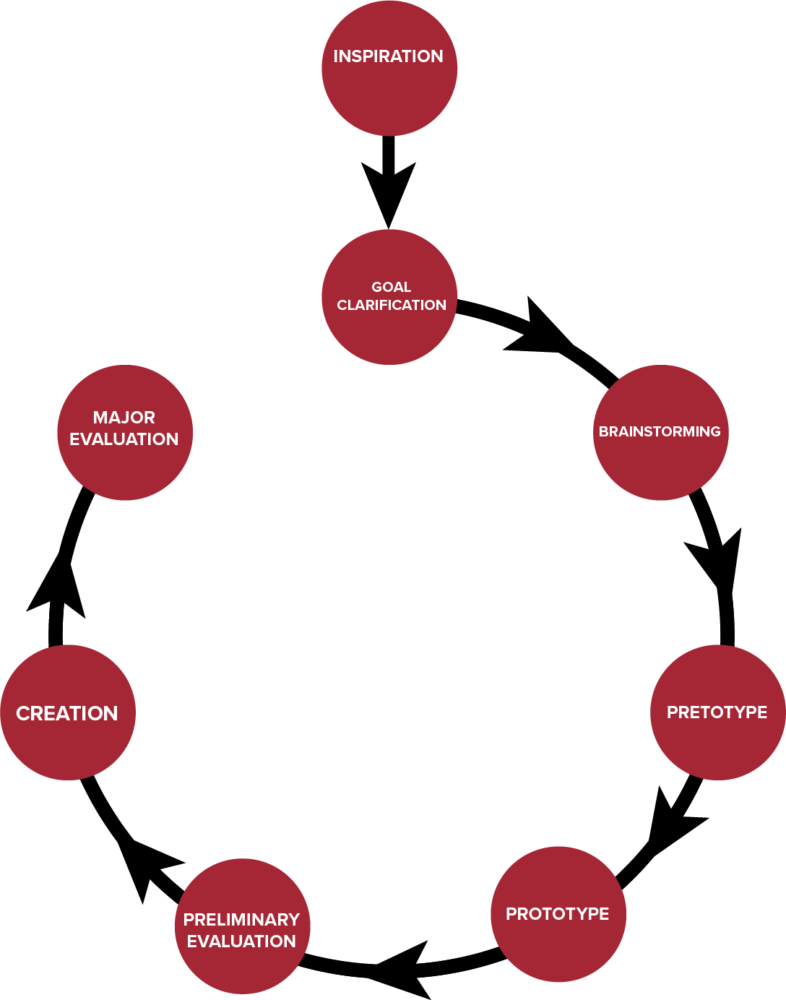
In this case, there wasn’t a specific problem to solve. It started with inspiration. From there the inspiration must be transformed in such a way to accomplish the goal of upcycling. From there, the process was similar to the general design process. For me pretotyping consisted of designing the artifact in SolidWorks and analyzing the mechanics. The prototyping process consisted of some initial laser cutting of gear designs and hole sizes. From there, the final product was assembled and evaluated relative to my pre-defined specifications. Note that there is a dead end here. There wasn’t time to iterate for this project.
Fabrication
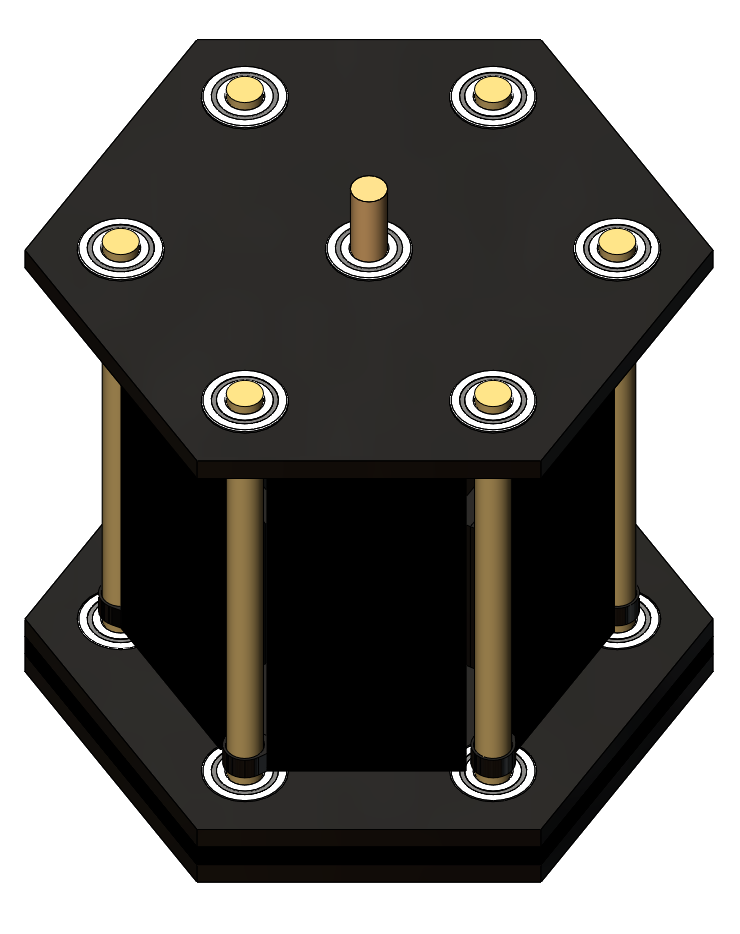
The final materials I utilized for the project were quarter inch black acrylic, 3/8 inch diameter wooden rods, and 3/8 inch bore diameter ball bearings. The acrylic consisted of both personal scrap from my past projects and scrap acrylic from Colorado Plastic Products. The rods were also personal scrap. The bearings however were a required purchase.
The first step in the assembly process is designing the assembly in SolidWorks. Next, drawings should be made for all acrylic parts. Converting them to dxf files allows for the parts to be laser cut. As reference, this is what the final CAD assembly looked like.
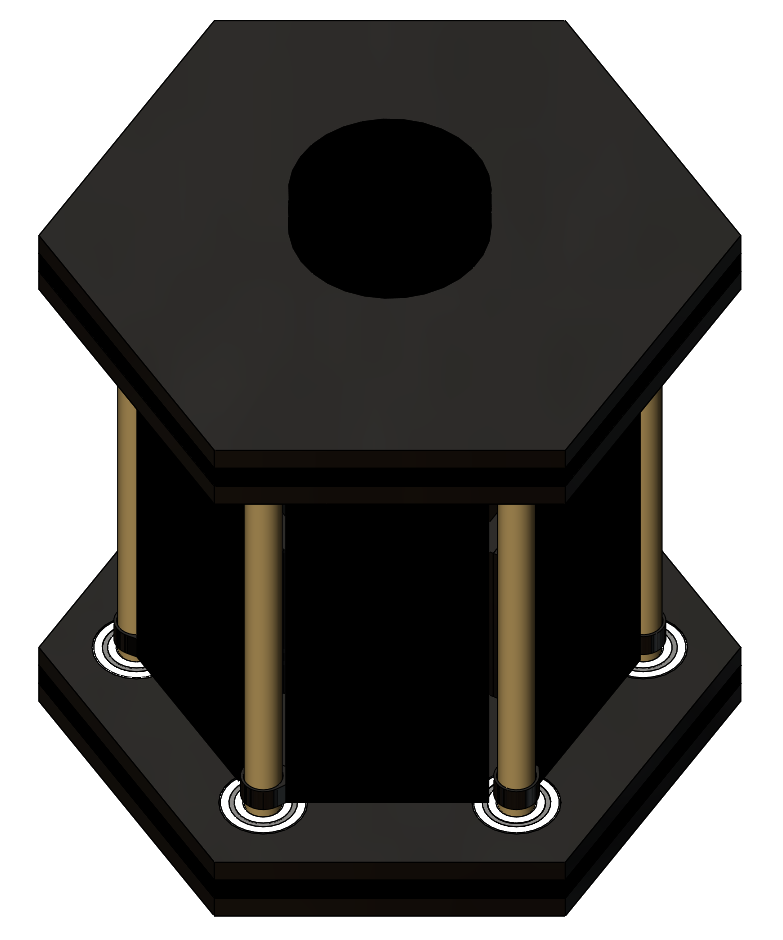
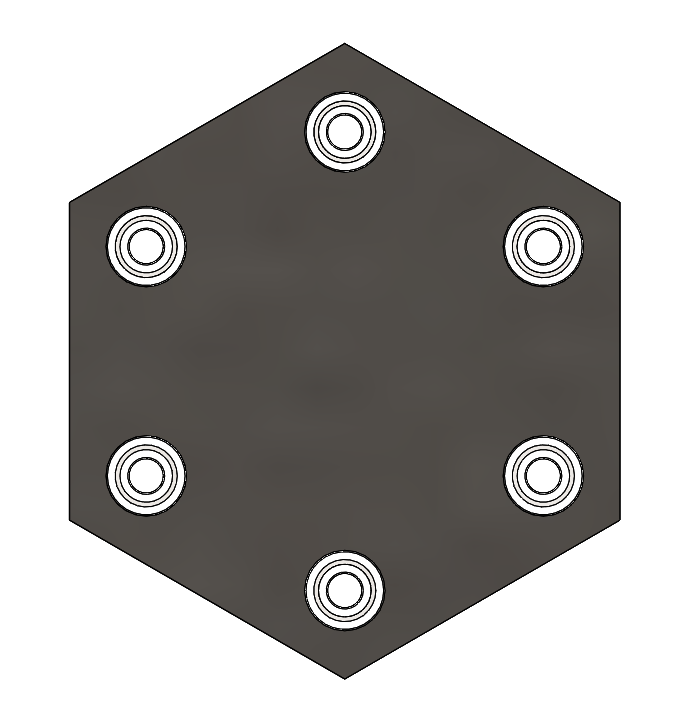
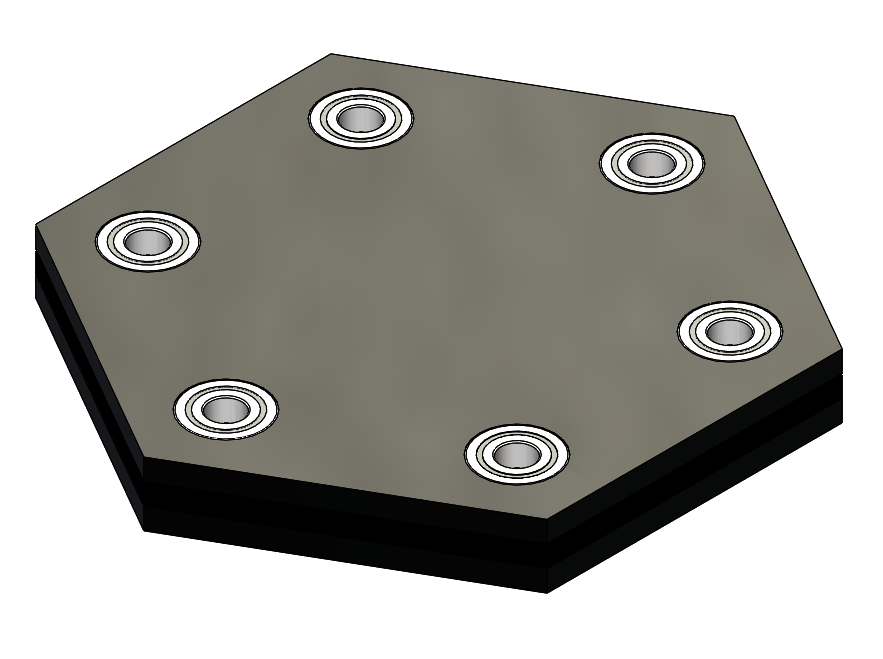
The first step in the assembly process is the base. The bearings are placed into the six holes of the base hexagon. Superglue should be added to the interior of the acrylic to ensure the ball bearing are fixed. Bellow this plate, add a spacer to accommodate for ball bearing thickness, and a full plate plate below. This results in a total thickness of 3/4″.
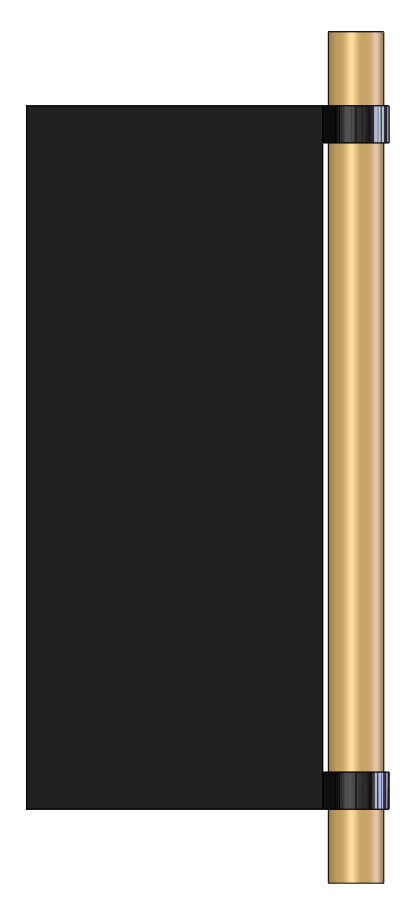
The next step in the assembly process is creating the doors. Start with the wooden rod and add two hinges. The hinges are designed to allow the door to be glued to a flat (instead of curved) surface. Once the hinges are added, super glue the door to the top and bottom hinges as pictured below.

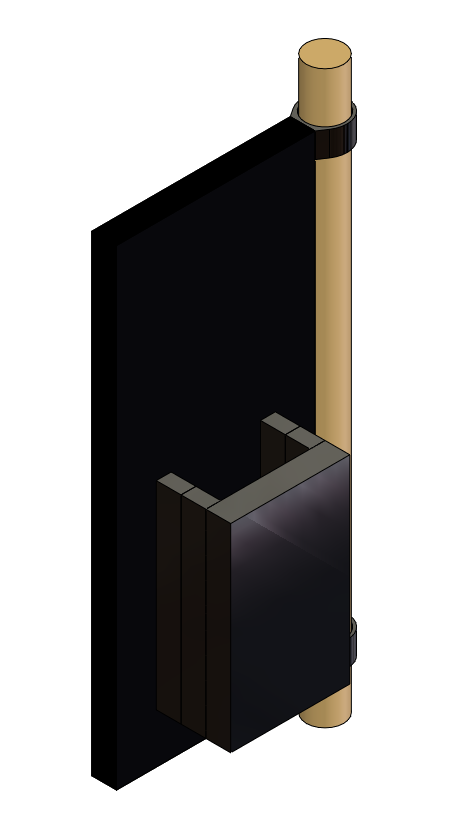
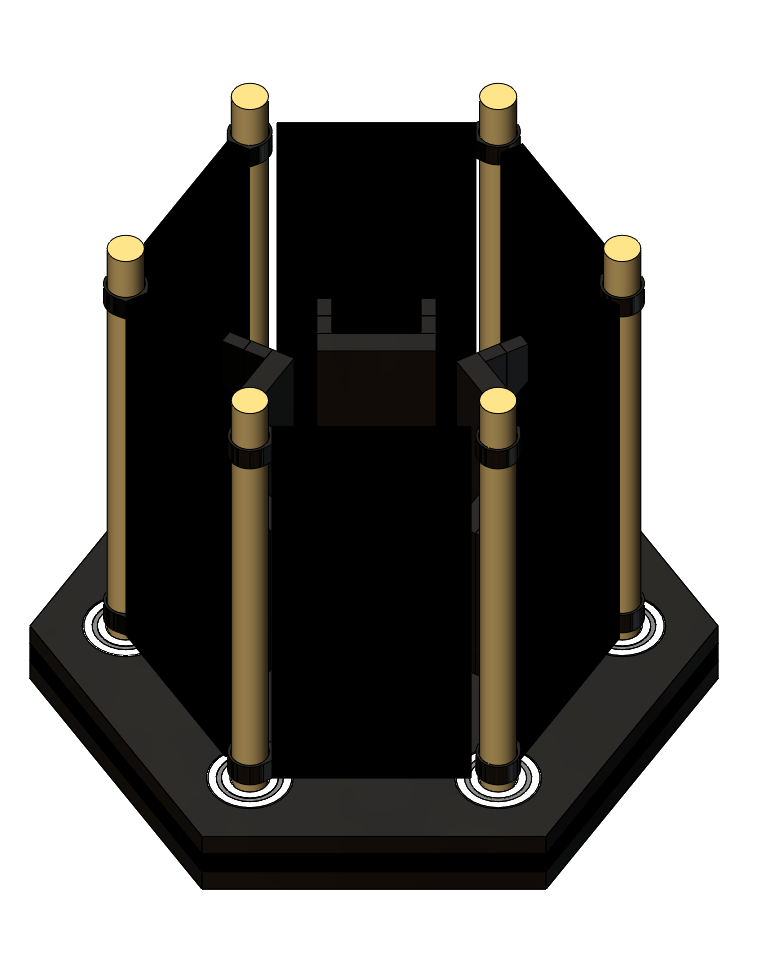
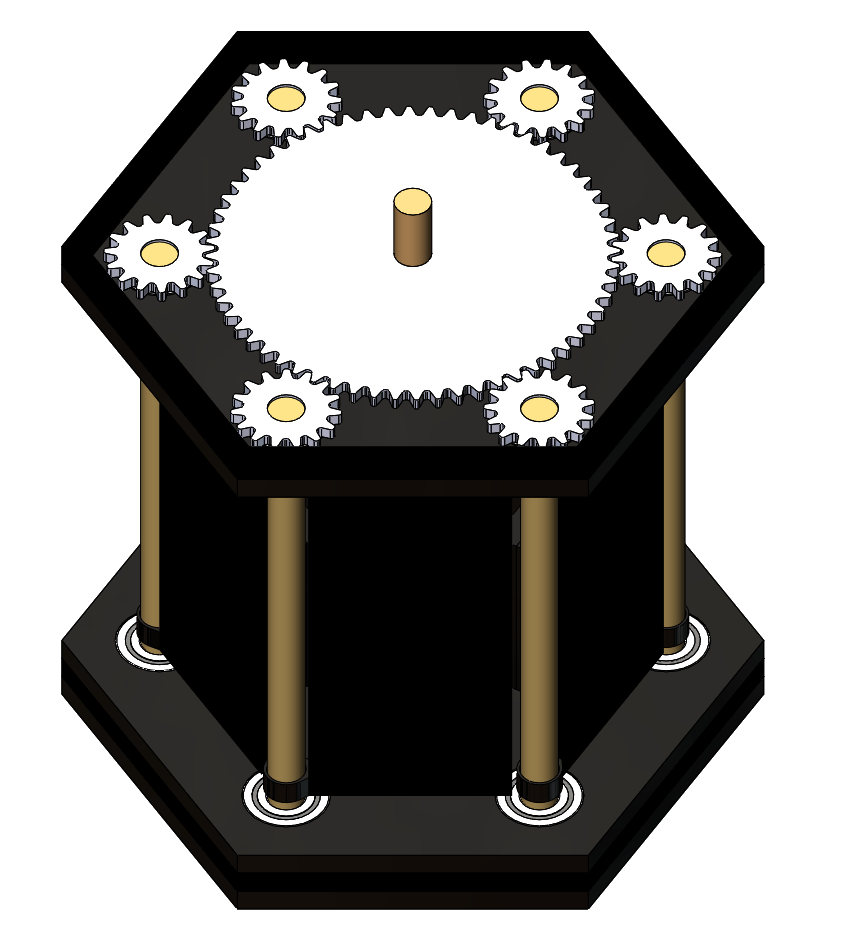
The above process should be repeated six times. The rods can then be added to the bearing of the base. Additional bearings and gears should then be placed on top of the doors.
Final Artifact
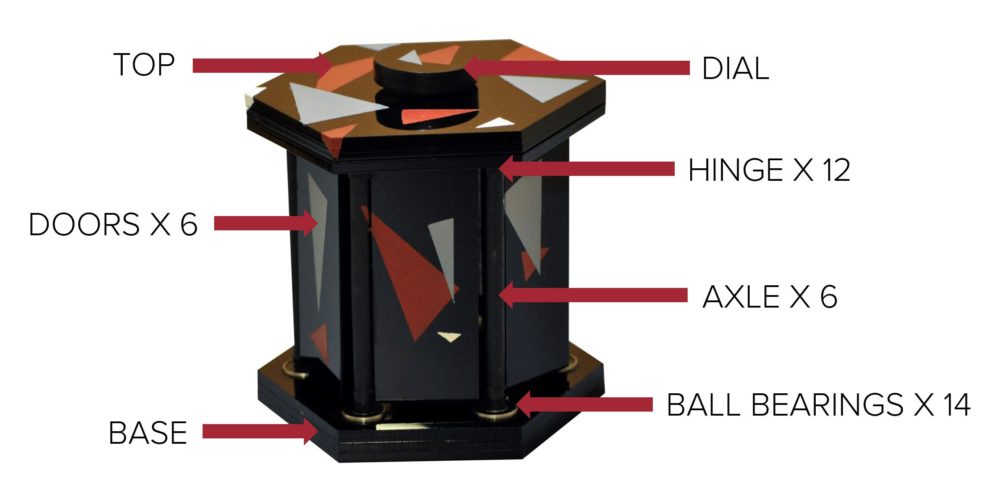
The assembly is completed by adding another plate on top of the gears and then adding a dial to the top of the central rod. The finishing touches are added with paint. The wood is painted black and the aesthetic is added by masking off random triangles on the exterior faces of the artifact. The triangles are then painted red, grey, and white. Below is a labeled image of the final artifact and the included components.
Additionally, the following GIF illustrates the mechanical functionality of the artifact. All doors rotate together, as dictated by the systems of gears. This provides an interesting effect that enhances the futuristic aesthetic.

Evaluation and Next Steps
I believe I achieved all my functional and aesthetic goals, with one exception. While the central dial was initially functional, the dial and central gear are no longer coupled. I believe this is because there is a large amount of torque applied to the central gear from the six smaller gears. The doors still rotate together, however, maintaining the desired functionality. I additionally believe the reflective acrylic added to the modernist aesthetic and that the random positioning of the triangles also enhances the futuristic and geometric look of the storage device.
In the future, I’d like to make the design more robust. This can be accomplished by replacing the wood with steel rods and gears with off the shelf components. Gears can then be press fit or secured with set screws. Furthermore, the design is easy to scale up. I would be interested to create the same artifact at twice the size. This allows for more storage space.
Presentation Video
The following video is a recording of my presentation discussing the above upcycling project.
10 Comments. Leave new
Jackson, the dynamic aspect of this project really catches my attention. As a mechanical engineer this is something that I like a lot. I never knew that there were cigar boxes like this so that aspect of being more uniques is really appealing as well. Overall the project looks very clean, well thought out, and and functions as intended, which is always really exciting. Why did you choose to put the triangles on after as compared to possibly etching the shapes with the laser cutter? I personally think it would look cleaner that way. But that is my opinion. Im more interested to hear your reasoning behind that. Also, is there a reason you wanted all doors to open, rather than just have some doors open?
Thanks George! The main reason I did not engrave the triangles using the laser cutter was simply that a few triangles spanned multiple surfaces. These would be difficult to engrave in a way that lined up. For consistency, I opted to utilize masking tape instead. As for the doors, I thought opening all at the same time would provide a more dramatic visual.
Awesome job, Jackson;
The actual functionality of the artifact is fantastic; the synced rotation of the doors is a great effect.
Size-wise (in response to your in-class question), I think it would be cool if it was almost walk-in pantry size; while that might not be possible, even scaling it up would be beneficial. In terms of whether or not I would use the artifact in my daily life, I think I’m in the minority when I say that generally I would want a storage object to be more easily accessible and quick, rather than more ornate or complex; ultimately, I don’t think this takes away from the piece though!
One question I have is whether acrylic has the durability required for something in day to day use?
Thanks Kevin! I am in complete agreement that this piece is far from practical. The reason I asked that question was to gauge if people thought the mechanics compensated for the lack of practicality, so I appreciate your honest input. As for the acrylic, for most parts I think it is suitable. In a future iteration, though, I would replace the acrylic gears with an off the shelf component (most likely steel).
Excellent work, despite your concerns with the paint job not being as clean as it could be, it really looked to me as if it were part of the material you lasered rather than added afterwards, especially with the triangle that runs over the edge. I was also impressed at how you achieved such smooth, synchronized action of the doors. A question for you I meant to ask during your presentation: How did you create the gears? What specific thickness of material was used?
Thanks Thomas! The gears definitely took some trial and error. Because they needed to rotate freely between two sheets of acrylic 1/4″ apart, I utilized 1/8″ acrylic to cut the gears. I designed the box such that the distance between opposing axles was 5″. This means the larger gear can have a radius of 4″ while the smaller gear has a radius of 1″. From there, I used the same sketch to cut the individual teeth, ensuring that 4 times as many teeth were cut from the larger gear. This ensured proper engagement between all door gears and the central gear.
I am also fascinated by the mechanical design. This is a really cool contraption! I appreciated the screenshots of your CAD to understand what was going on in the device. Great presentation and it seems the device achieved your aesthetic of restoration and upcycling. I like how the doors open and close together; it creates an awesome visual. I love your idea of using this to store other things like jewelry or keys. Adding LEDs to this device would also look great, especially if you used a clearer acrylic so the light could refract through the acrylic.
Thanks Daniel! I am a bit surprised that I had never seen anything like this prior to watching The Repair Shop, as I agree it creates a very engaging visual. I really like your idea of adding LEDs. Lighting the inside would further add to the interesting effect that takes place when the doors are opened. Perhaps when I have some more free time I could try adding a motor do drive the central gear. This way, the whole device could be operated remotely.
Great job Jackson! Your presentation was very thorough. I like how you mathematically approached the challenge of the moving pieces. You amped up the challenge by adding more doors and by executing the interactive moving elements. The black modern aesthetic works well as an expansion to the original inspiration and it almost makes me think of a Japanese Pagoda.
Looking ahead, I recommend increasing the size and re-purposing it for jewelry, make up, or keys. By simply adding hooks or mirrors you can easily elevate the aesthetic.
Thanks Nicole! Those are all great ideas and I completely agree that this design would work better at a larger scale. I was thinking if I made it a bit taller I could use it as a pencil holder. There is also room to customize the back of each door with different pockets, shelves, hooks, and fabrics. This, like you were saying, would be perfect for a jewelry box.