
I. INTRODUCTION: INSPIRATION
This report will look at the design process of an upcycled product, made up of re-purposed materials. My Upcycled vinly billboard wallet project first began when I looked through one of Peter McKinnon’s videos, “The Best Minimalistic EDC Wallet” [¹], after discovering it from a recent aesthetic exploration blog post that Christopher Lehr, a fellow colleague in our course, observed [²]. This aesthetic: “The Peter McKinnon Aesthetic” centers around the photographer Peter McKinnon, one of minimalism, simplicity, rusticity, yet modern, which gave me inspiration to make my own carry-on that I would be proud of, for my upcycle project. McKinnon also talked about patina, the surface appearance of something grown beautiful especially with age or use, which really spoke to me in finding an potentially aesthetic material. The intrigue and motivation came from making something that I’d carry with me everyday, aesthetically pleasing, and had a great use.
II. MATERIAL SELECTION
The main material I looked at and used was re-purposed vinyl billboard, taking the strengths we see from duck tape in its flexibility and the strengths of cardboard in its texture and specific aesthetic, while not appearing dull and stiff.

Figure 1: Material selection, recycled and re-purposed vinyl billboard, image source: https://www.pinterest.com/pin/92534967313929824/?lp=true]
I first required the vinyl billboard from RepurposedMATERIALS, I went to their location in brighton instead of ordering from their website (https://www.repurposedmaterialsinc.com/). Their address was 13505 E 112th Ave, Brighton, CO 80603, and I got to view several of their vinyl billboards. I decided on a green texture as it caught my eye the most.
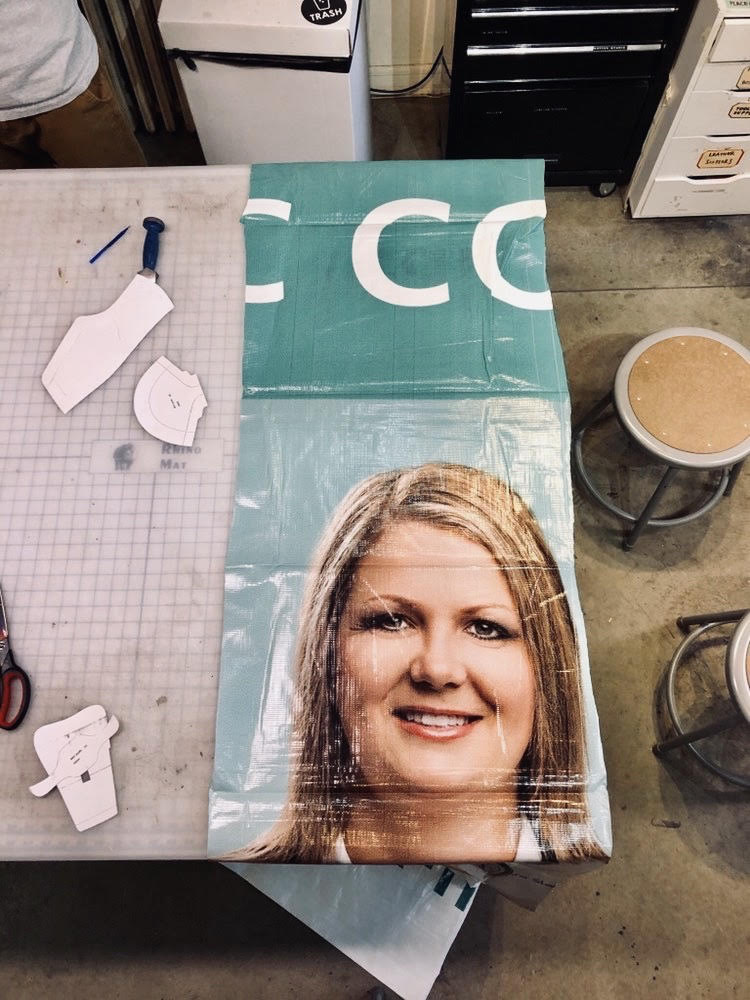
Figure 2: This is the vinyl billboard. Cut from the darker green texture for the body and the left pocket. I used the lighter green side for the right pocket of my wallet .
III. DESIGN PROCESS
Some designs that I observed for wallets was both minimalist, but still highly functional. The design for my specific wallet can be seen in the image below at the bottom right corner, a simple fold-wallet that would have plenty of space for my cards and ample area for cash within the inner pockets. I chose this over the others as it had the second most pockets without looking like a standard wallet like the one seen next to it, and requiring plenty of stitching for a very aesthetic look.

Figure 3: Some Bexar Goods Wallets, very simple designs but very functional and very nice hand stitching that I like, in terms of an aesthetic. Image Source: https://www.bexargoods.com/products/simple-card-wallet-woodland
Initial hand sketching was done to visualize the design of the wallet and what dimensions I wanted the wallet to be, to get a feel for size and function. Did not do CAD sketching as the wallet is very minimalist, as intended.
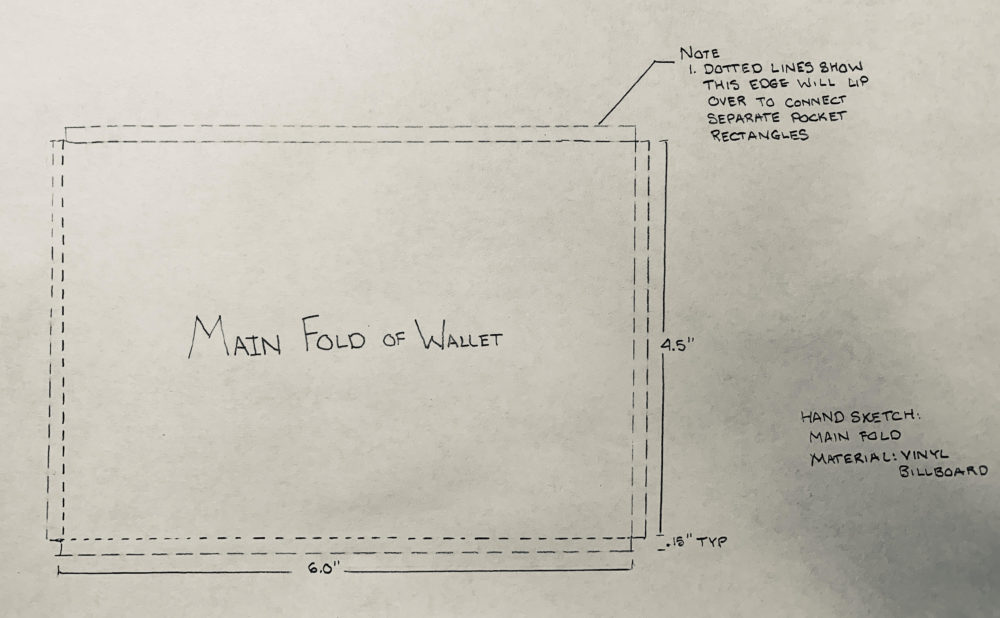
Figure 4: Hand sketching of the main piece of vinyl fabric of the wallet.

Figure 5: Added pockets onto fig. 4.
IV. MANUFACTURING PROCESS
To be able to stitch, I had to learn how to sew. The ITLL as well as the Idea forge both have very nice sewing machines that students can use. I followed the instruction book at the sewing station and learned how to sew.
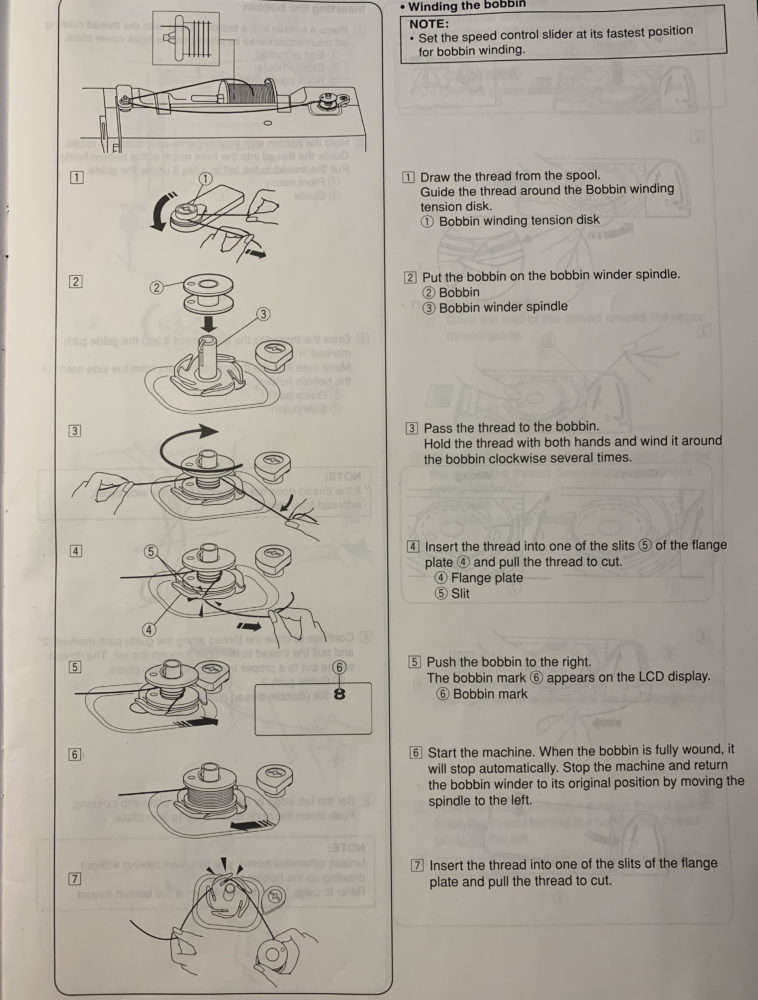
Figure 6: A preview to the instructional steps of the Instruction Book, this is page 13.
The workstation provided all necessary equipment for my initial progress as well.
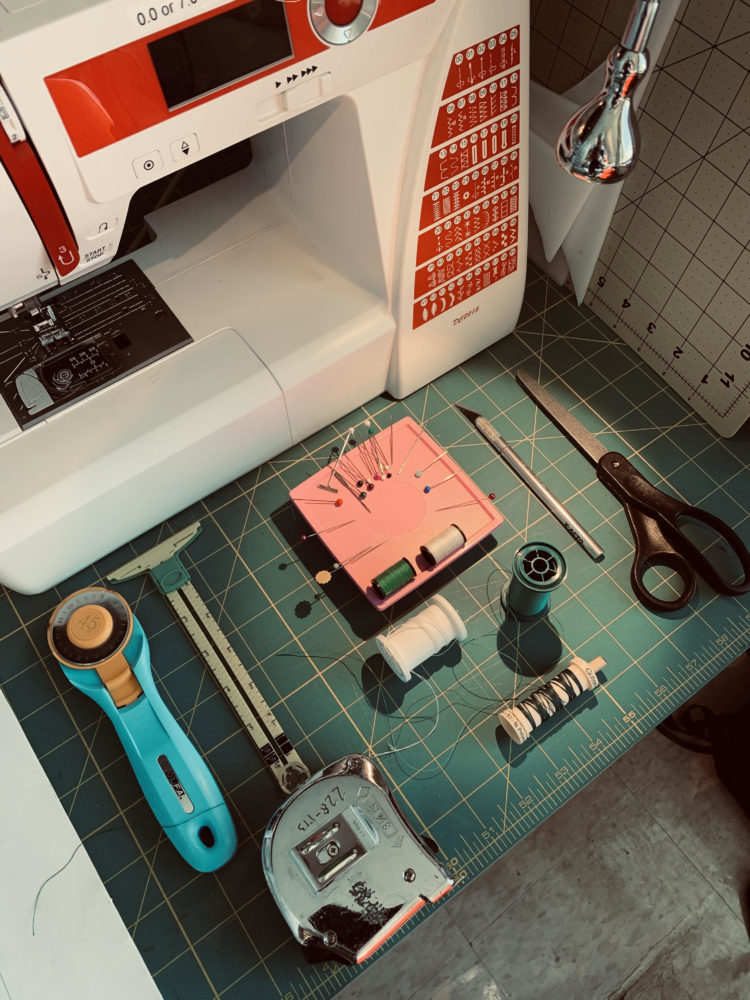
Figure 7: Various measuring devices, thread colors (different shades of green and white), needles, and cutting devices are at the work station.
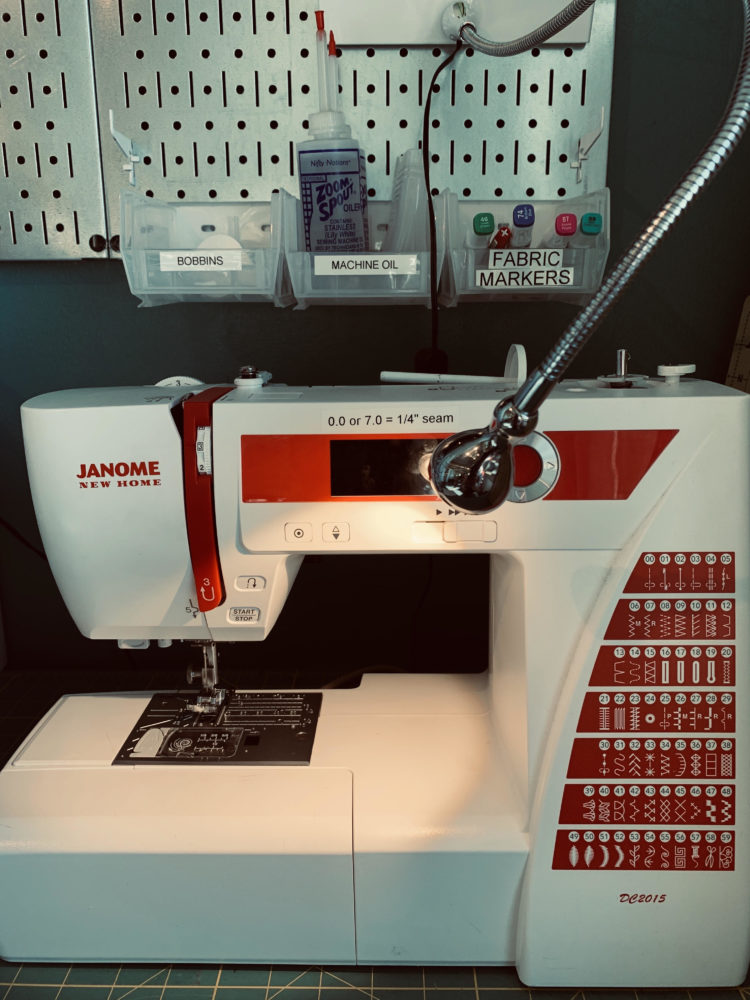
Figure 8: ITLL sewing machine used.
I first began creating the wallet by cutting a 4.5″ x 6″ rectangle out of the dark green side of the vinyl billboard, this formed the main external fold of the wallet. I then cut out 4.5″ x 3″ rectangles for the back of the large pocket, 0.75″ x 3″ rectangles for the middle divider, and 3.5″ x 3″ rectangles for the top side of the smaller pocket. The following are the steps I took to make assemble the wallet:
- I stacked these rectangles on top of each other, starting with the largest (4.5″ x 6″) rectangle, the divider, and the small front pocket.
- Placed one pocket on the right side of the wallet, lipped over a little bit of the edge of the main fold over the pocket, and used gorilla glue for initial structure of the pocket.
- Sewed the glued connection with an ITLL sewing machine.
- Repeated steps 1-3 for the left side of the wallet.
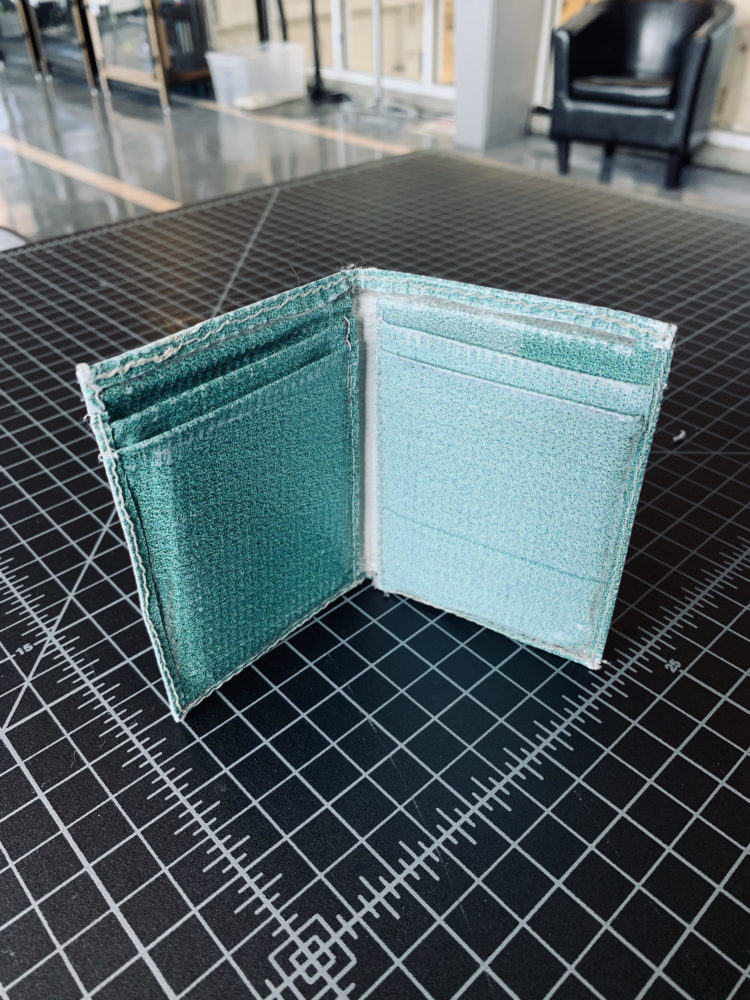
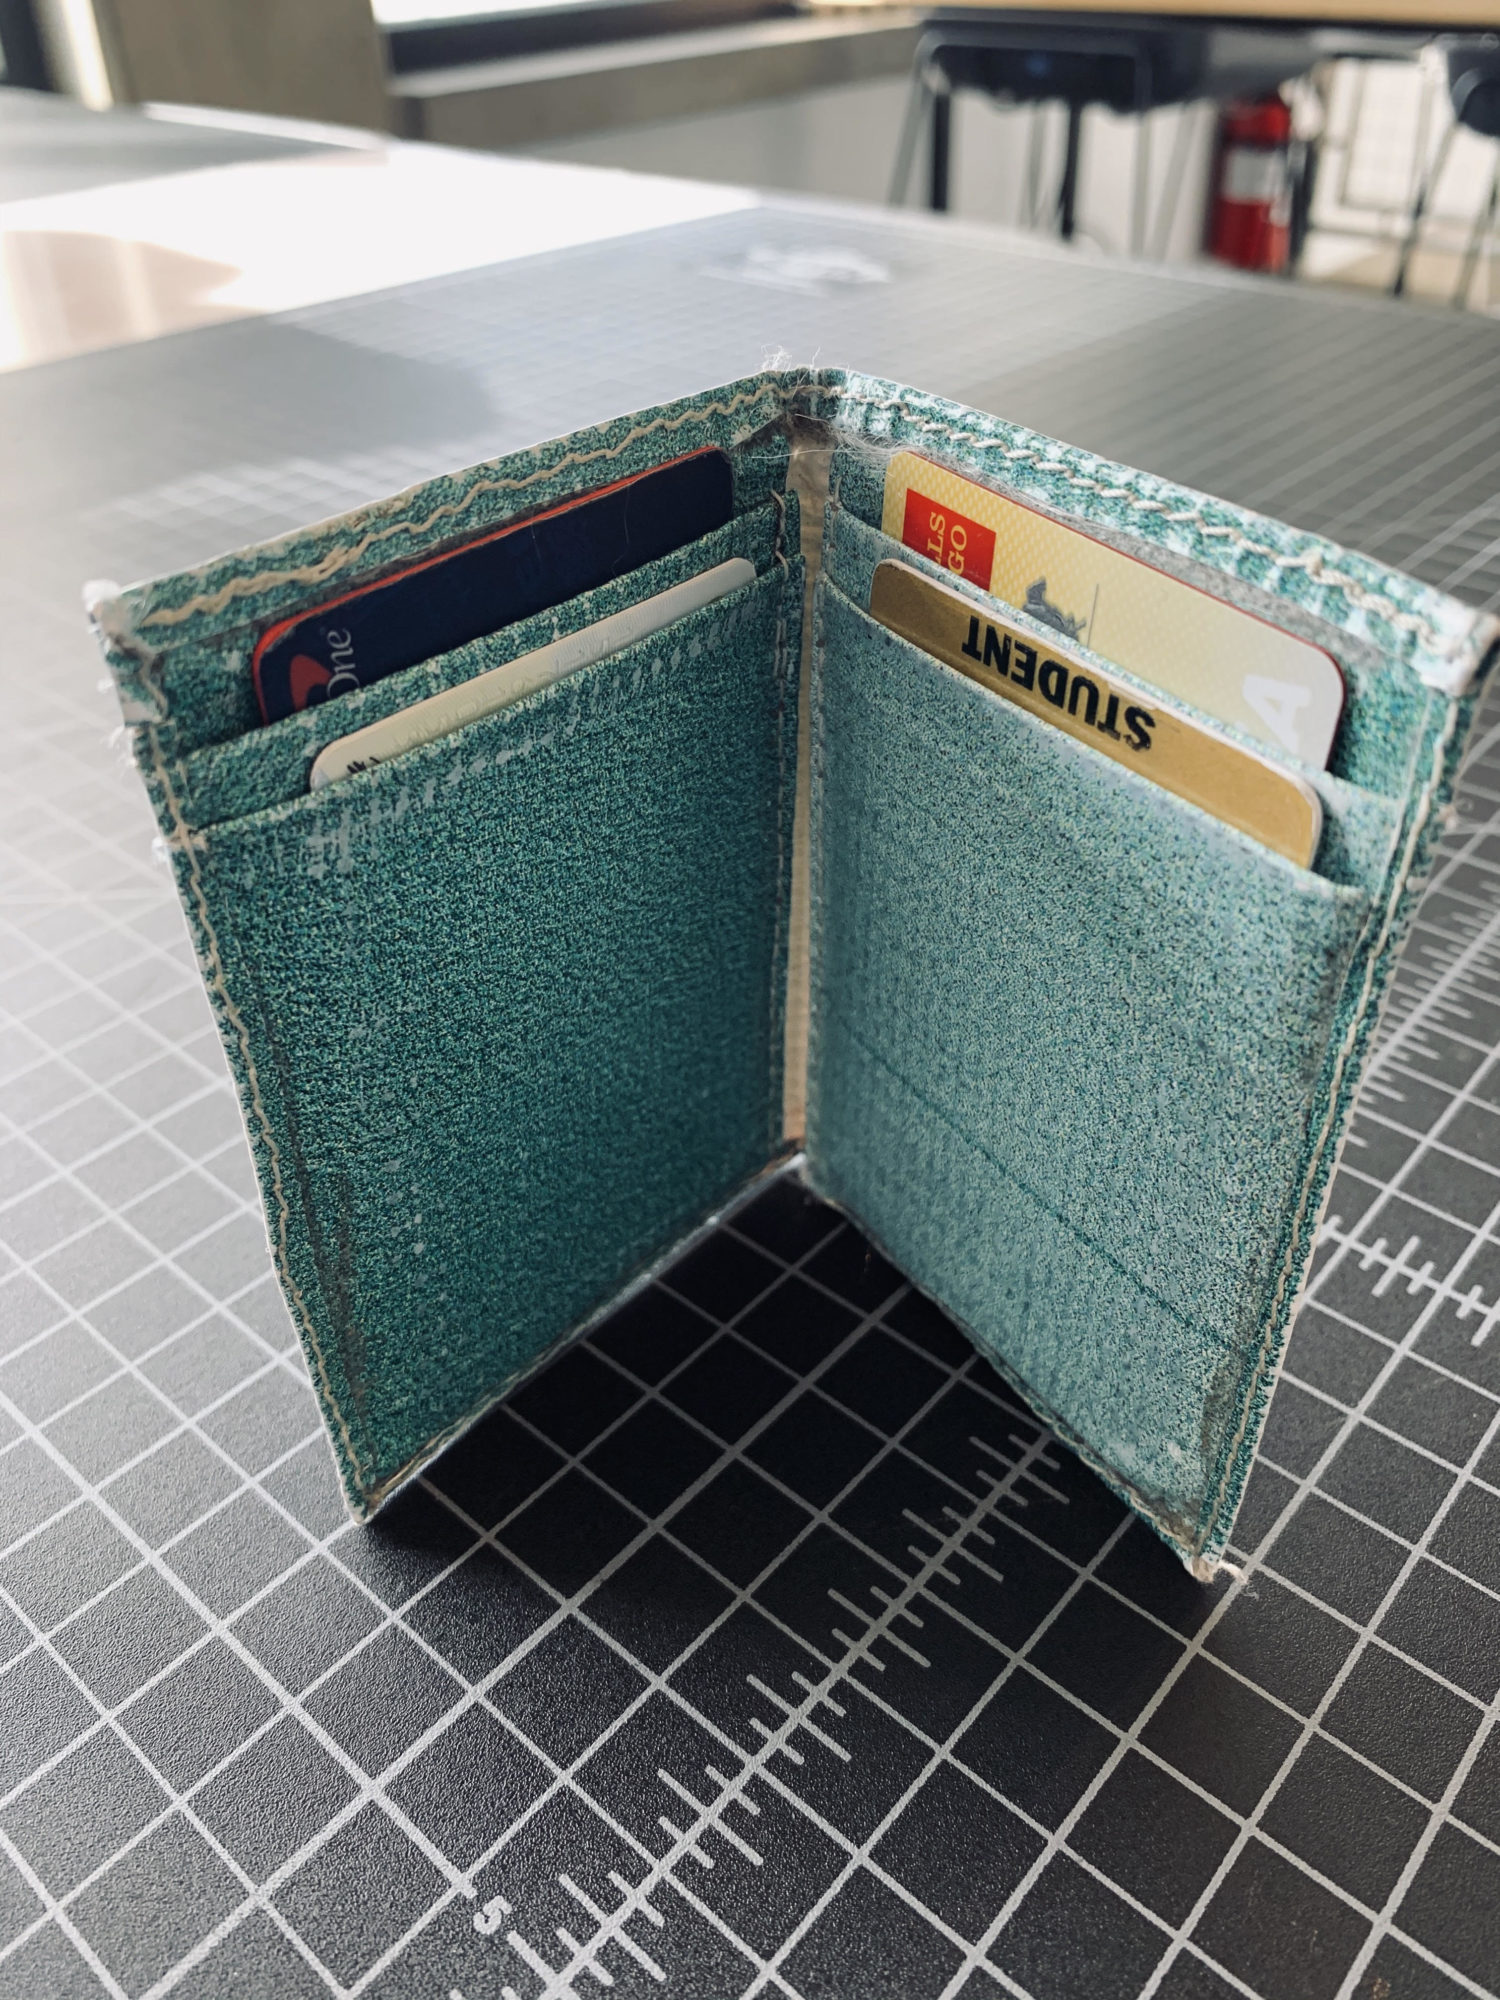
Figure 9: Vinyl billboard wallet isometric
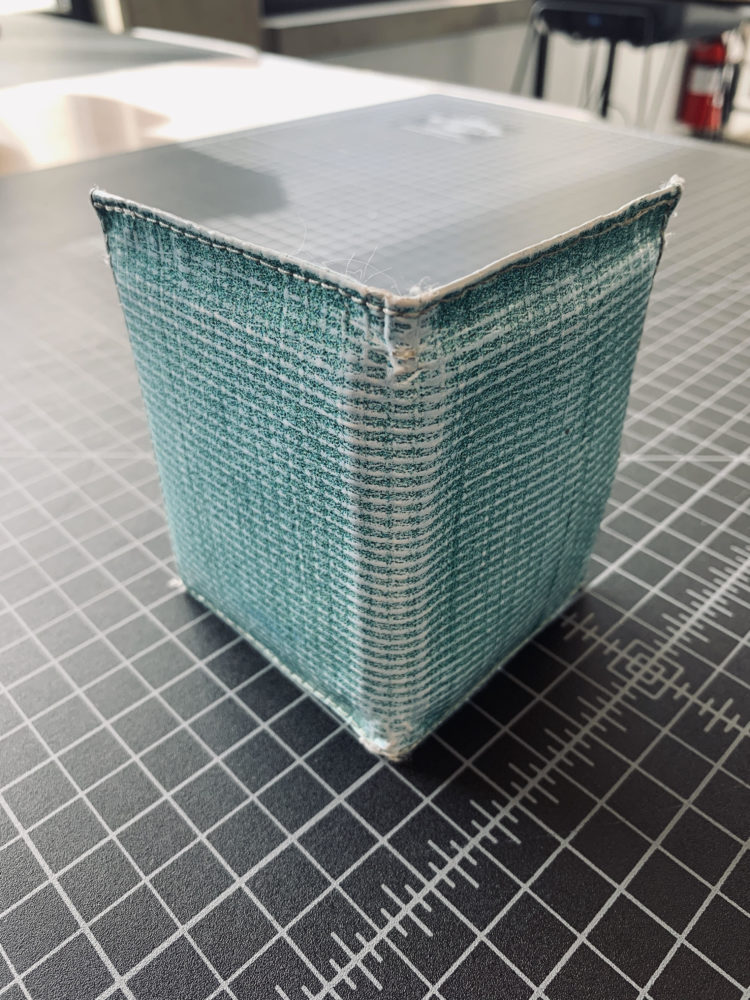
Figure 10: Vinyl billboard wallet isometric (back)
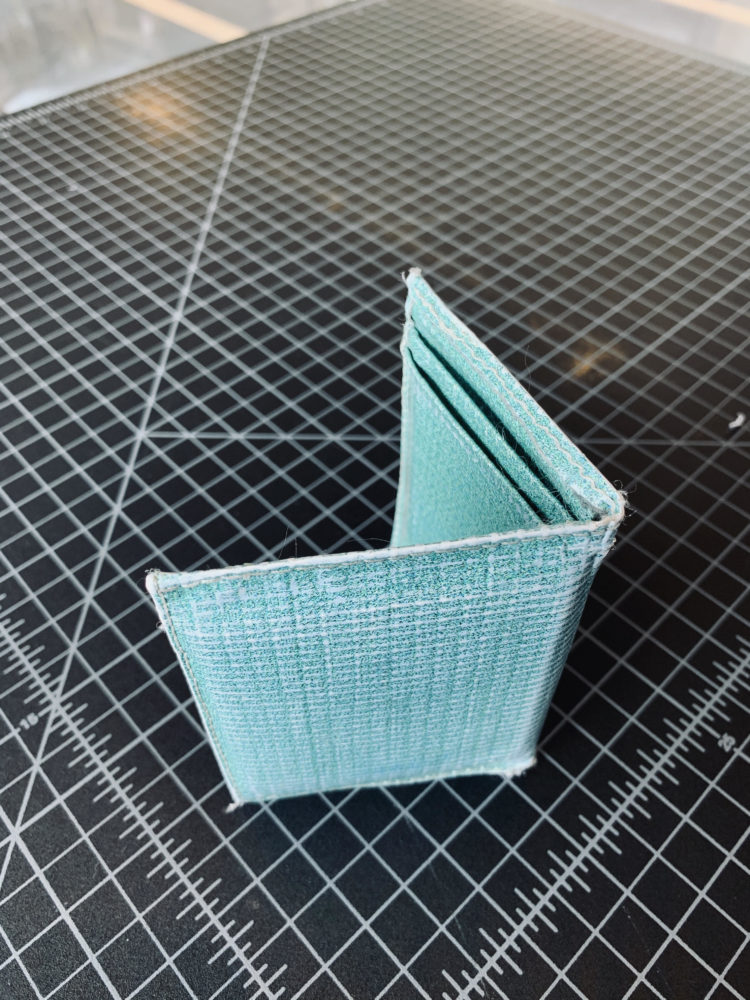
Figure 11: Vinyl billboard wallet isometric (side)
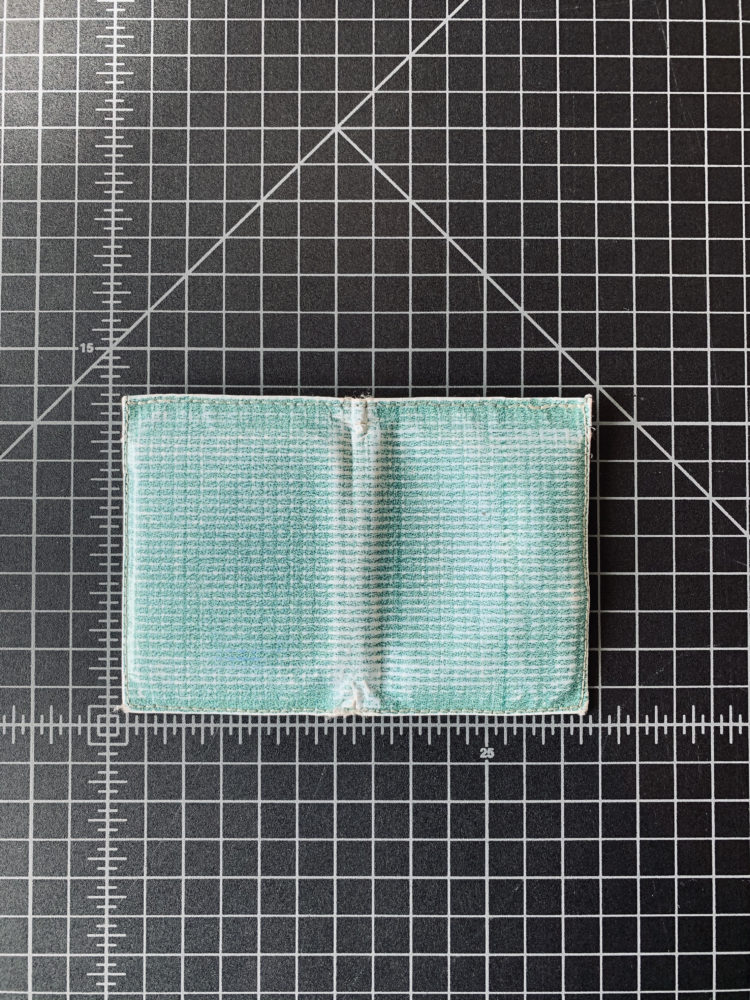
Figure 12: Vinyl billboard wallet top view
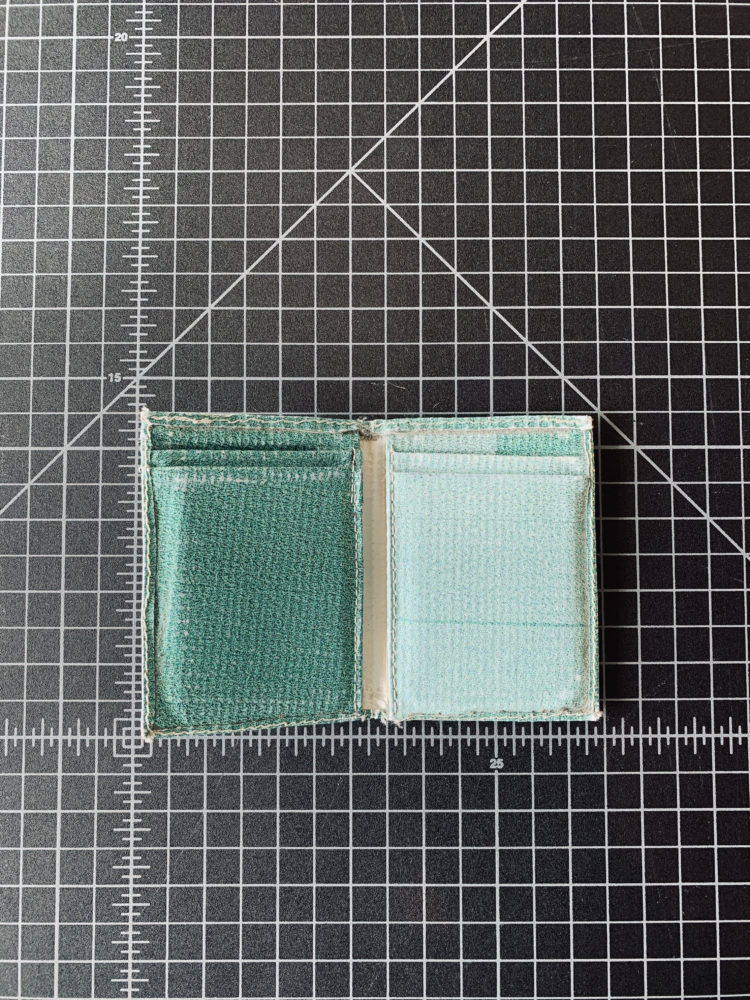
Figure 13: Vinyl billboard wallet front view
V. CONCLUSION
I have used the wallet for about a week now. I accidentally left it in one of my pockets of one of my pants that I placed in the laundry, but the wallet held up quite well, it even added some texture to the wallet itself. The only slight damage can be seen on the bottom side of the right pocket, which I intend to restitch. Overall, I am very happy in what I have made, and I intend make more wallets, maybe of different color if I find the material, such as black, gold, or red. In terms of lessons learned, I should have bought a few more vinyl billboards of different colors, it was quite a long drive, and I should have cut the left pocket rectangle a little finer so it wouldn’t jut out as it is currently, after being washed in the washing machine.
VI. REFERENCES
¹McKinnon, Peter, director. The Best Minimalist EDC Wallets. YouTube, YouTube, 17 Dec. 2019, www.youtube.com/watch?v=1sPtKl00iDc.
²Lehr, Christopher. “The Peter Mckinnon Aesthetic.” Aesthetics of Design, Jean Hertzberg, 28 Jan. 2020, www.aesdes.org/2020/01/22/the-peter-mckinnon-aesthetic/.
11 Comments. Leave new
When holding the wallet I liked how it seems to snap closed when it’s slightly open. It almost felt like there was a small magnet on either side pulling it closed. Very subtle touch that I really enjoyed.
Will,
I liked how you went in depth about your inspiration and material selection. I also enjoyed your slide layout as it highlighted images by centering them.I think that one area you could improve upon is looking at that audience more instead of the slides.
Statement of meaning:
I like how how you learned a new skill for this project
Neutral question:
Did you intentionally buy the vinyl in this color?
Overall the quality of this wallet is amazing. It’s very impressive that you were able to make such a quality product with it being your first time sewing. Did you consider using another material such as leather for the wallet? I know you wish the vinyl was a different color, but I think the teal color really makes it unique. Well done!
This is so neat! I would have never thought to use vinyl billboard for this project. I really like the blue color, and love that you had the chance to take a trip to the repurposing facility. Do you think you’ll go back and gather more material for a future project?
– Was it tough to sew the vinyl?
– Why that color?
Overall I liked how it turned out a lot, it looks really clean and neat.
The stitch quality looks excellent, to the point that this looks like a commercially fabricated project. Great job seeking out the necessary skills to carry out this project!
When holding the wallet I liked how it seems to snap closed when it’s slightly open. It almost felt like there was a small magnet on either side pulling it closed. Very subtly adds to the minimalist aesthetic.
The form of the wallet and how you store the cash make the wallet really sleek and clean. Did you consider using a different color for the interior? Was there even different colored vinyl available?
I am really impressed with the quality of the wallet. As I mentioned in one of your previous posts, I currently have a smaller vinyl card wallet that I’ve had for almost five years. Yours is so much better and such higher quality. I would much prefer yours over my current one!
I really like the quality of the piece. It feels like it’s built to last
Do you think you will make more?
Honestly, I am really impressed with the how your wallet turned out to be. When I was reading at the beginning of the post, I was slightly hesitant about the material you selected, but I think it was an ideal choice after I saw the final result. For your inspiration, I really respect it and like it and I think you had the right right path in mind.
Similar to your inspiration idea, I think your design process and sketching look neatly simple (minimalist) and efficient. I also like the color you chose which reflect your idea. Some questions that arose when I was reading the post were: how strong is your material? isn’t it very strong in tension but have a low shear force?, how hard was it to use the sewing machine with the vinyl billboards because your stitches look like they were made by someone who’s very experienced with sewing?
Overall, I truly love your product and I think you can turn it into something profitable. I you told me you bought this wallet without me knowing you made it, I would have believed it. Well done!