
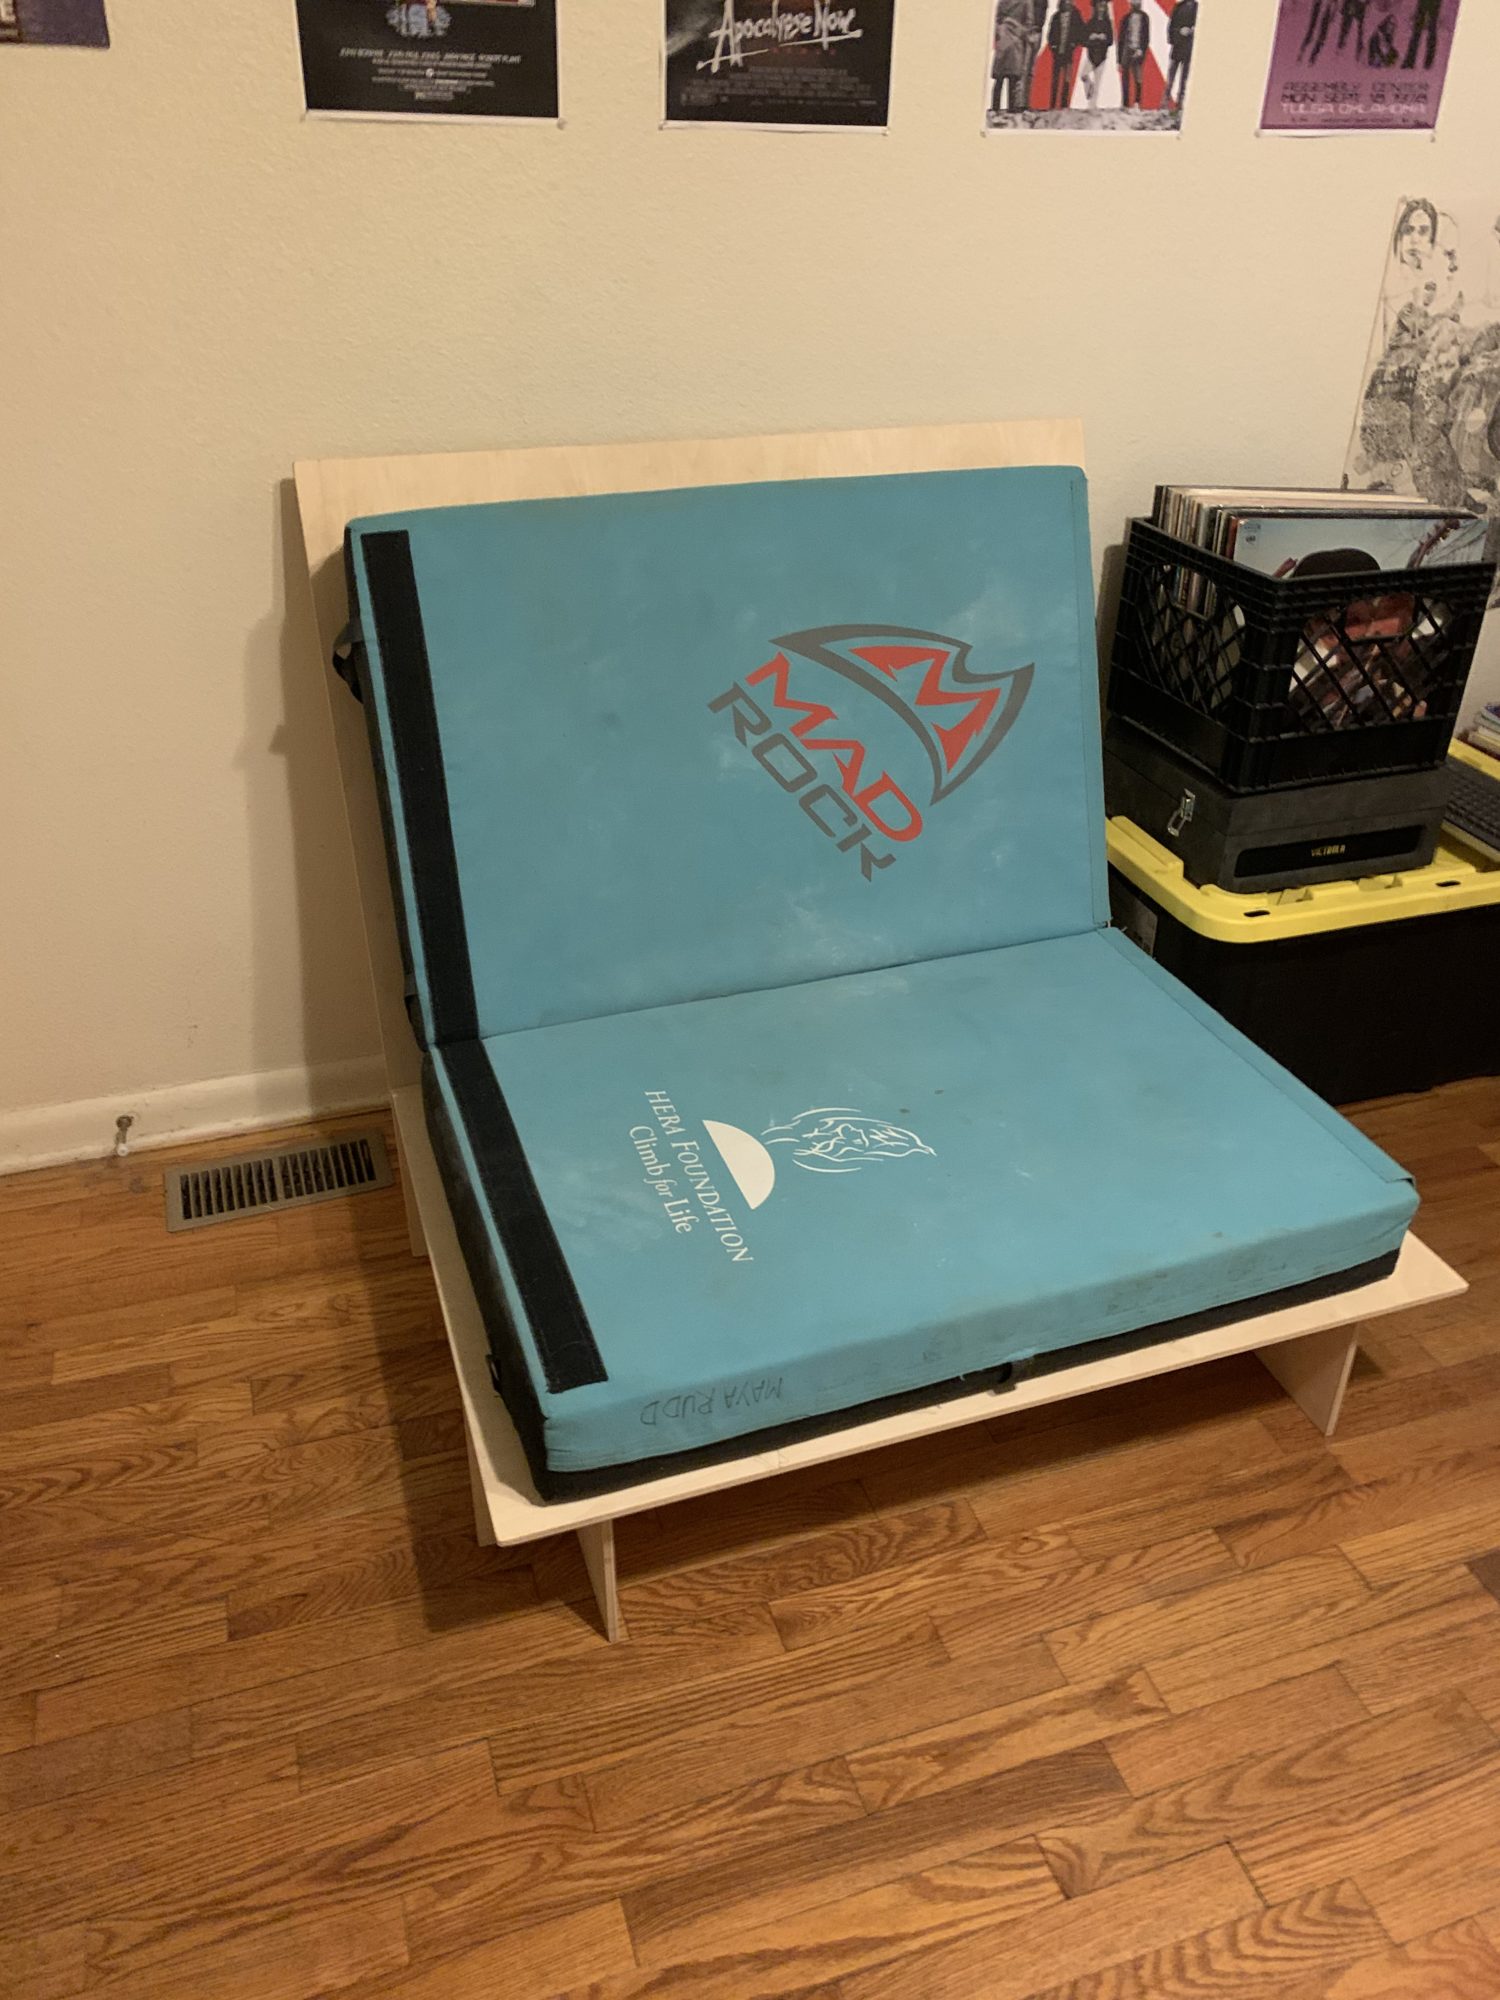
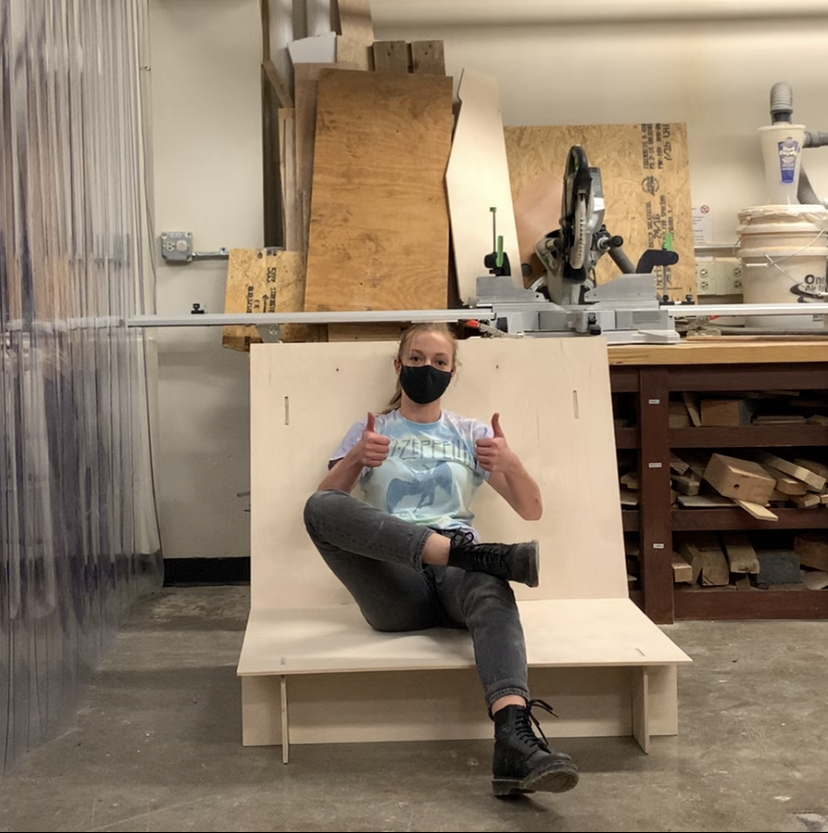
For my upcycle project, I repurposed a climbing crash pad to be used as a small couch. I built a frame out of plywood for the pad to sit on comfortably, which was the main fabrication portion of my project. My goal was to apply a sleek minimalist look to the frame that would look aesthetically pleasing with the pad sitting on top of it, and create a unique look between the combined rock climbing and minimalist aesthetics.

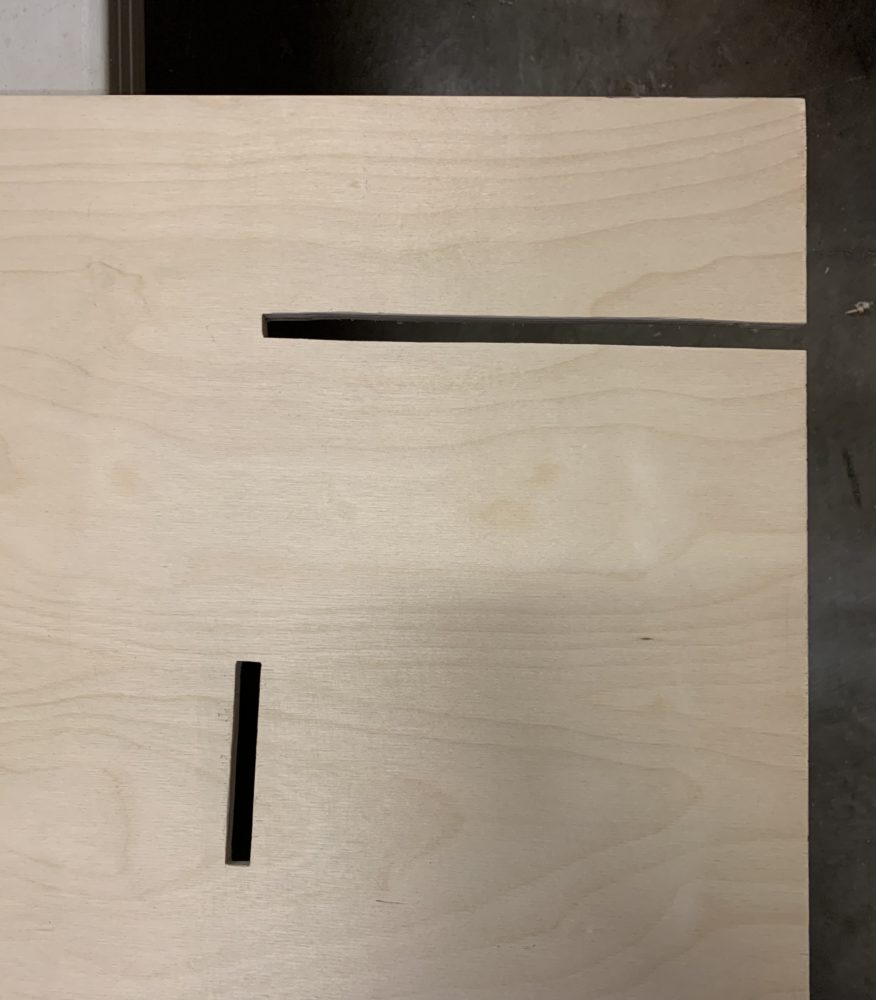
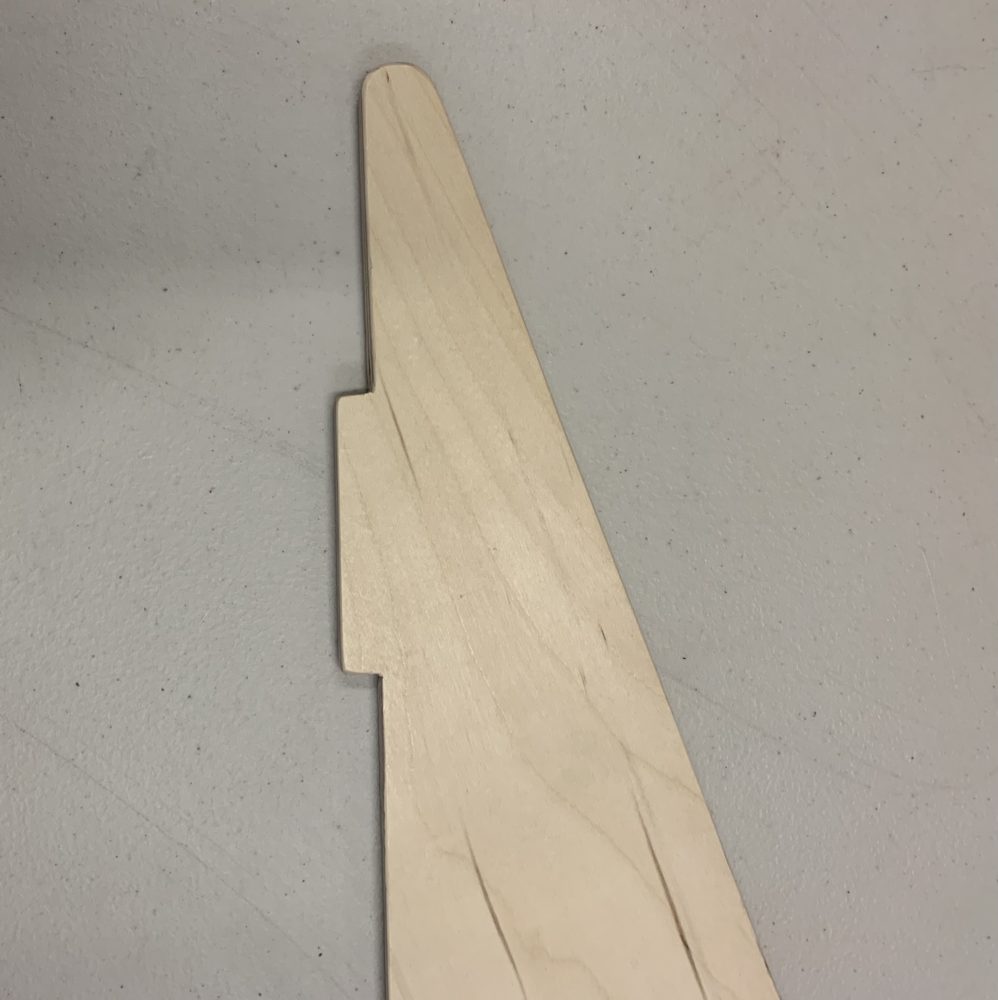
I accomplished the minimalist aesthetic by designing a five piece frame made of Baltic birch plywood, which sort of fits together like puzzle pieces, rather than using fasteners. I started by brainstorming different ways for the pieces to fit together; considering things like other designs that I’ve seen, ease of fabrication, aesthetic look, and creating a comfortable seat. I decided on the idea of using slots and tabs to fit the pieces together securely. I decided that I needed slots to fit the angled back of the seat onto the side supports in order to slide it on easily and have it be even with the ground. I also decided to have 3 sets of tabs for stability and structure as well; one set to fit in from the side supports into the seat piece, one set from the seat piece to slide into the bottom of the back of the seat, and one more set to fit in from the top of the side supports into the top of the back of the seat.
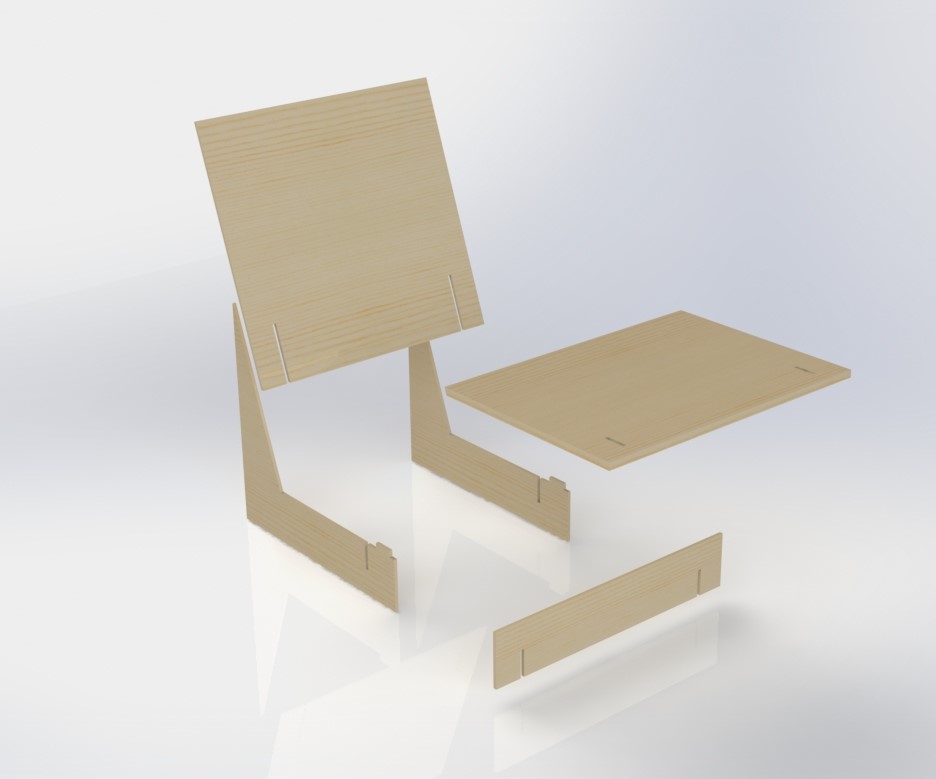
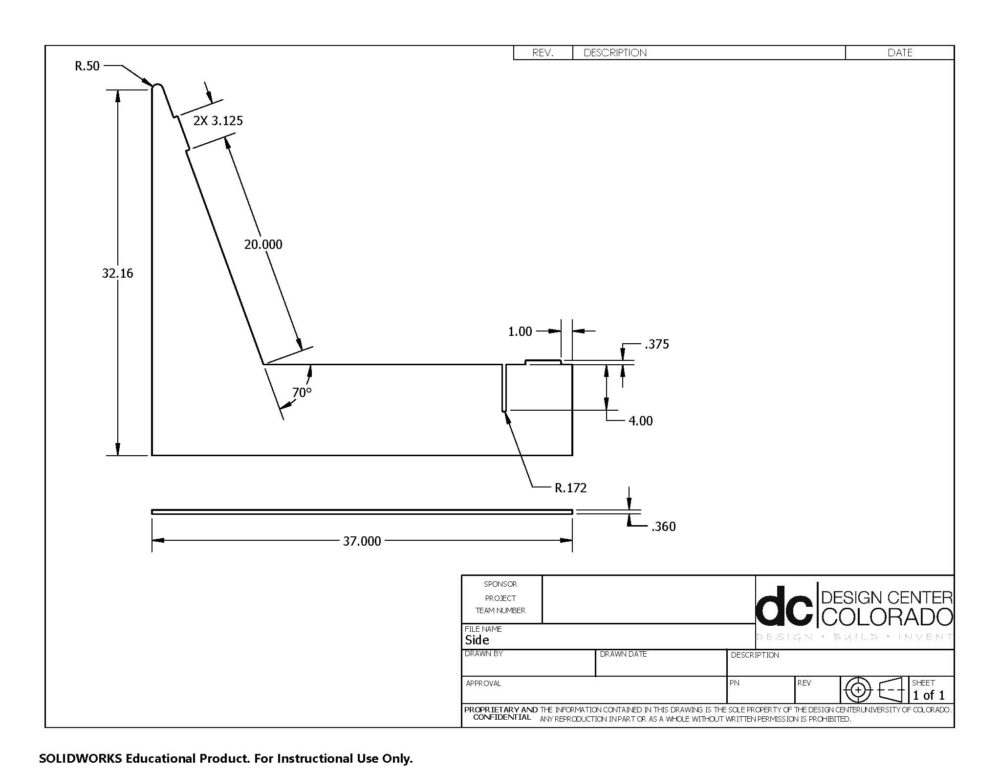
For fabrication, first I created drawings from my Solidworks CAD model, so that I was prepared when I went into the shop to make the pieces with all the appropriate dimensions. I had to make sure that I specified all of the angle cuts and dimensioned the slots properly. If I were to do it again, I would have used fractional measurements just to make it easier for fabrication in the woodshop (i.e. ⅜” instead of 0.375”).

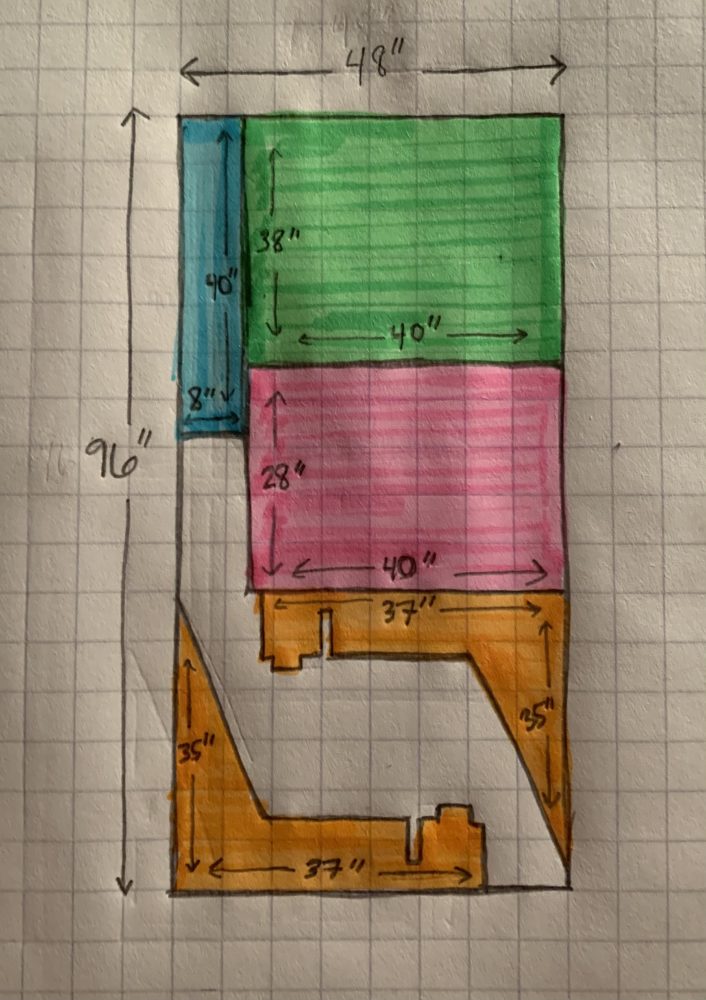
Then, I also planned the cuts of each piece into a sheet of plywood. I did this in order to maximize efficiency of the cuts and also to minimize cost by using as little plywood as possible. I ended up having to change this layout slightly from what is shown, as the plywood stock that the Idea Forge had was 60” x 60” rather than a standard 4’ x 8’ sheet. However, it was still very useful to visualize the cuts and which pieces to cut on the same sheet together before starting.
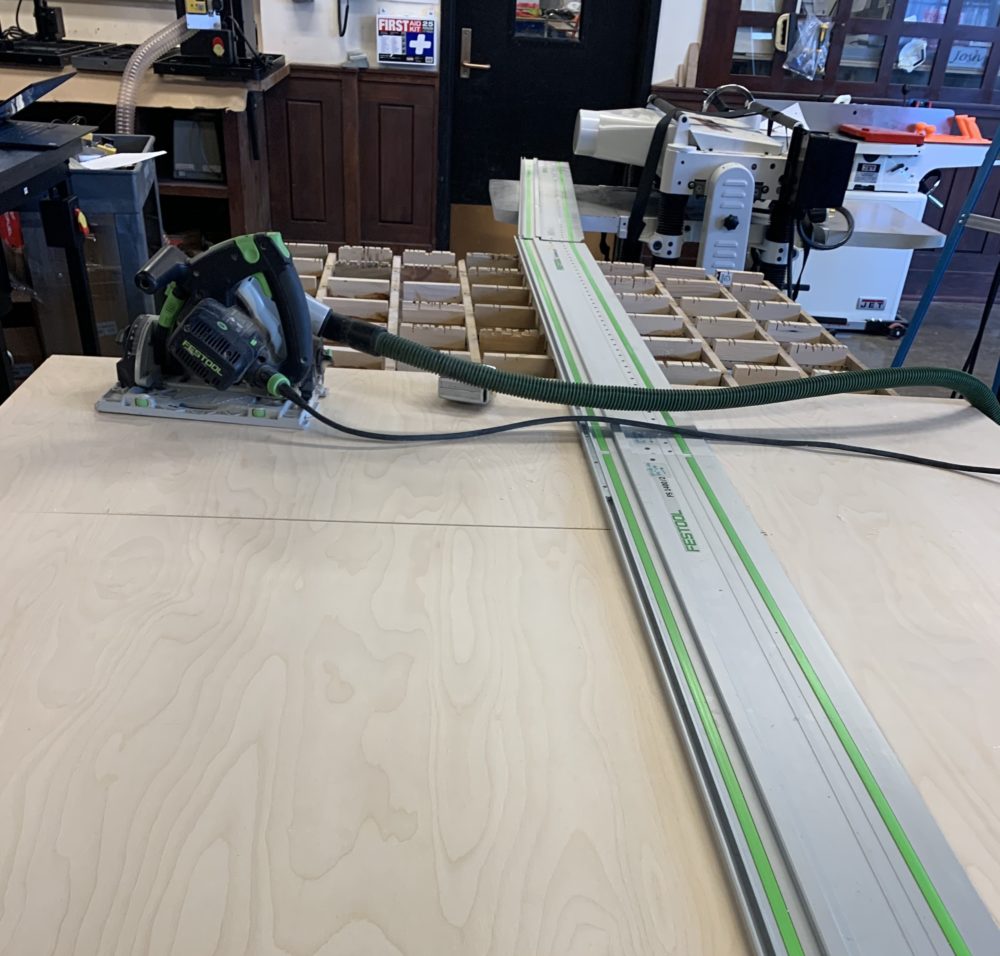
Then, for fabrication itself, I started mainly with the large cuts on the track saw (shown below). I was able to cut all the outlines of the pieces using the track saw. Then, I used a jigsaw to do more detail work, like the slots and tabs. It took me the most time to measure out all of my cuts and make sure that they were correct. It was especially important that both the placement and the sizing of the tabs and slots were correct in order for the pieces to fit together properly. For the tabs, I cut generally around them with the jigsaw and then hand sawed and filed them to precision. And for the slots, I put holes on either end with a drill press and then jig sawed the connections of the tangent lines between the holes. I ended up doing square corners for the slots rather than filleting them to be round like I initially planned, and I’m glad I ended up doing that because I think that it offered a tighter fit.
Then, I cut the twenty degree angle cuts with the track saw for the two large pieces to fit together. Finally, I hand sanded and filed everything to perfection, and with all the work I put in to making sure my measurements were correct, the pieces fit together correctly the first time with very little extra adjustments (filing/sanding to fit). At that time, it was complete and everything fit together great, but I did end up taking the pieces back in a few days later to just add a few cosmetic touches like adding a boiled linseed oil protective coat finish and rounding off the sharp corners.
In total, it was much more woodworking than I had anticipated, probably around 8-10 hours worth. I think that there were a lot of things that I hadn’t considered before fabricating that took extra time, and slight design changes such as adding an extra set of tabs that took ended up making the project take longer than expected. However, I was happy to do some hands on woodworking, and feel lucky to have the in person access to the woodshop that I do as an employee at the Idea Forge.
Overall, I think the project was definitely a success. I was very nervous that the pieces weren’t going to fit together, but I think with a combination of making sure my measurements were correct and a bit of luck, I was able to come away with it all fitting together just about perfectly. All I needed to do to adjust the fit was to file the front tabs and slots down just a bit.
The couch turned out to be very comfortable. The two main factors that were going to affect the overall comfort of the chair were the angle of the seat and the distance of the seat from the ground. I think that I definitely made the right choices with these, and I wouldn’t change them if I was to make it again. The pad also sits perfectly on the frame, so I really feel like I made the right measurements there. There is a bit of frame that sort of hangs off the edge of the pad, but I like that you can see the frame and that it is a bit bigger than the pad rather than flush with it. There is no slip between the pad and the chair when you sit on it as well, which I was nervous about. I considered adding a lip to the end of the seat in case there was slip, but I don’t think that this will be necessary now. I think the angle and the friction is enough to hold it in place and that it looks more aesthetically pleasing without a lip.
In terms of aesthetics, I think the look of the couch also turned out great. I think that the frame really fits the minimalist/modern look that I was hoping for. I think that the minimalist idea of “less is more” is captured well by the simple puzzle piece design that doesn’t require any fasteners. I also think the sharp angles and simple fit captures the modern aesthetic well. I am also happy with how the rock climbing aesthetic was able to be incorporated by using the rugged crash pad as the main sort of center piece for the couch. I think that it gives the chair personality and makes it a much more interesting piece than if the couch had a simple regular cushion on it instead. I am still undecided on if I am going to add the climbing brand stickers and on where I would put those, it’s definitely a fun aspect that I could play with over time.
If I were to do this project again, I would definitely consider doing all of the cuts on a CNC. All of the woodworking by hand was very time consuming and it definitely doesn’t come out perfect. Honestly, I would be excited to make more of these couch frames for crash pads and I definitely know other people who would be interested in owning one, so I would consider putting together the cuts for it to be fabricated on the CNC. It would also be interesting to play with the stain of the wood a bit to see how that affects the aesthetic of the couch as well. I personally really like the super light color that the Baltic birch naturally has and I think it looks fairly modern/minimalist, but I would also consider something like cherry that is much more darker and somewhat reddish.
*All images are original
6 Comments. Leave new
[…] aesdes […]
Hey Maya. Great work. I had some questions. Not sure if you mentioned it but what kind of wood did you use? Also how heavy is it to carry all the pieces together? I was considering building one, cutting out hand pockets to easily grab and transport. Also cutting out bigger pieces so it can be more light weight. Of course that will be difficult to measure while keep the integrity of it as a whole. So i was curious if that step would be useful if it is already light enough to carry around.
Hi Maya,
Great work on this upcycled couch! I love the color of the Birchwood and feel that it absolutely fits in the minimalist aesthetic. The extra wood material around the crashpad, to me, is a great touch to the modern aesthetic as it has contrast to the color of the crashpad, but also doesn’t have features that are distracting. Like Michael, I’m also curious to know how stable/steady the couch is. Do you know if assembling and disassembling the couch multiple times would wear down the tabs and make it more unsteady, or do you think it shouldn’t see that much wear? If it doesn’t see too much wear, I think this is an awesome, portable couch to bring on climbing trips! Again, great job.
Hey Chris, I am very happy with the overall sturdiness of the couch. It turned out super stable and doesn’t have any issues with moving around or being uncomfortable. And this is a good point, I’m sure there will be some wear on the tabs that might make the fit looser, but this was kind of the point of adding in multiple sets of tabs, so that when that happens there’s enough points of contact to where the overall stability shouldn’t take too big of a hit.
Hi Maya,
What an amazing project. I have commented on some of your earlier posts so I thought it only makes sense to comment on the final project. I’m really glad you made the couch lower and more casual looking. Not only does it fit the climbing aesthetic better but looks really comfortable. I know you talked about using some stickers in your earlier posts and was wondering if you decided against using them. I also want to know how steady it is when you sit in it. Great work!
Hi Michael, I am still undecided about adding stickers. I think this will be something that I will decide on overtime. I think I would only do it if I had a big collection of even more stickers, like a wide variety or shapes and interesting colors. For now, I think I am going to leave it, because I think the piece is interesting enough as it currently stands and don’t think the look of it would necessarily benefit from getting any busier. And see my comment above for Chris on the steadiness, it is totally stable when you sit on it!