

![]() Project Introduction
Project Introduction
As a student employee of the Integrated Teaching and Learning Laboratory for the past 3 years at CU Boulder, I sought to create a piece which would fit the aesthetic of the space, and serves a functional purpose in order to give back to the program which has given me so much.
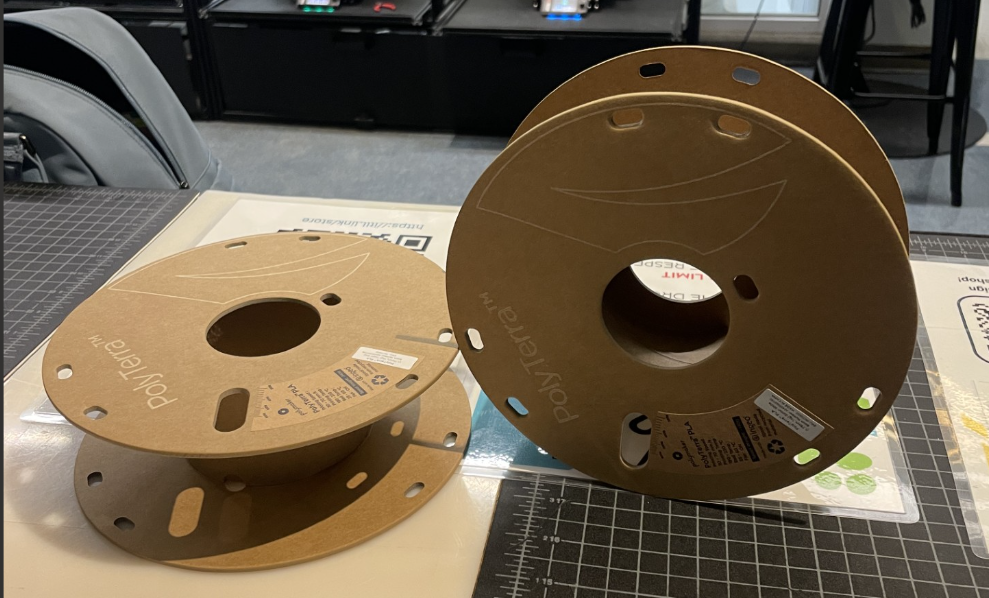
One thing that had always stood out to me was the amount of PLA 3D Printing Filament spools our program goes through – between September 2023 and May 2025 our system has tracked a whopping 837 kg of filament, meaning that we have seen 837 cardboard spools come and go from our building. Although these spools are easily recyclable (being cardboard), the sheer quantity of them made them an ideal material for this upcycle project.

Although the ITL Program has example 3D prints which are shown during workshops, there is currently no way which students can see the possibilities of 3D printing unless they take these workshops.
I believe that allowing students to see what they can make with manufacturing machinery will help build interest in engineering and our program, and will get more students (particularly non-engineers) involved/familiar with 3D printing. These printers are able to make remarkably complex shapes, perfect for certain applications in engineering projects. And even if students are not interested in engineering, who can resist being able to make a 3D printed highland cow once they realize that this is something they have access to at no cost??
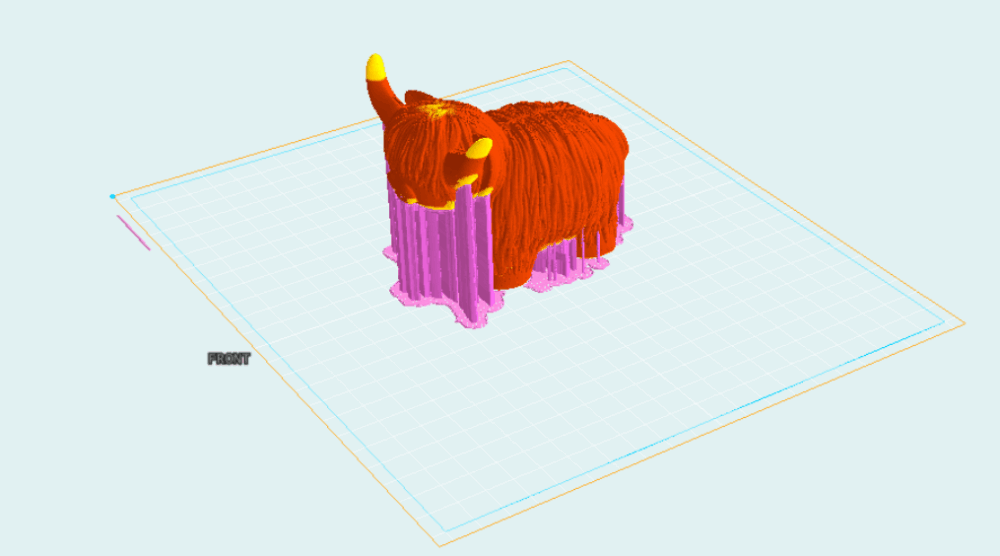
Exhibit A: 3D printed highland cow (isn’t it lovely??)
A display unit with example parts would be a perfect way for students to see what is possible… and although we are tight on space up at the printers, we happened to have a nicely-sized 30″x30″ gap on our wall. From from this, the idea of bringing the 3D printer ecosystem full circle – using these recycled spools as a shelf for example prints made from their filament – was born.
Initial Concept
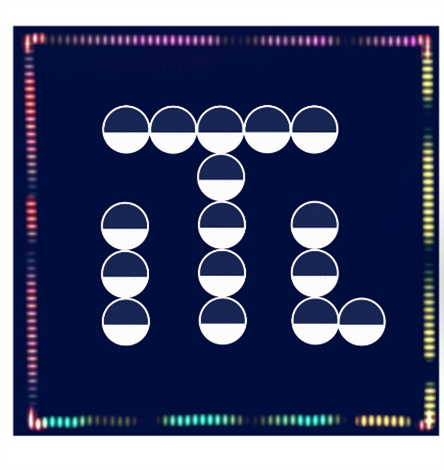
Each 3D printer spool can be decomposed into 3 sections: a rigid inner ring (OD 3.75″, ID 3.5″) and two wider outside walls. I quickly landed on the inner rings being used as the primary shelving unit – its small, round shape made it easy to arrange into different shapes. Now, the question remained: what shape should this display unit take?
Because this piece will be displayed in the 3D Printing room, I worked toward making the shape relevant to the ITLL or to CU Engineering’s branding – and settled on using the ITL Program Logo. The logo is a rather simple one – the letters “I-T-L,” a thick outer box surrounding the letters, with a notch for the L to spill into. This simple design made it feasible to shape the rings into letters and manufacture a frame for the outside box. Forming the rings out into the ITL lettering presented two options: a six-ring tall T with a total height of 22.5″, or a five-ring T with a total height of 19.25″. I opted for the five-ring variant, in order to allow enough room for the box frame.

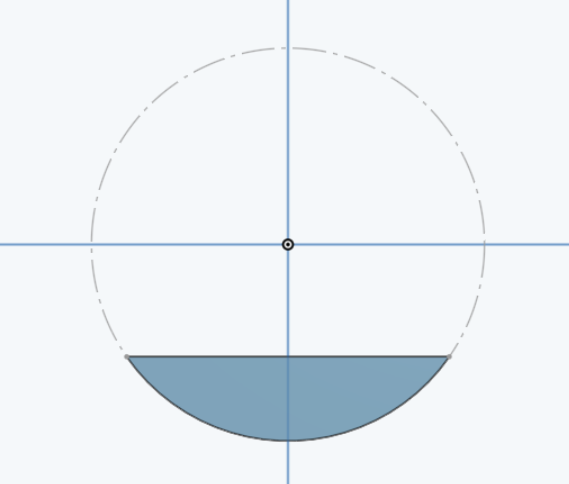
Next up: designing the shelving units themselves. In order to reliably hold prints, a flat surface was needed… and the round rings did not have any flatness. Thankfully, cardboard is very easily laser cut! I designed a 3.5″ OD to flat surface adapter, balancing shelf area with vertical height. The shelf top was a simple box cut, placed on top of two of these round-to-flat adapters. These 3 pieces were designed to be cut out of the outer rings of the piece, then glued together to form the shelving unit as a whole.
![]()

Lastly: What aesthetic should this piece take??
The ITLL as a whole has an industrial feel – lots of exposed rebar, pipes, and beams. However, the 3DP space and some study areas have been incorporating pops of color to contrast the overall monochrome look of the building. Upon further research, this is most akin to a “pop industrial” aesthetic – mostly a hard manufactured feel, with bits of color and abstract art to incorporate a human element.
The ITLL student staff wears vests of white, yellow, and navy blue, and I incorporated these into my initial design. The shelf letters at the center would be spray-painted with a glossy white in order to draw the eye toward the focus of this piece: the 3D prints on the shelves.
The outer box would be a ring of color-changing LED lights, matching the pop of color that the 3D prints have into this piece.
Design Revisions
Because this would be publicly displayed in the ITLL, I discussed plans with our program lead and graphic designer – and while they liked the overall concept, they took issue with some of my design choices. The navy background and light bar were the main adjustments.
As for the navy background – the program as a whole is moving toward CU black and gold rather than the old ITLL navy and gold. Thus, a change to black spray paint was an easy change to make. For the light bar, a main concern of theirs was that the piece would not look good if unpowered. Thus, the lights were moved to the back of the piece to create an under-glow effect, and a new frame was devised. The new frame would be comprised of four wood pieces joined with 45 degree cuts at the corner, with one piece cut shorter than the others (18″ vs 26″) in order to create a 5″ gap for the L to pass into.
Material Procurement
Although I likely would come across enough empty 3DP spools on my own (on average I would take off 1-2 empty spools per shift), but with just 3 shifts per week it would take a little bit to get what I needed. Thus, I wrote a note to my ITLL coworkers to not recycle any empty spools they took off of the printers… and within 2 days I had been able to obtain a huge stack of 30 spools – more than what I would need for this project!
For the framework, I took a visit to the ITLL machine shop and their ever-growing scrap woods section. The backboard was sourced from a much-larger sheet of unknown material, likely a plastic of some kind. This ~96″x48″ sheet was cut down using a table saw to the desired 28″x28″ size.
For the outside frame, I was able to use a large shelf that had sat unused for 2 years… and it happened to be just large enough to fit all components needed to make the large box around the ITL logo.
The following paints were bought from Home Depot.
White Gesso (primer for cardboard, ensures that spray-paint liquid will not damage material)
Rust-Oleum Gloss White (For spool shelves)
Rust-Oleum Clear Gloss Coat (For spool shelves)
Rust-Oleum Satin Black (For backboard)
Rust-Oleum Satin Squash (Yellow Frames)
Manufacturing
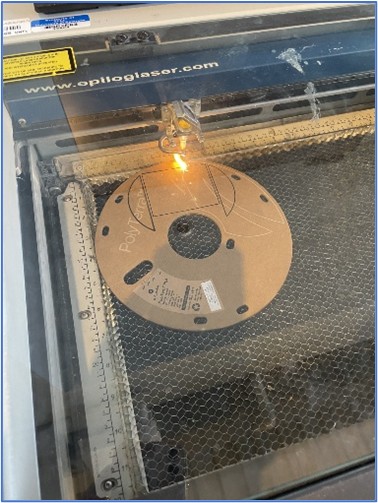
I began with manufacturing all parts needed for the shelves. Laser cutting settings took a lot of trial and error, and many incinerated parts… but eventually they came out looking crisp!
Hot glue was used to place these parts together – the front-facing unit was pressed up against the table to ensure it was flush with the rings. The back unit’s positioning was a little less precise, besides making sure that it was not flush with the back ring… this would make it so that the shelf would sit cleanly against the backboard. The flat piece was glued on top, being careful to avoid any seeping out the edges. Lastly – a rotary sander was used to clean up any rough edge, before pieces were coated in white gesso and left to dry. See the process below!!
For the frame – the shelving unit was 0.75″ thick, and the goal was to match the box’s height to the height of the shelves in order to achieve a clean look. Thus, each of the four walls were made out of a three-piece stack. A table saw was used to cut the shelf down into 24″x1″ strips, and a chop saw was used to create the 45 degree interfaces. These pieces were then glued together and left to dry.
Painting was fairly straightforward… besides mother nature having other plans and snowing on my parts as they dried! Each part received two coats of spray paint – and the shelves received an extra top coat to provide a glossy look and protection. The finish suffered slightly due to the snow… but turned out alright otherwise.
Assembly
Once all paint had dried, it was time to assemble. I started by penciling out the locations of the shelves and frame walls, then aligning each into place. For the walls, I clamped each down into position, measured inward an inch (to get close to the angle joints but not too close), tapped holes through the backboard and into each piece, before pushing through with long wood screws. The shelving units themselves were glued down due to time constraints… but will likely need to be bolted down for longevity reasons. I will do so by tapping holes in the backboard where bolts need to go (likely on the vertical mill for precise positional control), then screws can push through the backboard and secure into the shelves’ back flat adapter.
Last steps & conclusions
Last steps needed are related to the lighting system. I need to purchase these LEDs still, and attach them around the back of the shelf to achieve the underglow that I desire, and then I will need to create a raised edge to put mounting hardware on.
Aside from these, I am very happy with how this project turned out! The process was very tedious (mostly when it came to creating sixteen identical shelving units), but it came together very well in the end and I am very happy with how the piece looks from an aesthetical perspective. Considering that all materials here are recycled and not the prettiest-looking at the start, I was able to give them all a proper polish and make the shelf look good!
Most of all – it does its job of displaying parts very well. The prints need to be relatively small due to the small shelf size, but the piece truly comes to life when it is holding these 3D parts. They put the “pop” and human element of into an industrial-looking artefact – a reflection of how important it is to find creative outlets in engineering, and how 3D printing can help students create artefacts of their own that express themselves.
2 Comments. Leave new
Fantastic work Lia! I remember seeing you in the ITLL working on this design. I am absolutely floored with how it turned out and would purchase one myself. I enjoy how you balanced matching the aesthetic achievements to the design you chose. To clarify, making the artifact both industrial yet still conforming to the ITLL’s somewhat experimental/laboratory design was an impressive feat. What other renditions of this design would you consider doing for other facilities on campus?
Hi Lia! Really impressed with how you turned recycled spools into such a functional and aesthetic piece! I love how you integrated the ITL logo into the shelving design—it adds a personal touch while keeping it relevant to the space. The process of trial and error with the laser cutting and painting really shows in the final product, and I think the underglow lighting will be an awesome finishing touch. Have you thought about using the design for other areas around campus or integrating more materials for future projects? Would love to see how you expand on this idea