
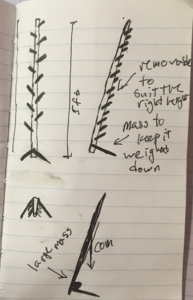
The design process for the hat rack began in my room. I was thinking what could be improved what do I need. I did not start with what materials were available. I think you could go either way. With mine I have hats strewn across my room. These need a place to be without taking up so much space. You can buy hat racks now days very easily but in my opinion they don’t look very appealing. I thought what would make them cooler and more appealing. For me I like geometric shapes and simple colors. (white, grey, black) I thought about using a cantilever hat rack which is what I am making now.
The process started with the idea and quickly turned into sketches in my design notebook. Once the sketches were done we did a few share your project with your group mates and got some new ideas that quickly required new sketches to be made. Then came the acquiring parts for my project PVC and wooden dowels. I got lucky and found some fittings too so it made the job easier so that I didn’t have to glue everything together like I originally thought so I adjusted the design again.
5 Comments. Leave new
Hunter,
Really good post, I thought your idea for a hat rack was an excellent idea. I like how you are constantly upgrading your design throughout your design loop, it will allow for the best possible finished product. My sister is very into hats and just recently failed trying to make a hat rack. I do believe it was the weight of the hats that brought down the rack, so make sure you take that into account while choosing your materials. I like how you thought to cantilever the beam to give it some character. The only thing I would tell you to be careful on is changing your design while you are building. If you decide to change something after a cut or permanent change has been made can be fatal to your design. Overall great post though!
It’s great that your design loop has some iteration in it. In this day and age with rapid proto typing it is become more and more important to fail early and fail often. Hopefully, you didn’t experience too much failure, but its even better if you were able to advance on your idea. I hope you enjoy your hat rack!
I like that you incorporated your “adjusting design” section into your design loop reality. It shows that you updated your process and you really are serious about doing this project correctly. This concept is cool, because it is something you could actually use in every day life. Good work.
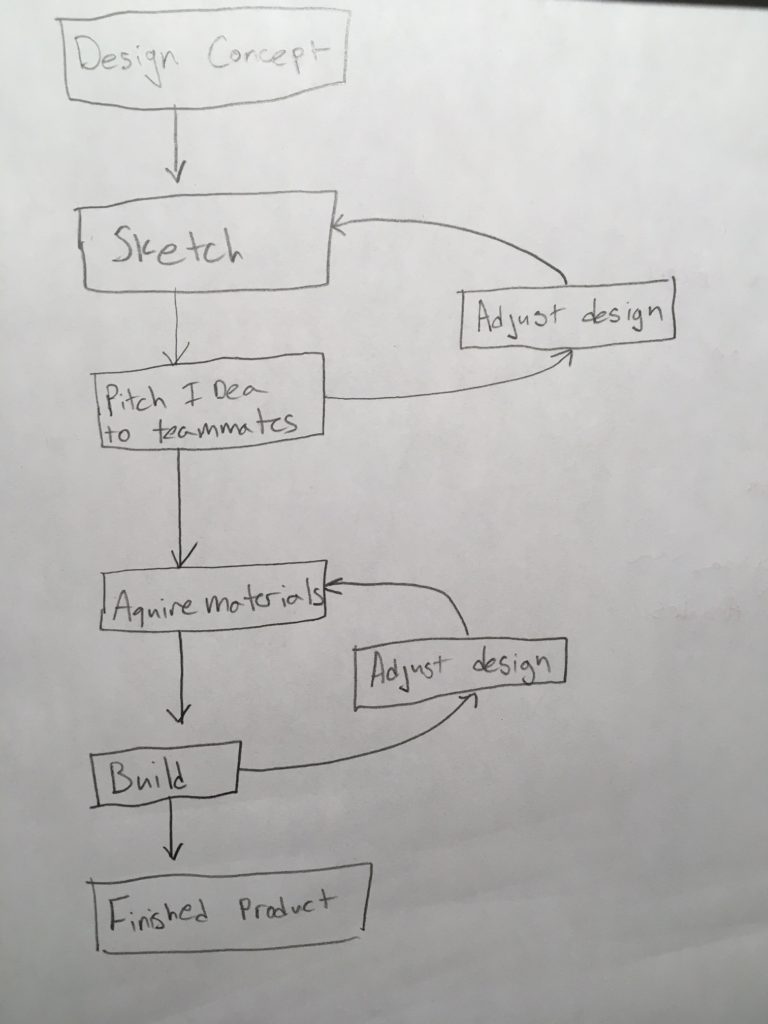
This looks like a solid design loop. I like the “pitch idea to teammates” after the sketch because then it allows for some critique before the design is built, which is always a good thing. That also allows for some collaboration as to making your hat rack the best that it can be. Nice job!
I like your depiction of the design loop as being fairly linear, with a couple loops included! And I like the steps that you have included: think of the idea, design, sketch, pitch the idea, acquire the materials, build, and finalize. The adjustments are great timing. Are you sure you designed before having the materials in mind (even if they were not in hand)? Or does that count as the idea and design phases? Either way, I hope you have the chance to enjoy your hat rack! Great work!