
For my final project, I made a lava lamp beer tap handle. My inspiration came from a few different places: my personal hobbies, my experience, and my desire to learn new skills within this project.
For my personal hobbies, I started a 3D printing business back in August, so I wanted to utilize my design and printing abilities to make something for this project. One item that I have done a lot and I found was a great combination of creative design skills and 3D printing techniques was beer tap handles.
To capture the dynamic element for this project, I thought it would be creative to utilize a lighting feature in this project. At my internship this spring, I worked on a surgical device that needed to achieve a certain lighting effect based on user feedback. While working on this project, I gained a lot of experience with LED effects and various ways to diffuse them, which I found was a big help with this project.
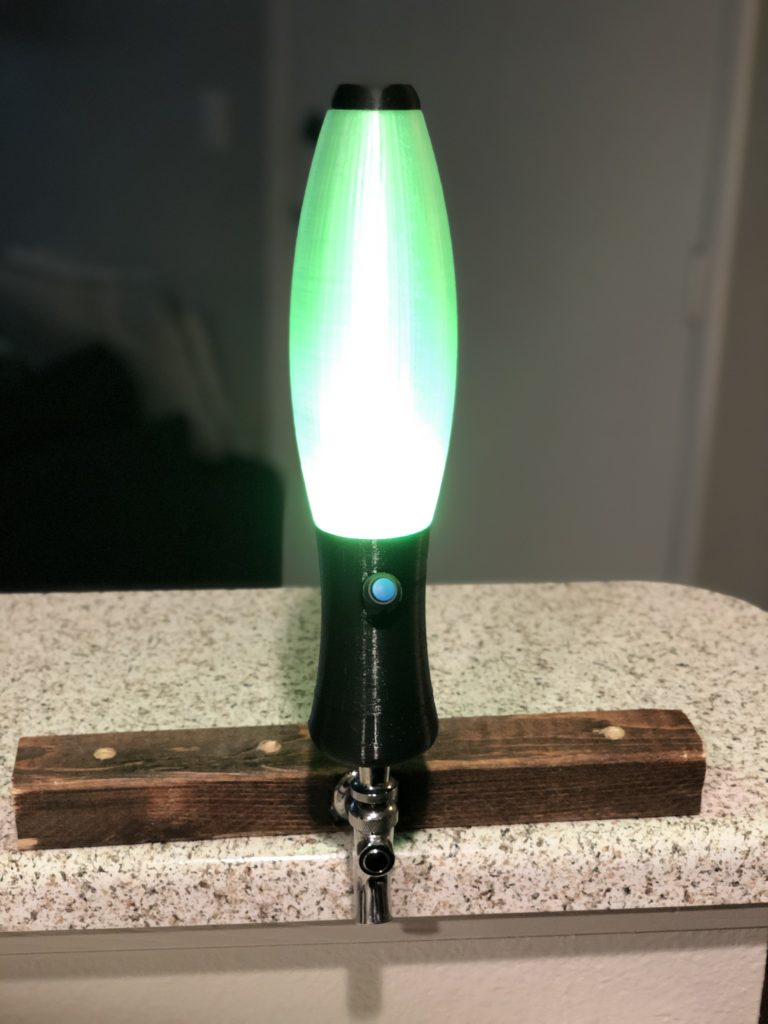
For the actual design of the handle, I decided to go with a lava lamp. The aesthetic of the colors really fit what I would be capable of with the LED lighting effects, and the shape of the lamp fit well with creating a handle.
Initially, I had planned for the body of the lava lamp to be cast in resin with a silicone mold. I had never done this before, but I have had a variety of projects where I have considered utilizing it so I was familiar with the materials and techniques used. I needed to create a smooth positive for the mold, so I was planning on utilizing the FormLabs printers in the Idea Forge, but unfortunately they were all out of order.
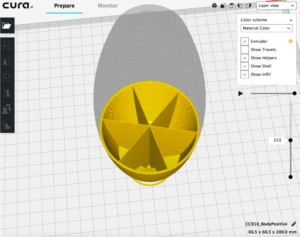
In order to improvise, I decided to model and print the body to be 3D printed instead. I utilized PETG filament, which is a higher-strength material than the typical PLA and ABS that is used for 3D printing. Initially, I thought that a fancy infill pattern would diffuse the light in a creative way. However, I found that an overly complex infill pattern didn’t allow the light to reach the entire body, and only lit up about an inch of the body. After a few trials, I found a triangular infill pattern in a “pie slice” orientation allowed for large chambers of the body to be completely hollow, and the light filled the body of the lamp.

After a few iterations, I was finally able to achieve the effect I was originally going for with the handle, and the printed body did actually diffuse the light very well to fill the whole body. For the code, I found other projects that had utilized the Adafruit Neopixel LEDs to create a cycling rainbow effect, which is what I wanted for the light. After prototyping the effect on an Arduino Uno I had, I purchased an Adafruit Trinket microcontroller and push button to fit into the body of the handle. The base of the handle is 2 pieces with printed threads that screw together, which allows me to place the controller and a 9 volt battery inside the handle to power the LED ring.
In the end, I actually was able to stay below my budget I had originally allotted, mainly because the silicone molding didn’t end up working out, which was going to be my largest expense. The man hours were also lower due to that, with the main efforts coming in the designing of the base of the handle and the coding of the LED ring.
Overall, I am really happy with how this project turned out! Though I was disappointed I wasn’t able to try out a silicone mold for this project, I don’t think it took away from the aesthetic and still allowed me to create an awesome project for the semester!
8 Comments. Leave new
It’s really cool how much this has transformed since the first project and now it’s usable! Awesome project, hope to see it in use one day!
Chris, this came out awesome! I really like the way that the infill refracts the light giving the “lava” portion a little more depth so that it doesn’t just come off as an empty cylinder. It is very streamlined and simplistic yet catches your eye with the LEDs. I think this would be an awesome tap handle to come across at a bar.
I can tell a lot of work went into making this but the final product turned out great! The body turned out really neat! also having your own 3d printer must be nice for experimentation sake if you need to make multiple versions
Facinating design! The most impressive parts from my perspective is the transparent body of your project. Solid 3D design skill and project managment expreice can be told from your presention. Nice worl!
I like that you clearly went down a route of something you are passionate about and something you do in your free time anyways. It’s also clear that you utilized your resources really well. The finished product looks great!
The lighting effect is very cool! The shape of the body is aesthetically pleasing, It’d be really cool if the molding method worked for you though. I think the lighting will give it a great vibe when used in the bar!
I like the final product it looks like it was well designed and a lot of effort went into making it work. Good job!
Chris, I liked hearing about how you create tap handles! I am jealous that you have your own 3D printer too. Additionally, hearing about the LED code, printing process, and assembly was cool. I look forward to seeing more of your designs in the future!