
Over the last few weeks, I’ve made significant progress on my deck-building project. The essential materials for the deck itself have arrived, and the excitement of seeing this vision come to life is steadily building. However, I’m still in the process of sourcing the finishing products, specifically, the urethane and edge epoxy, to complete the deck once constructed.
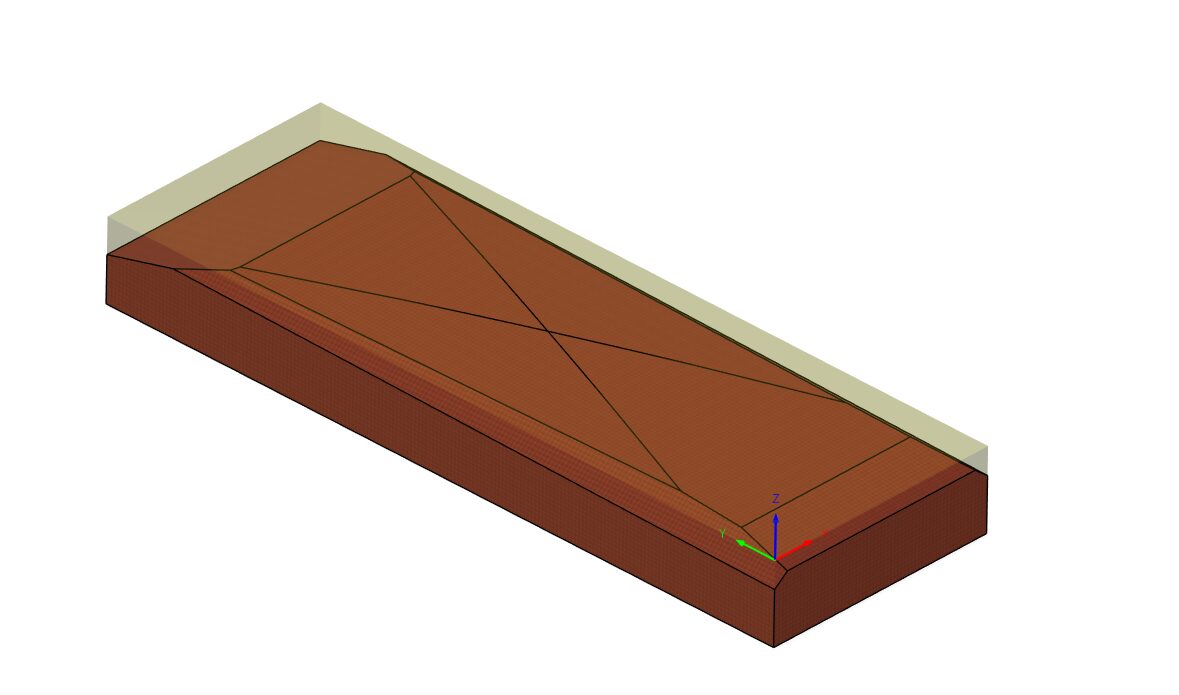
The design phase moved forward smoothly; I carefully created the deck’s profile, meticulously laser-cutting the layers. These layers are now prepared and waiting for the layup stage, which will bring structure and strength to the deck.
To facilitate this process, I acquired three hobby panels of 1-inch foam, intending to create a robust 4-inch thick positive mold. This mold is critical for the glue-up stage and the vacuum bagging process, ensuring that the final deck conforms precisely to my designed shape. To secure a high-quality finish, I made sure to stock up sufficiently on vacuum bagging material and tape, ensuring that the pressing phase proceeds without a hitch.
One of the project’s most rewarding aspects has been expanding my technical skills. I’ve learned to use Autodesk software, specifically exploring its powerful Computer Aided Machining (CAM) capabilities. This knowledge has empowered me to generate precise CAM code for use with a CNC router. Leveraging Autodesk, I designed the machining paths necessary to cut the foam mold accurately, creating the rocker and profile needed in both transverse and longitudinal directions.
The machining itself is set to be executed with a half-inch, two-flute flat mill, chosen for its efficiency and precision. These parallel machining operations will ensure the mold captures the exact curvature intended for the deck.
This process has been a valuable learning experience, pushing me beyond my previous skills and inspiring me with each successful step. With everything in place, I’m eager to move onto the next phase: bringing this meticulously planned deck into reality.
3 Comments. Leave new
Hello Tyler,
I like the idea of this project; it reminds me of when my brother did a very similar project. I think it’s cool how you want to achieve the curvature and concave shape from a mold, rather than using the method I usually see, which involves getting very thick pieces and placing and gluing them between two existing decks. I didn’t get to read much of your last post, but are you planning on adding a design to the bottom through laser engraving or paint? Also, do you plan to ride it or just place it on the wall? Either way, this is very cool. I am eager to see how this turns out in the end.
I am jealous I did not come up with the idea for this project. For making the top of the wood no-slip, are you planning on using a specific finish or grip tape? How far are you taking this project, Do you plan to warp the wood or leave it as a flat deck? and will you drill holes into it to attach trucks?
Creating a mold using a CNC machine is very ambitious, but the reward will be worth the effort from the looks of it. I didn’t know that the ITLL allowed cutting of more unique wood species, but looks like the board came out really well. Are you going to sand down the edges to remove the burnt edge from laser cutting? I am very excited to see the board come to life.