

Summary
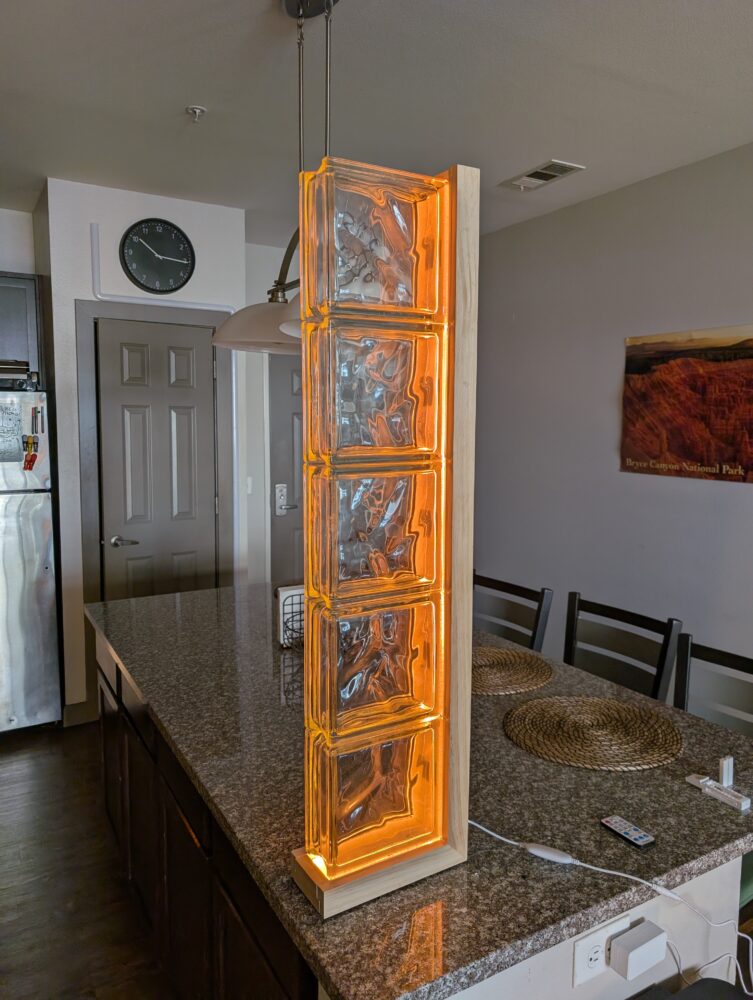
For my main project, I made a mid-century modern furniture inspired floor lamp. I used glass blocks and diffused LED strips as the primary lighting element, and the frame is manufactured using pine hardwood. The overall height of the lamp is ~3.5 feet tall, and is powered by a wall plug. The LED strip is a 2700k warm white diffused LED strip, that includes a controller and remote to adjust the brightness and lighting mode. This project was created as a statement piece for my living room, that fits the aesthetic of me and my own space.

Inspirations/Aesthetic
For the overall aesthetic, I used mid-century modern furniture design. Popular from the 1940s to the 1960s, emphasizes clean lines, organic shapes, and functionality. It often features high-quality materials such as teak, walnut, and rosewood, along with molded plywood, plastic, metal, and glass.
The biggest inspiration for using glass blocks was from the ‘Kismas Lamp 01’ which uses a glass block as a lighting element. Since I had already liked glass blocks as a building material, I knew I wanted to use it for my project. After seeing it done here, I found myself really inspired to create my design.
Initial Designs
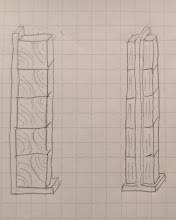
From the inspirations I described above, I used many of the same design elements found in mid century modern furniture to create the design of the frame. The one thing that stayed constant throughout the design process was the use of glass blocks, since I knew what shape/size they were going to be from the start. My initial sketches ended up very close to the final design that I decided to go with. The main changes I made were adding the smaller details of how each of the pieces would fit together and the sizing of the LEDs and diffusion material. My final design uses many of the same materials as well.
Wooden Frame
When designing the frame, I wanted to make sure everything fit together in a seamless way. In mid-century modern furniture, angled joints that meld the corners of the frames at 90 degrees are common, and give artifacts of that aesthetic a clean look that I really like. In order to achieve this myself, I wanted to make sure that the design of the frame used joints that made the frame look like it was made from a single board, where the grains of the wood always flowed together across different angles. There was one point on the project where I knew I needed to achieve this: where the vertical and horizontal sections of the frame met. I decided on doing a simple miter joint at this corner, where each piece would be cut at a 45 degree angle and put together so that the grain of the wood would flow from the horizontal section to the vertical section. I wanted to do miter joints at the outermost points of the frame as well to keep things consistent, but I decided not to because I did not have a lot of experience in wood working, and would need to keep things only as complex as I knew I would be able to complete.
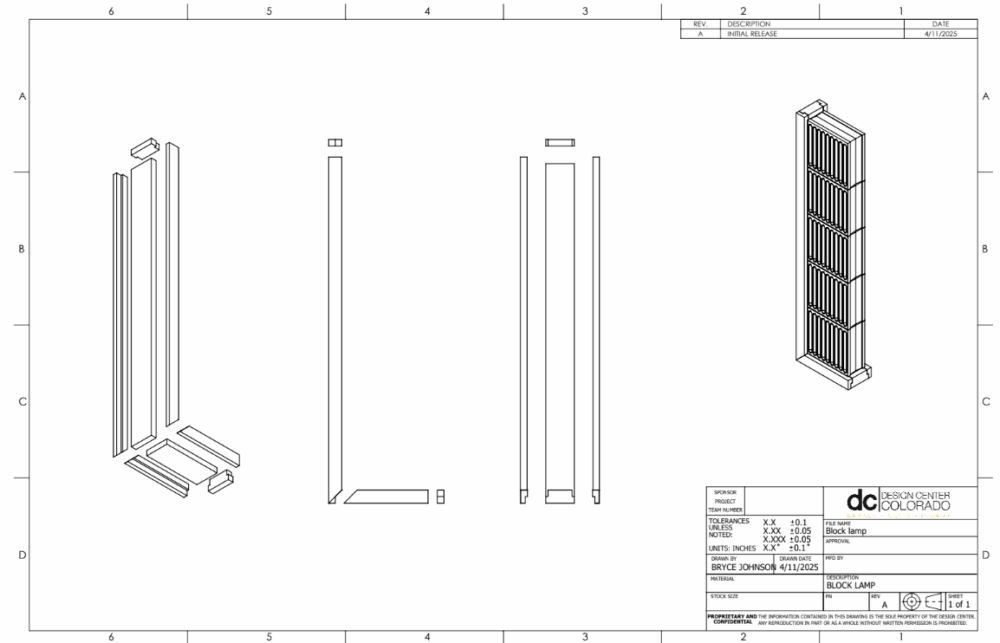
I designed the vertical and horizontal sections of the frame in the same way, where each of the side pieces had slots that could fit against the base board. I used this approach for a few reasons: First, I wanted to make the assembly involve no fasteners, so I tried to restrain the wood against itself in as many directions as possible. Second, I wanted the assembly of the project to not involve as too many clamps, and to maintain positional accuracy between the parts. By having each of the pieces already fit together nicely without any adhesive or fasteners, I knew I could guarantee a certain level of accuracy without needed to construct any sort of assembly jig.
When picking the kind of wood, I initially searched for wood I could salvage from old furniture on websites like Facebook marketplace. After a lot of searching, I realized it would be difficult to guarantee that a single piece of furniture could have all of the pieces I would need, and so I turned to look for fresh hardwood instead. At first, I had looked at actual lumber supply stores, but they proved to be quite expensive and sold mainly unfinished boards that I would need to spend more time processing to get the final look that I wanted. So, I went to Home Depot, and found some nice pieces of pine hardwood that had both the dimensions I was looking for (0.75” thickness) and the lengths I needed, all for a affordable price. I do wish I had selected a darker board, such as walnut, but blond woods like oak/pine are much cheaper and would allow me to mess up without losing a lot of money.
Glass Blocks
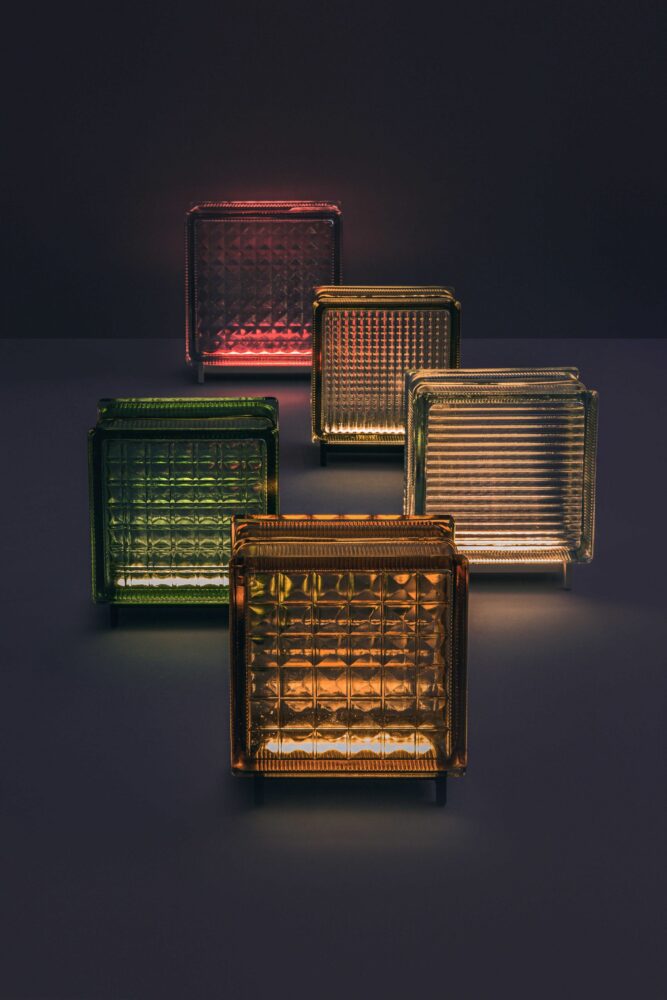
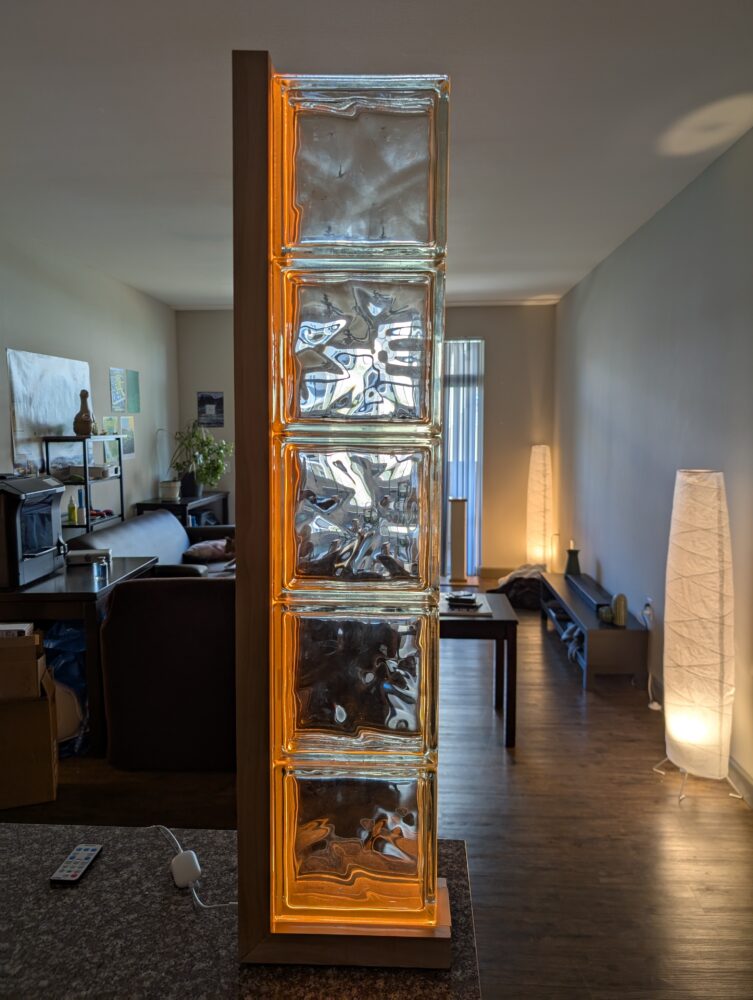
The main focus of the lamp is on the glass blocks, which was my design intent of this project since I had the design in my head. I really like the look of glass blocks, and I feel like they are an often underutilized building material that does look truly beautiful when done correctly. For my project, I knew I had a lot of options for different glass blocks. Not only are there numerous different designs and sizes, but I could have even selected different colors if I wanted to. The website I used to look for blocks is called ‘qualityglassblock’ and they had quite a few different options for me to choose from. I decided to order from here since I could get the blocks individually, and they had good shipping times. The only downside is that they are quite heavy, and so shipping can become quite expensive.
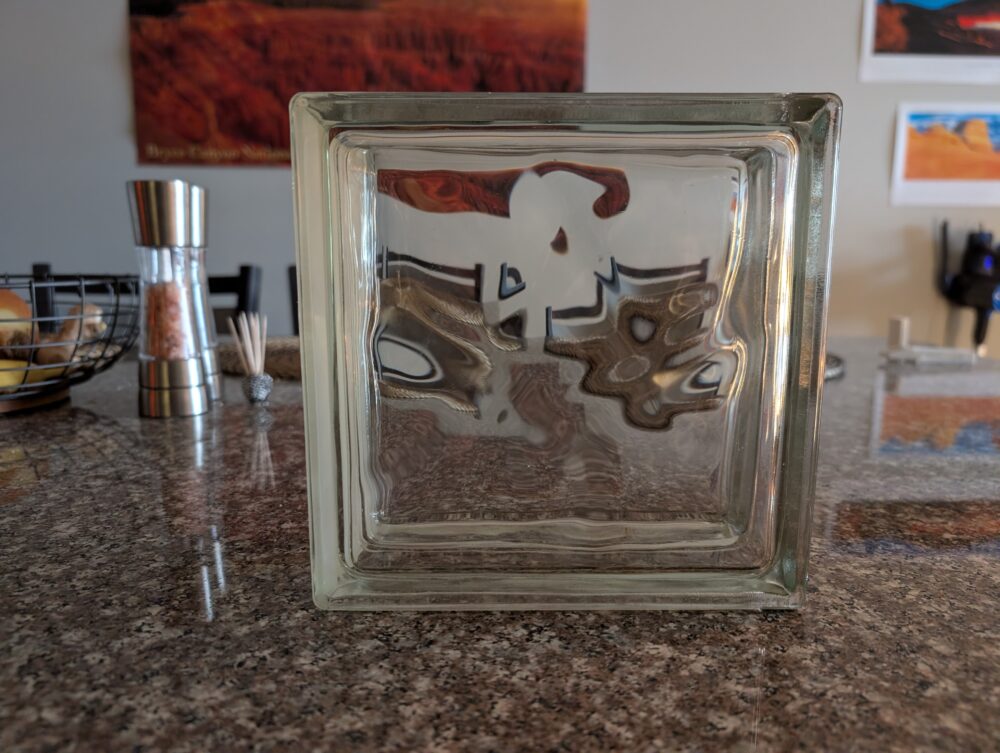
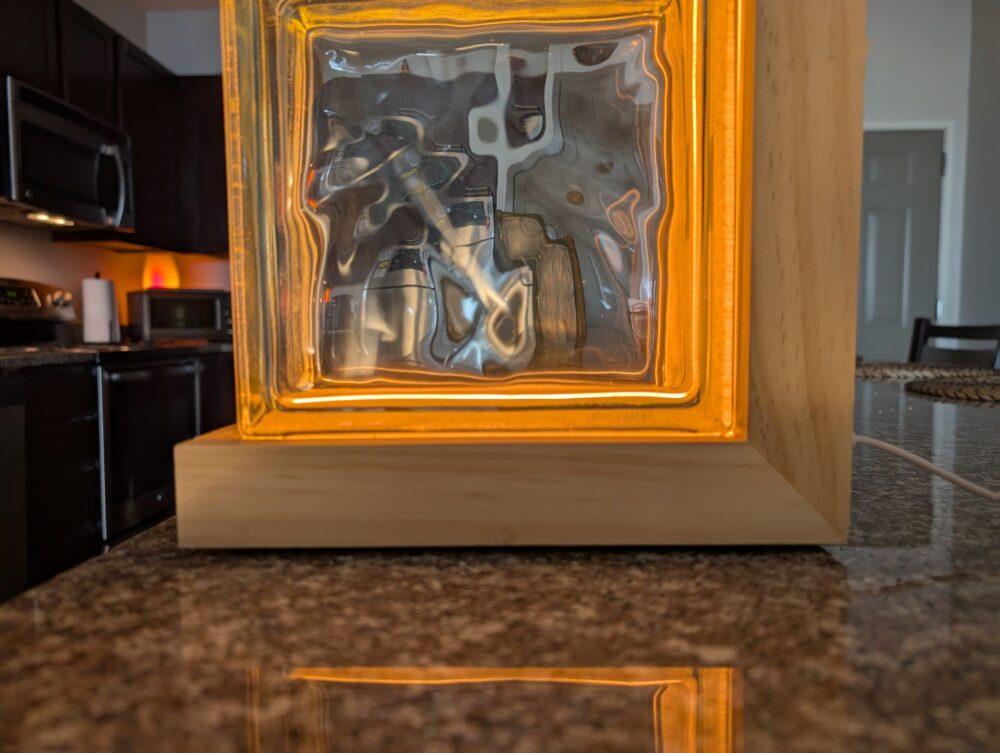
My initial goal for this project was be able to swap out the glass blocks for different styles, so that I could slightly change the aesthetic/mood of the lamp if I wanted to. While I did make some universal mounts for glass blocks (which is detailed in my ‘How’ post), I did not end up buying any other sets of glass blocks mainly due to the high cost of shipping them and that I did not have a good place to store them. The glass blocks I did choose are the ‘wave’ variety, which is likely the most common type of glass block you will see. I really like this style of block, since it has an organic feel to its design while still maintaining the geometric outside shape. I decided to go with a clear color, so that the warm hue of the LED lights could be diffused into the blocks without any discoloration.
Lighting Element
For the lighting element of this project, I decided to use an LED strip that I already had on hand, both to save money and because it was a color that I really liked. It is a 2700k lighting strip, meaning it is an extremely warm white color temperature, that appears almost orange when you look at it straight on. I love this color, and any warm white in general, as it feels very cozy and inviting. The lighting strips spans the length of the frame around the glass blocks, diffusing light into them in a really even way. I love the way the lighting came out, the light dances around the blocks just how I had hoped.
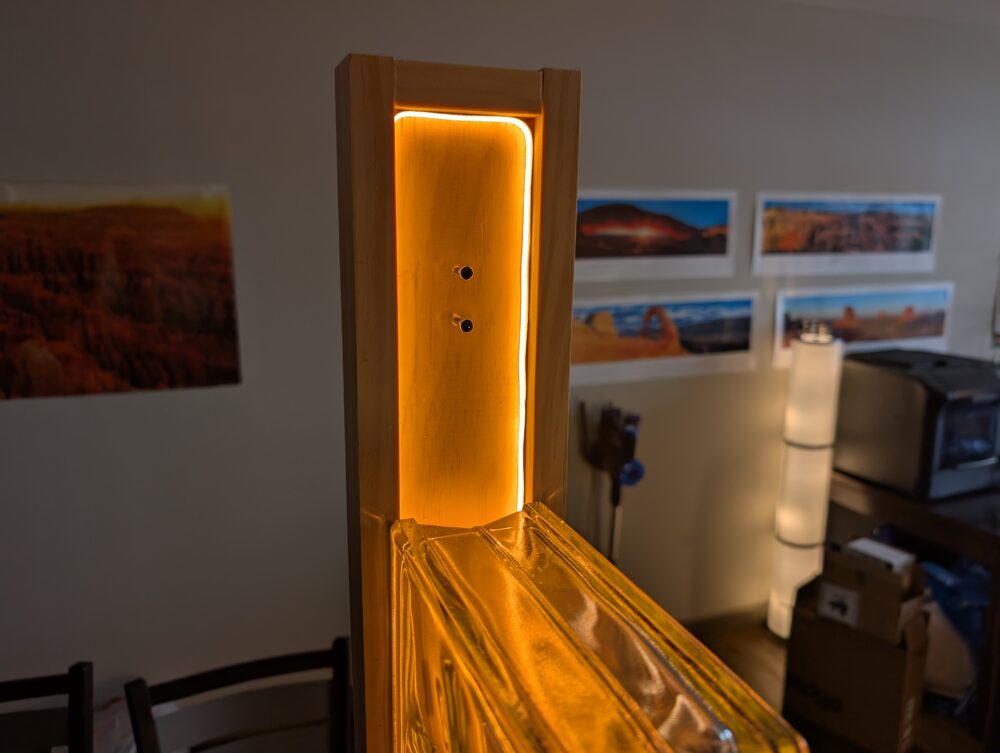
The lighting strip has some customization built in that I feel makes the project have more versatility. Attached to the power cord is a small controller that can adjust the brightness, so that I can make it very dim to leave on at night, or very bright if I want to use it as a more functional light. Additionally, it has an on/off switch, and a way to swap between lighting modes like breathing or strobe. The lighting strip also has a remote that allows me to be able to change each of the settings describes, along with additional settings like a timer and preset modes.
Final Design
Once the wooden frame, glass blocks, and lighting are all combined, the project turns into a fully functional lamp that fills the mid-century modern aesthetic that I was hoping for. As I had described, the lighting can be adjusted, and reflects off and diffuses through the glass blocks in a really cool way. The wave pattern of the glass blocks makes the light look very organic, while the overall shape and style still feels very linear/angular.
I am really happy with how the project turned out. I believe I have created a style of lamp that has not really been explored yet, and that has combined several design ideas that I like. I plan on keeping this lamp in my bedroom or living room as a statement piece for the foreseeable future, since it closely matches my own aesthetic that I maintain in my space.
Next Steps
There are a few parts of my project that I would like to expand on in the future. Firstly, as I had described in the wooden frame section, I would have liked to build the frame out of a darker wood. Since I did not, I am looking into staining the wood a darker color so that it more closely matches what my initial vision was. Secondly, I would like to get more sets of glass blocks, so that my design has more versatility. This may require some modifications to my mounting system, though.
Overall, I really like how my project went. I think I achieved my overall aesthetic and functional goals, and am excited to keep the lamp in my space for the foreseeable future.
4 Comments. Leave new
Hi Bryce!!!! This is so cool, I really think it turned out amazing. The aesthetic that the glass blocks, along with the LED lighting provide is really cool. You mentioned that the glass blocks you went with have a wavy pattern. I’m curious, if you went with a different type of glass block, what pattern would you choose?
Thanks Delos! I think if I were to choose an alternative, I would go with the ‘Alpha’ varient!
The soft orange 2700k light is a great choice. I think it matches the wood color well. The miter joint looks really nice. It would be cool if the lights were rgb and let you change the color.
Thanks Adam! I originally was planning on using an RGB strip, but I did not have one available at the time of building, and a diffused one with warm white is expensive.