
Design and Fabrication Process
For my final project, I set out to create a pressure flaker that reimagines the tool as if it were designed 2,500 years into the future. I wanted something smooth, sleek, and bright — a tool that looks like it belongs in a science fiction world but still feels solid and functional in the hand. My inspiration was based on traditional flaking tools, but I aimed to improve the durability, aesthetic appeal, and modularity of the design.
The process began with hand sketches where I played with different forms and proportions. Once I had a rough idea, I modeled the design in CAD to better visualize it and plan the machining steps. There was a lot of improvisation along the way — the CAD model gave a general guide, but I made real-time decisions during fabrication to refine the shape and details based on how the material responded.
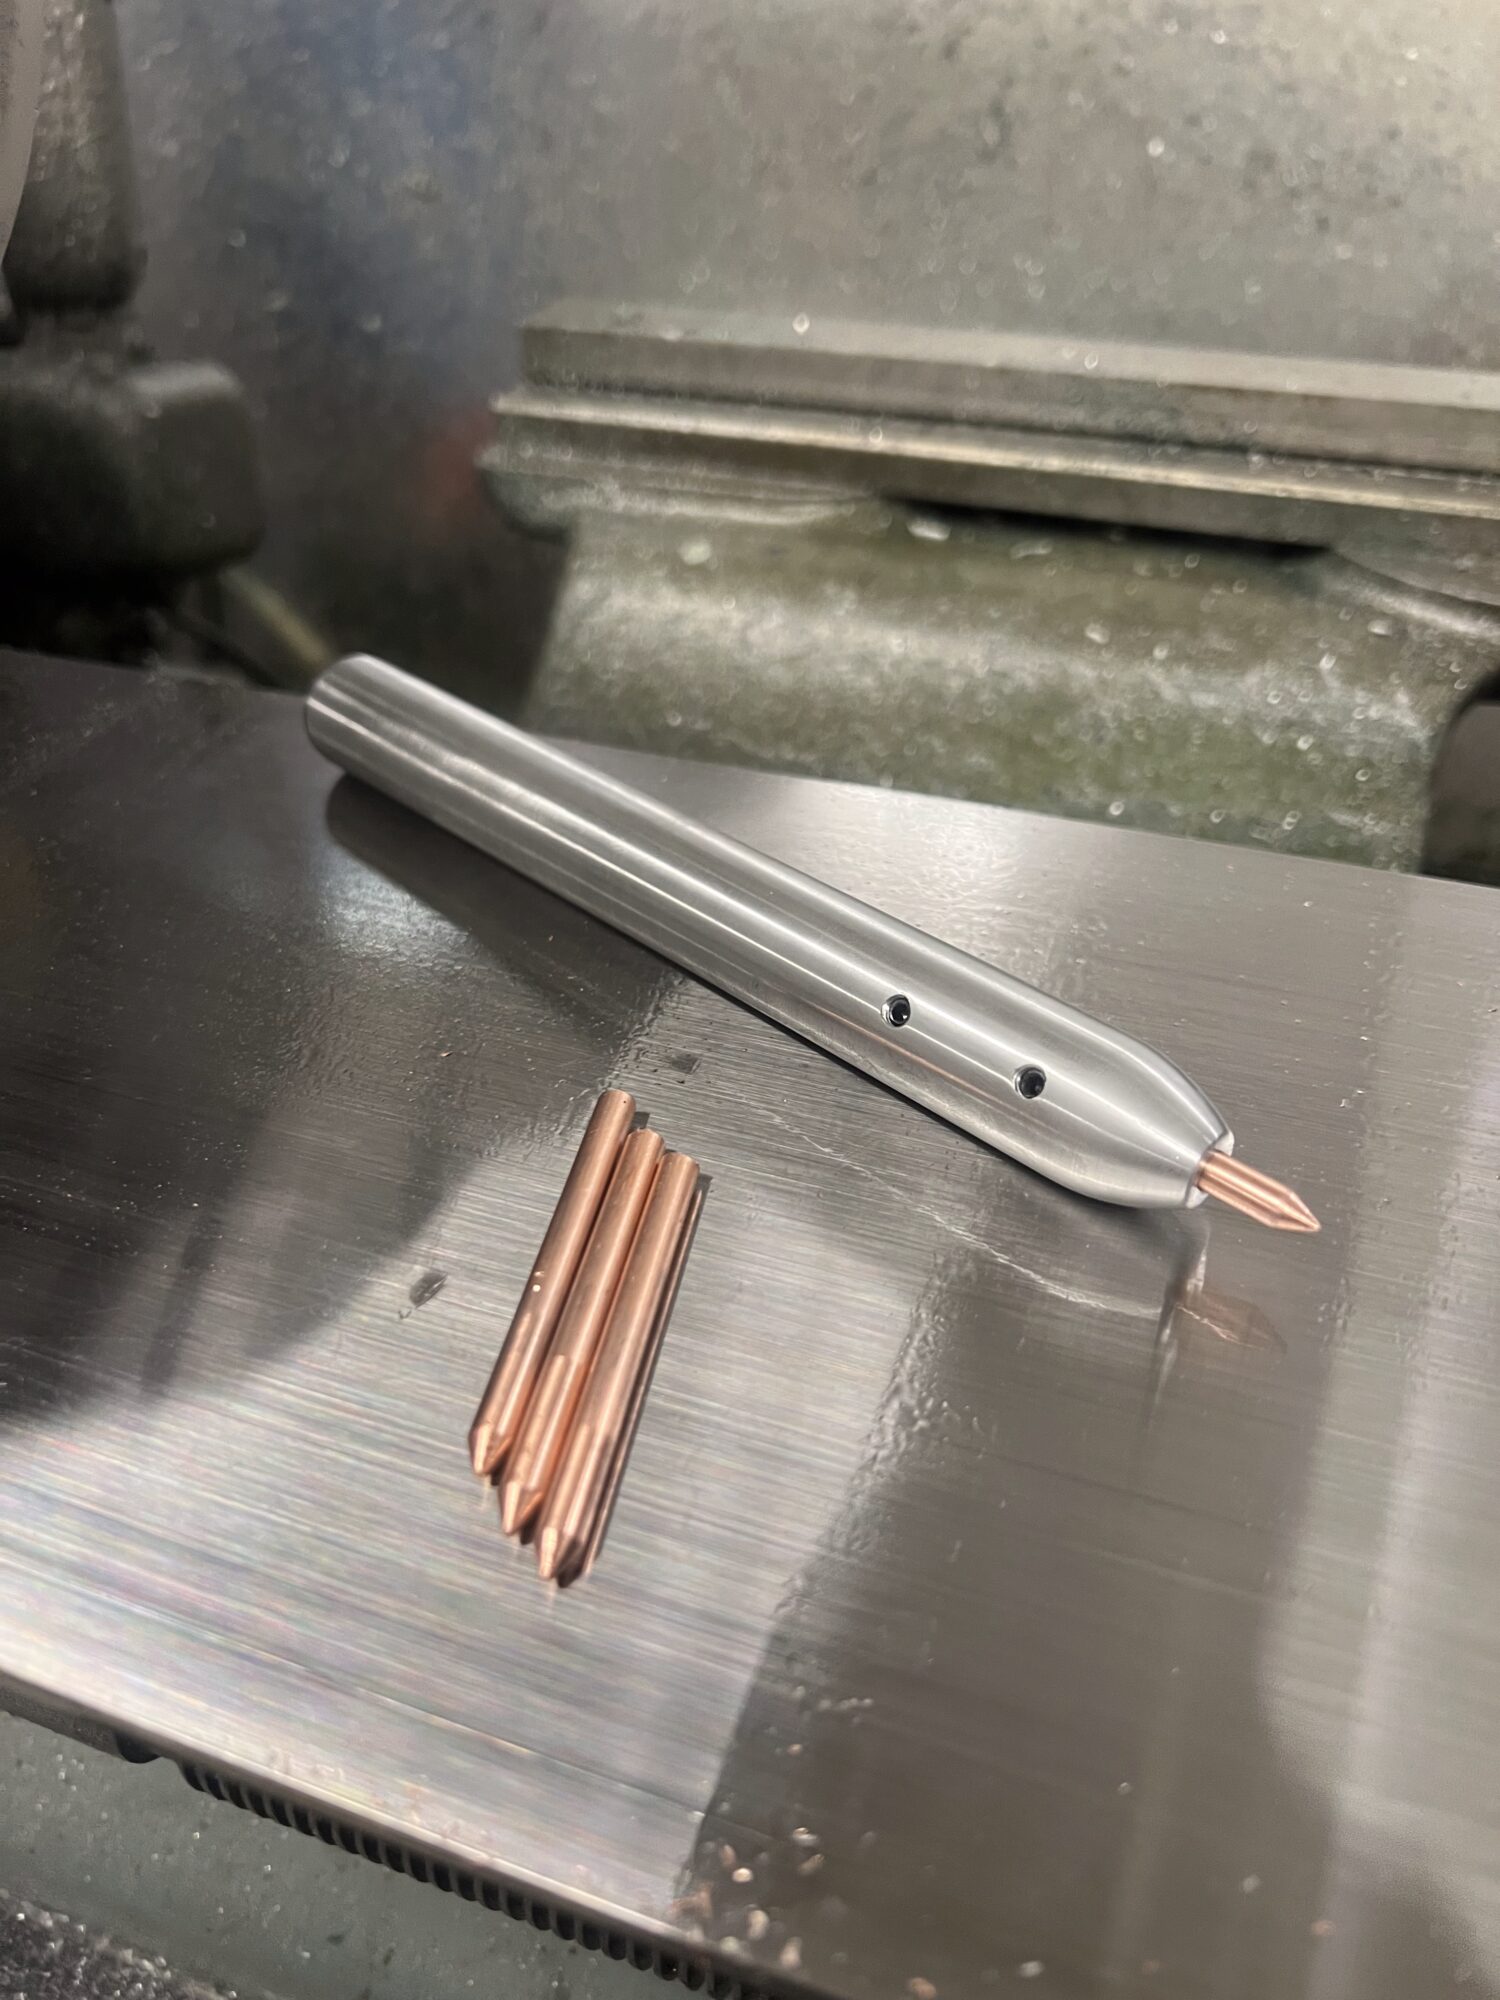
After finalizing the rough design, I gathered materials, selecting aluminum for the body and copper for the tips. Aluminum provided the lightweight strength I was looking for, while copper offered a traditional feel for the working tip but with a futuristic, polished look.
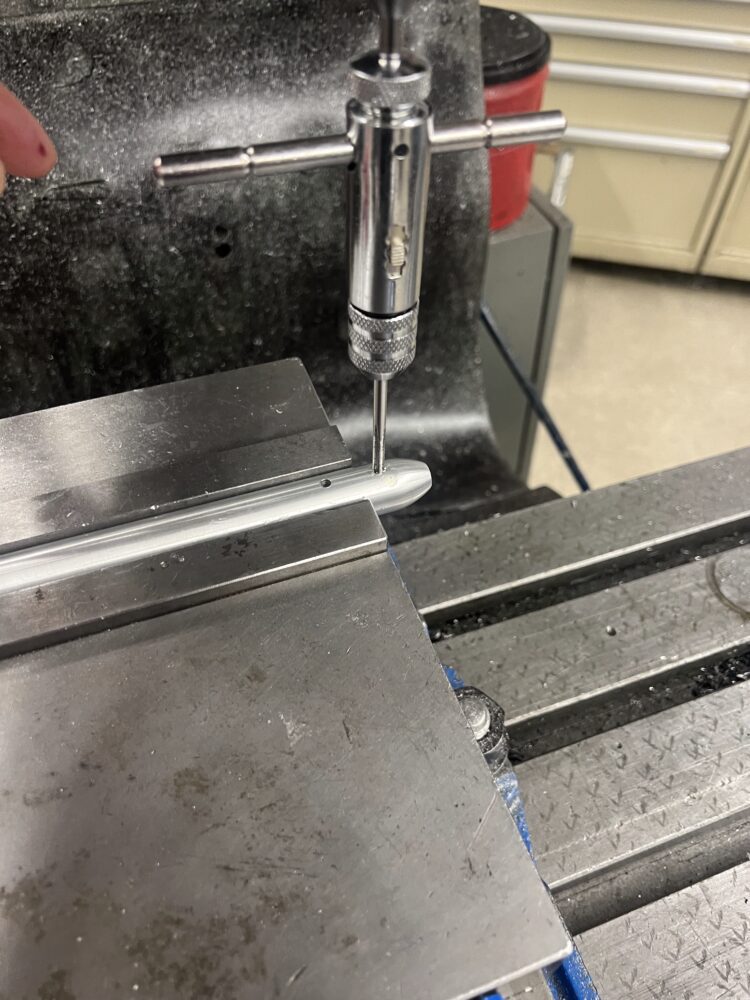
Fabrication began by cutting the aluminum stock to length using a bandsaw. I then used a lathe to drill a centered hole into one end of the body, where the copper tip would eventually sit. After drilling, I carefully shaped both ends with a file while the piece was spinning on the lathe, smoothing the forms into tapered, ergonomic profiles.
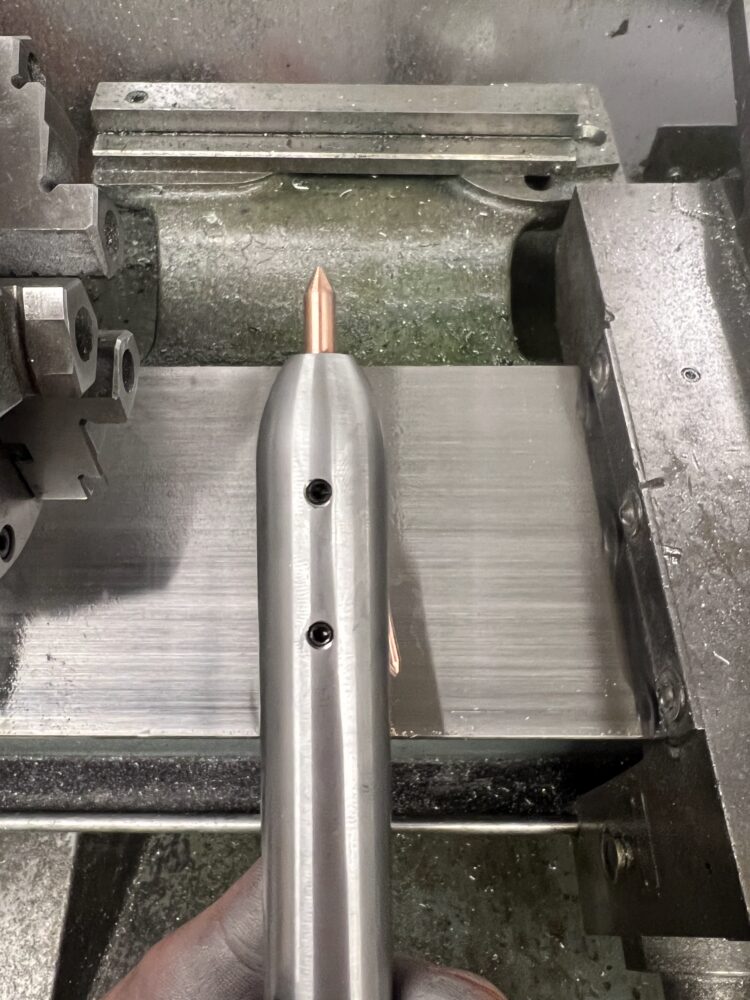
Next, I moved to the mill where I drilled and tapped two small, perpendicular holes into the aluminum body. These holes allow set screws to securely hold interchangeable copper tips. I wanted users (including myself) to be able to swap out tips easily if they wear down or if different tip shapes are needed.
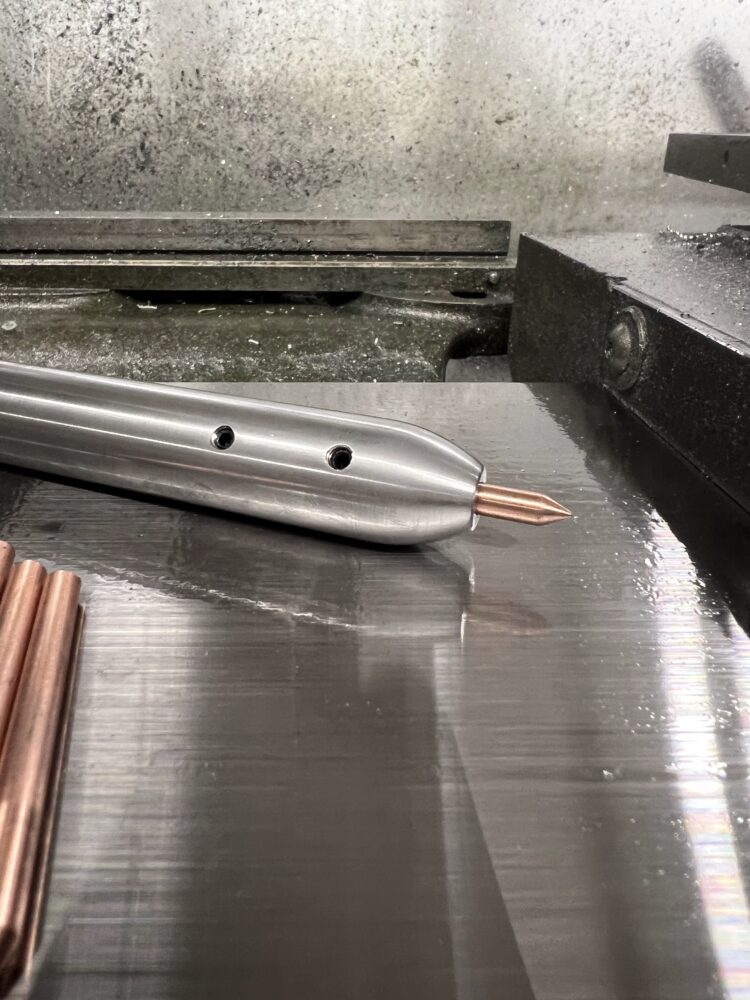
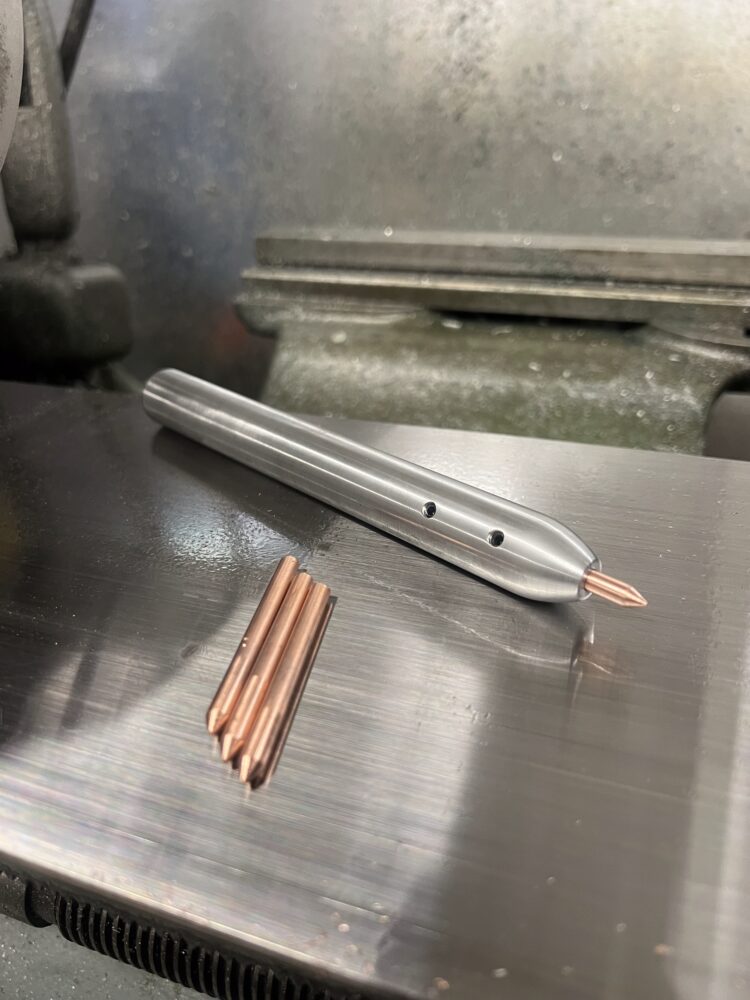
Once the body was fully machined, I returned to the lathe for finishing. I sanded the surface progressively up to 400 grit, creating a smooth, almost mirror-like surface that fits the futuristic design goal. Separately, I cut and shaped copper rods on the lathe to create the pressure flaking tips.
Finally, I assembled everything: the aluminum body, copper tips, and set screws came together into a pressure flaker that is lightweight, modular, and durable. Although not originally planned, I am considering making a custom carrying pouch and fabricating additional specialized tips in the future. Thank you for the summary chatgpt.
Now, Lets talk about my plans, versus where I ended up. Originally, I was planning on making two pressure flakers, one longer (called an ishi stick). However, after making the first one, I realized the material and design would not be optimized for an ishi stick. Because of this, I ended up deciding to only do the short pressure flaker tool.
 .
. 
 .
. 
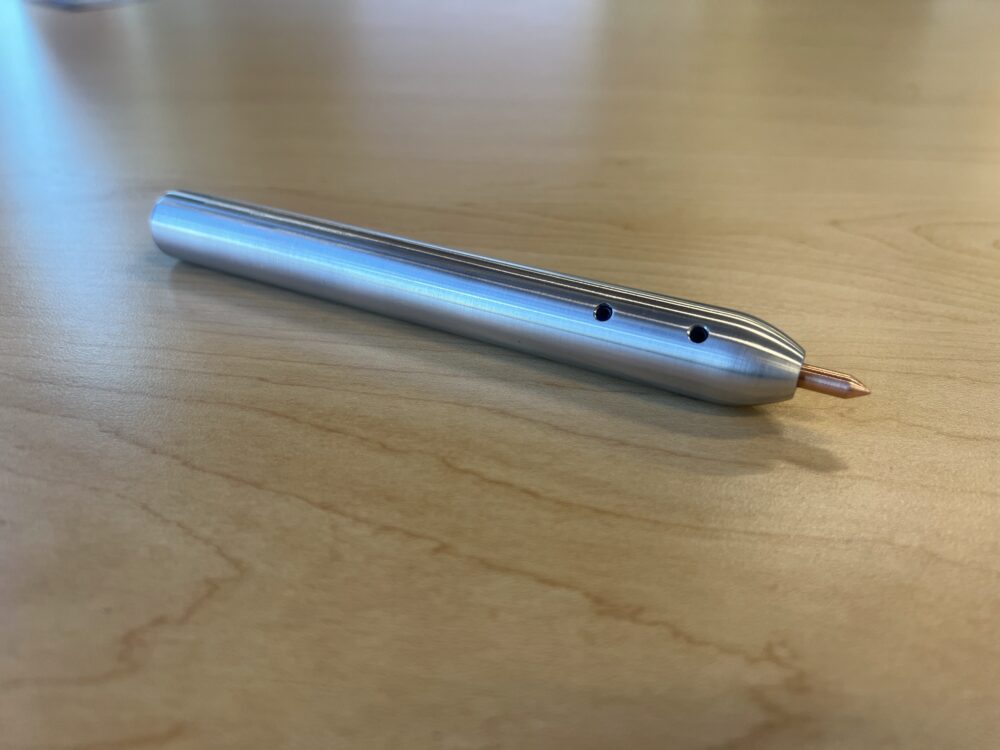
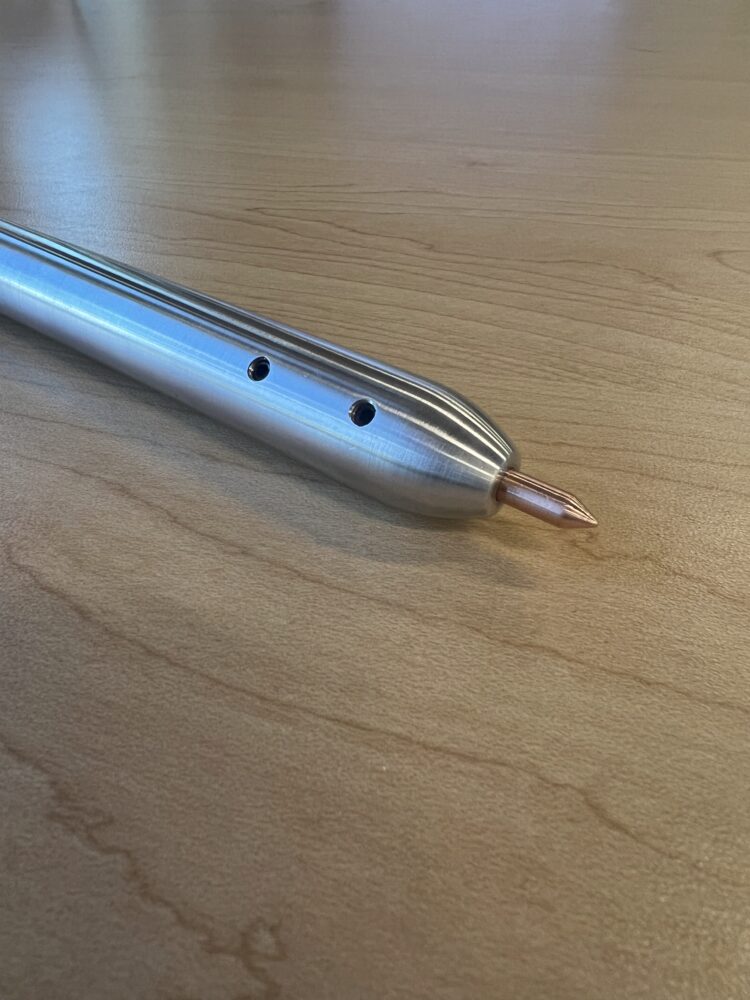
Here are four images of what the final product looks like. The aesthetic turned out exactly as I planned, very smooth and bright looking. The 400 grit sandpaper on the lathe achieved a very shiny and aesthetically pleasing appearance.
One of the most important goals I set for this project was achieving a very specific aesthetic: smooth, bright, clean, and futuristic. From the beginning, I imagined the pressure flaker as something that looked like it belonged hundreds or even thousands of years into the future — a reimagined tool that still carried its traditional spirit but was visually transformed into something new. I wanted the final piece to feel both functional and elevated, something that would immediately look and feel different from traditional handmade tools.
In the final product, I think the aesthetic turned out exactly as I had planned. From the overall form down to the smallest surface details, the pressure flaker matches the vision I had in my head when I first started sketching ideas. The shape is smooth and continuous, with subtle tapers at each end that make it feel aerodynamic and modern. There are no rough or unfinished edges, no signs of tool marks or unevenness — every curve and surface was intentionally refined to feel deliberate and high-quality.
A major factor in achieving this look was the finishing process. I knew early on that the surface finish would make or break the aesthetic. After machining the aluminum body, I sanded it down on the lathe using progressively finer grits, finishing with 400 grit sandpaper. Sanding on the lathe allowed me to get a uniform, consistent finish around the entire surface, which is something that would have been very difficult to achieve by hand. The result is a bright, almost shimmering surface that catches the light beautifully. It’s not mirror polished to the point of looking sterile or mass-produced — instead, it has a clean, slightly softened reflectiveness that feels crafted but futuristic.
The choice of materials also played a huge role in the aesthetic success of the piece. Aluminum naturally has a bright, light appearance when properly finished, and it gives the tool a visual weightlessness that matches the sleek form. Copper, used for the tips, provides a striking contrast. The warm tone of the copper against the cooler, silvery aluminum creates an immediate visual interest. It hints at tradition — since copper has historically been used for pressure flakers — but still fits cleanly into the futuristic vision I was aiming for. The set screws that hold the tip in place are small and cleanly integrated into the body, so they don’t disrupt the overall visual flow of the tool.
Another detail that really helped reinforce the aesthetic was the scale and proportion of the pressure flaker. It’s compact without feeling stubby, and the diameter and tapering were carefully balanced to feel right in the hand while still maintaining a visually sleek profile. Every decision — from the length of the body to the placement of the drilled holes — was made with the goal of preserving clean lines and avoiding any visual clutter.
When I look at the final pressure flaker now, I am genuinely proud of how well the aesthetic goals translated into reality. Often with hands-on projects, especially those involving machining and fabrication, there can be small compromises along the way — imperfections that creep in because of tool limitations or material behavior. In this case, though, I feel that the aesthetic outcome stayed extremely true to the original plan. It looks futuristic, smooth, and bright — exactly the qualities I was aiming for.
If I were to push the aesthetic even further in the future, I might experiment with anodizing the aluminum to add subtle color tones while maintaining the metallic shine. Or I might create a custom carrying case that matches the tool’s clean, modern look, using minimalistic materials like black leather or molded foam. Overall, though, I think the pressure flaker, as it stands, captures the aesthetic spirit I wanted better than almost any project I’ve done before.
Overall, I am incredibly happy with how my final project turned out, hopefully I can test it before the expo. I will update on how it works!
TIMELINE:
week 1 : draw designs, make basic CAD in solidworks
week 2 : source materials, finalize designs
week 3 : machine the round ends, drill holes
week 4 : tap holes, make copper tips, do final sanding
week 5 : test and finalize any issues
 .
.  .
.  .
. 
2 Comments. Leave new
Hello Cason,
Great job creating your pressure flaker. It definitely looks very futuristic, and I believe you nailed the aesthetic you were aiming for. Your work in manufacturing and fabrication is quite impressive, and the level of polish on the project is commendable. I am curious about how clean it looks. How many hours did it take in the shop to create it?
Love the clean, futuristic look you achieved. Would you ever try anodizing it?