
Intro
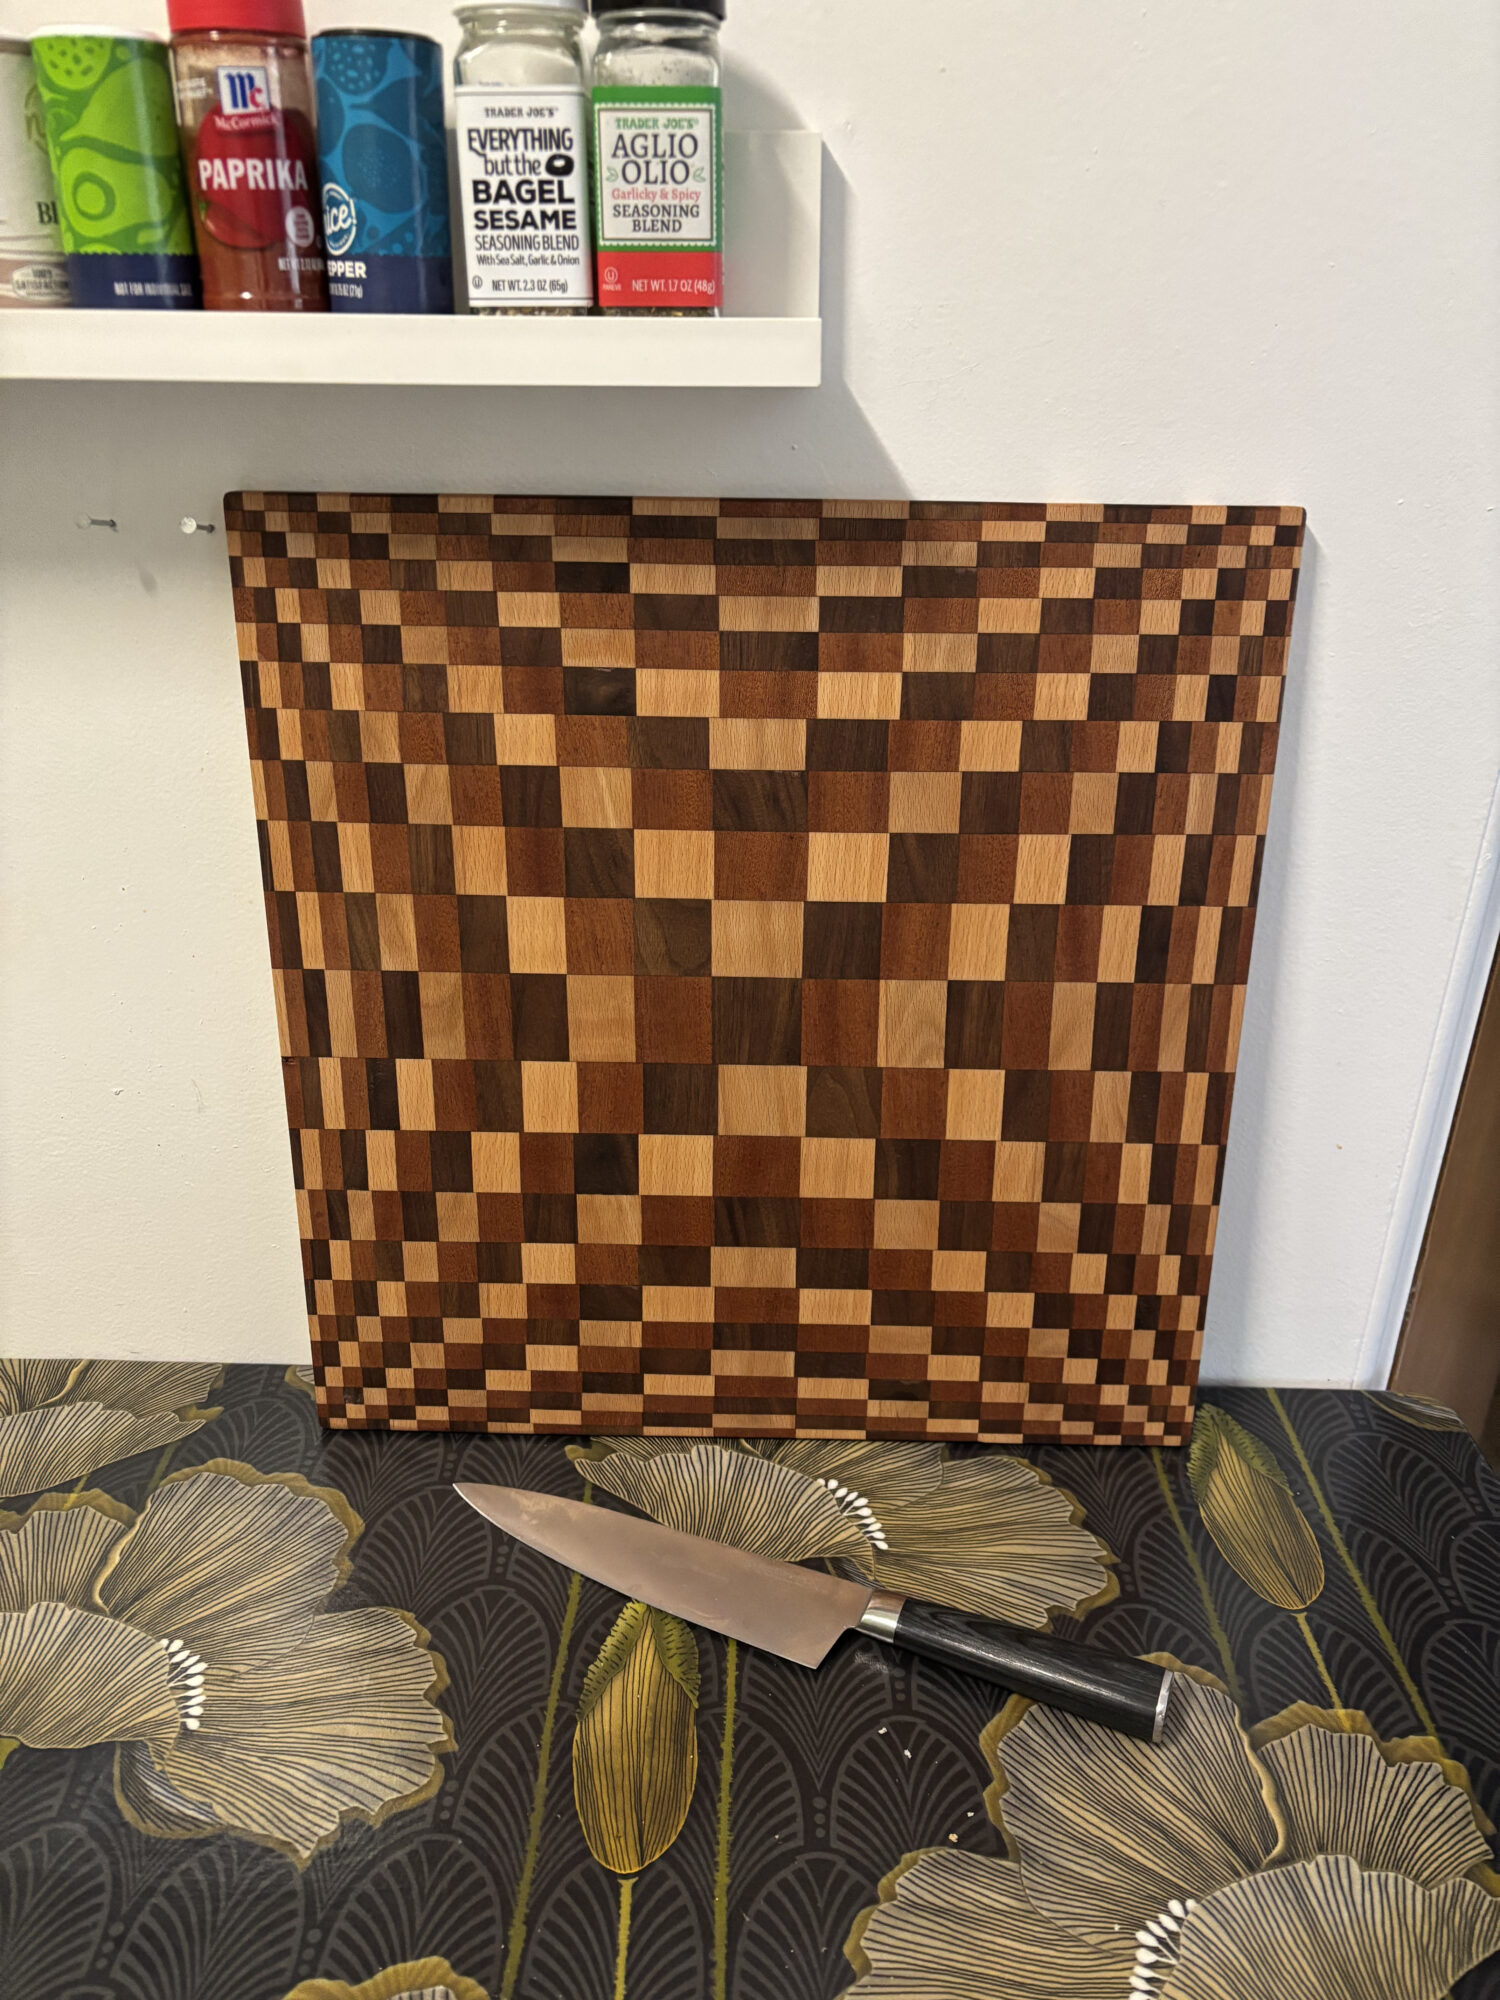
This is my final post on the optical illusion cutting board. This has been one of my favorite projects during my time at CU Boulder and I have developed a love for woodworking. The intricate process was a blend of engineering and design, which is something I love most about my major: Creative Technology & Design. Because of this, I submitted this board to the ATLAS Expo this year and it got accepted. I am beyond excited to showcase this board in two different Expo’s!
Timeline
Fabrication Process
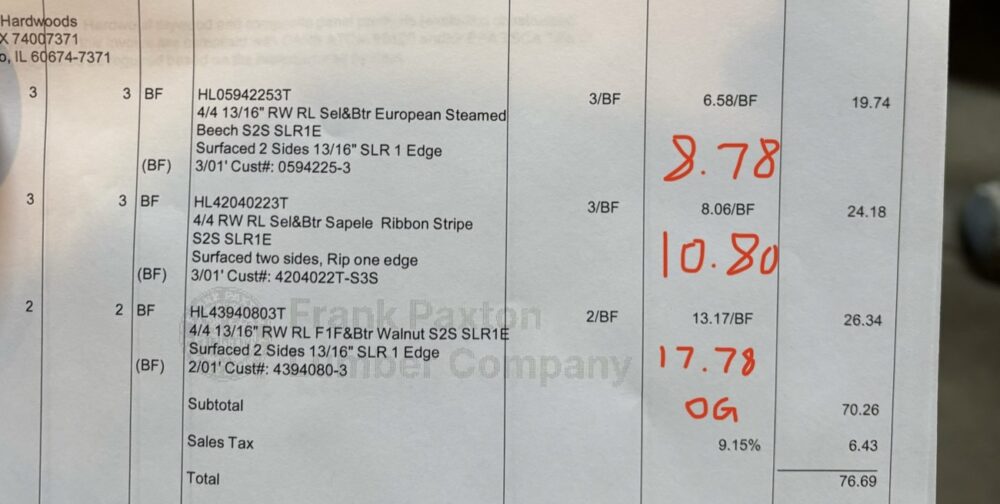
As you can see in my timeline, My fabrication process starts during spring break, with step one being purchasing a plan from mtmwood for $9. Choosing the plan I wanted was easy because I already had the idea for a bulge cutting board, due to prior research. Next I modified the Sketchup plan that comes with the purchase to have 3 wood types instead of 2. This added the middle color which I am so glad I did because it adds a very nice touch to the illusion and aesthetic of the board. Finally during spring break I went to Paxton hardwoods to purchase my lumber. I wasn’t very concerned on a specific type for each wood, only that I had three contrasting colors, each getting darker than the previous. I ended ujp going with the cheapest assortment that fit my constraint: European Beech, Sapele, and Walnut. These colors worked exactly how I wanted. The walnut was a little difficult at times like with some tear-out in the planer, but overall a smooth experience. Paxton hardwoods is amazing, they give a generous student discount, and can even cut the wood down to smaller sizes for projects that don’t use a construction amount of lumber. Below is the recipt I got, In red is the original amount per board foot, So I saved about $35.

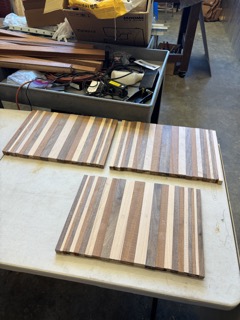
Next up Is cutting the initial strips. I was very excited to do this and went to the BTU table saw the same day I got back in boulder from spring break. I initially did this with a micro-jig thin ripper that I got on amazon for $30 this will be worth it for future projects as well. For a push block this thing is amazing but I end up using a different method for thin strips later that is better practice. For each of the 3 panels, I made 23 strips. These cuts were at widths of 8mm – 2pcs, 9mm – 2pcs, 11mm – 2pcs, 13mm – 2pcs, 15mm – 4pcs, 18mm – 2pcs, 21mm – 2pcs, 25mm – 2pcs, 29mm – 2pcs, 34mm – 2pcs, and 40mm – 1pc. These ranged what type of wood to use as each board had a different order of combination light -> medium -> dark. Here is what those panels will look like for a better understanding.
\
Next is running each strip through the planer, see my post on progress to see how difficult of a process finding one was. Shout out Dustin from panelboardshop for letting me use his for the price of a 12 pack of voodoo rangers. This was a great learning experience about planers, and I’m glad Dustin was able to guide me through the process. First, I organized all my strips, then I brought them to the planer and checked the grain before running them through. The exact mm width does not matter as much of the strips of each width being exactly the same, this is necessary for the illusion to line up exactly how it’s supposed to.
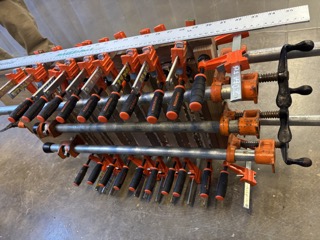
After planing the strips, it’s time for the first glue up. This was unexpectedly the longest part of this whole process, and its mostly all prep work. When I do this again (which I actually plan on doing!) I will have a shorter, more independent way of doing it, but a person in the wood shop insisted this prep was necessary (I would argue otherwise.) I glued the panels up on pieces of wood that I put paste-wax on and then used pipe clamps and smaller clamps to hold everything in place; I also had calls that were taped up on either end. I used titebond III because it approved for indirect food contact and has a longer work time. I let it sit in the clamps for about 16 hours, then undid the arrangement in the morning. After originally having the panels leaned up against a wall, I was told I need to have them dry straight up for optimal non-warping. This worked extremely well and after a week, the small warping had even reversed itself.
After a long week of letting the boards dry, it was time to run them through the planer. To do this, I first sanded off any glue sticking out the sides that was preventing it from sitting flat, I then used shims to make sure the board was supported in its resting position. Since the board is not 100% flat, I needed to use a sled that was flat and run the panels on top of this. What this does is prevent the panels from going in warped and just coming back out warped, because they will be secured to a flat surface, MDF in this case. I secured the panels on the board with hot glue, first gluing up the shims and then putting dots of glue around all the edges of the panel. I made sure that the grain was going in the right direction (pointing to the planer) so there wouldn’t be harsh tear-out. Finally, it was time to run the sled through the planer with my panels. I gave it enough passes until I was satisfied with the flatness. I didn’t have to run the other side as I had crosscuts, another glue up, and eventually using the planer again which will get both sides.
The same day as planing, a couple hours later I made crosscuts on the panels. This time, I used a thin rip jig (recommended by Dustin) for accuracy and repeatability. I got the thin rip jig on amazon for $26. This takes out having to plane the thin strips which saved me some extra time. The thin rip jig makes cuts on the opposite side of the fence, making cleaner straighter cuts especially if you have a bad fence like the BTU table saw. This process in addition of using my micro-jig push block was a very smooth experience. One note about the jig I got is that the metal was too thick to fit into the table saw, this was a manufacturing error only on one side of the jig. It took about 5 minutes to file it down to be able to fit in the groove, besides this the jig was great.
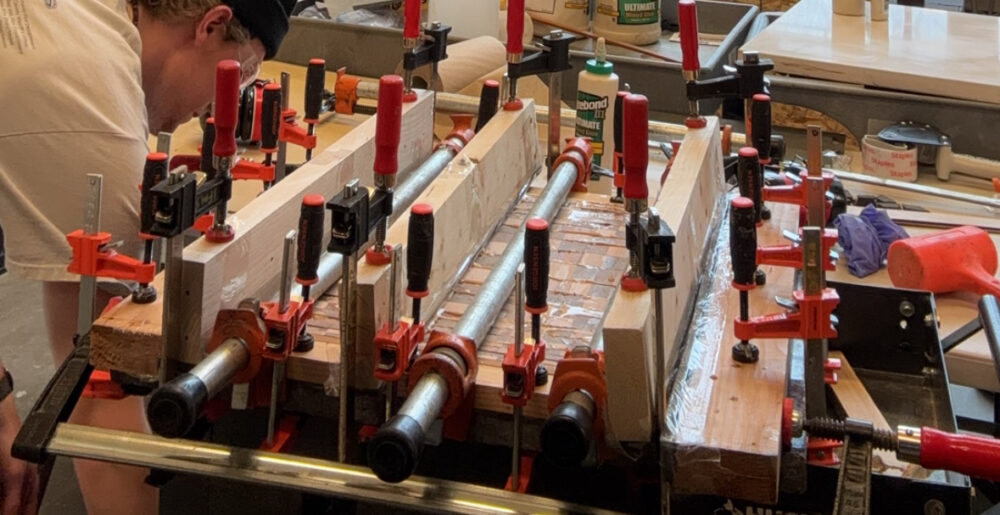
After making these crosscuts it was time for the final glue up. This was a very stressful day. Following directions again this took a lot longer than I think it should’ve. Basically, the glue up was the same as before, this time I used a slab of granite with paste wax as my flat surface (which was not very useful as it didn’t end up flat due to gluing errors.) This time, I used calls with foam to push the strips downwards and also towards my flat edge. Two straight walls were fixed at a 90-degree angle using clamps to make my board as square as possible. I also glued sacrificial rails to reduce snipe on the planer. After I had glued, the worker told me I had done everything wrong and started hitting it with a mallet which ended up cracking the bottom of my board (unnecessary but not a huge deal in the end.) I don’t have much more to write about this other than glue ups shouldn’t be this stressful at least for a school project. I will be taking a different route next time. I
Since this board isn’t end grain (I couldn’t make it end grain because I got 1″ lumber instead of 2″) I can plane it! This is great and saves me the time of finding a drum sander to use or making a router rig to flatten the board. Same process happened here as I did for the panels but this time, I did the top and bottom of the board. About the board being face grain instead of end grain, I like how the thinner material ended up looking, a 2″ thick cutting board would’ve taken up way too much space in my kitchen.
The last step in this long fabrication process is sanding and finishing the board. Before this I routed all the edges with a 1/8th” roundover bit on the palm router. For sanding, I did 80grit –> 120 grit –> 240 grit, I didn’t go any higher to ensure the board soaks up the finish. Before finishing I burned my initials into the side of the board with a soldering iron. Finally, it was time for the best part, putting on the finish and seeing the beautiful colors of the wood pop. I used a food grade mineral oil finish that I let dry for 6 hours. Then I applied a butcher block conditioner which is a mix of mineral oil and wax to seal and protect the board, I let this sit over night and did two more coats the following day. And now it’s DONE!!!!!!!
![]()
![]()

Conclusion
In short, the aesthetics of this project have far exceeded my imagination and although I achieved what I set out to do, it looks far better than I expected somehow. I had a blast making this and can’t wait to show it off at expo.
2 Comments. Leave new
This is so cool. I imagine it was pretty difficult to keep track of all those little pieces and to be able to put them in the right spot.
Joe, this cutting board looks fantastic! Without knowing you or your skill level, I wasn’t sure this cutting board was going to turn out when I saw it pitched in earlier posts. I’d seen some folks having trouble with far less complicated cutting boards in the woodshops while I was working on my own project. The clean and well-integrated pattern of so many different sized sections and wood tones is really impressive and speaks to the level of care you put into this project. I’d almost hate to see a knife scour it up!
Stellar job. Well done!