
In my last blog post, I described in great detail what my final project is, as well as the aesthetic, Lunarpunk, which has dark, lunar related, characteristics. In this post, I will describe, in detail, my timeline for this project, how I designed this project, the different parts that I ordered, how I put them all together, and how I made this project fit with the aesthetic. First, lets go over the timeline that I constructed for this project. I did not include dates into this timeline because I didn’t want to clutter it up too much, but I will go in depth into the actual dates relating to each bubble.
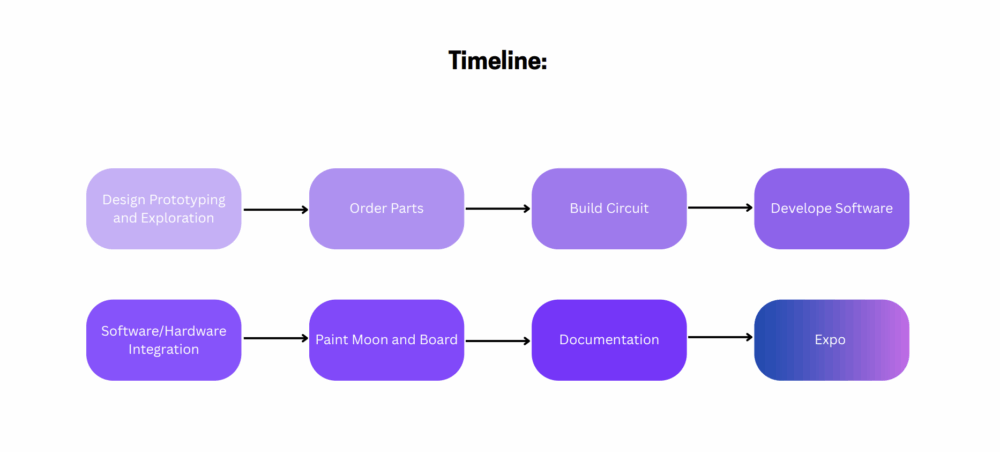
Stage 1: 3/1 – 3/14 Aesthetics Exploration and Design Prototyping
This was one of the most important phases for this project, as defining the aesthetic of this project not only controlled the outcome of what it would look like, but the functionality as well. I first started by exploring my own personal aesthetic. I decided on Solarpunk.
After researching styles I like and looking around my room to see what decorations I have on the walls, I noticed a common theme. Many of my posters and items share three defining characteristics: technology — such as cars and city skylines — space-related imagery, and natural scenes filled with greenery.
One aesthetic that captures this combination is Solarpunk — a bright, green, and futuristic style. Solarpunk often depicts a future world overgrown with foliage, running entirely on renewable energy.
Although Solarpunk matches well with my personal aesthetic, I didn’t want to incorporate it into my project, as after hours of brainstorming, I couldn’t think of anything practical that I could easily make in a couple months. Solarpunk often involves renewable energy, such as solar panels.
I then did some research into Lunarpunk, and after discovering that it is a pretty new and unexplored aesthetic. I decided that this would be what I would base my project on. I also really liked how I could make this dynamic by incorporating the Moon phases into my lamp.
During the design process, I had a couple of ideas and initial sketches:
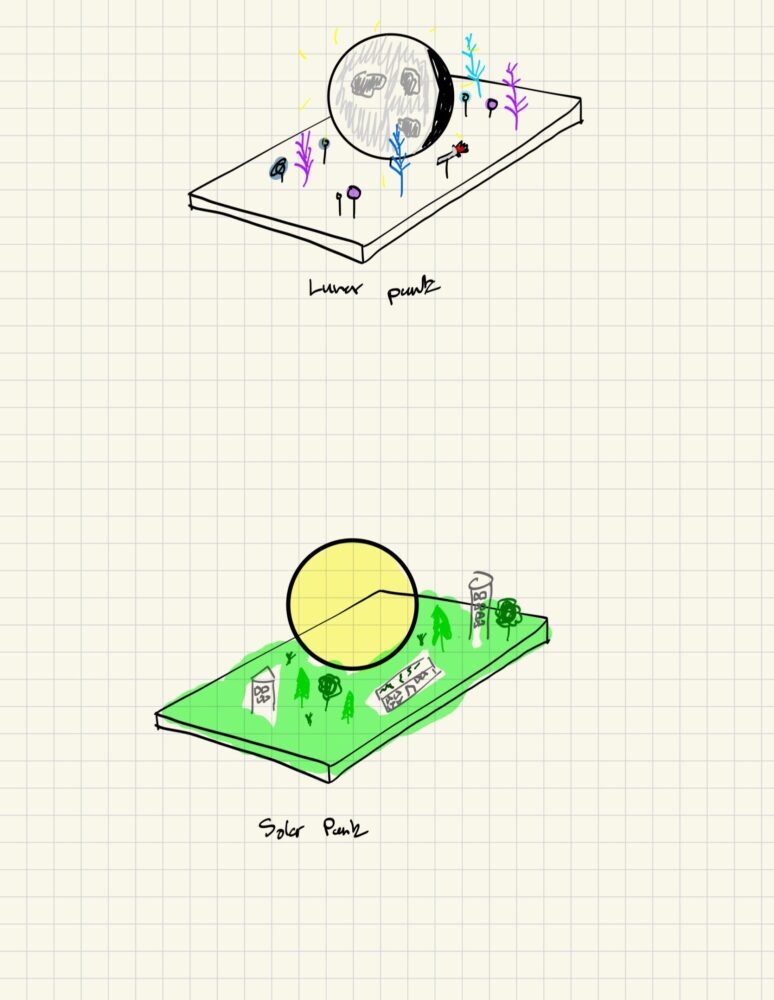
I made sketches that followed both the Lunarpunk and Solarpunk aesthetic, because I was still in love with the idea of incorporating Solarpunk into my design, but I eventually settled on Lunarpunk due to the dynamics of the design.
I eventually moved on to the following sketch of my design that I ended up going with:
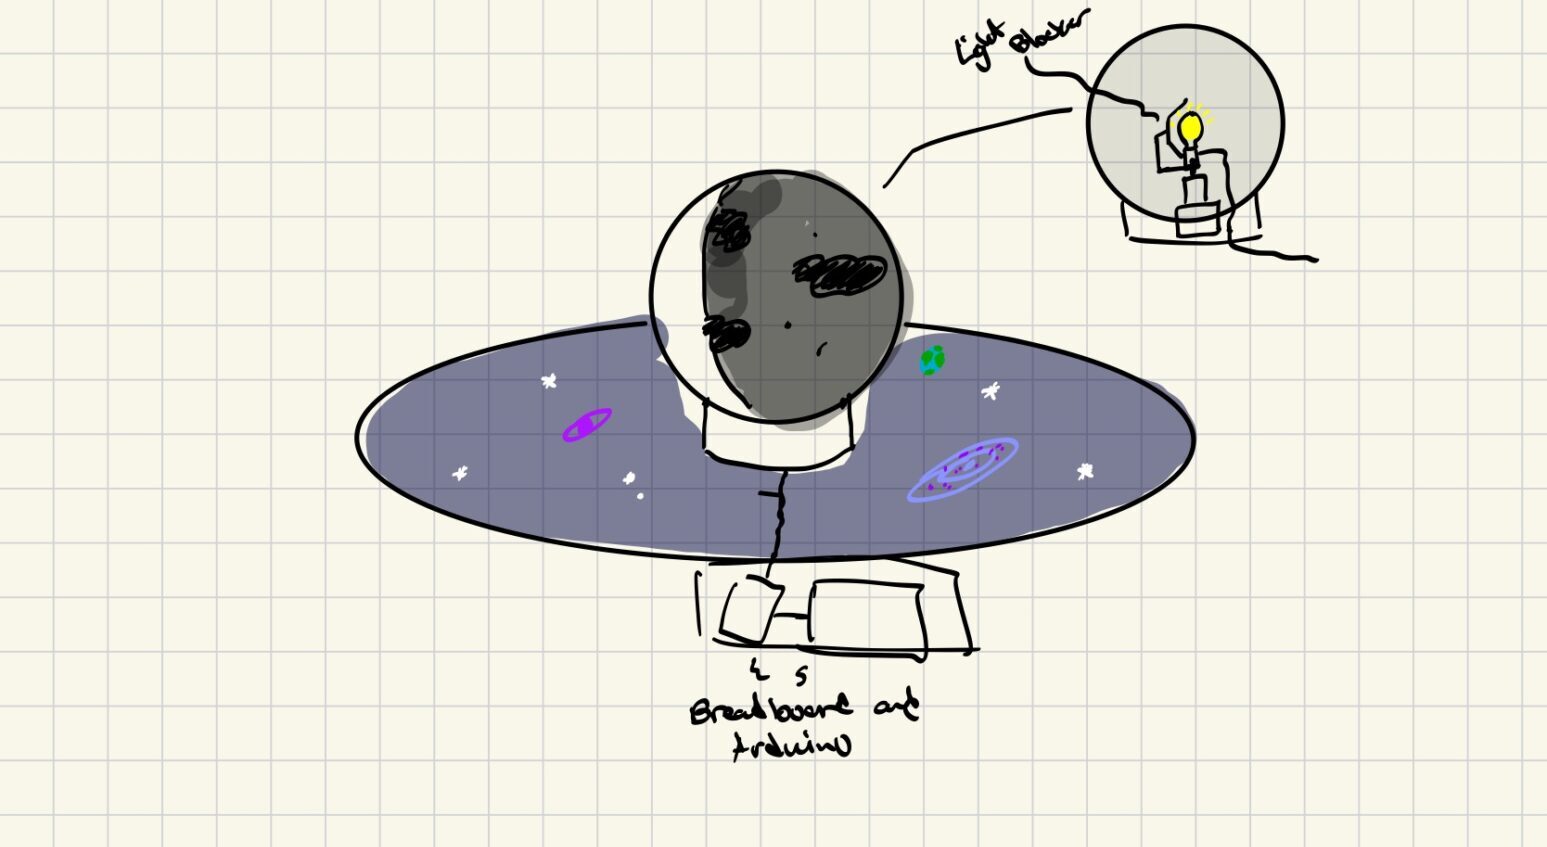
I then started brainstorming ideas on how I was going to design every component.
Board Design:
The board played a very important role in helping create the Lunarpunk aesthetic of this project. I found several options on Home Depot’s website that I used for this board. They had flat wooden boards ranging from 16-24″. My plan for this board was to paint it purple, and draw several different star constellations, planets, and galaxies in the background for decorations. In the comments of one of my posts, someone recommended using glow in the dark paint to help my project fit the Lunarpunk aesthetic. I think this is a really interesting idea, and maybe something that I will implement in the future.
I brainstormed ideas on how to connect the moon to the wooden plate. The plastic globe I ordered has an opening at the bottom of it that extends outward slightly, my first idea was to cut through the wood and insert the exit of the globe into this cut out section, but I figured it may save me some fabrication time if I instead glued the exit to the top of the wooden plate. I also 3D printed an extension to put underneath the exit to elevate the moon, allowing more room for the motor. With this idea, I also designed an outlet for any wires going to the motor and lightbulb instead of cutting one out of the acrylic globe’s exit.
Moon Design:
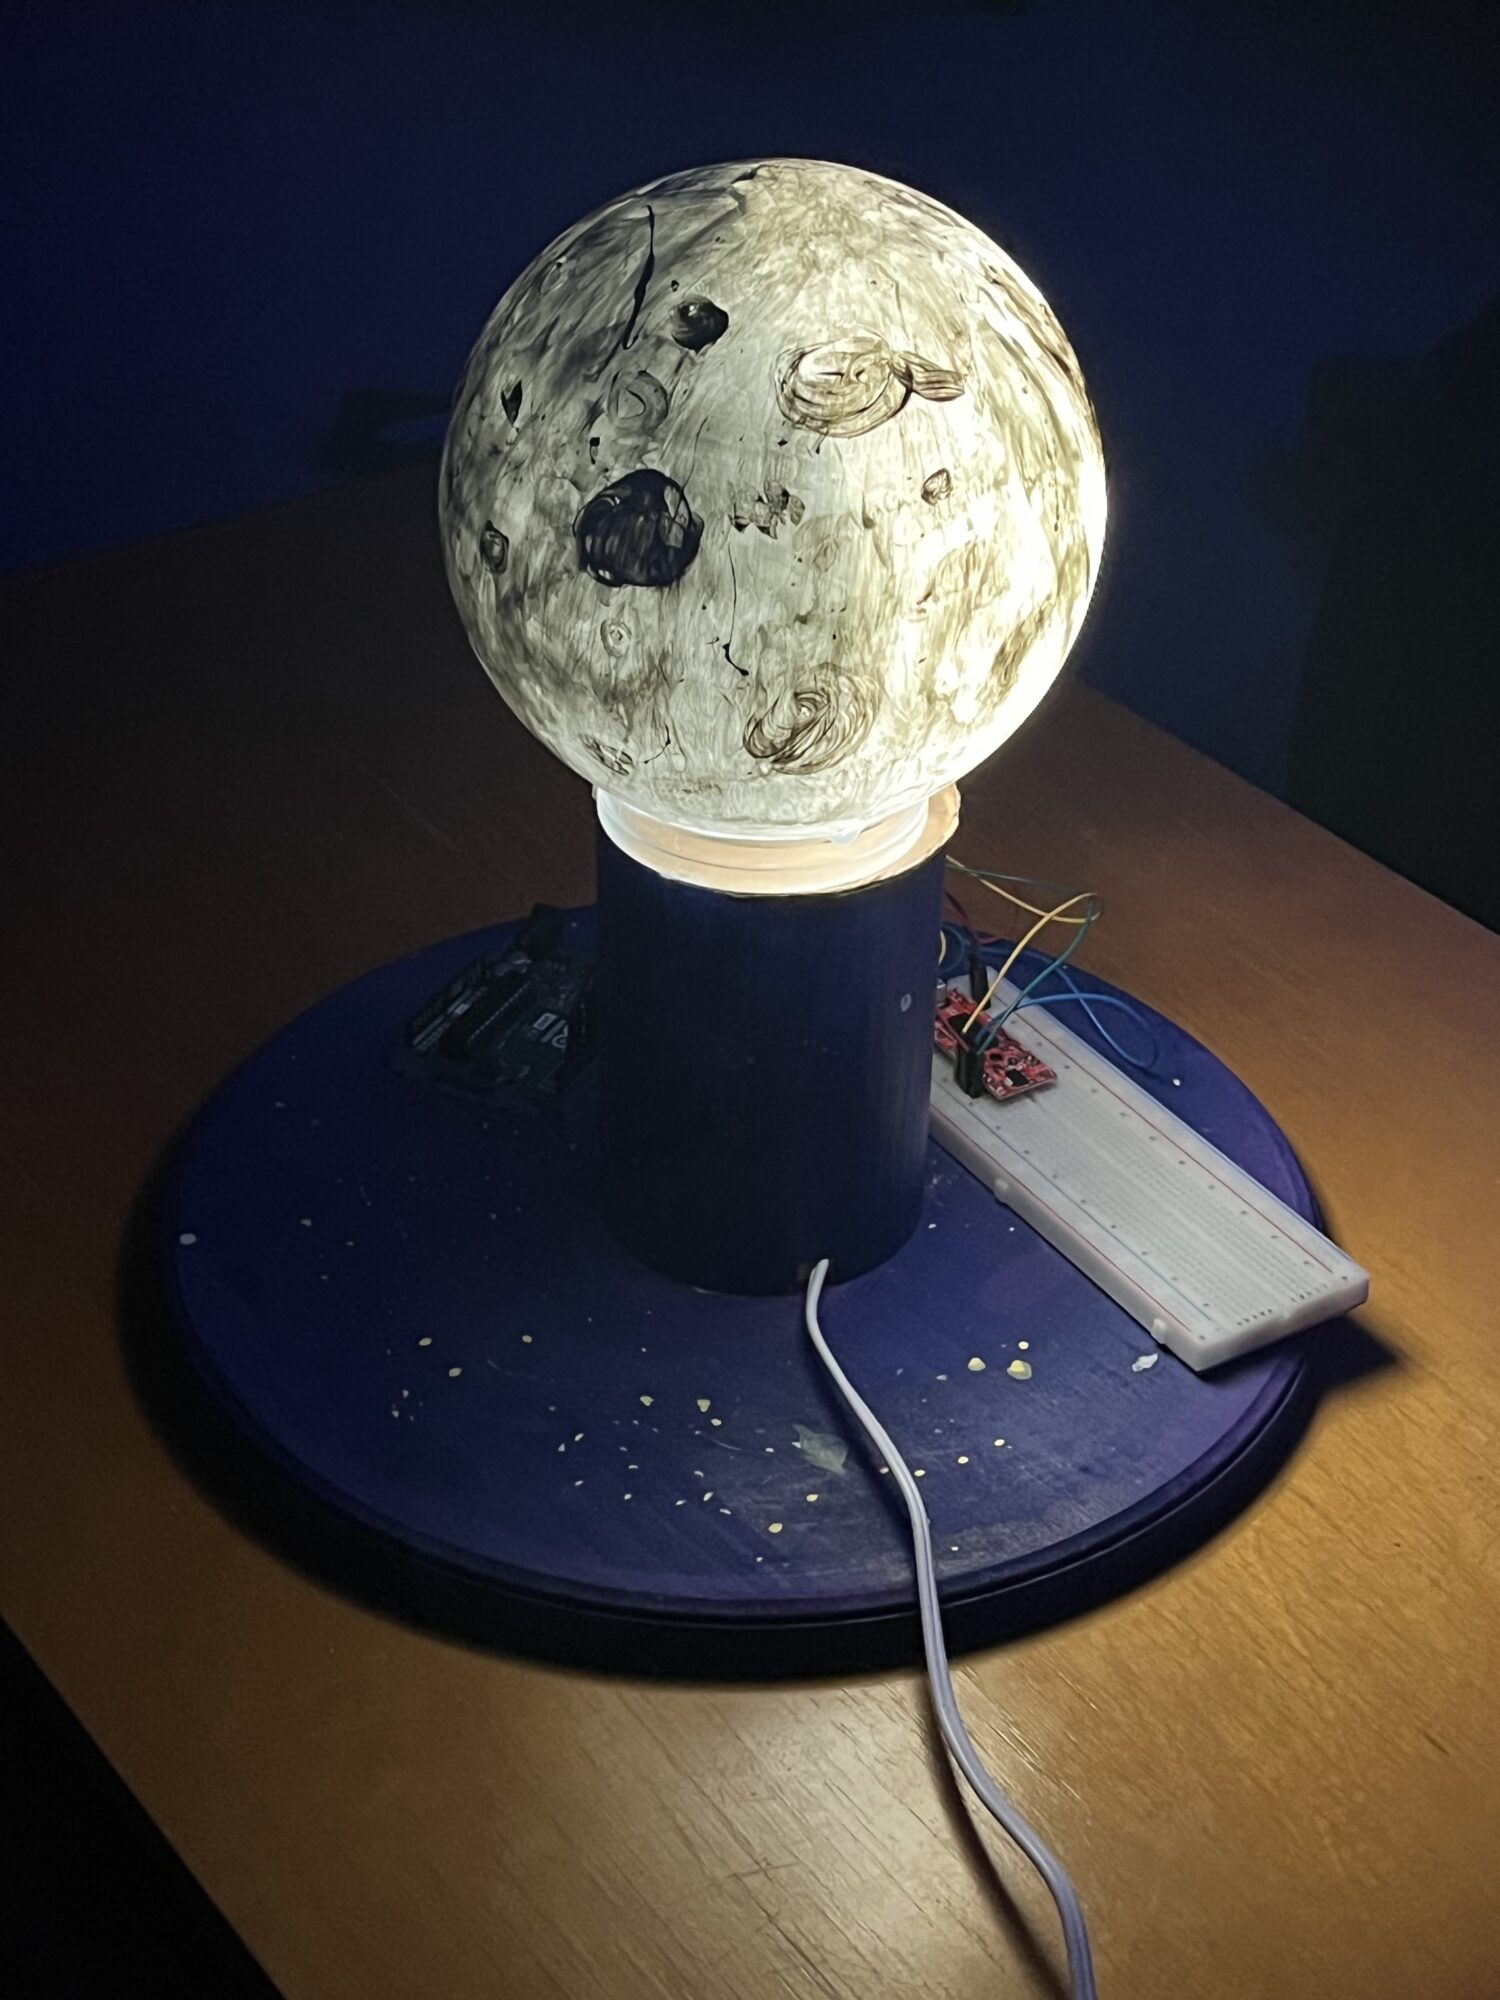
As mentioned earlier, the Moon wis made out of an acrylic globe. This globe has a 6″ diameter, and an outlet at the bottom. The Moon was the most complicated part of this project, as there are a lot of components that I had to design. The first being the blight blocker, which will allows the moon phases to actually be seen. I had to ensure this component actually blocks the light in a way that allows the replicated Moon phase patterns to appear on the surface of the sphere. I have not yet started to consider how I will test this, but I do plan on making multiple prototypes until I get it right. I also put careful consideration into the light bulb fixture itself. The light blocker will be rotating inside of the sphere, and the wires from the bulb fixture can’t get in the way.
Stage 2: Ordering Parts and Waiting for them to Arrive – 3/14-3/21
The next step in this process was to order all of the parts for this project. There were quite a few, and a lot of them came from different places. Several of the electronics, such as; the Arduino, the stepper motor driver, the wires, and the breadboard, I was able to get from Pat for free in the Idea Forge. I had to order the stepper motor online from Digikey, which took about a week to come in. The baseboard, the acrylic globe, and the paint I was able to find in Home Depot and Target. I was able to find a light bulb and light bulb fixture kit here as well. By around 3/21, I had finally collected everything I needed and was able to move on to the next step.
Stage 3: Build the Circuit 4/1-4/7
This was arguably one of the most challenging aspects of this project, as I have never really built any circuits before, and I had never coded in Arduino IDE. Luckily the Arduino website had lots of great resources for me, such as wiring guides, and even sample code. Below is an image of the wiring guide that I followed:
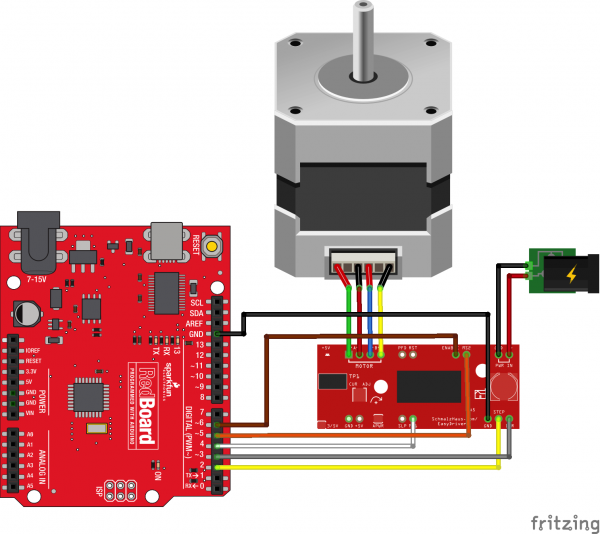
During the process of building this circuit, I was able to learn valuable skills, such as soldering, and crimping. I was lucky enough to have one of my friends help me learn both of these skills for my project. Each of the connections to the breadboard had to be soldered.
Stage 4: Develop Software 4/7-4/14
Fortunately for me the Arduino website had some pre-developed stepper motor software that I could download and use for free. There were a couple of things that I had to change within the code to get it to behave the way that I wanted it to, but for the most part it was a very easy and fun process.
Stage 5: Software/Hardware Integration 4/7-4/14
Integrating the software with the hardware wasn’t too difficult, I just needed to find a data cable that I could route from my computer to the Arduino so I could transfer the code. The difficult part was integrating the stepper motor with the lightbulb fixture. I ended up using two gears, but there was a lot of slip, and I will need to make improvements to this design in the future.
Stage 6: Paint Moon and Baseboard 4/14
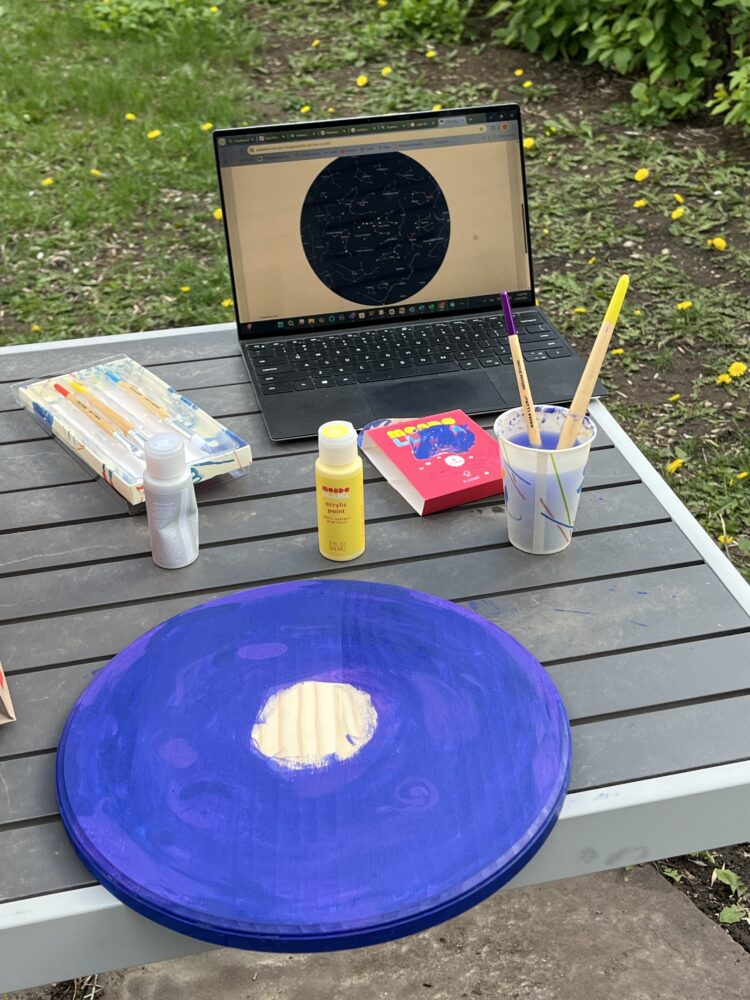
This was definitely one of the most fun parts of this entire process. I am not an artist, but I still had a great time during this process, and I think I learned a lot about painting. I was also able to draw real constellations onto the surface of the baseboard. I choose to use constellations only visible during April. I made this decision because I was painting it during April.
Stage 7: Documentation April 4/14 – 4/30
This next stage probably requires the least amount of context, because it is what I am currently doing right now, writing two 1500 word reports about my project.
Stage 8: Expo!!! 5/7
Before Expo, I plan on making several modifications to my project.
- I want to make the light blocker block more light. It currently blocks light at a sub-par level. While it does replicate the phases of the Moon, I think I can make it better before expo.
- Improve the interface between the stepper motor and the light fixture. The two are currently interfaced, but there is a lot of slip between the two gears. I might try and design a new interfacial method in CAD, and 3D print it before Expo. This is a project that I plan on having for a long time, and I want to be proud of it.
References:
1. My friend Juan (he helped me solder the circuit together, thanks Juan)
2. Article from Architizer (Web Source):
Hill, Jessica. “Solarpunk Architecture: Designing a Future Where Nature and Technology Coexist.” Architizer, architizer.com/blog/inspiration/stories/solarpunk-architecture. Accessed 26 Feb. 2025.
3. SparkFun Tutorial (Web Source, No Author):
“Easy Driver Hook-Up Guide.” SparkFun Electronics, https://learn.sparkfun.com/tutorials/easy-driver-hook-up-guide/all. Accessed 30 Apr. 2025.