

Project Timeline
During my design preview, I presented the following steps with “done by” dates that would give ample time for troubleshooting and experimentation.
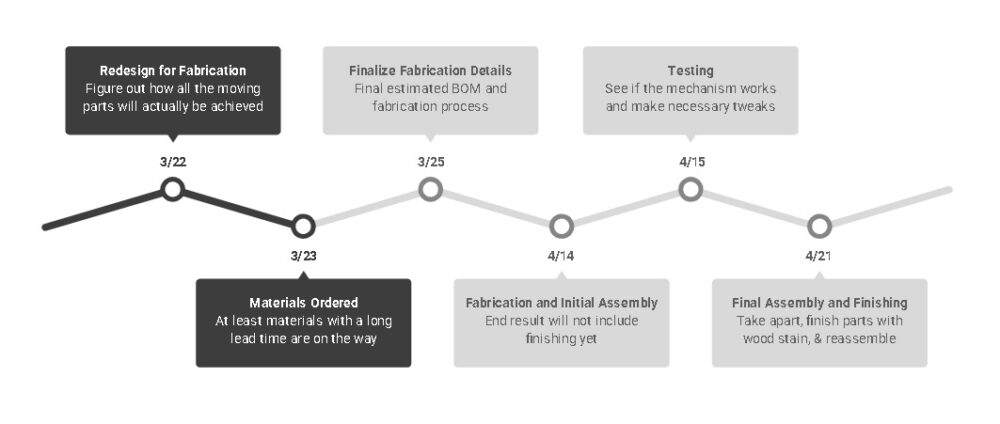
When starting the actual process, I decided to skip redesigning the CAD model, as I figured it’d be near impossible for me to match the dimensions exactly when using hand tools. Instead, I thought it made more sense to take measurements as I went and make design decisions using the material and assembly in front of me at any given stage of the project.
Due to unforeseen circumstances, the imprecision of using hand tools, and shipping delays, the actual timeline branched out quite a bit from what I planned and left me in a situation without much time for error or exploration before starting the final fabrication process.
Personal situations led to me ordering materials a little less than a week later than initially planned, but they were set to arrive with plenty of time to get back on track. I started cutting some of the material to size the best I could as I waited for the rails to arrive. Some of the pieces were dependent on having the rails in my hands, as I couldn’t find the exact dimensions of them online, so when they were delayed in shipping by almost a week and a half, it put me in a tight spot. They arrived on 4/16 (along with the router bit I purchased on the same order that I needed for the record frames), which left me no time to experiment to do anything other than start on the final build with little room for experimenting or testing. Two days later, my orbital sander broke which I was going to use to correct the inaccuracies I made while cutting material with a hand saw. On the same day, I also tried using my router to cut the slots for the record frames only to realize that it was way too loud to do in an apartment without risking noise complaints, and I had a lot of material to slot. I had only used my router for minor things before that, so I forgot how loud it can be.
As the fabrication went on, the limitations presented by the tools I had and my level of skill with them popped up one after another requiring me to change the design. Due to the last minute nature caused by the shipping delays, I was restricted to using only things that home depot had on hand. This caused the fabrication process to continue right up to the design expo.
Fabrication Process
My final fabrication process could be split into 7 main steps. They are presented in the order I would have done them, but in this specific case, each stage was not done in any particular order. Instead, they were all done concurrently due to some cuts needing to be informed by measurements from assembled sections. This also was more efficient given the unforeseen time crunch.
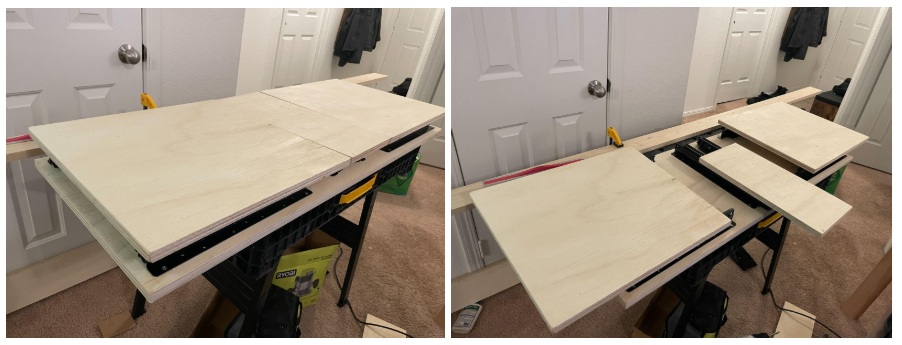
1. Cut wood for the base and frame
I chose 2 sizes of wood to use for the base and frame:
- 2’ x 4’ x .75” project board
- .75” x 3.5” plank
All cuts were made with a 5” hand saw. The first of them were for the base of the build using the 2’ x 4’ project board. This would make up the bottom panel and the three “drawer-like” surfaces that the records would eventually attach to. The project board was also used for the platform that would hold the record player.
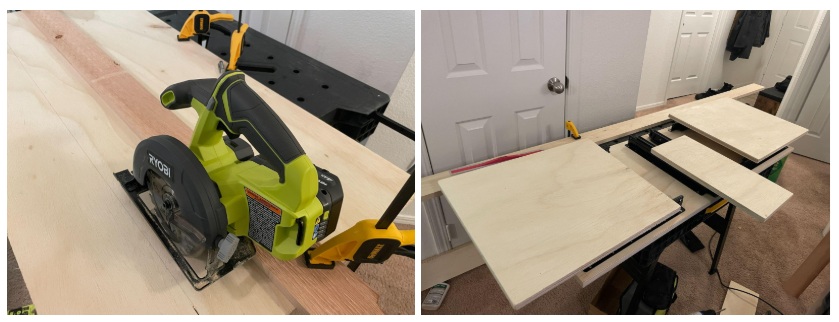
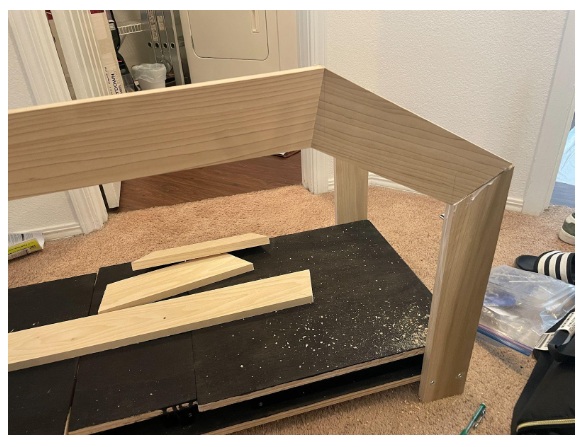
The .75” x 3.5” plank was used for the main support frame.
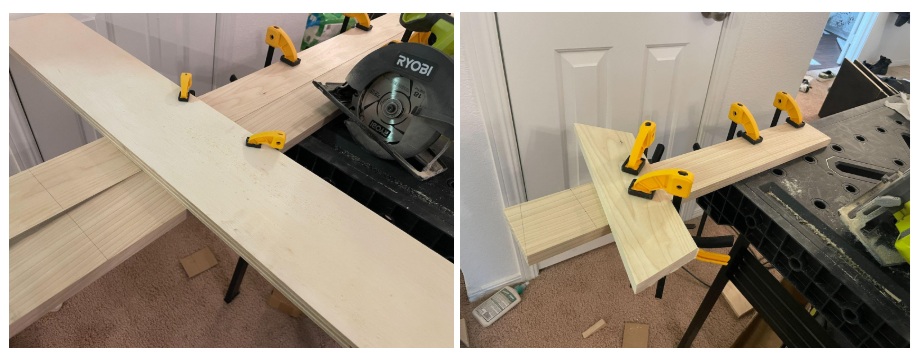
For the angled cuts I need to make for the frame, I clamped together the pieces in a way that resembled how I wanted the final product to look and marked where I needed to cut with a pencil. I chose to do this instead of planning out exact measurements because I believed it to be the faster method; however, this does make it a lot harder to replicate to the exact same spec.
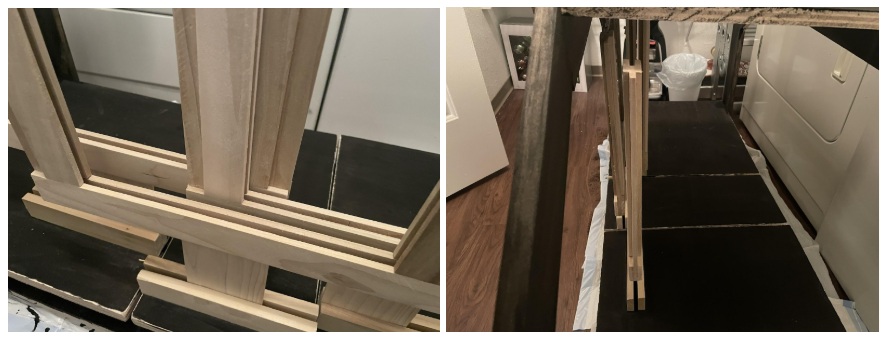
2. Cut wood for the record frames
After abandoning my initial plan of using a router to create the slots for the records, I pivoted to creating frames out of standard sized planks of wood that I could get from home depot. I began with the following material:
- ¼” x 3.5” plank
- ¼” x 1.5” plank
- ½” x 1.5” plank
My process of preparing the cuts was similar to step one, as I used one of my records to measure out the different pieces I would need. I determined I needed the following:
- 2x longer base pieces for the bottom part of the frame (¼” x 1.5”)
- 2x longer side pieces for the arms of the frame (¼” x 1.5”)
- 4x shorter side pieces for the part of the arms that kept the record in place (¼” x 1.5”)
- 1x wide piece for the frame stand (¼” x 3.5”)
- 2x thicker pieces for the base of the stand (½” x 1.5”)
3. Sand away any imperfections and smooth the wood
Due to using hand tools, it was very difficult making consistent cuts between the various pieces, so I used a dremel and an orbital sander as needed to make sure parts that needed to be the same size were as close as possible. This was also very important when it came to interfacing parts, as the ones that glued together required their faces to be as flat as possible and be at the proper angle needed. This proved exceptionally difficult to do without a belt sander.
In addition to any corrective sanding, I smoothed out some of the edges and surfaces of the various pieces. I paid extra attention to the parts that would be handled often.
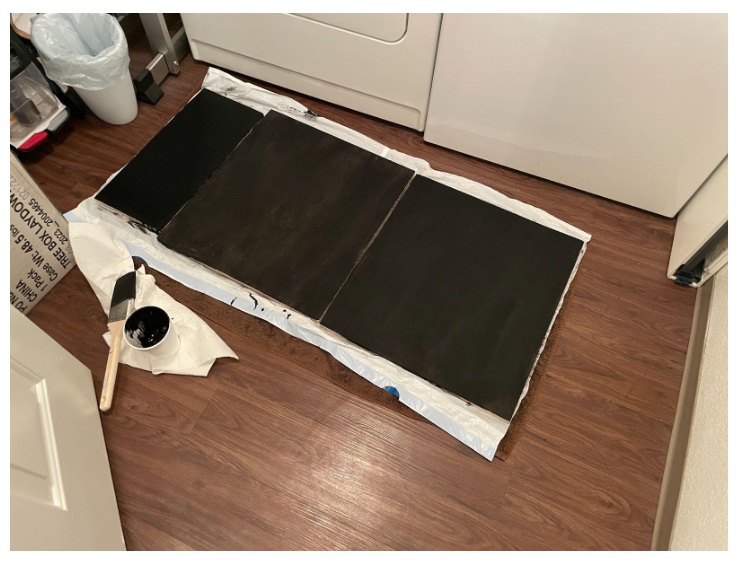
4. Apply wood stain
I used a paint brush to apply black wood stain to the artifact. This was done to a few of the pieces early on to see how it would come out; I finished the rest of the pieces at the end of the build. Due to the last minute pivot of the record frame design, I only had time to apply wood stain to the base and frame.
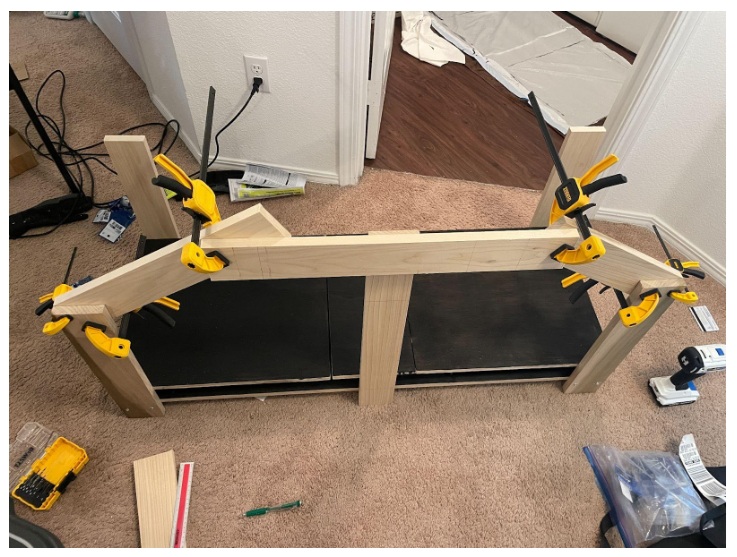
5. Assemble the base and frame
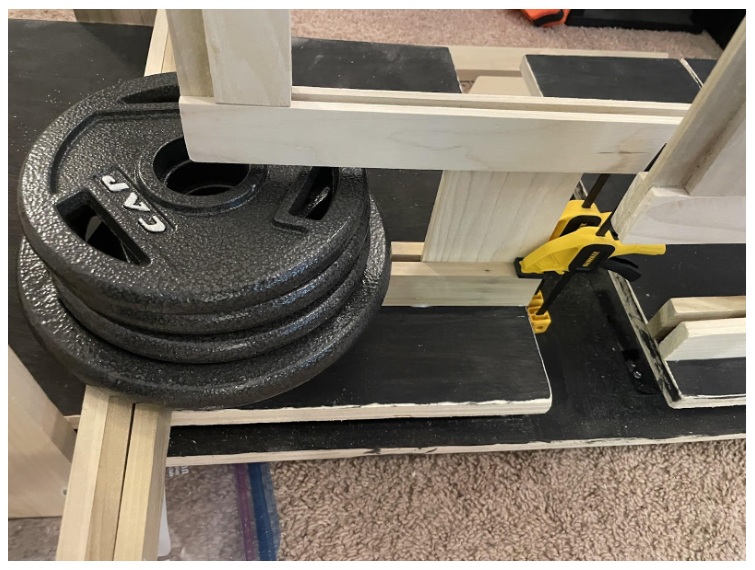
I first assembled the base using the wood I cut from the 4’ x 2’ x .75” boards, the undermount rails, and ⅜” wood screws. This was to make sure I got the moving parts working before adding in any other pieces that would get in the way or make it more difficult for me to make sure the rails were installed correctly.
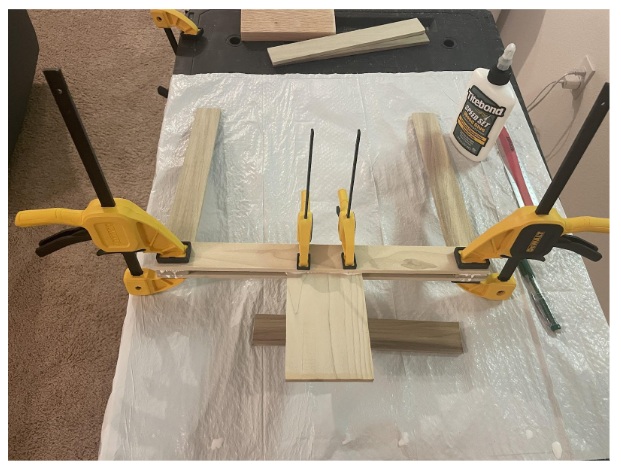
When assembling the frame, I found that my initial plan of using cam lock nuts and screws was going to be nearly impossible for me to do with handles given my level of experience with them and lack of foresight to consider looking for fixtures/clamps that could help with consistently aligning a hand drill. I initially pivoted to using quick set wood glue along with wooden dowels instead, but I ran into a similar problem when trying to drill holes for the dowels. After looking into how strong the wood glue I had was and considering the forces that would be at play, I decided to use 2” wood screws I had on hand to attach the frame to the base and use only wood glue for the rest of the frame.
6. Assemble the record frames
Using wood glue and the various pieces cut out from the ¼” x 3.5”, ¼” x 1.5”, & ½” x 1.5” planks, I assembled the frames that will hold the actual records. I didn’t have enough material or time to make all 15 that I planned to, but I made one for each of the moving parts (3 total) so I could see how they interfaced with each other.
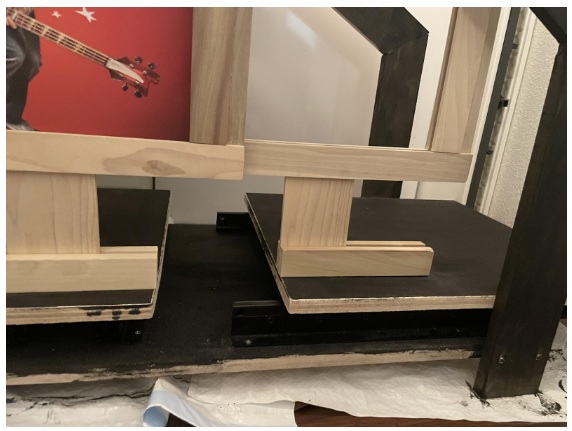
7. Attach the record frames to the rest of the build
With the main body and 3 record frames individually assembled, I used wood glue to attach everything together. Due to the placement of the record frames on the side platforms, I couldn’t get clamps everywhere that was needed, so I used lifting plates that I had lying around to make sure the glue set properly.
Final Product
With everything put together, this is the state I was able to get to within the bounds of this class. It allows for one record to be prominently displayed in the front with the next two albums peeking out on either side creating a cool pattern.

Although it is not the smoothest, the sliding mechanism functions properly allowing for the records on the left and right to move and be accessed independently of the center.
Although there are only 3 frames currently present, you can see the geometric pattern that the interlocking frames create, which showcases its mid century modern influence.
Conclusion and Reflection
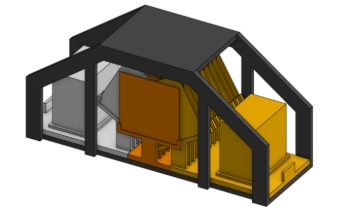
When I first envisioned the end product, I knew it was an ambitious project to tackle, especially within the bounds of this class given I didn’t have access to a machine shop.
Although not always by choice, my plans changed drastically from where I started as the project went on; however, most of the change was centered around the means to the end, not the end product itself. I have a sense of pride that even after having to weather a storm on the way to this point, the final version of my artifact is pretty faithful to the original design I drew up in CAD.
With the circumstances I was presented with, I think the current state of my project turned out better than I expected in some ways and worse in other areas.
First, to touch on some positives, I really like the new design of the record frames. I think they were made way more interesting to look at since they do not look like a single, uniform piece. I believe the extra lines that came from the last minute design change really accentuates the mid century modern aspect better than what I originally planned. I also loved the decision to make the record player platform out of multiple pieces instead of a single piece. It really leans into the rustic farmhouse style that I tend to gravitate towards.
Now for some things I wish I did differently. For starters, I believe I should have tried to pivot or at least thought up contingency plans the second I learned that the router bit and rails were going to be delayed. I didn’t even end up using the router at all, and I could have tried to redesign my idea to be less complex since I would now have less time to experiment with the rails. I am also not in love with the black wood stain; I find myself wishing I used a very dark brown that was close to black instead. Another thing is that I miscalculated how tall I needed to make the outer support beams, so the middle row of records cannot be accessed with the record player platform on the frame. Because of this, I decided not to glue it to the frame yet. A final negative I came away with is the thought that I should never try to make something this complex again if all I have are hand tools.
Going forward, there are a lot of things I still plan to do. Obvious things I plan to do include remaking the outer support beams to be taller so that I can attach the record player stand, finishing the rest of the record frames, and staining the edges of the base. Another obvious thing is applying wood stain to the record frames, but I think not having enough time to stain them black might have been a blessing in disguise. I don’t hate how it looks with the record frames being a different color than the rest of the build, so since there is no longer a deadline, I would like to experiment with different colors of wood stain, perhaps a blue or purple. If I get access to shop tools at some point, I might consider remaking the whole thing so that it has a more professional feel to it.
Overall, this project taught me that designing with aesthetics in mind can lead to creative end products that I would never have otherwise thought to make, but it is important to consider the complexity that could be added when putting function on the back burner. Truly innovative engineering requires a balance between both and the willingness to consider when it makes sense to focus on one or the other.