
Inspiration
In Hong Kong I came across this shop called “GOD” (Goods of Desire) selling handbags made of woven seamstress tape measures. It was a clever way to make a durable product, but like most things at GOD, these bags were extremely over priced. Sometime later in the Guangzhou fabric district I came across the same tape measures, but this time they were sold in bulk rate! So I bought a bunch, thinking it could be a fun project. I’ve had these tape measures sitting in storage for years. This project has finally given me the motivation to use these tape measures to create something.
It doesn’t seem like GOD is still selling those bags, but I found some other examples of similar stuff for reference.


The Project’s Vision
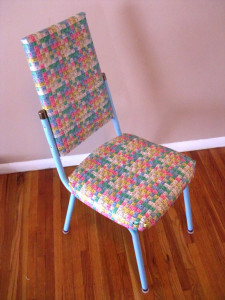
I chose to go for a shabby chic aesthetic, following my post in the first class assignment in aesthetic exploration. From the beginning, I wanted to create a functional chair that would serve as a real piece of furniture rather than just an art chair. The final result does fulfill this functional requirement. The chair itself is robust and the woven tape measures are a durable material that should be able to withstand normal use. Artistically, the chair seems to achieve a shabby chic feeling. The chic part of this label refers to elegance and sophistication, which is usually a result refinement and hard work. The shabby part refers to something unpretentious and folky. This chair has qualities of both shabby and chic – mission accomplished. It could seem random to commandeer a bunch of tape measures to create a chair, especially considering that the extend of my sewing experience is reattaching a button to a shirt. But I created this chair to give to my mom. She has a cute sewing room where this chair will make a nice accent.
Process

Above: Divergent / Convergent Design Process by Jason McGrath
The design process depicted above shows divergent exploration followed convergent narrowing of possible solutions. The interior shows the iteration loops, which is an unbroken thread throughout the entire design process. Milestones are shown by the meeting of red and blue lines. Divergence and convergence segments are so distinct because the during the work flow, activities such as market research, brainstorming or workshops are inherently structured to proliferate ideas or identify as many opportunities as possible. The output of these activities feed into a funnel, grouped according to affinity and prioritized – narrowing the focus to manage the execution of ideas. As constraints are set (shown in diagram as the narrow bottle neck in the middle) they are used as a springboard for further exploration. Iteration on the other hand should not stop even when solutions are being refined for milestones. Overarching project objectives to either to launch a product to market or to complete a school project by a given deadline make the design cycle directional and finite. What is interesting to note about this diagram is that the initial exploration on the left results in a narrow focus that expands even broader as the project drills down into specifics.
While the seed of inspiration was found in a hand bag with an exorbitant price tag, I would not say that was the point when divergent exploration began. The upcycling project really began the day I found bulk rate tape measures in the fabric market in China – during a completely different project’s design process. Prior to that, I wasn’t thinking about weaving tape measures or reupholstering any furniture. Still reeling with sticker shock and now with access to so many cheap tape measures; this is when the numerous possibilities began to flood my mind (divergence). Different types of applications could use woven tape measures, but many projects like handbags were ruled out simply due to lack of interest (convergence). The chair is the quintessential object of design. And the chairs of China left a great impression on me. What impressed me most was that regardless of the chairs’ condition, they were never considered trash; people always seemed to find unique solutions to prolong the life of the chairs. The streets of Shanghai are filled with chairs in ruin – but still in service. This impressed me so much that I self-published a coffee table book titled “Have a Seat” showcasing the chairs of China. For those who are curious, you can preview the book at Blurb: Have a Seat.
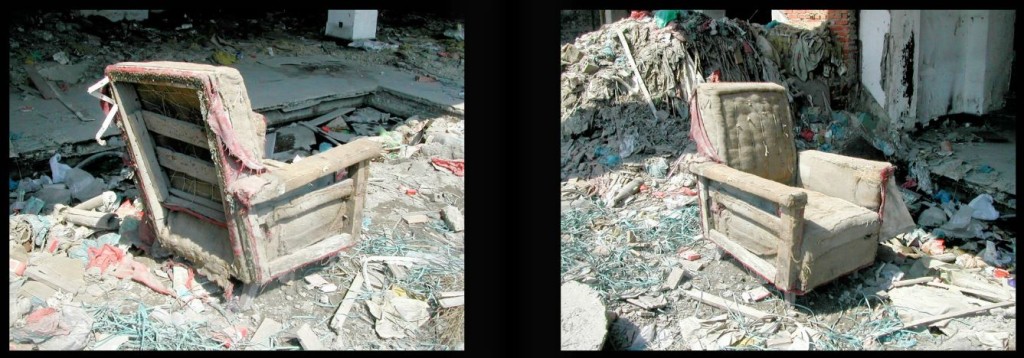
Above: Excerpt from “Have a Seat” by Jason McGrath
The prospect of creating a chair constitutes the first milestone in this project. I then had to diverge on the type of chair it would be. As I experimented with weaving a few tape measures the appropriate size and shape for this project became apparent. It was clear that a fully upholstered arm chair would not be feasible for amount of tape measures on hand. Furthermore it was decided that any chair with a backrest must have two separate cushions for easier recovering and also to tie the aesthetic of the chair together. These two constraints: small in size and rectangular in shape would be considered the next milestone in the design process.
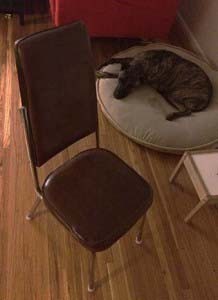
From here, I began to broaden my horizons again as I searched for chair candidates. It would have been great to create a matching set of 2-4 chairs or bar stools to provide more value for customers going for a unified interior design theme. Unfortunately I didn’t find a set that would fit the design constraints of this project. There are a lot single orphan chairs on the second hand market, which opened up more possibilities. Below are just a couple of pictures from chair hunting.
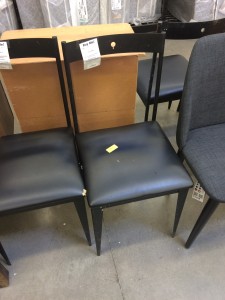

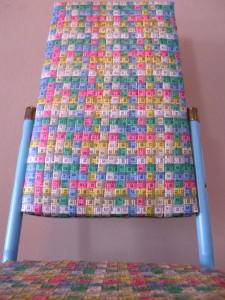
I settled on a small kitchen chair with two separate rectangular cushions.
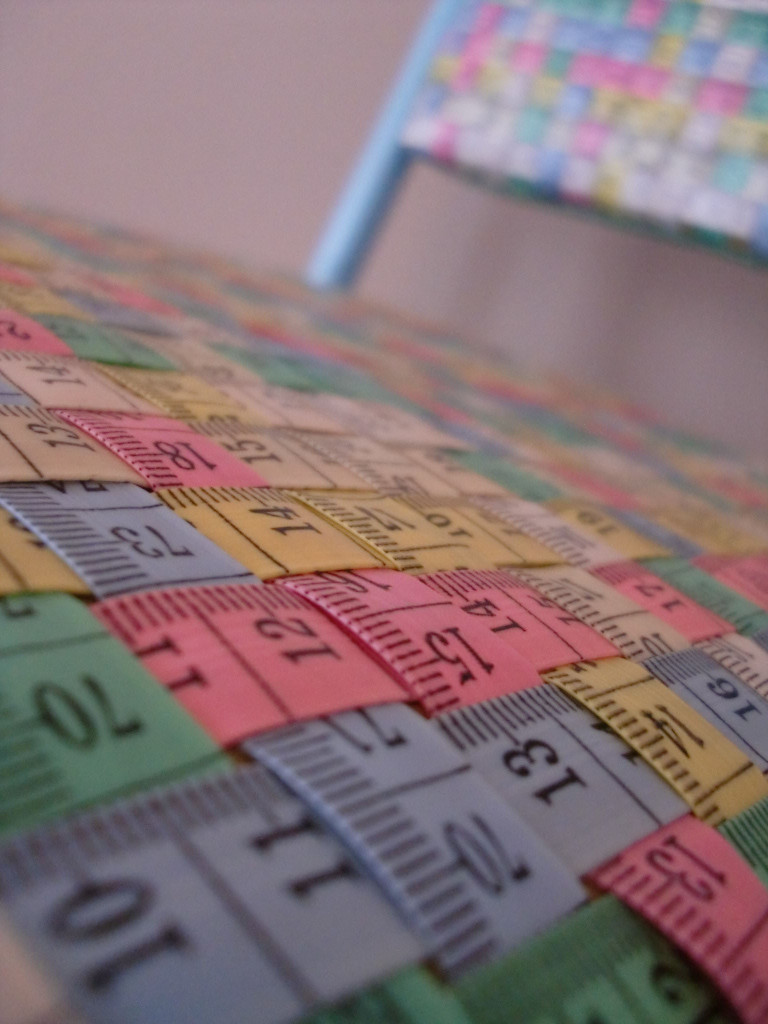
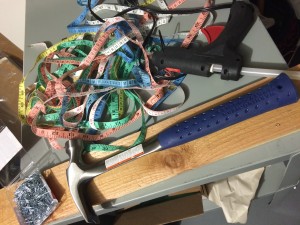
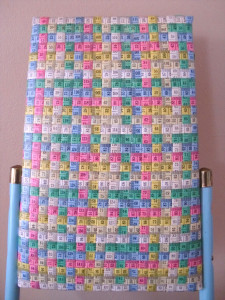
The building process began by rounding up the tools and materials required for the job. Each tape measure has a metal tab on the end that provides a robust connection for nailing them to a surface. About 40 tape measures were nailed to a board in a straight row. Care was taken to arrange the tape measures in a pattern according to color. Next, I began weaving the tape measures across the rows following the same color pattern and trying to keep them tight as I went along. The weaving was all done by hand, basically threading one tape measure over and under perpendicular tape measures. Weaving the bands was a very linear process. I did not explore many different options on how to go about it. The only fork in the road was the issue of how to keep them all together once they were woven. Unfortunately, I do not have any experience sewing and felt that time was too constrained to learn during this project. Sewing the edges of the newly woven material would have been my first choice, and would probably be the right choice for manufacturing. The other choices I explored were gluing the ends of the bands together, and using clear tape on the back side to hold the bands together. I was afraid that the tape’s adhesive might be exposed in the gaps between the weave, which could have captured some fuzzy lint when people sat down. As it turns out, there is a fair amount of adjusting the bands as they cover the cushion in this adhoc process. So individually adjusting each strap and fixing it to the chair with staples on the bottom side of the cushion worked well in this project. Sewing the edges or otherwise securing the weave before adhering it to the chair would require more coordination between the design of the cushion and the pattern used to create the cushion covers. Systematically designing the cushions and covers to fit each other would be the ideal design scenario.
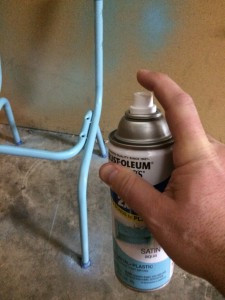
The frame was painted early in the process so it would have plenty of time to dry. The chair’s feet and end caps were masked off to avoid over spray or shadowing. Two thin coats of light blue spray paint were applied. I tried to match the paint to the blue tape measures. Obviously there were other colors that would have matched the chair equally well. The choice to go with blue was twofold. First, it was my favorite color of all the matching choices of spray paint that Home Depot had. Secondly, I chose not to buy five cans of spray paint to control cost and avoid additional time needed to sample multiple color schemes. Like weaving, the process of painting was mostly linear and driven by practicality rather than design exploration. The paint options that were not purchased or sampled could be considered dead ends or stubs in the design process. Color is a powerful design element that ideally should be given ample attention in any product. Choosing color isn’t always as easy as it may seem, especially when going for a unique and definitive look. For the sake of time in this project, the light blue presented a choice that I felt worked well with the cushions and was not as polarizing the other colors available.
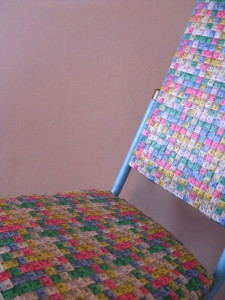
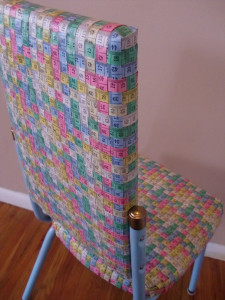
For the back rest, one tape measure could be cut into two halves to create the horizontal bands. Which was lucky because the supply was starting to run low and I wasn’t sure I would be able to find the same tape measures again. It was reassuring to see the number one design constraint – small in size – serving its purpose at this point. The back rest cushion presented a different challenge because it would be visible from all sides. It wasn’t possible to just staple the straps to a bottom surface that would be seldom seen. In order to get a finished look all around, the cushion itself was used as the weaving loom. using the same color pattern as the seat cushion, tape measures were stapled along the bottom edge of the back rest. Then more tape measures were woven in the perpendicular direction, again following the color pattern. To assure that the back of the chair looked finished, complete loops were made from the horizontal bands by attaching the ends together with a small dab of hot glue. Hot glue seemed to work fine for this application, however after some time in a freezing garage some of the bonds had broken. Which was not a big disaster because the bands were now held in place by a tight weave. The ideal process for covering the back rest would again be sewing a cover specifically for the shape and size of the cushion. The hardest part of this entire project was weaving the last strap around the edge of the back rest. With all other straps firmly secured, this last strap proved challenging to thread in between the layers. Once the last strap was in place, it was stapled to the bottom edge with as few staples as possible, covering all two staples in each vertical band.
The finishing touch was to reassemble the chair. The increased thickness of the cushions made it slightly difficult to squeeze the back rest into its original position between the metal tubing. Also, because the original screw holes were now covered by tape measures, new holes has to be made exactly where the old ones were before the chair could be reassembled.


52 Comments. Leave new
The process to making this is absolutely fascinating! The colors work very well together, and I love how the chair is still very functional with the aesthetic touch you added!
Looks very cool! I like how the chair is both artistic and functional!
That’s a really cool aesthetic, it would be nice if you could make a full set of furniture out of that material. Do you think that fabric could be used for other things?
First off, your report is super professional.
Second, the way you built a loom into the chair and then wove around it is a super neat idea. I’m glad that it’s functional too.
The chair is phenomenal! I really like your inspiration behind the aesthetic just makes it that much more interesting. When you where putting the chair together was there a color scheme?
I really like how you took a concept which you observed while in China, and adapted it to something that was entirely your own. While the idea of weaving tape measures to make a textile is not an original idea, you adapted the concept into an entirely original idea and something I have neither seen nor heard of before.
I think this is perfect for a sewing room item decoration. Also love the woven look, which to me is itself an aesthetic (though maybe different than the shabby chic look). Nice job, ending with a professional looking project is always the goal, and you nailed it.
I like the color matching you did with the Tape measures and the chair steal bars. I know that the durability of the tape measures were questioned. Can you coat them somehow?
Can stables can be replaced with strings for attachment?
This is the coolest chair I’ve seen in a long time. I love the colors you used, they work together so well! The pattern you used for weaving is so even, it’s really great. I even like the little metal tabs that you can see under the seat, they give it just a little extra interest. Is it comfortable sitting on all those tape measures? I’d think they might feel a little weird and press a funny pattern into the skin.
It’s pretty comfy. Certainly more comfy than the street sweeper bristle chair I uploaded. That one leaves a pretty good waffle iron pattern.
The color of the legs and frame go well with the measuring tape. The metal ends on the frame seem to contrast the overall scheme a little bit too much. Maybe a different color would work well. Nice work!
Weaving those tape measures looks like a slow, careful process. Really impressive! Dig the paint to match the aesthetic too.
I think the design is really neat, and I am impressed with how much time went into this. Did you pick the pattern out beforehand, or was it created as you made the chair? I would recommend against staples since I have used staples to make a chair before and discovered that they slowly pry out as you use the chair.
Nice work on the chair! The quality of your weaving was so good that I initially thought it was store bought. I’m sure you’ll be able to not only dress chairs, but create a nice woven cover for anything.
The chair looks really good, it’s easy to tell that you put a lot of thought and time into the design and manufacturing process.
The quality is impressive–you can tell a lot of thought and effort went into this process. I agree with the comments suggesting a more durable solution to the staples so that the chair can last for many years. Great job!
Very nice that you are going to give the chair to your mom for her sewing room. The nice thing about the tape measure material is that it would probably do okay outside as well, since it’s plastic, depending on what the original material of the chair is underneath. You did an excellent job of weaving a very tight pattern and not leaving any gaps. The other colors are also very pleasing and the pastels definitely add to the shabby chic look.
You made a fun and colorful chair with a bit or retro flair. Creative use of old measuring tape.
I really like the attention to detail on the weave pattern. It wouldn’t have even occurred to me to use the tape measure colors to create a gradient-like grid. The final product looks very professional and durable, and I think that your mom will have it for years to come. I would love to take an up close look at how you created a seamless transition on the back cushion. Instead of glue, you could sew it inside out, and flip it to make a pillow-case cover. Very nice job!
Yes, sewing would definitely be in order. It’s a bit ironic I can’t sew while this whole sewing theme going.
This looks very professional! Love that the inspiration came from your travels. Really awesome stuff Jason.
I love the intricate work done with all the weaving. The color scheme is also very visually appealing and works well with the materials used. Maybe consider adding some sort of protective layer over the top. I had a purse like this and it wore down very easily.
I liked the project as it looks artistically beautiful, you took great care of details and above all the project will serve a purpose.
nice work!
I really like how clean the woven fabric looks. The way you wrapped it around the backrest of the chair really shows how thorough you were when creating this. My only suggestion is to go into depth a little more about how you wove the material
Well done! cool chair! This one is very aesthetically pleased. I really like the traditional chinese art! Can’t imagine how much it takes to build this fantastic chair.
Well done! Looks like something I’d see being sold in a store. What would you do differently next time?
Next time, I would perhaps make perfectly squared off cushions with plywood and foam to avoid the loose corners.
Wow! Well done on a great design and execution. I like how professional it looks and love the color choices. Do you think sewing will be needed in the future or are the staples robust enough?
That’s a really cool chair! Its a super meticulous manufacturing effort. I definitely would not have had the patience to work through that. I love the retro color scheme too! And the stapling was a super creative solution. Sewing that probably would have taken a pretty long time, especially if you were teaching yourself to at the same time.
Very nice chair, I like that it is durable enough to be functional as a chair still.
This is honestly really impressive! The color scheme and the fact that it has a pretty consistent pattern is especially eye-catching. You set the bar really high. Have you ever considered taking some sewing classes of any sort? That would possibly take it even one step higher than it already is.
I was also curious; how many tape measures did you end up using?
Your chair definitely has a high quality look to it! Something I got confused about was whether or not there was cushioning below the new fabric?
The chair is very aesthetically pleasing. I like the colors you used and that your inspiration came from your time in China. From afar they don’t even look like tape measures. Also it is really cute you are giving it to your mom as a gift. I am sure she will love it.
Your finished product looks like something you could purchase in a store for big $$$. Very impressive, professional level product out of recycled materials. Great job!
I can’t believe you wove for 30 hours, that’s crazy! Well done, looks great, your mom will love the chair.
Really neat project- it looks like you invested a lot of time in it. It would be interesting to try a spray urethane lamination to provide some additional durability.
Awesome idea. At first glance it doesn’t look like measuring at all until you get a closer look. Excellent craftsmanship I would’ve guessed it was professionally made from company! One suggestion would be a different sealing component rather than staples. Sewing might not solve the problem either but I bet there are some other simple measures. Overall excellent project though!
Your chair looks incredible. It was really interesting to hear the background as to what influenced your design. Instead of stapling the tape measure on, have you thought about epoxying it? It will be stronger than hot glue, and potentially less noticeable than staples. It’s also good to hear that someone else somewhere will be able to use the chair for time to come.
Interesting use of tape measure, seems quite resilient as the material is thick and appreciate the use of color and the finished look of the chair.
Nice work, I think you achieved the aesthetic with the turquoise frame. The quality of the build is high and well executed. As I said before, the corners could have been woven more tightly for a more professional look. Overall, good job.
The chair came out really great! I do appreciate that you repainted the frame to match your new upholstery.
“I used a stapler because I didn’t know how to sew” – I think you did a nice job of using what you did know how to do on this project! I guess that’s all part of the upcycling aesthetic… Excellent job!
I love the colors you used in the chair. It almost looks like a periodic table on the chair! Some chairs use push pins to secure the fabric onto the frame; that might help them stay more secured in the long run.
I like the visual aesthetic- it looks vintage, probably because of the color choices and the chair style. As you noted in the presentation- it would be nice to see this sewn or tacked on the underside, as I wonder if the staples and hot glue will last over time.
Great use of color palette. Turquoise contributes to the retro part of Shabby Chique. Try upholstery tacks instead of staples.
Well done! The colors are cool, and the chair looks very retro.
This is an awesome project and I appreciate that the colors of the tape measure all work together and with the color of the frame of the chair.
This is wonderful, I love the color. I’m very impressed how clean the weave looks. I hope this lasts a long time.
Stapling to the chair was a great solution to holding the tape measures on. It looks really good!
Looks very well done, professional, like something from a store. I like the reference to the store in China. Looks like plenty of work, I would definitely consider purchasing something like this if I saw it.
Very cool chair! I like the color scheme you went for and how you matched the leg color with the measuring tape. Good use of being creative with the staples. It looks very sturdy and well built!