
As a personal fan of the contemporary industrial aesthetic I wanted to capture it within my upcycling project. I appreciate the simplicity of this aesthetic, but also how it doesn’t sacrifice strength or quality. I wanted something that would be useful in my life, but also add a subtle intricacy that was not immediately evident. I chose to make a common household item, the drink coaster.
Source: blogspot.com
Source: blogspot.com
Source: home-designing.com
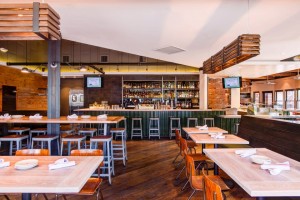
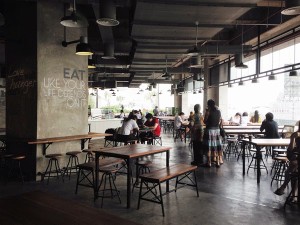
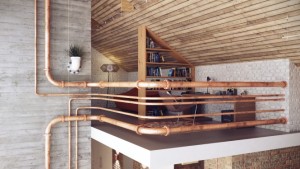
Examples of contemporary industrial design
Not immediately certain of my final design intent, I scavenged through the Manufacturing Center and machine shop in the ITLL. I couldn’t find any pieces of metal in good enough condition or large enough, but I was able to stumble upon some engineered wood. This wood had a slightly rough surface, but a soft grain. Next I found scrap acrylic that was in great shape. I decided to use this to give the wood a finished appearance and also level it better, eliminating the need for tedious surface finishing. With materials in hand, I planned to laminate them together to complete the process, but as I was leaving I found the perfect material to bring the design together: matching black bolts.
Supplies in hand I began to process of manufacturing. I created a 3D model in SolidWorks in order to create a pattern for the laser cutter to follow. I also used this to engrave the circular geometry into the wood so that it could be cut with a band saw and mill. The overall process was fairly simple and the pieces fit together with little trouble. With it assembled I realized that I had plenty of room in the base to add some intricacies and keep them hidden to maintain the overall simplistic look.
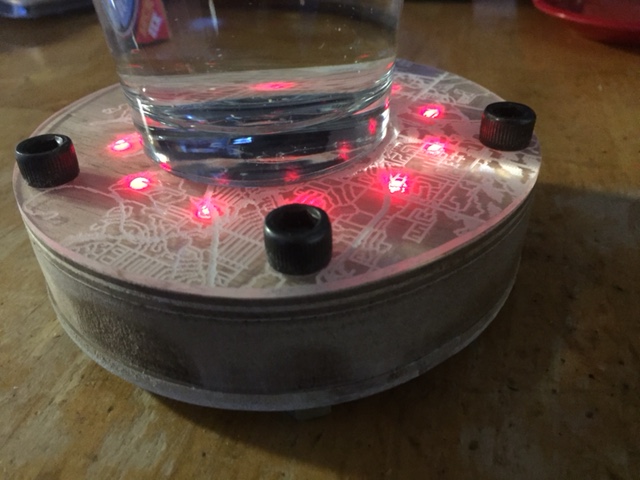
I chose to inset a ring of LED’s that I found in the ITLL. The only color options were red or yellow. Hoping to add some warmth, I chose red. I wired the LED’s together, soldering the joints, and connected them to a 9V battery that I found a handy case with a switch for. I had to put a resistor in the circuit to drop to voltage to an acceptable level for the LED’s.
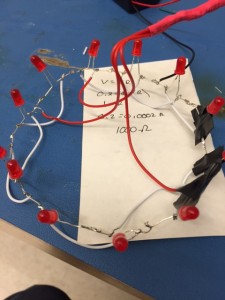
Once I had it all wired I placed electrical tape around the connections as I knew the space would be cramped and I didn’t want any wires to short.
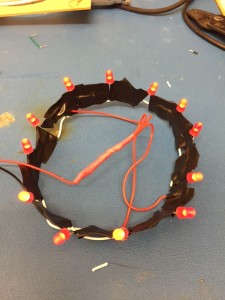
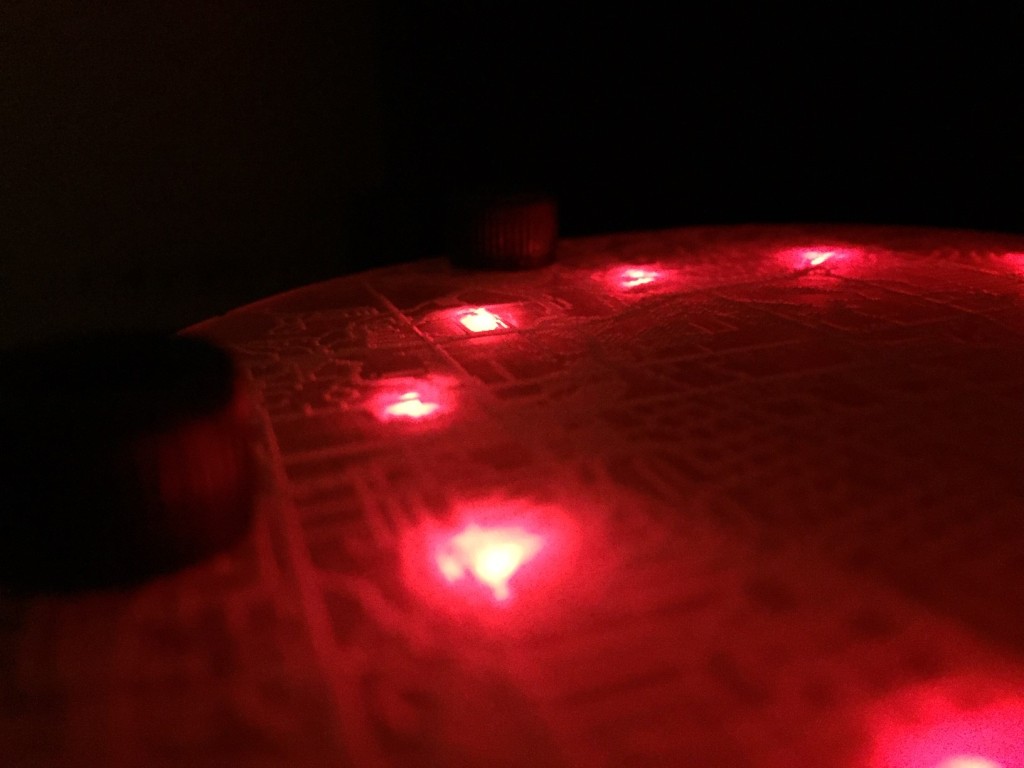
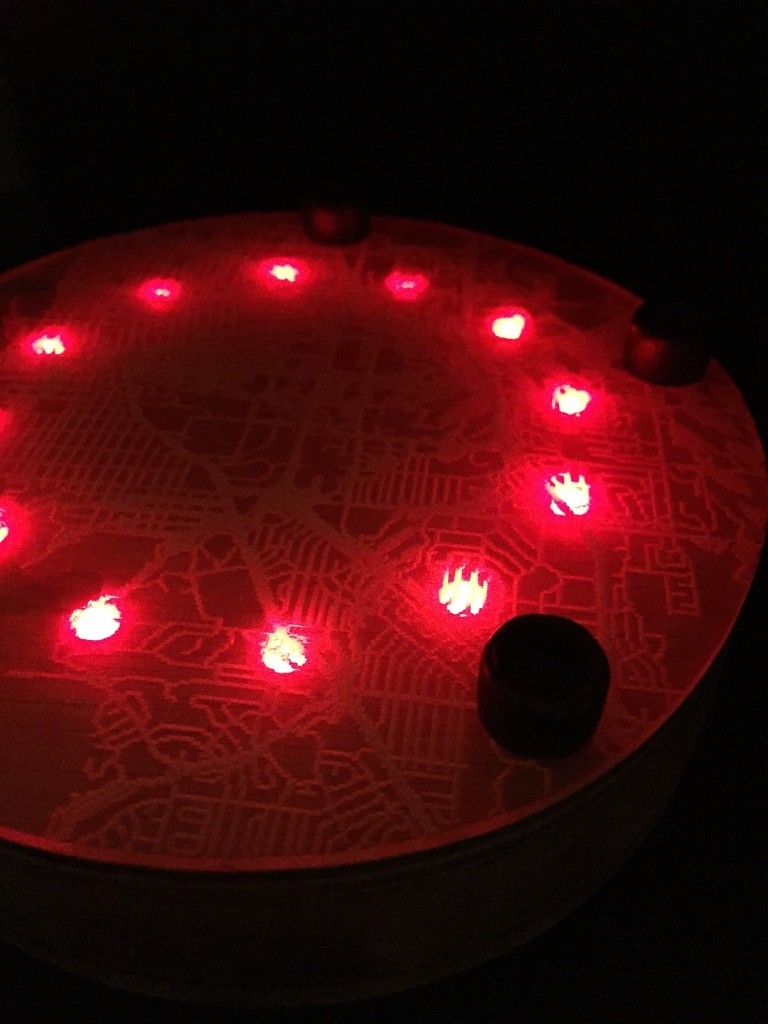
With the LED assembly complete, I had to use a hole saw to remove the core from the large center laminate of wood. I also cut 10 holes in the top laminate layer to allow just the top of the lights to shine through, preserving the sleek aesthetic. Each light has a small amount of superglue holding it in.

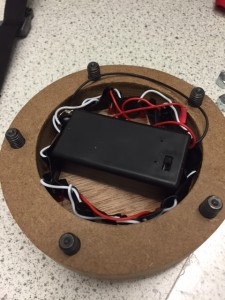
With this complete, I had to cut another piece of acrylic to hold the electrics in. I found I had to make a spacer to give enough clearance, but this all resulted in a very tight fit. So tight, in fact, I did not even need to use the slots to zip-tie the battery pack down as it was held in purely through compression. With the bottom on, I bolted it all together and tested the fit. It all fit!
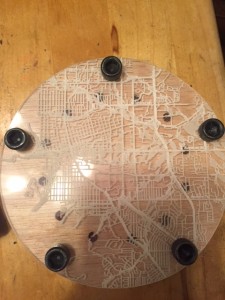
To hide the wires a bit better and remain true to the aesthetic, I chose to engrave the bottom with an edgy design.
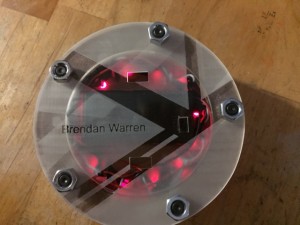
However, once it was assembled, I found that the top surface didn’t appear sturdy. Therefore, to hide some of the imperfections, I chose to engrave the top with a personal effect as a graduating senior at CU. The top has a low quality image that, at first, appears to be random lines, but upon closer inspection is actually a map of Boulder.
While I recognize that this detracts from the goal of simplicity, the desired look couldn’t be achieved with the materials available to me.
To finish, I sanded the entire assembly together, making everything align properly as circular cuts are hard to make accurately with wood.

If I were to do the project again, I would probably use more lights and put them facing down onto the table. This lights up the table and gives a really cool aesthetic by expanding the size of the product without making it physically larger. I would also use glass instead of acrylic and much higher quality woods, possibly even metals.

Ultimately I was able to make the coaster completely free of cost, from all recycled materials. The design cycle I followed wasn’t necessarily traditional. With a project that did not require a practical need, I was not limited in scope. I brainstormed many ideas in my head but could not come up with a concrete idea. Once I sourced materials, I found my inspiration for my final project. Writing nothing down, I went threw many possible designs in my head, but could not make prototypes as I was severely limited in material. Once I thought I had a completed product, I had to loop back and rethink my finish on the top as my material did not appear as clean as I originally thought it would. Ultimately, my physical design cycle was very linear in contrast to what is traditionally thought of as the cycle, however, mentally, I went through many theoretical iterations before making my first cut. By not writing anything down, I felt less limited in my design and able to make quick adaptations without ever becoming fully invested in one aspect. I learned a lot about stylistic choices throughout the process and it helped refine my personal style. Plus, I now have a great place to put my drink!
Image links:
http://2.bp.blogspot.com/-xxaeYWlMySE/UmKrutLfGfI/AAAAAAAAATQ/zNqwHxcfIqM/s1600/pic04.jpg
http://4.bp.blogspot.com/-a02iskYAph8/UXCYt8G9k7I/AAAAAAAAD7E/k0-RLN70dp4/s1600/32288_304832126290125_734971058_n.jpg
http://cdn.home-designing.com/wp-content/uploads/2012/10/1-Industrial-pipe-railings-665×374.jpeg
40 Comments. Leave new
I see you don’t monetize your website, don’t waste your traffic,
you can earn extra cash every month because you’ve got high
quality content. If you want to know how to make extra $$$, search for:
best adsense alternative Wrastain’s tools
The map is boulder is a really great, subtle touch! I do agree that backlighting may have been better, but it looks great as is. If you want to capture a modern, industrial aesthetic, consider the use of stainless steel banding around the outside in the future.
The engraved map looks really cool! My only recommendation would be to make the coaster a little thinner, which would depend on the battery pack
Awesome idea. I would try and make it thinner but besides that a really well thought out and made project
The map of Boulder on the top is a nice touch. I like the contrast between the clean cut acrylic and the rougher wood. It could look more finished if the nuts were the same color as the bolts, otherwise it looks great!
This looks really professionally done. May I suggest adding some kind of vinyl wood strip around the perimeter of the device, it would be the cherry on top for this project.
It would be really cool if the LEDs lined up with popular or your favorite landmarks/places in Boulder on the map. Overall, the coaster turned out really cool. Nice job!
Coaster looks great! I could very much see this being used in a very modern/hip bar.
Super cool! You definitely did a good job embracing the industrial aesthetic. I does seem a bit thick to be a practical coaster though, so you might consider trying to minimize the battery pack to slim it down.
This looks great. The map is a great idea. Are there any issues with water seeping into places it shouldn’t?
Also, after looking at the final product in person, the map that you used ended up looking pixelated a bit similar to an old video game. I like that.
The map of Boulder is great addition to this piece. Your aesthetic turned out really nice between this map and the LEDs. If you can make this thinner in future iterations, this could be great item to sell on the side.
Nicely polished. It looks great. I would love white LEDs instead. Good solution for cutting a circular pattern. I love the idea of printing Boulder’s map. Maybe have it with a lower profile to look sleek. But I understand that LEDs and Batteries might not fit inside. Nice Job.
I like that you incorporated a map to make it a bit more personal and interesting. The lights add a lot of visual interest. Good job.
the project close up is very interesting looking and you can you use the two sides of it. Actually, the bottom part looks more “industrial”. Really interesting design process and just spikes your interest once you’ve seen, don’t get it wet while using it ^^.
Awesome job!
I really like the look of the etched map of Boulder – has a very personalized as well as stylish feel to it.
I really like the look of your project. I am a little concerned about water and electronics for your project. It was really interesting to hear about your design process. Are you concerned about the hardware scratching your tables or anything? I like your ideas for what you want to improve and how. It’d be cool to have it be so that the LEDs would turn on when the glass was put on, but turn off when the glass was taken off.
I really like the map design underneath it. It feels like it could be sold to bars. It seems a little thick, but it looks nice regardless.
This is a really unique coaster. I like the contemporary industrial aesthetic. I initially thought the engraved map was a circuit boar which totally plays to that aesthetic.
I like the Boulder map; fits the aesthetic and has personal meaning. Maybe consider a light in the center; then it would illuminate glass and liquid better.
Great use of ITLL resources, this came out looking really nice. Awesome engraved map.
Nice looking final design. I like how you adapted your initial idea and cut a ring with some wood you found. Are you at all worried about the coaster being too thick? It seems pretty robust. Good work!
The laser etching of the boulder map on top is a really neat addition, looks good!
Really good piece, like the use of led lighting, as well the engraved pattern. Great finished product although the hardware while matching the aesthetic is a bit distracting due to the height, consider using a counter sink to set the hardware into the material. Also would like to see the acrylic glow from the led rather than just be a cover.
I really like the surface of the coaster. you might consider using one of those flat led lights that will evenly light up the entire coaster. The map of boulder is a great addition
I bet you could commercialize this as a product. You could make all of the LEDs surface mount components on a circular PCB, which would make it much thinner. I also have some weird affinity for socket head cap screws! Really nice job!
I love the engraving pattern on the top. In the future, it might be be cool to do this similar idea on a larger scale like a table top or side table.
I really like the map and frosted design with your name. These aspects make it quite original.
I like the modern look, detail-oriented approach you took, and the acrylic looks great! This idea is very unique and looks nice.
The coaster turned out really well! It would be cool to use RGB LEDs and have them cycle through a color spectrum, creating a more dynamic piece of art.
Although you were going for the industrial look, I actually feel like this looks somewhat futuristic when it’s lit up! I like how you incorporated CU and Boulder in the end of your project.
The LED’s give it an awesome touch! Even though they don’t light up the entire acrylic, I still like the look!
I love the intricate design and elements you used! The acrylic really adds to the overall design and does give it that polished and finished look. Very well done and creative design for a coaster!
I really like the looks of this project. It is very visually appealing and I love all the LED’s lighting it up. Great work!
Good looking coaster! This also reminds me of one of those buzzers that restaurants give people to let them know that they have a table ready. Just gotta throw a little motor in there and I think it’d work! Really cool.
Cool idea with laser cutting the holes before you drilled them. I’m going to use that.
I love the designs that you included on the acrylic! They add a great dimension to the coaster along with the lights.
I like this aesthetic, especially the use of frosted glass or acrylic. It would be fun to make a set of these with different city maps on them.
Nice job making it look professional. The engraved map of Boulder on the top looks very classy, and the lights underneath bring it to life!
Excellent work! I like how you combined engineering and art for this project. The product is both artistic and functional. I can see you put a lot of effort into this project by having used Solidworks and the laser cutter. Well done!