
Introduction:
This part 1 of the final blog post, which unwinds the story behind my Sand Frame project from the inspiration to the final build. Even though building the sand frame might be simple and intuitive, roadblocks and challenges were discovered along the way of building the frame. This post will discuss the ups and downs of the build project and will educate the reader on how to make a sand picture frame with minimal tools.
Inspiration
A look back at what inspired me to start building Sand Frames:
I visited Denver’s Art museum last year and out of all the art pieces in the museum I was really inspired by a sand picture frame I saw in the museum shop. As you can see below a sand picture is a frame that houses a special fluid with air and fine sand particles. The frame is oriented so that the sand particles are held by the air and slowly falls between air gaps by gravity (same idea as a sand clock but in fluid on a 2D level).
Prototypes and final Design:
In the first week of the project I borrowed a purchased sand picture frame to experiment with it. I found out that these have issues when they age primarily due to leaking, drying out and sand sticks to the top or the bottom. I found that they add a hole on the side of the frame so you can add more air or release more air. (air bubbles control the flow)
Sand Testing:
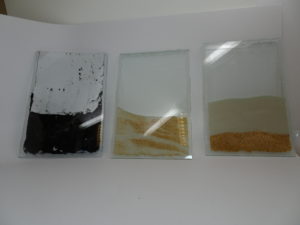
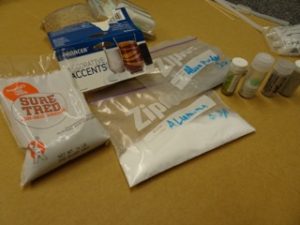
I tested 8 different samples of sand. 4 Sand types, Alumina, Aluminum oxide, Glitter and small spheres as shown in the figure below. The sand I tried all ranged from 0.5microns to 2mm. I was looking for something with a fine grain and does not get muddy in the water.
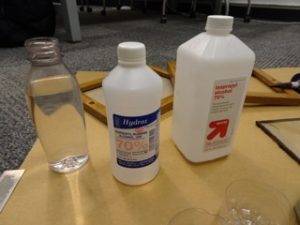
Liquid Medium:
The patent holders for these devices are very secretive about the liquid medium they are using so that they are not copied. It is important that the liquid does not get turbid easily by the sand. To find the suitable liquid medium I started with using distilled water and saw how sand reacted to it. It was fine but I needed to add sault and alcohol to the water to prevent algae or any form of bacteria being in the water.
At the end I decided to use 50% Isopropyl Alcohol and 50% Salt and water.
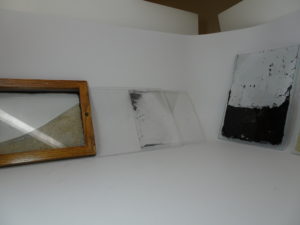
Glass vs Acrylic:
I started using glass and it worked fine but once I tried acrylic for the possibility of having an engraved frame things didn’t go very well. This is because acrylic frames usually warped and unsealed when filled with the fluid.
Sealant: hot glue vs silicone:
Silicone was a better option here because it reacted better to water and alchohol. Silicone was sealant and far more durable than hot glue.
Aluminum sheet vs wood:
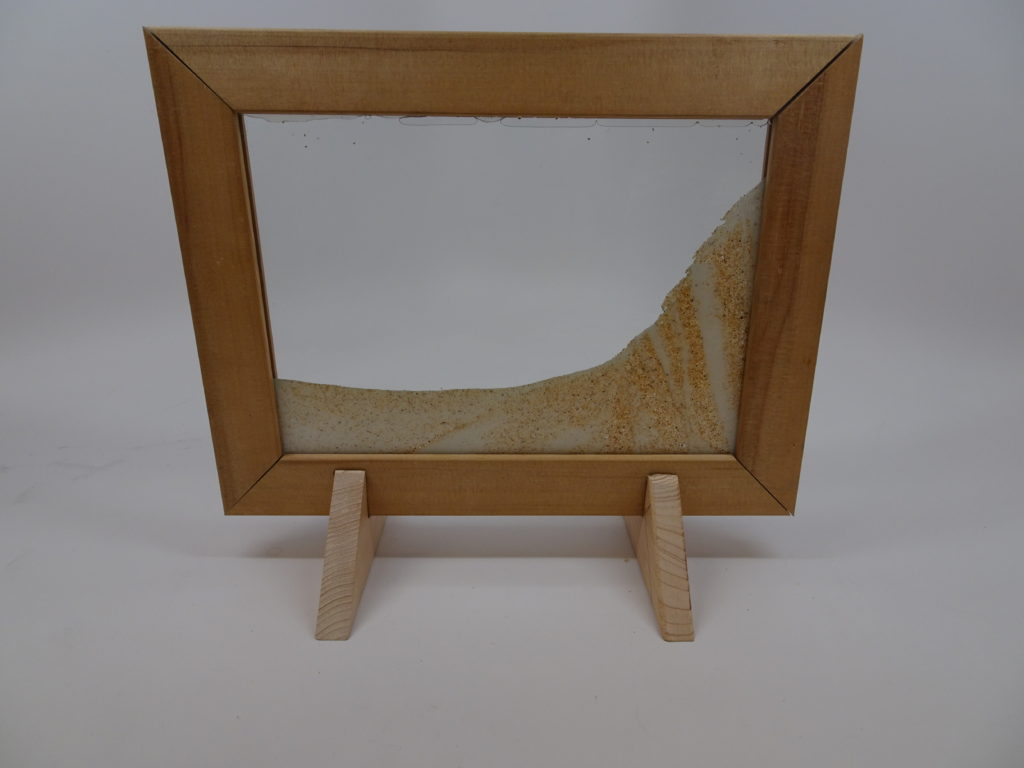
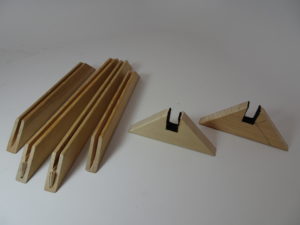
Since my sand selection was white and brown I wanted to go with wood of the same color. I initially planned to have a 3D printed stand to the frame but after I finished building the frame I decided to have simple triangular stand.I wanted to add a nice aesthetic to the frame by making it wider than the ones sold. I hope you like it.
Materials and Tools:
Materials needed that go in the build of one Sand Frame:
- 2 equally sized glass panels. The size used in this demo is 12″ x 8″ x 0.25″
- 70% Isopropyl Alcohol
- Water and Salt
- A 4 foot long wooden bar for the frame. The size used in the demo: 0.7″x 0.7″x 0.25″
- A filler fabric pice
- A square wooden block
- Clear Weather Proof Silicone
- Syringe
- Sand
Tools used (preferably) to build a Sand frame:
- Sicossrs
- Box Cutter
- Saw + Routing Saw
- Sand Paper
- Spacers: Any long piece of 2mm thickness that can be sandwiched between glass without scratching it while removing it from the glass.
- Cutting pad
- Caulk gun
- Wet wipes
- Tape prefereably double sided
- Measuring tape / ruler
- Bottle
- Paper
- Vice grip
- Pipette
Build Steps:
Conclusion:
My main conclusion for this project is to be patient. Projects like these are more of an art type projects, they are not engineering projects with kowns and unknowns, it is just keep trying until it looks good enough. My design process was simple and straight forward: Keep trying everything and choose what works best. I have gone through 7 complete frames builds to get to this point. I am happy about it. I have tried changing a lot in this sand picture frame but learned that it is a little challenging and needed more time. That might be my summer personal project though.
Acknowledgments:
I would like to thank Prof. Jean Hertzberg for helping me to collect various sand samples as well as lending me her purchased frame to play around with. I would also like to thank Mr. Josh Coyler in the idea forge maker space for helping me in designing, collecting material and building the frame.
18 Comments. Leave new
Thank you for sharing your project and sharing the details you mentioned you tried different kinds of sand which worked best in combination in which did not work? And where did you get the sand? Thank you so much and God bless
Has anybody tried contact solution for the liquid?
Wow, thanks for that!
[…] Source: http://www.aesdes.org […]
Hello sir
A hole is important or not. It would be leak
Awesome work! It turned out beautifully!❤️
I am making this for my school project. I have found several tutorials, but I can’t seem to find what kind of sand to use. The current pandemic is a problem in finding supplies. Where can I get sand and what kind? Any suggestions?
I am really interested in your project and I want to try so can you please tell me that what liquid do you use inside? and What kind of sand is used? if it possible I want to make one for my babe.
Thank you very much.
New to sand flow frames. Where to obtain sands?
The sand I use won’t stratify. it just mixes and won’t separate?
maravilloso.explica muy bien.un placer leer las intrucciones…muchas gracias por compartir su experiencia tan generosamente.A quien da la vida le devuelve con creces…God bless yow all the ways…all the times.
Your sand frame turned out great. The two types of sand you put in it really enhances the depth of the motion of the falling sand. It’s very refined too, I can tell you went through multiple iterations and lots of trial and error to arrive at your final product!
The project turned out great! The amount of effort you put into making the sand fall nicely in your display was awesome. I didn’t know it took 8 iterations, and tons of fluid testing in order to make come together nicely. Overall fantastic work!
Great presentation.
Great work on this project Aly! Even though it came out to be very expensive and time-consuming, I’m guessing that after making a few iterations, you are able to make it much quicker now. Therefore, you might have the potential to mass produce this kind of product and sell it for a great deal of money. I know I’d buy something like this. It is so beautiful and you can probably spend great deals of time just watching the sand slide down between the panels.
Great work. It is crazy that you were able to make it for so much cheaper than those that you can buy in the store. Also great work going through so many iterations.
I think you project came out beautifully. The falling sand is enticing to watch. Cool that you built the frame yourself.
This is a really well thought out structured report. I like that you listed pros-cons of processes and material choices. I also think adding some links or pictures from your past updates and such could be really helpful to future readers. Your project turned out really good. I liked the look a lot. Excellent work.