
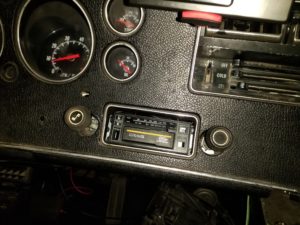
I started working on cars years before I was able to drive. My first project was the restoration of a 1971 Jeepster Commando. I have had several automotive projects since then, of varying levels of magnitude. One of my current projects is a 1970 Chevrolet El Camino. When I got the vehicle it was missing most of the interior, including the radio unit. I could have gotten an aftermarket radio or tried to find an original Chevrolet radio, but I decided to build my own so I could include whichever features I want and make it look however I would like. My finished radio will have an FM tuner, Bluetooth audio, auxiliary audio input, and most importantly will not look out of place in my 50 year old dashboard.
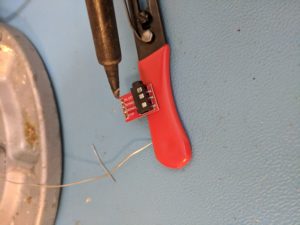
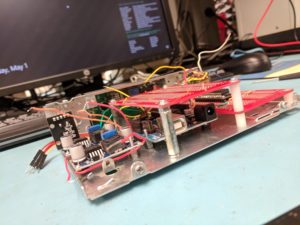
This is an electronics heavy project and exceeds the level of involvement I have previously had with electronics. My first stages of this project consisted of me learning about the electronics I will be using in this project and testing their implementation. No tangible progress came until I started ordering parts and materials. I am using an Arduino Uno for the control of the radio. It drives the LCD screen, and takes and interprets inputs from the knobs and buttons. A TDA7439 is used to switch between audio sources. It can select from up to four audio input sources. The IC can also make equalizer adjustments, such as bass, mid, treble levels, but I do not currently plan on implementing those features. The tricky thing about the TDA7439 is that it will not fit in a regular ol’ breadboard. It has smaller SDIP dimensions, rather than the usual DIP dimensions. To overcome this I got a little breakout board. I ordered two, which ended up being a good call because I fried a TDA7439 chip during testing and they are hard to unsolder from the breakout board. Radio tuning and RDS data comes from another IC, a Si4703. I got the chip from SparkFun. They also offer a Bluetooth audio chip, but it is expensive, so I opted for a less refined, but cheaper option. [more info about the BT solution] It does not provide any sort of play/pause/skip music control and does not provide information about the current track. The next component is a real-time-clock module, to keep time when the device is turned off. The real-time-clock module has a battery onboard, so time should be kept even if the car battery is disconnected. The last ICs used were two buck converters to bring the 11~14.6V provided by the car down to 9V (the TDA7439 requires 9V) and to 5V (the rest of the electronics require 5V). At the time of this initial posting I do not yet have all of the electronics in working order. I have been prioritizing the visual aspect of the project, as this is an aesthetics class, not an electronics class.
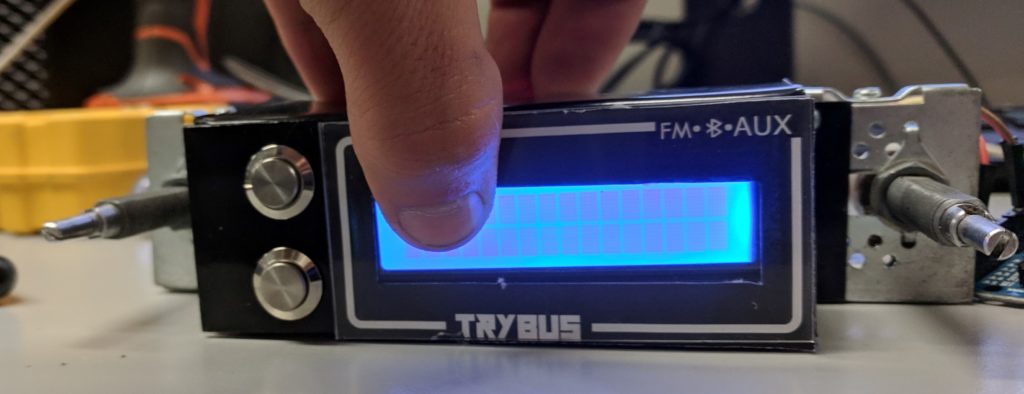
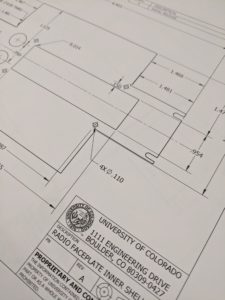
I took apart an old car radio and am reusing the housing and knob shafts. The main piece that has been designed an fabricated is the “faceplate.” It is comprised of sheet metal and acrylic. An inner faceplate part exists for mounting the LCD display. An outer faceplate part exists for holding the acrylic sheet and another piece of sheet metal. These inner and outer parts are both 26 gauge steel sheet metal. The acrylic is in front of the LCD display and will have markings. The front-most metal will have holes for two push buttons. I had a hard time deciding between having two or three buttons. I thought three would be nice to have, but may look too crowded in the space available.
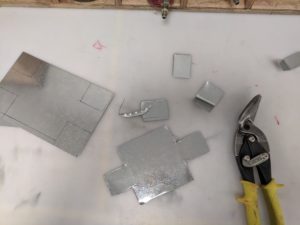

I am not impressed with how the sheet metal turned out. Using tin snips to cut was a sloppy method. I am considering re-manufacturing the sheet metal parts with a mill before our class expo.
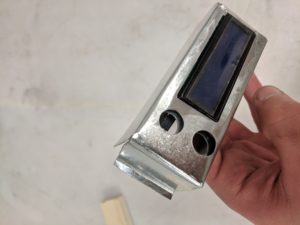
The radio face plate also features a piece of acrylic over the LCD screen. I used 0.050″ thick anti-glare acrylic for this and laser cut it. I tried engraving my desired design into the acrylic. It looked fine, but I think that having the design printed on paper behind the acrylic looks better.
11 Comments. Leave new
[…] Radio Project Report – Part II […]
Very cool project Conrad, Having an old radio available to you probably made this project easier to make. The electronics side has been a problem for many of us in this class since most of us are mechanical engineers, but you can do it, it’s always difficult when you are so close to finishing.
I like this project and I can’t wait to see it at expo! I like the aesthetic you chose and I think you stuck to that throughout your project. I know I haven’t seen it in real life but in the pictures you showed the metal looked fine after it had been bent. I don’t know if you need to mill a new piece especially since most of the metal will be hidden when it’s in the car.
Such a cool project! I think it is amazing how you are incorporating a new and unique radio into an other model of car. I don’t think that many people would be able to do this or even would think of an idea like this so it is extra awesome that you are doing it. I’m excited to see the final project in the car!
This is a really cool project! I love that you combined metal with laser cutting, acrylic, with all the silver buttons. This really did give your radio a star wars aesthetic. Will you be making another version of this in the future, or sticking with the black and silver?
The radio turned out so cool! It’s also awesome that you will have a self built radio that looks how you want it too. Have you looked into different ways to display the information other than the arduino LCD screen to fit the aesthetic more?
This is a really cool challenging project, props for taking it on. The font you used on the face plate really captures the aesthetic of the 70’s. In an early post, you said you were looking for buttons with a tactile feel. Were you able to find buttons that achieved this?
I like the starwars theme of your design, and how you steered away from designs that didn’t fit the time. When you get the chance would you mind uploading a photo with the radio in the car?
I like the unexpected Star Wars aesthetic. Good luck finishing up the electronic side of things. That stuff can be a pain!
I think this turned out to be a really great project and one that no one else was even close to in terms of style. Lots of electronics involved and sounds like you learned a lot.
This project is intense! You really took on quite a challenge. Not only do you have to build a radio, but you are incorporating so many addition add-ons. The clock in itself is a project. Adding the Bluetooth option was a fantastic idea and really makes a world of difference to me when I am using a radio, but that’s because I hate radio music. I like that you are using parts from your old radio, sticking to the upcycling theme we learned about earlier on this semester. I would love to see how the hardware looks right now! I am very excited to see the final product at expo. As fr the aesthetic, you said you wanted it to math your vehicle. So what kind of aesthetic does that entail. Is it a retro look? I think this project is so cool because it will end up saving you so much money and it would be awesome to tell your passengers that you built the radio yourself. I can see how this project would be quite the learning experience. I myself have some electrical experience, but still had a hard time with my infinity mirror clock. That really wasn’t that much wiring, so I could imagine that this project would really take some time and trial and error. Why did you decide to use acrylic and metal as opposed to wood? I feel like wood may have suited your aesthetic better. However, I could be completely wrong! Maybe post a picture of the interior of your car to see why you designed it the way you did! I would definitely have a picture of the car’s interior for expo! Great work, you definitely put a lot of time and effort into your project!