

Introduction
The creation of my final project, the layered laser cut tree wall art piece with a hidden photo frame, was more than just a build. It was a journey of aesthetic exploration, emotional connection, trial and error, and iterative design. From the earliest sketches to the final stain and screw, each step carried artistic intention and personal meaning.
In this blog post, I document the actual timeline of the project with an illustrated breakdown of each phase, from initial exploration through final fabrication and documentation. I reflect on what changed, what succeeded, and what I would do differently in the future, all through the lens of aesthetic development rather than function alone.
Project Timeline: Week-by-Week Design and Build Process
Below is a simplified timeline graphic and corresponding breakdown of my major project stages. Each day reflects a core focus in the process and maps out where I was gaining skills, testing ideas, looping back, and finally executing the final design.
Project Timeline Graphic (day-by-day Breakdown)
| Day | Focus Area | Key Activities |
|---|---|---|
| 1 | Exploration | Researched layered wood art, gathered inspiration, brainstormed concepts |
| 2 | Skill Acquisition | Practiced laser cutting techniques, learned CAD workflows, tested stains |
| 3 | Iteration & Sketching | Developed initial sketches, tested different tree shapes and layer systems |
| 4 | CAD Development | Created layered vector files in CorelDRAW & SolidWorks; hinge prototype in Fusion 360 |
| 5 | Prototyping | Cut scaled prototype in cardboard and scrap wood; evaluated hinge system and visibility |
| 6 | Shopping & Material Prep | Gathered birch plywood, hinge hardware, matte sealant, stain, glue |
| 7 | Full Laser Cutting | Cut all layers of the final piece using optimized laser settings |
| 8 | Finishing & Assembly | Sanded, stained, glued, and mounted layers; installed hinge and photo |
| 9 | Documentation & Presentation | Captured process photos, filmed time-lapse, wrote report and blog reflections |
Fabrication Process: Step-by-Step Overview
The fabrication process consisted of nine distinct steps, each carefully documented and approached with intention. Below is a breakdown of how the final artifact came together, including key design decisions and reflections on aesthetic execution.
Step 1: Sketching and Ideation
I started with simple pencil sketches of tree silhouettes—some symmetrical, some flowing, some abstract. My goal was to develop a form that would feel both grounded and expressive. I played with branch density, trunk curves, and how negative space could reveal a hidden photo behind.
I landed on a semi-abstract tree with asymmetric branches, allowing for openness in the silhouette while still grounding the composition. I traced the final sketch digitally using CorelDRAW.

Step 2: CAD Development
Once the tree silhouette was finalized, I moved into SolidWorks and CorelDRAW to build the full system:
-
Four-layer system:
-
Foreground tree silhouette
-
Spacer frame
-
Hinge panels
-
Photo holder/backing board
-
-
Added tolerances for laser kerf
-
Created drill holes for hinge screws
-
Modeled the hinge in a prototype to test swing clearance
This stage was where aesthetics met engineering, ensuring everything would fit, align, and function without disrupting the clean design.
Step 3: Prototyping in Cardboard and Scrap Wood
I ran a half scale prototype using scrap wood and cardboard, testing layer stacking, hinge alignment, and photo visibility. This led to several key adjustments:
-
Lowered photo placement slightly for better centering behind the tree
-
Increased the depth between layers to enhance shadowing and visual depth
-
Reinforced hinge support with wider frame edge
This phase was essential in confirming the piece would work not only visually but also mechanically.
Step 4: Material Sourcing
I sourced:
-
3mm and 6mm birch plywood (Bought from Amazon, that costed around $40 for 5 panels)
-
Micro brass hinges from Home Depot
-
Water-based wood stain (dark walnut) from michaels
-
Matte sealant, small screws, wood glue from the ITL
I chose materials that aligned with my aesthetic goal: natural minimalism with subtle contrast. Birch’s light tone and consistent grain made it perfect for the clean, modern look I was aiming for.
Step 5: Laser Cutting Final Layers
Using the CU Boulder fabrication lab’s Epilog laser cutter, I cut each layer using these optimized settings:
-
Speed: 15%
-
Power: 100%
-
Frequency (DPI): 300
To minimize char, I masked the wood with painter’s tape and cleaned the edges post-cutting. I immediately labeled and organized the cut parts to maintain alignment order.
![]()
![]()
![]()
Step 6: Sanding and Finishing
Each layer was hand sanded with fine grit paper to smooth edges and remove any residual char. I applied:
-
Matte clear sealant to the tree silhouette
-
Dark walnut stain to the background panel for contrast
The contrast between natural birch and deep brown wood gave the layers more presence while maintaining a calm, grounded feel.
Step 7: Hinge Installation and Assembly
This phase of the build was one of the most technically challenging, especially constructing the interior photo frame by hand.
Rather than using a premade frame, I sourced thin wood bars and manually cut them into four individual sides using a saw. Each piece was measured to fit snugly inside the back of the main design, with a slight offset for the hinge swing.
Assembling the frame proved more difficult than expected. Gluing all four sides at once led to warping and uneven corners. To fix this, I had to glue and clamp one side at a time, allowing each joint to cure fully before adding the next. Even then, slight misalignments remained. I lightly sanded down the edges to even things out and ensure the photo would fit cleanly inside.
Once the frame was secure, I installed a small brass hinge on one side and attached it to the backing board. I carefully pre-drilled holes and used micro screws to keep the hinge from splitting the wood. The alignment was tricky but essential for smooth opening.
Though not perfectly square, the handmade frame added a layer of authenticity. The hidden compartment now opens like a subtle door behind the tree silhouette, holding the photo in a way that feels both personal and intentional. Despite the small imperfections, this part of the project reminded me that craftsmanship isn’t about perfection, it’s about problem-solving and care.

Step 8: Documentation and Reflection
Throughout fabrication, I took process photos, filmed a time-lapse of laser cutting and assembly, and collected materials for this report. I also printed a final photo of the scholars and mounted it inside, completing the emotional layer of the piece.
Conclusion: Comparing Plans to Final Results
Looking back on my original plan, I’m struck by how closely the final artifact adheres to my aesthetic vision, even though some aspects evolved along the way.
What Stayed the Same:
-
The layered tree silhouette remained the centerpiece
-
The photo frame concept and hidden hinge made it into the final build
-
The use of natural wood and minimalist visual language was preserved
-
The symbolic intent, as a gift rooted in growth and gratitude
What Changed:
-
The tree shape became more abstract and less symmetrical
-
I added more visual contrast than initially planned (through stain)
-
The hinge was originally going to be magnetic but became mechanical for durability
What I Would Do Differently
-
More prototyping earlier: A full-scale prototype would’ve helped me finalize the hinge location sooner.
-
Try alternative finishes: I would explore matte black paint or a more distressed look to contrast with the clean lines.
-
Consider lighting integration: A subtle backlight might elevate the mood without overcomplicating the piece.
What’s Next for the Project
The final piece will be gifted to my scholarship foundation, who supported my journey through engineering and design. It will be displayed in their Lake Tahoe home, symbolizing the growth they helped foster in my life.
More than a wall art piece, this project became a reflection of my identity as both a designer and a grateful recipient of support. The layers of wood mirror the layers of experience I’ve built over the years—guided by others and shaped by intention.
Aesthetic Reflection
One of the most rewarding parts of this process was realizing how much nuance exists in layer-based design. At first, I assumed the laser-cutting would be the most challenging part—but the reality was, the artistry came from what happened after the cut. The layering of natural materials revealed a quiet complexity.
When assembling the piece, I experimented with different orientations—flipping certain layers or rotating them slightly—and I was surprised at how small adjustments dramatically changed the visual flow of the branches. The shadows created between layers introduced a third dimension, making the piece feel alive as lighting conditions changed throughout the day.
The way the stained background receded visually against the lighter birch foreground created a sense of visual hierarchy that was both subtle and powerful. This was something I couldn’t have fully grasped in the CAD model or 2D sketches—it came alive only through physical interaction with the materials. It reminded me that fabrication is a kind of learning in motion—something you can’t fully simulate until you’re building it with your own hands.
Personal Reflection: What I Learned as a Designer
This project has been a deep exercise in aesthetic restraint and emotional intention. Unlike other functional engineering projects I’ve worked on, this piece demanded that I slow down and think about what I wanted someone to feel, not just what I wanted them to see or use.
I learned that aesthetic design is often about editing. I removed several ornamental elements I originally planned, realizing they distracted from the simplicity I was aiming for. I practiced saying “no” to visual noise so I could say “yes” to clarity and meaning.
I also learned how valuable small moments of surprise are in design. The hidden photo frame isn’t just a gimmick, it changes the way someone engages with the piece. It turns the viewer into a participant. That, to me, is the highest goal of design: creating something that invites interaction and reveals emotion.
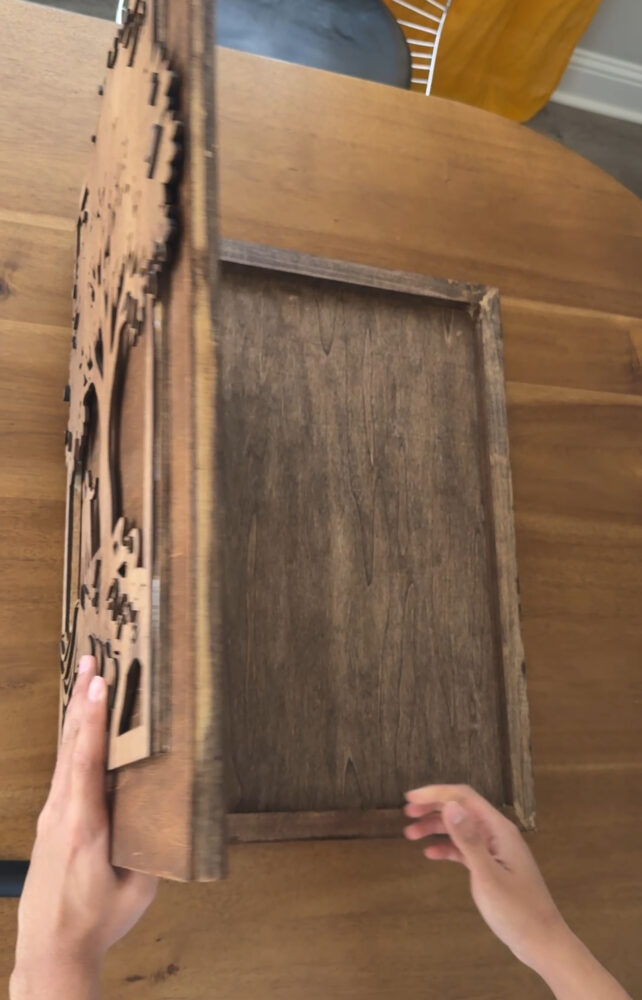
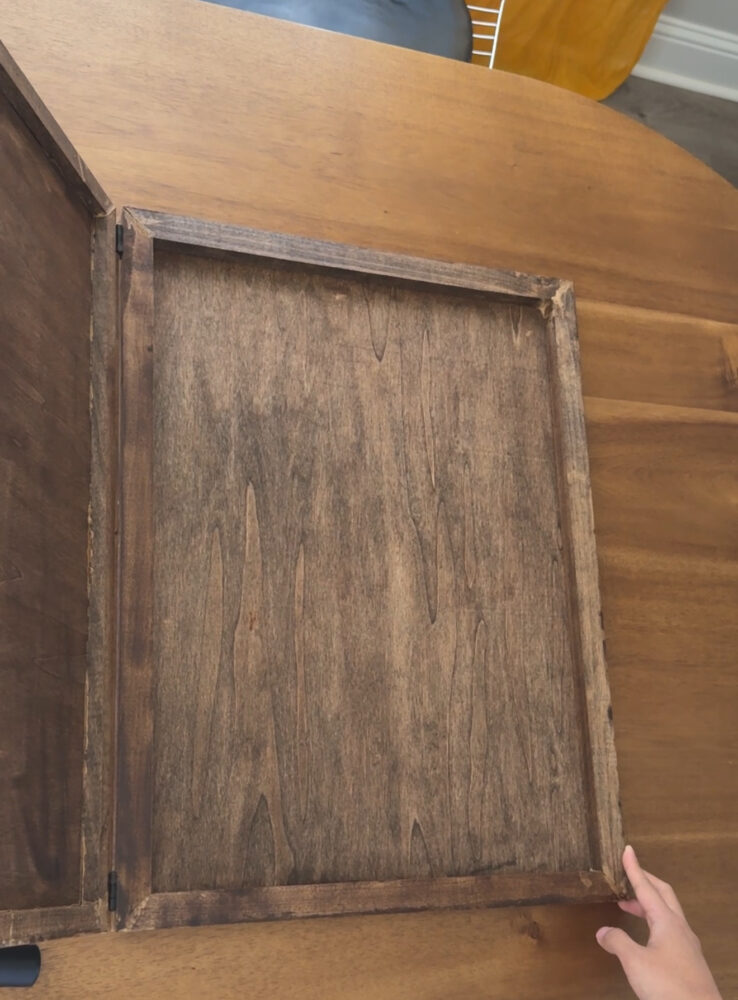
Figure 5. Opening the Frame
1 Comment. Leave new
Hi Airyl, this came out wonderfully! I am really impressed by the way that the stain came out, and personally, I really like the look of it. Creating your design makes this project much more personal, and with the great job you did with the mitered corners, I would be incredibly proud!