
The construction of this project began with reaching out to Erik Gustafson, a Chicago based artist that specialized in wood working. I asked about his advice on incorporating a moving element into a lighting element crafted from wood. Being an engineer, we are constantly told that Wood is not an engineering material and should not be used for anything other than prototyping. I was not sure if I could expect the same machinability or stability from wood as I could aluminum or steel. I was certain that the lamp would not experience sufficient strain to overcome the material properties the wood, but I was not sure if press-fit tolerances would be the same, or if I needed different machining techniques. He told me that he would recommend using the lathe and turning down most of it. He then said that any other non-concentric features could be done with the proper hand tools and finished with sandpaper. During our discussion I asked about what he used for the lighting elements, and what he did to make his pieces hinge. Mr. Gustafson said that he just used common LED strips and a ball bearing that he pressed into the wood. His elevation of common materials helped reassure me that this project was feasible.
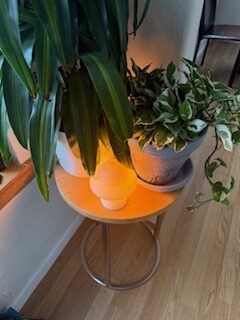
 Initial Inspiration from Coffee Shop
During our discussion I asked about where he typically finds wood for his projects. He mentioned that I could find wood at a local reclaimed lumber yard or look on Etsy. Unfortunately, this is where my hopes of completing this project out of wood hit its first hurdle. I could not find much wood within my budget, and when I did, there was significant cracking on the blocks, and they would not work for me when turning on a lathe. The beams were often far too large to fit on the lathe I would be using, or too small to house any electronics. I then decided to turn to additive manufacturing for the first few prototypes with the hopes of finding suitable wood further down the line.
Splitting of Wood Found on Etsy
In an ideal world my lamp would have been made of wood, but due to unforeseen expenses, poor time management, and lack of skill, I have had to turn to 3D printing. If I had planned my schedule more effectively, I would have loved to pursue wood working on this project or even use aluminum as an alternative.
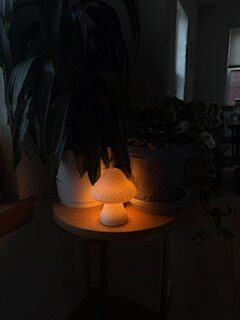
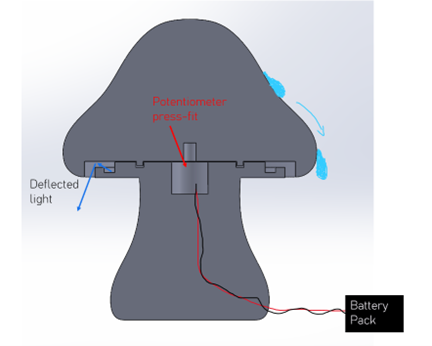
Prototyping began well with a simple mushroom and the circuitry outside of the mushroom. This allowed me to change and figure out the circuitry while seeing how the light would interact and change the appearance of the lamp. I began creating circuitry by using a transistor and the micro controller, but after talking with members of the electronic center, they did not believe the manufacturer in that I needed to use a micro controller to adjust the brightness. They believed I could just use the potentiometer as a variable resistor and directly power the LED strip through the potentiometer. In the first iteration, I tried using just the potentiometer, and it worked very well. I was able to control the light levels with the turning of one mechanism. This was perfect for what I wanted out of the project, now I just needed to find a way to physically house the components and keep the functionality of the circuitry. On the second prototype, I wanted the lamp to be bigger, so I purchased a 300mm LED strip and 3D printed the second design to be triple the size of the first prototype.

First Prototype with External Electronics
The second iteration took up much more design work before I could begin printing. The biggest hurdle for me was considering wire management. I broke the lamp into two key elements: the cap and the stem. I would start a design where the LED strip was under the mushroom cap, and the potentiometer was in the stem. This quickly ran into issues as I wanted to be able to do a full 360-degree rotation of the cap, so I would have needed extra loose wire to allow for free movement. This was a nightmare because wires would want to protrude from the seam or would wrap too tightly and restrict rotation. I then decided that I should have all the electronic components in the ap then run the wires down into the base where the micro controller was housed. I then ran into a similar issue where the more I wound, the more it would pull on the cables, and I broke the lead on one of my LED strips. The next iteration houses all the elements in the stem of the mushroom and only uses a press-fit of the potentiometer into the cap. This made the design much larger to account for the electronics inside the stem. I had no wiring issues with this design, but I did have an issue with turning the potentiometer. Because the design was much larger to house the electronics in the stem, the connection of the potentiometer was relatively very small in comparison to the mushroom. This created a large lever arm and made the cap wobble a bit when turning. To account for this, I added some built-in guide rails that help locate the cap and stem concentrically but also restrict any tilting. I then had to deepen the groove for the wiring so the guide rail could pass over the wires without pulling on them.
Second Iteration
In this design, I incorporated bounced light. It is a practice that is used commonly in higher end housing or in photography. To make the light less harsh, you don’t allow the light to escape directly from the LED, but you have a path that bounces the light out from the point of emission to the open air. I did this because in the first prototype, the light was brighter than I expected, and did not make sense for a small lamp. It was very overpowering in the corner of a room. I added the bounce to soften the light, but I over did it. The lamp now glows evenly and less so out of the bottom. I want to keep it like the original lamp that I found in the coffee shop, and in that design the light is only directed down from underneath the cap. In future iterations I will fine tune the balance of having softer light while managing the glow how I want it.
The design also uses a dramatic overhang around the cap to guide any water away from the electronics inside the stem. I aim to have the lamp in a planter and be able to water the plant without damaging the electronics. I am nervous about any layer separation of the 3D print allowing water to seep in, so I am not going to risk testing on this iteration.
As senior expo and other projects have come up, I have had to put this project on the back burners. I am incredibly happy with where it is now, but there are a few functional changes and a couple of aesthetic changes I would make. The first change is trying to tie it back to the modern cottage core aesthetic I am trying to imitate. The aesthetic uses a lot of exposed, light wood, so I would love to make the next iteration out of wood like oak. As mentioned previously, I was not able to find wood that was suitable for my budget while meeting quality requirements. In the future I hope to save some money to purchase high quality wood.
The second design change I would make includes internal housing for the battery pack. The battery pack was much larger than I expected, and I was not able to fit in the base without making the lamp incredibly large. The battery pack I am using is an AA battery pack that runs four AA batteries in series, meaning that I must have all four batteries in for the lamp to turn on. Unfortunately, the battery pack is larger than I need it to be, but I got it for free from the electronic center. It also puts out six volts when I only need 3.3 volts for the LED strip to be operational. This does mean that in the future I could downsize the battery pack a fair amount to put it in the stem of the lamp. This would help immensely with waterproofing my design.
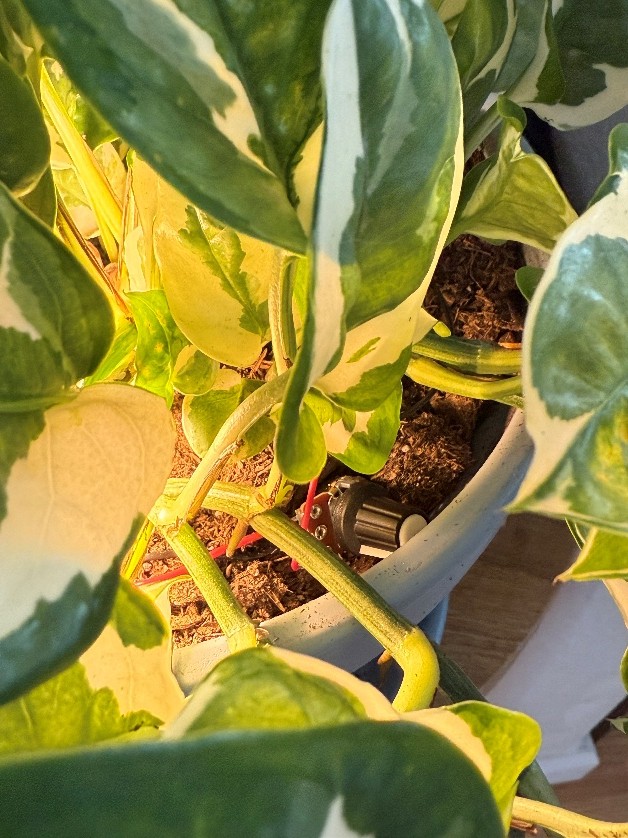
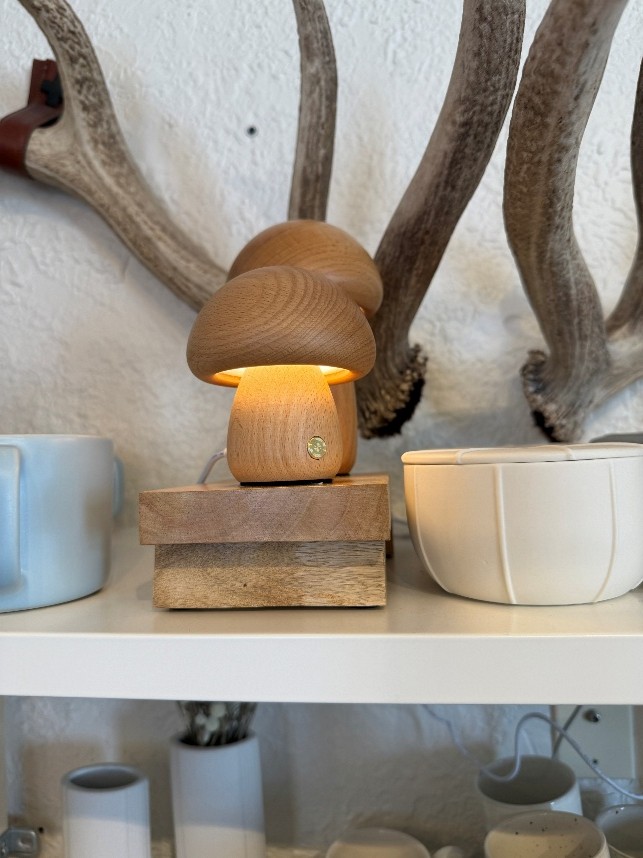
Electronics Exposed in Planter (Very Bad)
 Waterproofing and Full Assembly
The final change I would make deals with how the light is emitted. I want to increase the brightness coming out of the bottom of the cap instead of having the whole lamp glow. To do this I will remove the bounce light and have the light face directly down. This will make the light harsher, so I may investigate putting a thin film over the light to soften it slightly. I would also have to do little more waterproofing with the LED strip being more exposed, but the film could double as a protective layer if I choose the right material.