
Introduction:
My project has been a long journey that began with my own passions and educational background as well as inspirations found online.
My Environmental Design background has led me to become interested in spaces for people from buildings, to parks, to whole cities. I knew I wanted to incorporate this personal interest of mine as well as challenge myself to learn new skills and produce a project unlike any other I have been asked to create in my own major. As I began brainstorming ideas and figuring out how to make my design dynamic I decided to incorporate lights in my project. I had created a hanging lamp “bird’s nest” for my up-cycling project at the beginning of the semester and I wanted to explore the concept of light further and the many uses it possess. Different color and intensity of light produce a different feeling such as we discussed during class. I wanted to examine ways light could be used in my project in an engaging and exciting way.
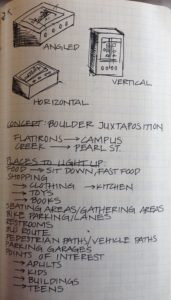
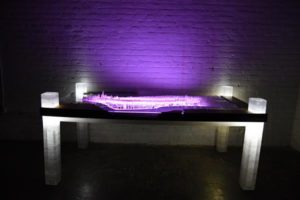
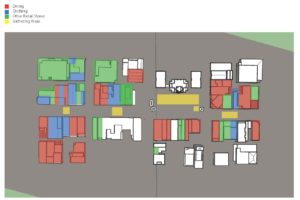
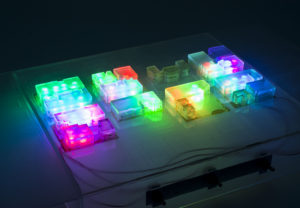
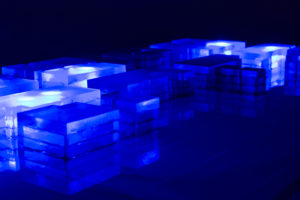
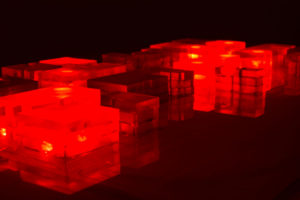
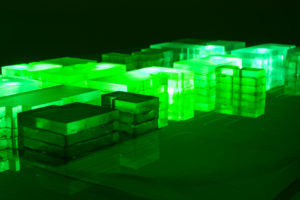
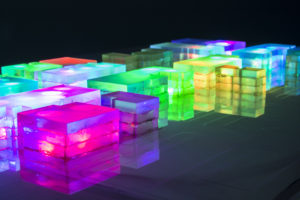
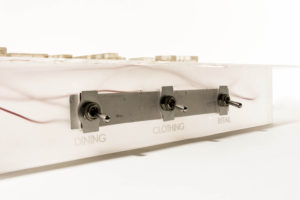
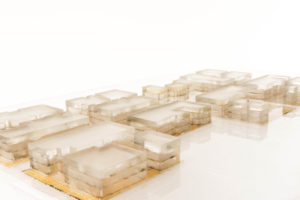
After many iterations of design ideas and understanding my own skill set, I settled on creating a prototype of what would be public interactive art. I decided to study Pearl St. the historical landmark of Boulder. I have always been interested in maps and wanted to create a modern map, a map that is both engaging and informative. In simple terms I wanted to create an interactive map of Pearl St. that allowed me to analyze the space/buildings on the mall. This project became known as “Lighting up Pearl.” The map would be 3D and have LED’s that lit up different areas of the mall. People could push a button and see all the eating places on Pearl St., all the retail stores, and other programs along the street. Below I will describe my design process of creating the “Light up Pearl St.” including my challenges and eventual outcome and cost.
Design Process:
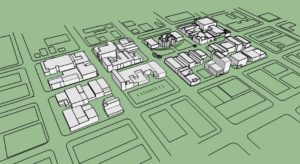
The first part of my design began in Sketchup, building up the buildings on Pearl St. and the surrounding streets and buildings. I decided to include the stretch of Pearl St. from 11th to 15th street that is home to the courthouse. I had initially planned on 3D printing my buildings out of glow-in-the-dark semi-transparent filament. I had it all planned out in sketchup, but the buildings I had imported from the Sketchup Warehouse were very complex, not closed object, making them really hard to make ready for the 3D printer. After many days of struggling to create the file correctly, I realized that I would have to hand-create every building from scratch. I didn’t have the time or skills to do this in a way I wanted to, so I scrapped the idea of creating 3D buildings.
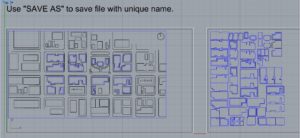
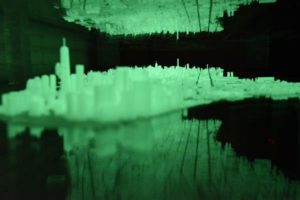
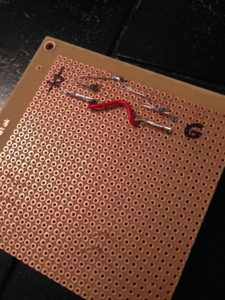
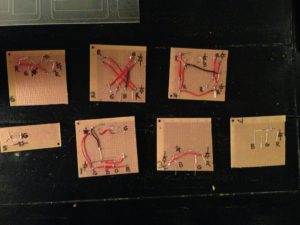
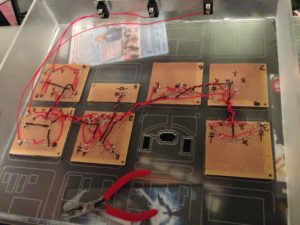
I decided to create more simplistic models out of laser cutting acrylic and stacking them on top of each other. I got this idea from the seniors in studios near me that had made beautiful concept models out of thick pieces of acrylic, showing circulation inside the building. I figured this would be the perfect medium for me to shine LED’s through. I started my new track of creating a rhino file that include pieces to create building models and a map of the surrounding context on Pearl St. I used Sketchup to get the basic layout of the mall to make sure everything was in the right place and was orthogonal. I then brought the file into AutoCAD to clean up lines and make everything ready for the Rhino laser cutting file. I developed these files and got them ready to print.
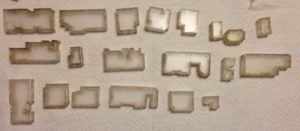
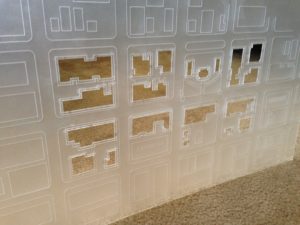 These were the base layer map and pieces frosted and the pieces glued together.I tried to find frosted or semi-transparent acrylic at Colorado Plastics, but the price was ridiculously out of my budget so I bought some cheaper clear acrylic at the CINC (Center for Innovation and Creativity) on east campus and used a frosted spray paint to make the acrylic less see through. I cut out my acrylic pieces and began gluing them with epoxy gorilla glue.
Conclusion:
The project did not turn out how I had expected it to at the beginning, but I am quite pleased with the outcome and my multiple learning experiences throughout this project. I feel like I have gained new skill sets and am more comfortable with using different machinery and soldering. I even learned a little bit about circuits and have an understanding of how the current flow works and why certain wires connect to others. My design aesthetic really draws on modernism as well as a futuristic aspect. Modernism was my initial design aesthetic. I wanted a clean simple design that got the job done, while having a finished appearance. I also designed by the modernist creed of “form follows function” (Louis Sullivan). I really was focused on the function of the design, believing that an object that performs its function well is intrinsically beautiful. The semi-transparent acrylic and the bright color of the LED’s gave it a futuristic chic look that I believe really brought the design together. I really emphasize my importance of wanting to draw the old “boring” maps into the future and make maps an experience for people, not just a piece of paper with lines and text.
Cost:
Acrylic-$45
Epoxy Gorilla Glue-$10
iHome-$7
LED’s-$13
Perf boards-$22.50
Capacitors-$3
Resistors-$1
Switches-$9
Frosted Spray paint-$5
Approximate total: $115
4 Comments. Leave new
[…] Lighting Up Pearl: Final Report Part 1 […]
Elyse, your project looked incredibly clean and aesthetically pleasing when I saw it at Expo. You did a really great job with a project that was maybe out of your technical knowledge when you took it on. It would be really cool to put some kind of tactile feedback on each of the shops, like the store names in braille, or simply label the type of building in order to make the map more interactive for visually impaired people. The map is already a great tactile representation, and would not take much more to increase it’s functionality. Great job with the project!
Your pearl street looked great today at Expo! Aesthetically, I found it playful and engaging. It also seemed like a genuinely useful tool for visitors and those who are new in town. It was interesting to see the clusters of businesses like restaurants concentrated in specific blocks. I would encourage you to pitch this display to the City, using your model as a proof of concept accompanied by renderings of your ultimate vision.
As for lighting, you were interesting in the edge lit acrylic used in the immersion wheel. It would be very feasible to incorporate this effect into a light-up map, either like yours or modified. For example- you could etch a thin layer of each type of business and edge light each layer. Only the layer with an edge in direct contact with the LED would light up. And because the layers can be pretty thin, the whole stack of layers wouldn’t be very bulky. And that whole stack could sit on a mirror to give the buildings foot prints height or multiple stories.
The end result looks great! It is unfortunate that the 3D printing did not work out, but the acrylic was a great alternative. I also like how you can see the lines separating the different layers in the piece, it gives it another dimension when viewed. For any future additions, it would maybe be cool to add a top layer of acrylic that has the address or something similar placed on it so that you could figure out which buildings were which, but overall awesome job.