
For my project, I’ll be designing a MIDI drum pad. MIDI (Musical Instrument Digital Interface) is just a standard of connectors, digital interfaces, and protocols that allow musical instruments to communicate with one another and computers. My midi drum pad will be able to sense when a drum head is being hit, and transmit that signal, via MIDI to either another instrument or a computer. This is awesome, because it allows me to use the drum kit to play pretty much any sound with the drum kit that I can create/control on my computer.
I was inspired by a few of the analog drum synthesizers/controllers that are already on the market. I think the two most aesthetically pleasing electronic drums on the market are the Nord Pad (really just a control
ler for the Nord Drum 2 synthesizer) and the Yamaha DTX-Multi 12. 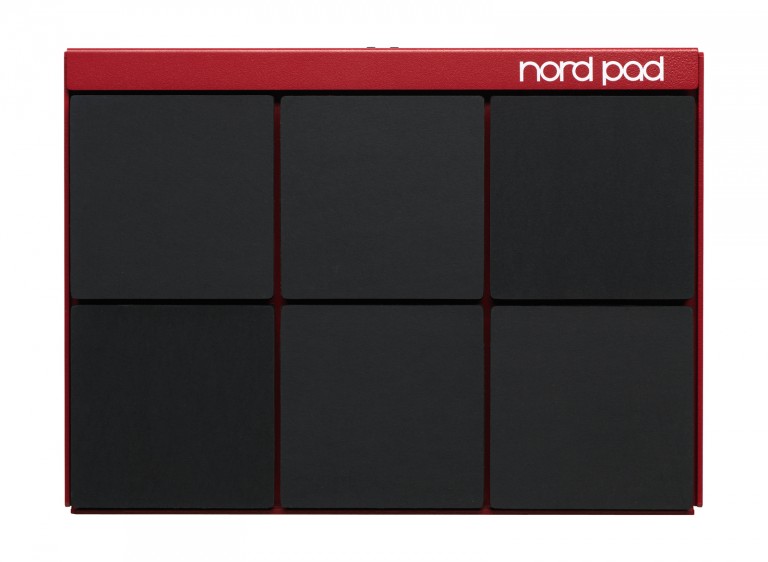 Both of these models have a minimalist design (most of the real estate is dedicated to the drum pads) that I’m really attracted to. By squaring up the drum pads, and mounting them to a single, flat chassis, the drums becoming a lot more convenient to utilize in different performance environments. They can be set up on a table next to a computer, on a chair, on a stage stand, etc.
A lot of modern electronic drum sets take up a lot of real-estate, and look like they’re trying to be something they not. For my design, I’ll be going with something more along the lines of the Nord Pad.
To construct the chassis, I plan on using 1/4″ maple. Maple is known for being durable, so it should be able to withstand a few stray hits. Besides this, maple is a popular choice for laser-cutting, so I should be able to design the drum kit body in SolidWorks, and laser-cut out all of the panels. this will provide a clean assembly, that can be stained or painted.
For the drum pads, I’m going to use modified Rock Band drum heads. Using a stencil and razor, I’ll cut the drum head down to the size and shape that I want (probably 6″x6″ squares). These drum pads are super durable, so they should hold up to any jam-sesh. 
The rock band drum set will also provide all of the sensors required. Each drum head has a pretty decent piezoelectric transducer in it. This sensor just sends out a voltage when deformed – in this case, when the drum head is struck.
Each of these sensors will be rewired to a single MIDI head so that when each sensor is hit, it will send out MIDI data. There may be a way to wire up the sensors so that no micro-controller is needed, however, if I do ned up needing to use a micro-controller to streamline things, I plan on going with the SparkFun Teensy 3.2.
The teensy 3.2 actually has a MIDI Out setting, so that it can send Midi to a computer via a micro-USB to USB connection. I should be able to use the Rock Band drum set’s existing power supply to power my full assembly, however, if I end up using the Teensy, I might even be able to power the assembly straight from USB, which would be really sweet.
Finally, I want to add some flavor to the assembly, I’m pretty into LEDs right now, so I want to find a cool way to incorporate LEDs into the body of my drum kit. For now, the plan is to laser etch a some sort of sci-fi design (probably Space-Dandy themed) into a piece of acrylic mounted to the back, vertical wall of the assembly. A row of LEDs above and below this piece of acrylic will dissipate light (need a clever way to dissipate the light still) and accent the artwork.

The project should end up costing under $100. I already have a Rock Band drum set that I no longer use, and sheets of Maple are only around $25. If I end up using a Teensy, they’re only $20. Adding in cost of paint, wood glue, a USB cable, led’s and some acrylic, I should be able to stay well under $100.
Design will happen in three different subsystems: chassis, electronics, and LEDs. The chassis will have to hold all of the electronics and pads, and can be developed alongside the other two subsystems. The electronics will consist of re-wiring the sensors, and outputting appropriate MIDI data. The LED subsystem will light the art-panel with nice clean glow. The goal is to have independent sub-assemblies developed after spring break, leaving time in April to incorporate and refine them. Hopefully I’ll be able to build something as robust and form-functional as the Yamaha DTX-Multi 12 that’s even more aesthetically pleasing.

5 Comments. Leave new
[…] Preliminary Design Review 3/2/16 […]
I enjoy how you included Space Dandy for a design choice. I enjoy that show and look forward to seeing how you will replicate its effects
It would be super cool if you get this working as an analog setup, but at a certain point, you have to convert that data to digital anyway to use this control surface for triggering samples- I wonder if just using the Teensy would save you a lot of headaches.
I like that you are implementing your love of music into this project. That’ll be awesome to have LED’s incorporated in the project as well
You might have to do a fair amount signal processing to get a readable signal out of those piezoelectrics…filters, amplifiers, etc. Still, it would be really cool to get it working all analog.