

Because I won’t be at expo, since I am competing in the USA Triathlon Collegiate National Championship, here is my virtual presentation! The aesthetic I was going for here was postmodern, clean, and simplistic look, however complexity under the look.
I have been done with my project for about a week now, so it has been nice to have time to really make the final changes so it is perfect (in my perspective) to what I envisioned. My project began with the initial idea of making a fiber optic chandelier. I have many fond memories of star gazing in the backyard with my Dad growing up, so I wanted to have something beautiful I could hang from my ceiling to resemble the night sky. There were many beautiful DIY fiber optic chandelier ideas I found online, however, the light that would shine through the fiber optic strands was out of my price range being close to $200, so I knew I needed to be creative.
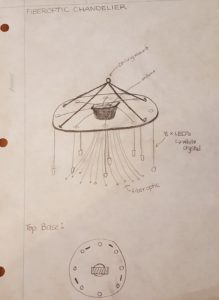
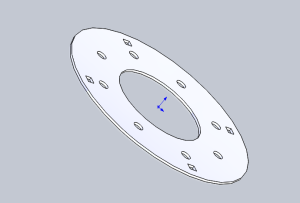
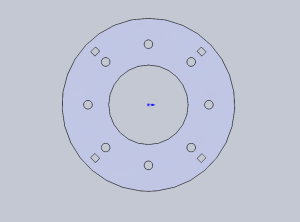
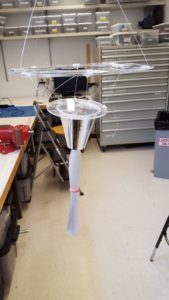
Shown below is an image of my initial plan for what I wanted for my fiber optic chandelier but over time, much iteration took place. The initial plan was to have an acrylic circular base, with eight small holes and one large hole on it. I used SolidWorks to model this and then proceeded with the laser cutter to cut the holes. I made a mistake and accidentally cut the middle large hole twice the size. I had set the radius to what was the diameter size! Oops! It actually turned out to be blessing in disguise. My sister gave me the great idea of having the fiberoptic light hang from the base to give it that free flowing- design.
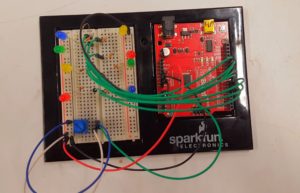
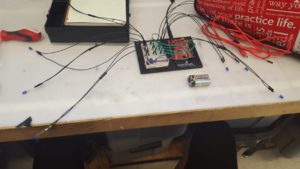
I have had little to no experience with Arduino, so the learning curve was quite steep, yet rewarding. I rented an Arduino kit from Dan Godrick, who helped me a ton on this project! I used the SparkFun Instructor’s manual to learn how to do all the wiring for the LED’s and I wanted to incorporate a potentiometer so that I could adjust the flicker speed of the LED’s. This is the initial set up.
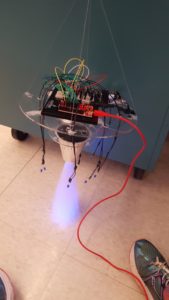
Below is a demonstration of the potentiometer and me changing the flicker speed of the LED’s
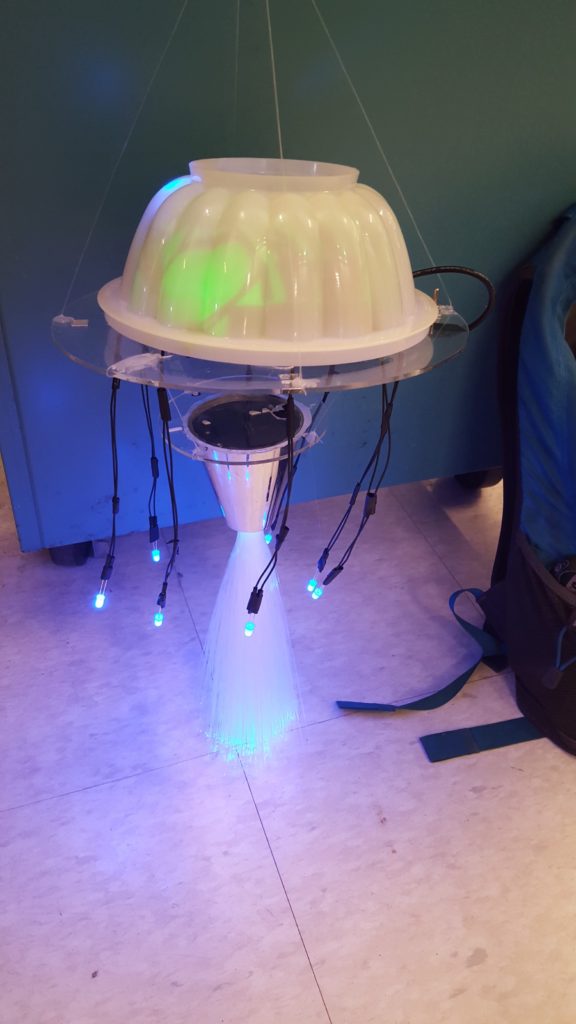
It was exciting once I got everything working, but as soon as I put the entire project together, I realized it looked more like a fiber optic jellyfish, so that was what my project became! I really like the way jellyfish naturally glow and float through the water; the thought of having this hanging from my ceiling, was relaxing to me, and I thought it would look really cool.
I ended up getting most of my circuitry supplies from Tim May. Here is an image of the exact same circuit shown above, but with added extension wires so the LED’s could hang below the base like the tentacles of a jellyfish.
Professor Hertzberg gave me the idea of adding a sensor to add some more life to my jellyfish. I decided to use a photosensor and my goal was to have the user touch the sensor and as the current gets blocked, the LED in the main body of the jellyfish would get brighter. I struggled with this code for a long time and it was way harder than it should have been due to my overthinking things and obsessing a bit. It turned out I just needed to switch the high and low values in the code to get the sensor to behave the way I wanted it to.
Once I put it all together it looked great! The next challenge for me was to find a dome cover which could hide all of the electrical components and serve as the jellyfish body. I found a jello mold, which turned out to be perfect. The last issue was that the LED that was directly in the board (not hanging by an extension wire) was not bright enough and I couldn’t find one that was bright enough for the board. It turned out once again to be a blessing in disguise. I realized that the body of the jellyfish lit up green from the green light from the power supply in the Arduino (which I had implemented a switch on too) and the blue light looked like the heart of the jellyfish. The wires’ shadow showed through the green light and I thought they would serve as the brains of the jellyfish.
- Arduino extension wires, extra LED’s, and switch materials from Tim May $15
- Acrylic base $1
- FiberOptic $12
- Arduino board was rented from Dan Godrick, and all remaining materials were free from the Project Depot
- Jello Mold/electrical component cover $1
My total cost is much lower than my predicted budget, which was originally around $5
One of the main things I learned in this project is that sometimes simpler is better. I was definitely overcomplicating my code to try to get the sensor to work exactly as I wanted it, when it was a simple change in the code. I got really frustrated one day, and taking a step away from my project was what I needed. The next day it came to me and I easily figured out what was wrong in my code. This project took a lot of perseverence and patience. Huge thank you to Professor Hertzberg, Tim May, and Dan Godrick!
Here is my Arduino code after much iteration!
//Brittany Warly
//AED fiber optic chandelier
//photoresistor info
const int sensorPin1 = 1;
const int ledPin = 3;
int lightLevel, high = 800, low = 100; //when you touch it
//it gets brighter
//potentiometer set-up
int sensorPin=0; //pot connected to analog pin 0
int ledPin1 =9 ; // The LED is connected to digital pin 9
int ledPin2 =10;
int ledPin3=11;
int ledPin4=12;
int ledPin5 =8 ;
int ledPin6 =7;
int ledPin7=6;
int ledPin8=5;
void setup() {
// put your setup code here, to run once:
// put your setup code here, to run once:
pinMode(ledPin, OUTPUT);//photoresistor
pinMode(ledPin8, OUTPUT);
pinMode(ledPin7, OUTPUT);
pinMode(ledPin6, OUTPUT);
pinMode(ledPin5, OUTPUT);
pinMode(ledPin4, OUTPUT); //set pin outputs
pinMode(ledPin3, OUTPUT);
pinMode(ledPin2, OUTPUT);
pinMode(ledPin1, OUTPUT);
}
void loop() {
//photoresistor
lightLevel = analogRead(sensorPin1);
manualTune();
analogWrite(ledPin, lightLevel);
//potentiometer stuff
int sensorValue;
sensorValue=analogRead(sensorPin);
digitalWrite(ledPin1, HIGH); // Turn the LED on
digitalWrite(ledPin2, HIGH);
digitalWrite(ledPin3, HIGH);
digitalWrite(ledPin4, HIGH);
digitalWrite(ledPin5, HIGH);
digitalWrite(ledPin6, HIGH);
digitalWrite(ledPin7, HIGH);
digitalWrite(ledPin8, HIGH);
delay(sensorValue); // Pause for sensorValue
// milliseconds
digitalWrite(ledPin1, LOW); // Turn the LED off
digitalWrite(ledPin2, LOW);
digitalWrite(ledPin3, LOW);
digitalWrite(ledPin4, LOW);
digitalWrite(ledPin5, LOW);
digitalWrite(ledPin6, LOW);
digitalWrite(ledPin7, LOW);
digitalWrite(ledPin8, LOW);
delay(sensorValue); // Pause for sensorValue
// milliseconds
//photoresistor
}
void manualTune()
{
lightLevel = map(lightLevel, 800, 100, 0, 255);
lightLevel = constrain(lightLevel, 0, 255);
}
void autoTune()
{
if (lightLevel < low)
{
low = lightLevel;
}
// We also initialized “high” to be 0. We’ll save anything
// we read that’s higher than that:
if (lightLevel > high)
{
high = lightLevel;
}
lightLevel = map(lightLevel, low+30, high-30, 0, 255);
lightLevel = constrain(lightLevel, 0, 255);
}
2 Comments. Leave new
I am glad that your project was at expo, even though you weren’t at expo. Happy I got to see it in person. It turned out great! I like the futuristic aesthetic of it. Also, I like that it incorporated an up cycling element, the use of the jello mold as the top.
Nice job getting your project done early! It’s too bad you didn’t get to present at expo, but great job at your competition! You should look up extra bright LEDs, they might disperse light within the body of jellyfish even better. Good job!