

After considering several possible ideas for dynamic, fully 3D-printed toys, including things like transformers figurines and twisty puzzles, I have settled on creating a mechanical buffalo crank toy. The buffalo will have moving legs, at minimum, that will be actuated by a crank to make it appear to be running. I will ultimately create a printable kit with assembly instructions and upload it to Thingiverse for other users to replicate.
First Impressions
- “I REALLY want to print this and put it together! It’s great because it looks cool, utilizes interesting mechanical concepts, and I don’t need to go to the store to buy a bunch of extra parts to make it. I can just print everything I need right here at home.” -Thingiverse User
- “This would make a cool gift for my kid. I can even put it together with him/her to show them how it works.” -Parent
- “GO BUFFS!” -CU alum
What Will It Do?
- A crank will be used to make the legs of the buffalo move back and forth.
- As noted in ‘first impressions’, the primary aesthetics will be ‘DIY’, ‘children’s toy’, and ‘Colorado Buffaloes.’
- Stretch goal 1: Make the tail and head move too.
- Stretch goal 2: Create a model of an actual bison (rather than the CU logo) and implement the same concepts. This could change the Colorado Buffaloes aesthetic into either “nature” or “Americana” depending on other embellishments made to the final design and the user’s color choices.
Inspirations
- Twisty Puzzles (https://www.youtube.com/watch?v=83a_DX8WDe8)
- Heart gears (https://www.youtube.com/watch?v=70dKZjP4NOo)
- Transformer toys (https://youtu.be/RYQUVr4qwHc?t=3m30s — http://tfwiki.net/wiki/Bumblebee_(G1)/toys#Generation_1)
- Hand-cranked horse toy (https://s-media-cache-ak0.pinimg.com/564x/88/96/27/8896272972178cf6b3783c262e7181df.jpg – via Pinterest)
- Automata (https://www.youtube.com/watch?v=YGoVssO3yEU, https://www.youtube.com/watch?v=0gjyVqwrf3E)
- 100% 3D-printed assemblies on Thingiverse (https://www.thingiverse.com/make:150667, http://www.thingiverse.com/thing:257911 – no assembly required on this one either!)
Design Considerations
The trickiest part of this project will likely be making the mechanical buffalo user-friendly for assembly. Unfortunately, this is a problem that can only be addressed through iteration.
I plan on documenting the design process on Thingiverse. Here is my first post, which is the initial box (housing): http://www.thingiverse.com/thing:1384028. It is composed of two halves that snap-fit together using bossed features. The bottom half will ultimately serve as the chassis for the gears.
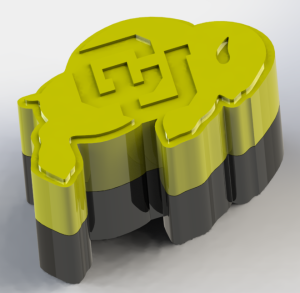
Photoview Rendering
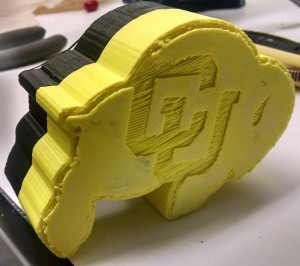
Results of initial Makerbot Print
Budget
I don’t anticipate spending any money on this project aside from prior overhead costs. I already have over 4 kg of 3D-printer filament (black, gold, silver, white, and clear) and my own 3D-printer at home. Additionally, I have free access to the Makerbots in Fleming at any time. Once the design is finalized, I may decide to send the final version of the toy to Shapeways for a professional quality print job (~$25-$50). However, it is likely I would use a DIY method for treatment instead, especially since I already have the required materials available (http://airwolf3d.com/2013/11/26/7-steps-shiny-finish-on-abs-parts-acetone/). Either way, I do intend to create an attractive display model!
Timeline
3/9 – Gear Design finalized, movable legs created
3/16 – System integration – gear design with movable legs
3/18 – Functioning prototype created
3/28 – Design for Assembly improvements for Thingiverse
4/6 – Stretch goals attempted by this time – decide how to proceed
4/13 – Final designs sent for professional printing (two week lead time) OR final model parts receive acetone treatment
4/15 – Final display model finished!
LET’S DO IT!
8 Comments. Leave new
[…] Conceptual Design – https://www.aesdes.org/2016/03/02/mechanical-buffalo-conceptual-design/ […]
the neat thing about this is that you can make multiple prototype, and the material is not so expensive. To add onto your design, have you looked into ninja flex? they also just came out with the semi ninja flex. doing a prototype with a rubbery material might add some more features in the near future. good job in starting your project early on.
I think that it is awesome that you have the ability to do all of this yourself and make lots of iteration!
This is an awesome idea. In order to make more toy like I would try decreasing the width and increasing the overall size.
That horse you showed was so cool. I hope Ralphie can keep stride!
I really like how you want to share your process and design with people! It might be weird but cool to print the inside components in white so it looks like the skeleton of the buffalo, or it might be just creepy…Did you also want to make it like a wind-up-toy where you twist the little knob and it runs/walks/moves on its own? So far I think you are off to a great start though!
I think that you will be in for a fun mechanical challenge. If you need gears, there are a bunch of really cool generators online (http://woodgears.ca/gear_cutting/template.html or http://www.thingiverse.com/thing:16627 ). That heart gear puzzle is really cool.
This is really cool. I like your inspiration and think it will be an awesome design. I like your goal of making it a DIY and a toy for kids. Great idea!